3、Qt Project之Socket网络编程
Socket网络编程
Step1:首先完成整个界面的设计
<?xml version="1.0" encoding="UTF-8"?>

<ui version="4.0">

 <class>MainWindow</class>

 <widget class="QMainWindow" name="MainWindow">

  <property name="geometry">

   <rect>

    <x>0</x>

    <y>0</y>

    <width>421</width>

    <height>533</height>

   </rect>

  </property>

  <property name="windowTitle">

   <string>MainWindow</string>

  </property>

  <widget class="QWidget" name="centralWidget">

   <widget class="QLineEdit" name="IP_Address">

    <property name="geometry">

     <rect>

      <x>30</x>

      <y>140</y>

      <width>113</width>

      <height>27</height>

     </rect>

    </property>

   </widget>

   <widget class="QLabel" name="label_4">

    <property name="geometry">

     <rect>

      <x>20</x>

      <y>100</y>

      <width>171</width>

      <height>21</height>

     </rect>

    </property>

    <property name="font">

     <font>

      <pointsize>10</pointsize>

      <italic>true</italic>

      <underline>false</underline>

      <strikeout>false</strikeout>

     </font>

    </property>

    <property name="cursor">

     <cursorShape>BlankCursor</cursorShape>

    </property>

    <property name="text">

     <string>Designed by : mm1994uestc</string>

    </property>

    <property name="alignment">

     <set>Qt::AlignCenter</set>

    </property>

   </widget>

   <widget class="QLabel" name="label_6">

    <property name="geometry">

     <rect>

      <x>0</x>

      <y>-10</y>

      <width>321</width>

      <height>51</height>

     </rect>

    </property>

    <property name="font">

     <font>

      <pointsize>28</pointsize>

      <italic>true</italic>

      <underline>false</underline>

      <strikeout>false</strikeout>

     </font>

    </property>

    <property name="cursor">

     <cursorShape>BlankCursor</cursorShape>

    </property>

    <property name="text">

     <string>Qt interface Demo!</string>

    </property>

    <property name="alignment">

     <set>Qt::AlignCenter</set>

    </property>

   </widget>

   <widget class="QLabel" name="label_5">

    <property name="geometry">

     <rect>

      <x>0</x>

      <y>40</y>

      <width>171</width>

      <height>51</height>

     </rect>

    </property>

    <property name="font">

     <font>

      <pointsize>16</pointsize>

      <italic>true</italic>

      <underline>false</underline>

      <strikeout>false</strikeout>

     </font>

    </property>

    <property name="cursor">

     <cursorShape>BlankCursor</cursorShape>

    </property>

    <property name="text">

     <string>Socket Control</string>

    </property>

    <property name="alignment">

     <set>Qt::AlignCenter</set>

    </property>

   </widget>

   <widget class="QLineEdit" name="Client_Port">

    <property name="geometry">

     <rect>

      <x>200</x>

      <y>140</y>

      <width>51</width>

      <height>27</height>

     </rect>

    </property>

   </widget>

   <widget class="QPushButton" name="Client_Button">

    <property name="geometry">

     <rect>

      <x>260</x>

      <y>140</y>

      <width>151</width>

      <height>27</height>

     </rect>

    </property>

    <property name="text">

     <string>TCP-Client-Connect</string>

    </property>

   </widget>

   <widget class="QLabel" name="label">

    <property name="geometry">

     <rect>

      <x>10</x>

      <y>130</y>

      <width>21</width>

      <height>41</height>

     </rect>

    </property>

    <property name="text">

     <string>IP:</string>

    </property>

   </widget>

   <widget class="QLabel" name="label_2">

    <property name="geometry">

     <rect>

      <x>150</x>

      <y>130</y>

      <width>51</width>

      <height>41</height>

     </rect>

    </property>

    <property name="text">

     <string>PORT:</string>

    </property>

   </widget>

   <widget class="QLineEdit" name="Server_Port">

    <property name="geometry">

     <rect>

      <x>60</x>

      <y>320</y>

      <width>51</width>

      <height>27</height>

     </rect>

    </property>

   </widget>

   <widget class="QLabel" name="label_3">

    <property name="geometry">

     <rect>

      <x>10</x>

      <y>310</y>

      <width>51</width>

      <height>41</height>

     </rect>

    </property>

    <property name="text">

     <string>PORT:</string>

    </property>

   </widget>

   <widget class="QPushButton" name="Server_Button">

    <property name="geometry">

     <rect>

      <x>120</x>

      <y>320</y>

      <width>161</width>

      <height>27</height>

     </rect>

    </property>

    <property name="text">

     <string>TCP-Server-Monitor</string>

    </property>

   </widget>

   <widget class="QLabel" name="label_7">

    <property name="geometry">

     <rect>

      <x>10</x>

      <y>170</y>

      <width>151</width>

      <height>41</height>

     </rect>

    </property>

    <property name="text">

     <string>Data Ricieve Frame:</string>

    </property>

   </widget>

   <widget class="QLabel" name="label_8">

    <property name="geometry">

     <rect>

      <x>230</x>

      <y>170</y>

      <width>151</width>

      <height>41</height>

     </rect>

    </property>

    <property name="text">

     <string>Data Send Frame:</string>

    </property>

   </widget>

   <widget class="QLabel" name="label_9">

    <property name="geometry">

     <rect>

      <x>10</x>

      <y>350</y>

      <width>151</width>

      <height>41</height>

     </rect>

    </property>

    <property name="text">

     <string>Data Ricieve Frame:</string>

    </property>

   </widget>

   <widget class="QLabel" name="label_10">

    <property name="geometry">

     <rect>

      <x>230</x>

      <y>350</y>

      <width>151</width>

      <height>41</height>

     </rect>

    </property>

    <property name="text">

     <string>Data Send Frame:</string>

    </property>

   </widget>

   <widget class="QLabel" name="Corver">

    <property name="geometry">

     <rect>

      <x>220</x>

      <y>40</y>

      <width>171</width>

      <height>91</height>

     </rect>

    </property>

    <property name="text">

     <string>                     Corver</string>

    </property>

   </widget>

   <widget class="QPushButton" name="pushButton">

    <property name="geometry">

     <rect>

      <x>350</x>

      <y>180</y>

      <width>51</width>

      <height>27</height>

     </rect>

    </property>

    <property name="text">

     <string>Send</string>

    </property>

   </widget>

   <widget class="QPushButton" name="ServerSend">

    <property name="geometry">

     <rect>

      <x>350</x>

      <y>360</y>

      <width>51</width>

      <height>27</height>

     </rect>

    </property>

    <property name="text">

     <string>Send</string>

    </property>

   </widget>

   <widget class="QPlainTextEdit" name="Client_Recieve">

    <property name="geometry">

     <rect>

      <x>10</x>

      <y>210</y>

      <width>171</width>

      <height>101</height>

     </rect>

    </property>

   </widget>

   <widget class="QPlainTextEdit" name="Client_Send">

    <property name="geometry">

     <rect>

      <x>230</x>

      <y>210</y>

      <width>171</width>

      <height>101</height>

     </rect>

    </property>

   </widget>

   <widget class="QPlainTextEdit" name="Server_Recieve">

    <property name="geometry">

     <rect>

      <x>10</x>

      <y>390</y>

      <width>171</width>

      <height>101</height>

     </rect>

    </property>

   </widget>

   <widget class="QPlainTextEdit" name="Server_Send">

    <property name="geometry">

     <rect>

      <x>230</x>

      <y>390</y>

      <width>171</width>

      <height>101</height>

     </rect>

    </property>

   </widget>

   <widget class="QPushButton" name="Client_Clear">

    <property name="geometry">

     <rect>

      <x>150</x>

      <y>180</y>

      <width>51</width>

      <height>27</height>

     </rect>

    </property>

    <property name="text">

     <string>Clear</string>

    </property>

   </widget>

   <widget class="QPushButton" name="Server_Clear">

    <property name="geometry">

     <rect>

      <x>150</x>

      <y>360</y>

      <width>51</width>

      <height>27</height>

     </rect>

    </property>

    <property name="text">

     <string>Clear</string>

    </property>

   </widget>

  </widget>

  <widget class="QMenuBar" name="menuBar">

   <property name="geometry">

    <rect>

     <x>0</x>

     <y>0</y>

     <width>421</width>

     <height>25</height>

    </rect>

   </property>

  </widget>

  <widget class="QToolBar" name="mainToolBar">

   <attribute name="toolBarArea">

    <enum>TopToolBarArea</enum>

   </attribute>

   <attribute name="toolBarBreak">

    <bool>false</bool>

   </attribute>

  </widget>

  <widget class="QStatusBar" name="statusBar"/>

 </widget>

 <layoutdefault spacing="6" margin="11"/>

 <resources/>

 <connections/>

</ui>
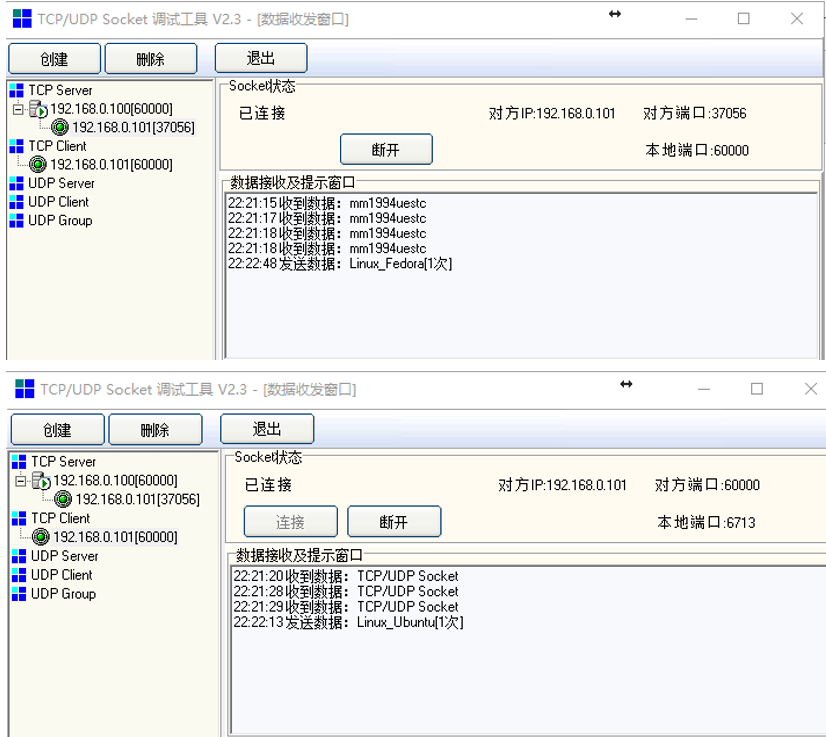
Ubuntu 16.04 Edition Qt Socket Project Windows 10 端的Socket Tool
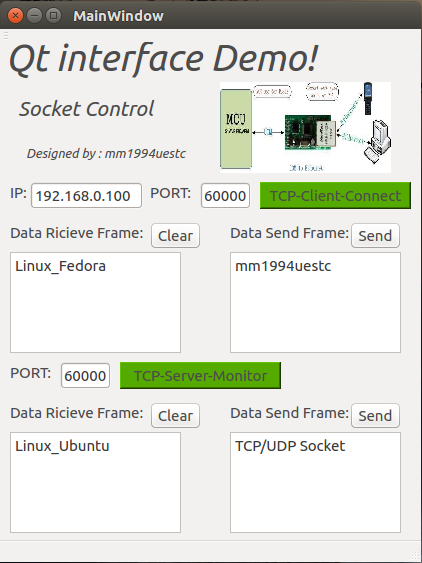
整个界面的样式如图所示,包括了TCP Client以及TCP Server端。
IP表示客户端将要连接的TCP Server的服务器ip地址,PORT填入的是对应的TCP Server的地址开放的监听的端口号
Clear按钮是用来清楚Server或者Client的接收空间,Send是用来发送发送栏当中的数据的。其他按钮用来开启对应的服务。
Step2:相关槽函数已经接收读取函数的实现
void MainWindow::Client_Recieve_Data(void)

{

    QByteArray buf;

    buf = client->readAll();

    if(!buf.isEmpty())

    {

        QString str = this->ui->Client_Recieve->toPlainText();

        str += tr(buf);

        this->ui->Client_Recieve->clear();

        this->ui->Client_Recieve->appendPlainText(str);

    }

    buf.clear();

}

void MainWindow::on_Client_Button_clicked(bool checked)

{

    if(!ClientFlag)

    {

        QString IP,PORT;

        IP = this->ui->IP_Address->text();

        PORT = this->ui->Client_Port->text();

        qDebug() << IP;

        qDebug() << PORT;

        client->connectToHost(QHostAddress(IP),PORT.toInt(),QTcpSocket::ReadWrite);

        qDebug() << "Client is Started!";

        QObject::connect(client,&QTcpSocket::readyRead,this,&MainWindow::Client_Recieve_Data);

        this->ui->Client_Button->setStyleSheet("background-color: rgb(85,170,0);");

    }

    else

    {

        this->ui->Client_Button->setStyleSheet("background-color: rgb(0,0,0);");

        client->close();

        qDebug() << "Client is Closed!";

    }

    ClientFlag = !ClientFlag;

}

void MainWindow::on_pushButton_clicked(bool checked)

{

    if(ClientFlag)

    {

        QString Send_data;

        Send_data = this->ui->Client_Send->toPlainText();

        qDebug() << Send_data;

        client->write(Send_data.toLatin1());

        qDebug() << "Data sended!";

    }

}

void MainWindow::on_Client_Clear_clicked(bool checked)

{

    this->ui->Client_Recieve->clear();

    qDebug() << "Client_Recieve_CLear!";

}

/************************************************************

 * Server Side Programming!

 * The Qt Socket Programming have ever finished binding the port!

 * The accept func is trigger by a new connection signal!

 ***********************************************************/

void MainWindow::readClient(void)

{

    QByteArray buf;

    buf = client_connect->readAll();

    if(!buf.isEmpty())

    {

        QString str = this->ui->Server_Recieve->toPlainText();

        str += tr(buf);

        this->ui->Server_Recieve->clear();

        this->ui->Server_Recieve->appendPlainText(str);

    }

    buf.clear();

}

void MainWindow::accepConnection(void)

{

    client_connect = server->nextPendingConnection();

    QObject::connect(client_connect,&QTcpSocket::readyRead,this,&MainWindow::readClient);

}

void MainWindow::on_Server_Clear_clicked(bool checked)

{

    this->ui->Server_Recieve->clear();

    qDebug() << "Server_Recieve_Clear!";

}

void MainWindow::on_ServerSend_clicked(bool checked)

{

    if(ServerFlag)

    {

        QString SendData;

        SendData = this->ui->Server_Send->toPlainText();

        client_connect->write(SendData.toLatin1());

        qDebug() << SendData;

        qDebug() << "ServerData send!";

    }

}

void MainWindow::on_Server_Button_clicked(bool checked)

{

    if(!ServerFlag)

    {

        QString MonitorPort;

        MonitorPort = this->ui->Server_Port->text();

        int PortNum;

        PortNum = MonitorPort.toInt();

        server->listen(QHostAddress::Any,PortNum);

        QObject::connect(server,&QTcpServer::newConnection,this,&MainWindow::accepConnection);

        qDebug() << "Server Started!";

        qDebug() << "PortNum:" << PortNum;

        this->ui->Server_Button->setStyleSheet("background-color: rgb(85,170,0);");

    }

    else

    {

        this->ui->Server_Button->setStyleSheet("background-color: rgb(0,0,0);");

        client_connect->close();

        server->close();

        qDebug() << "Server Closed!";

    }

    ServerFlag = !ServerFlag;

}
Step3:槽函数的声明&Socket对象定义
private slots:

    void on_Client_Button_clicked(bool checked);

    void on_pushButton_clicked(bool checked);

    void Client_Recieve_Data(void);

    void accepConnection(void);

    void readClient(void);

    void on_Client_Clear_clicked(bool checked);

    void on_Server_Clear_clicked(bool checked);

    void on_ServerSend_clicked(bool checked);

    void on_Server_Button_clicked(bool checked);

    void TimeOutProcess(void);

private:

    Ui::MainWindow *ui;

    QTcpSocket *client;

    QTcpServer *server;

    QTcpSocket *client_connect;

    QTimer *TimeMonitor;

    bool ClientFlag = false;

    bool ServerFlag = false;
Step4:信号和槽的连接
connect(this->ui->Client_Button,SIGNAL(clicked(bool)),this,SLOT(on_Client_Button_clicked()));
connect(this->ui->pushButton,SIGNAL(clicked(bool)),this,SLOT(on_pushButton_clicked()));
connect(this->ui->Client_Clear,SIGNAL(clicked(bool)),this,SLOT(on_Client_Clear_clicked()));
connect(this->ui->Server_Clear,SIGNAL(clicked(bool)),this,SLOT(on_Server_Clear_clicked()));
connect(this->ui->ServerSend,SIGNAL(clicked(bool)),this,SLOT(on_ServerSend_clicked()));
connect(this->ui->Server_Button,SIGNAL(clicked(bool)),this,SLOT(on_Server_Button_clicked()));
connect(TimeMonitor,&QTimer::timeout,this,&MainWindow::TimeOutProcess);
完成上述操作,基本就完成了Qt Socket程序的功能。
3、Qt Project之Socket网络编程的更多相关文章
- windows socket 网络编程
样例代码就在我的博客中,包含六个UDP和TCP发送接受的cpp文件,一个基于MFC的局域网聊天小工具project,和此小工具的全部执行时库.资源和执行程序.代码的压缩包位置是http://www.b ...
- Linux Socket 网络编程
Linux下的网络编程指的是socket套接字编程,入门比较简单.在学校里学过一些皮毛,平时就是自学玩,没有见识过真正的socket编程大程序,比较遗憾.总感觉每次看的时候都有收获,但是每次看完了之后 ...
- Python Socket 网络编程
Socket 是进程间通信的一种方式,它与其他进程间通信的一个主要不同是:它能实现不同主机间的进程间通信,我们网络上各种各样的服务大多都是基于 Socket 来完成通信的,例如我们每天浏览网页.QQ ...
- Python全栈【Socket网络编程】
Python全栈[socket网络编程] 本章内容: Socket 基于TCP的套接字 基于UDP的套接字 TCP粘包 SocketServer 模块(ThreadingTCPServer源码剖析) ...
- python之Socket网络编程
什么是网络? 网络是由节点和连线构成,表示诸多对象及其相互联系.在数学上,网络是一种图,一般认为专指加权图.网络除了数学定义外,还有具体的物理含义,即网络是从某种相同类型的实际问题中抽象出来的模型.在 ...
- Python之路【第七篇】python基础 之socket网络编程
本篇文章大部分借鉴 http://www.cnblogs.com/nulige/p/6235531.html python socket 网络编程 一.服务端和客户端 BS架构 (腾讯通软件:ser ...
- Socket网络编程-基础篇
Socket网络编程 网络通讯三要素: IP地址[主机名] 网络中设备的标识 本地回环地址:127.0.0.1 主机名:localhost 端口号 用于标识进程的逻辑地址 有效端口:0~65535 其 ...
- Socket网络编程--FTP客户端
Socket网络编程--FTP客户端(1)(Windows) 已经好久没有写过博客进行分享了.具体原因,在以后说. 这几天在了解FTP协议,准备任务是写一个FTP客户端程序.直接上干货了. 0.了解F ...
- windows下的socket网络编程
windows下的socket网络编程 windows下的socket网络编程 clinet.c 客户端 server.c 服务器端 UDP通信的实现 代码如下 已经很久没有在windows下编程了, ...
随机推荐
- ORACLE的数据类型的长度合集
-- ORACLE的数据类型常用的数据库字段类型如下:字段类型 中文说明 限制条件 其它说明CHAR 固定长度字符串 最大长度2000 bytesVARCHAR2 可变长度的字符串 最大长度4000 ...
- Confluence 6 外部参考
一个外部参考的意思是任何站点链接到你 Confluence 的实例.任何时候当 Confluence 的用户单击这个外部链接的时候,Confluence 可以记录这次单击为参考. 在默认的情况下,外部 ...
- Swift可选项
- Java编程的分期步骤(一)
日期:2018.8.12 星期一 博客期:005 不知不觉来到第五期了,先简单说一下Java环境!(虽然Java都自学完了才说....)首先,就是在网站上下载一个java包,之后把它下载到全英文的一个 ...
- Matplotlib模块:绘图和可视化
一.简单介绍Matplotlib 1.Matplotlib是一个强大的Python绘图和数据可视化的工具包 2.安装方法:pip install matplotlib 3.引用方法:import ma ...
- Java并发编程基础-线程安全问题及JMM(volatile)
什么情况下应该使用多线程 : 线程出现的目的是什么?解决进程中多任务的实时性问题?其实简单来说,也就是解决“阻塞”的问题,阻塞的意思就是程序运行到某个函数或过程后等待某些事件发生而暂时停止 CPU 占 ...
- mysql where和having的区别
简单描述:需要查询一个数量count,于是做分组查询后,发现有的数据没有过滤掉,于是就想加上过滤条件,就在group by后边写了where ,发现不好使,直接就报错了,查了一下,where只能写在g ...
- python(2): If/for/函数/try异常/调试/格式输出%
(一) if if a1==a2: print('ok') if: else: if: elif: ... else: 注意缩进 猜数字游戏 from random import randint ...
- cf909C 线性dp+滚动数组好题!
一开始一直以为是区间dp.. /* f下面必须有一个s 其余的s可以和任意f进行匹配 所以用线性dp来做 先预处理一下: fffssfsfs==>3 0 1 1 dp[i][j] 表示第i行缩进 ...
- getComputedStyle()用法详解
那如果元素即没有在style属性中设置宽高,也没有在样式表中设置宽高,还能用getComputedStyle或currentStyle获取吗?答案是getComputedStyle可以,current ...