在阅读IoBuffer源码之前,我们先看Mina对IoBuffer的描述:A byte buffer used by MINA applications. This is
a replacement for ByteBuffer. 这是一个对ByteBuffer的replacement,同样是用作缓冲区,做内容的切换和承载的容器,为什么要用重新封装ByteBuffer,MINA是这么给出解释的Two
Reasons:
l It doesn't provide useful getters and putters
l It is difficult to write variable-length data due to its fixed capacity
用过ByteBuffer的人可能经常会遇到BufferOverflowException这样的异常,原因是buffer在初始化allocate之后就不能再自动的改变大小了,如果项目很规整,约定的很好,那可能不太会出意外,怕就怕项目一大,好多东西就乱套了。所以在阅读IoBuffer源码的时候,我们会着重看它和ByteBuffer之间的差异。另外一点,就是IoBuffer作为一个应用框架的工具,必然会提供比原生Buffer更便捷的方法,比如IoBuffer中可以直接put和get
String,可以直接将内容转成十六进制等等。
用法很简单,我倒是想从如何将一个已有的类进行封装和扩展的角度来看IoBuffer的源码。在看MINA的源码之前,我们有必要稍稍回顾一下ByteBuffer的构成:
ByteBuffer继承了Buffer类,这个继承关系约定了Buffer系列中特定的操作形式(有点儿像指针),limit/position/mark/capacity,以及在遍历中使用的hasRemaining。然后通过两个静态方法来构建出ByteBuffer:
使用Heap空间,堆空间的构造采用申请byte数组:
1 |
public static ByteBuffer
allocate(int capacity)
{ |
3 |
throw new IllegalArgumentException(); |
4 |
return new HeapByteBuffer(capacity,
capacity); |
使用direct memory,这块内存的开辟就比较麻烦了,好多都是采用了Bit和native的方法:
1 |
public static ByteBuffer
allocateDirect(int capacity)
{ |
2 |
return new DirectByteBuffer(capacity); |
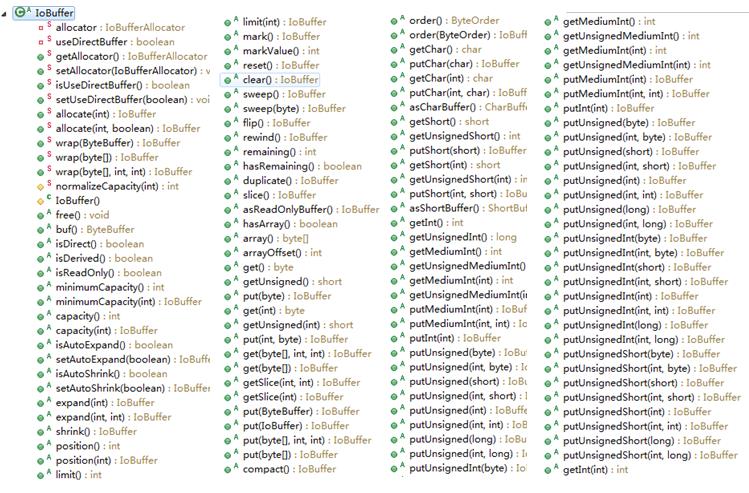
除了构造之外,剩下的主要是对数据的操作方法,wrap、get和put,下面的图没有截全,还有好多方法:
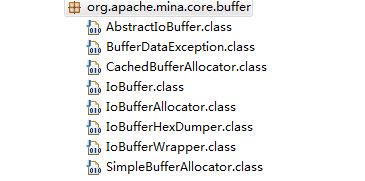
IoBuffer及其相关的类均在org.apache.mina.core.buffer下,IoBuffer定义了buffer使用的规则,AbseractIoBuffer提供了具体的实现:
IoBuffer没有继承任何类,只是实现了comparable接口,我们注意到IoBuffer类修饰符用的是abstract,跟ByteBuffer也是用abstract修饰,至于为什么要用abstract,我觉得也容易理解,毕竟这是一个要对外直接使用的类,同时需要对实现进行规则和扩展:
1 |
public abstract class IoBuffer implements Comparable<IoBuffer> |
在IoBuffer的一系列代码阅读中,你可以看到抽象类之间的继承,内部类的使用情况等等,后面,我会通过一个删减版的例子来盘点这中间的关系,所以大片的源码就不贴了。
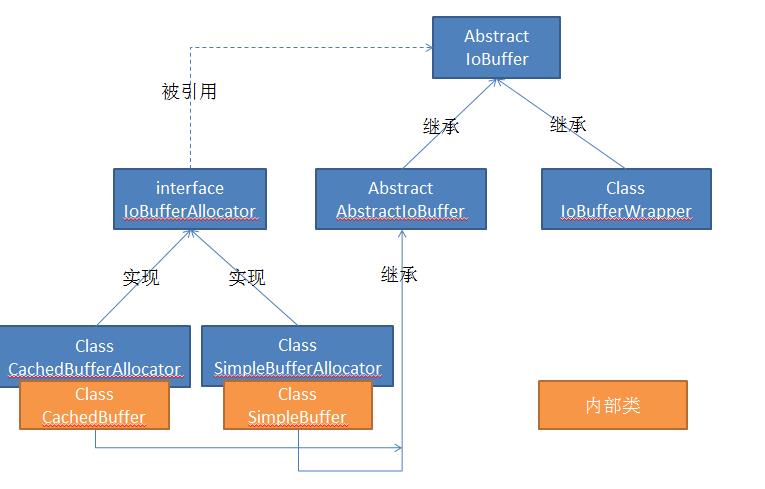
UML工具不会用,关键是怕用错了,还是用PPT画了。囧一个,大家有好那种可以一键生成的工具推荐一下,我之前用的是JUDE和Visio。上图画出了IoBuffer中几个重要类之间的关系,两个内部类均继承了AbstractIoBuffer,AbstractIoBuffer和IoBufferWrapper均实现了IoBuffer中的具体操作部分。IoBufferAllocator接口主要定义了为缓冲区开辟空间的方法,所以IoBuffer中需要引用来自IoBufferAllocator的对象。
在IoBuffer中,我们熟知的allocate和wrap方法被声明成了static,通过引用IoBufferAllocator接口中的对象来实现,而其他诸如get、put等操作的方法都定义为abstract了,让其子类得以实现。IoBuffer中我们还值得关注的主要见我之前写过的一篇文章《IoBuffer和ByteBuffer》。
下面是这些中产生buffer的接口IoBufferAllocator和其实现类:
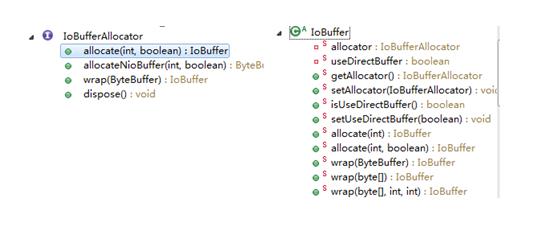
接口很简单,就定义了几个在IoBuffer中已经被static修饰的方法。有两个类都实现了IoBufferAllocator,但是在IoBuffer中使用的是SimpleBufferAllocator:
1 |
/**

The allocator used to create new buffers */ |
2 |
private static IoBufferAllocator
allocator = new SimpleBufferAllocator(); |
4 |
/**

A flag indicating which type of buffer we are using : heap or direct */ |
5 |
private static boolean useDirectBuffer
= false; |
所以我们主要关注SimpleBufferAllocator:
01 |
public IoBuffer
allocate(int capacity, boolean direct)
{ |
02 |
return wrap(allocateNioBuffer(capacity,
direct)); |
05 |
public ByteBuffer
allocateNioBuffer(int capacity, boolean direct)
{ |
08 |
nioBuffer
= ByteBuffer.allocateDirect(capacity); |
10 |
nioBuffer
= ByteBuffer.allocate(capacity); |
15 |
public IoBuffer
wrap(ByteBuffer nioBuffer) { |
16 |
return new SimpleBuffer(nioBuffer); |
19 |
public void dispose()
{ |
这是接口中定义的几个方法,这里调用内部类SimpleBuffer来生成相应的buffer,又由于SimpleBuffer继承了AbstractIoBuffer,所以真正实现的代码在AbstractIoBuffer中(这里有点儿绕,大家结合上面的图和源码一起读)。而且注意构造方法的protected关键字的使用:
01 |
private ByteBuffer
buf; |
03 |
protected SimpleBuffer(ByteBuffer
buf) { |
04 |
super(SimpleBufferAllocator.this,
buf.capacity()); |
06 |
buf.order(ByteOrder.BIG_ENDIAN); |
09 |
protected SimpleBuffer(SimpleBuffer
parent, ByteBuffer buf) { |
看到了吧,底层还是用的NIO中的ByteBuffer。至于怎么实现AutoExpand这样的方法,我觉得不是源码的重点,这些都是算法上的事情,如果你不关注算法,可以稍稍看看即可,而且好多都是native的实现,也看不到。而我这边主要关注的还是他们之间的结构。
上图左边的路走通了,我们来走右边的路,右边主要看AbstractIoBuffer,他是IoBuffer的具体实现,但是它也是一个抽象类,也要被其他类继承,用于扩展。AbstractIoBuffer中,大多类都是final的。而且这里面主要的实现都是在处理limit/position/mark/capacity这之间的关系。而CachedBufferAllocator主要用于实现IoBuffer中自动扩展AutoExpand和收缩: that
caches the buffers which are likely to be reused during auto-expansion of the buffers.
----------------------------------------------------------
最后,我们将上面的叙述用一个删减版的代码来模拟一下,这样有助于理解代码的结构,以后遇到类似的情况就可以类似的处理,我更希望,能在分析完所有源码之后,就能呈现一个类似的框架出来,不过这个真的只是想想,毕竟没那么多时间,如果你有时间,可以试着去阉割一下mina。
首先是IoBuffer:
01 |
package org.apache.mina.core.rewrite.buffer; |
09 |
public abstract class IoBuffer
{ |
11 |
private static IoBufferAllocator
allocator=new SimpleBufferAllocator(); |
12 |
private static boolean direct; |
14 |
protected IoBuffer()
{ |
18 |
public static IoBuffer
allocate(int capacity)
{ |
19 |
return allocator.allocate(capacity,
direct); |
22 |
public static IoBuffer
wrap(byte[]
byteArray, int offset, int length){ |
27 |
public abstract IoBuffer
get(); |
29 |
public abstract IoBuffer
put(byte b); |
31 |
public abstract boolean other(); |
然后是他的继承:
01 |
package org.apache.mina.core.rewrite.buffer; |
03 |
import java.nio.ByteBuffer; |
10 |
public abstract class AbstractIoBuffer extends IoBuffer{ |
12 |
protected AbstractIoBuffer(ByteBuffer
buffer){ |
17 |
public IoBuffer
get() { |
18 |
//
TODO Auto-generated method stub |
23 |
public IoBuffer
put(byte b)
{ |
24 |
//
TODO Auto-generated method stub |
allocator:
01 |
package org.apache.mina.core.rewrite.buffer; |
03 |
import java.nio.ByteBuffer; |
10 |
public interface IoBufferAllocator
{ |
12 |
IoBuffer

 allocate(
int capacity, boolean direct); |
14 |
IoBuffer
wrap(ByteBuffer nioBuffer); |
16 |
ByteBuffer

 allocateNioBuffer(
int capacity, boolean direct); |
allocator的实现:
01 |
package org.apache.mina.core.rewrite.buffer; |
03 |
import java.nio.ByteBuffer; |
09 |
public class SimpleBufferAllocator implements IoBufferAllocator{ |
12 |
public IoBuffer
allocate(int capacity, boolean direct)
{ |
13 |
return wrap(allocateNioBuffer(capacity,
direct)); |
17 |
public IoBuffer
wrap(ByteBuffer nioBuffer) { |
19 |
return new SimpleBuffer(nioBuffer); |
23 |
public ByteBuffer
allocateNioBuffer(int capacity, boolean direct)
{ |
26 |
nioBuffer

= ByteBuffer.allocateDirect(capacity); |
28 |
nioBuffer

= ByteBuffer.allocate(capacity); |
34 |
public void dispose()
{ |
35 |
//

TODO Auto-generated method stub |
39 |
private class SimpleBuffer extends AbstractIoBuffer{ |
40 |
@SuppressWarnings("unused") |
42 |
protected SimpleBuffer(ByteBuffer
buffer){ |
48 |
public boolean other()
{ |
49 |
//

TODO Auto-generated method stub |
55 |
public String
toString() { |
56 |
System.out.println(buffer); |
57 |
return super.toString(); |
最后是测试类和测试结果:
1 |
package org.apache.mina.core.rewrite.buffer; |
4 |
public static void main(String[]
args) { |
5 |
IoBuffer

buffer=IoBuffer.allocate(1024); |
6 |
System.out.println(buffer); |
控制台输出:
1 |
java.nio.HeapByteBuffer[pos=0 lim=1024 cap=1024] |
2 |
org.apache.mina.core.rewrite.buffer.SimpleBufferAllocator$SimpleBuffer@1da12fc0 |
-------------------------------------------------------------------
后面一篇应该会将service,就是mina中实现连接的部分,后面的更新速度可能会慢点儿,到后面越来越复杂了,我得想想怎么写才能写的号。最近在弄kafka,其实我还想写点儿kafka的东西,可是真的没有时间,kafka部分等我把分布式的弄完了再发点儿心得上来。大家将就着看吧。谢谢。
- Mina源码阅读笔记(四)—Mina的连接IoConnector2
接着Mina源码阅读笔记(四)-Mina的连接IoConnector1,,我们继续: AbstractIoAcceptor: 001 package org.apache.mina.core.rewr ...
- Mina源码阅读笔记(一)-整体解读
今天的这一节,将从整体上对mina的源代码进行把握,网上已经有好多关于mina源码的阅读笔记,但好多都是列举了一下每个接口或者类的方法.我倒是想从mina源码的结构和功能上对这个框架进行剖析.源码的阅 ...
- Mina源码阅读笔记(七)—Mina的拦截器FilterChain
Filter我们很熟悉,在Mina中,filter chain的用法也类似于Servlet的filters,这种拦截器的设计思想能够狠轻松的帮助我们实现对资源的统一处理.我们先大致连接下mina中的f ...
- Mina源码阅读笔记(六)—Mina异步IO的实现IoFuture
IoFuture是和IoSession紧密相连的一个类,在官网上并没有对它的描述,因为它一般不会显示的拿出来用,权当是一个工具类被session所使用.当然在作用上,这个系列可并不简单,我们先看源码的 ...
- Mina源码阅读笔记(五)—Mina对连接的操作IoSession
IoSession是Mina管理两端的一个重要部分,也是Mina的核心,Session具有了生命周期的概念,它的生命周期和连接时紧密相关的,这点在后面的介绍中会涉及.另外,好像hibernate中也有 ...
- Mina源码阅读笔记(四)—Mina的连接IoConnector1
上一篇写的是IoAcceptor是服务器端的接收代码,今天要写的是IoConnector,是客户端的连接器.在昨天,我们还留下一些问题没有解决,这些问题今天同样会产生,但是都要等到讲到session的 ...
- Mina源码阅读笔记(三)-Mina的连接IoAccpetor
其实在mina的源码中,IoService可以总结成五部分service责任.Processor线程处理.handler处理器.接收器和连接器,分别对应着IoService.IoProcessor.I ...
- werkzeug源码阅读笔记(二) 下
wsgi.py----第二部分 pop_path_info()函数 先测试一下这个函数的作用: >>> from werkzeug.wsgi import pop_path_info ...
- werkzeug源码阅读笔记(二) 上
因为第一部分是关于初始化的部分的,我就没有发布出来~ wsgi.py----第一部分 在分析这个模块之前, 需要了解一下WSGI, 大致了解了之后再继续~ get_current_url()函数 很明 ...
随机推荐
- Unable to access the IIS metabase.You do not have sufficient privilege
今天在用vs打开以前老代码的时候报如下问题,无法打开工程了,从提示来不大可能是因为vs的版本引起的,本身我用的是最新版的vs. 网上查了下解决方法如下:找到你电脑中的如下路径"C:\Wind ...
- Citrix 桌面虚拟化解决方案与VMware桌面虚拟化解决方案对比
通过 XenDesktop 和 FlexCast为各种场景交付虚拟桌面 企业桌面面临的问题 为每个用户提供安全高效的桌面环境是几乎所有公司或组织的基本要求.如果用户无法使用他们的桌面或应用程序,公司就 ...
- Mybatis3.4.0不支持mybatis-spring1.2.5及以下版本
今天将工程的Mybatis的版本由3.3.0升级到3.4.0导致程序运行错误,使用的mybatis-spring版本是1.2.3,错误内容如下,最后发现是SpringManagedTransactio ...
- UNIX网络编程——UDP缺乏流量控制(改进版)
现在我们查看无任何流量控制的UDP对数据报传输的影响.首先我们把dg_cli函数修改为发送固定数目的数据报,并不再从标准输入读.如下,它写2000个1400字节大小的UDP数据报给服务器. 客户端程序 ...
- iOS下WebRTC音视频通话(一)
在iOS下做IM功能时,难免都会涉及到音频通话和视频通话.QQ中的QQ电话和视频通话效果就非常好,但是如果你没有非常深厚的技术,也没有那么大的团队,很难做到QQ那么快速和稳定的通话效果. 但是利用We ...
- Win8.1开启Hyper-V并设置虚拟机联网
虚拟机用惯了VM,听说win8自带的hype-v不错比原来有了较大的改进,特地来试试. win8开启hype-v的方式如下 安装完重启下就可以了. 接着说联网,Hype-v的设置个人感觉稍微比VM麻烦 ...
- Oracle开发环境搭建
一.软件准备 地址:oracle官网 安装包:因为个人学习用,所以就安装服务器端就可以了,不需要客户端. 一共两个压缩文件,解压时一起解压到到一个文件夹. 本人使用的:win32_11gR2_data ...
- C算法分解质因数与分解因子
) ) printf("%d ",i); } }
- Mybatis接口编程原理分析(三)
前面两篇博客Mybatis接口编程原理分析(一)和Mybatis接口编程原理分析(二)我们介绍了MapperProxyFactory.MapperProxy和MapperMethod的操作及源码分析, ...
- (三十八)从私人通讯录引出的细节II -数据逆传 -tableView点击 -自定义分割线
项目中的警告是不会影响app发布的,例如引入第三方类库很容易引入警告. 细节1:跳转的数据传递. prepareForSegue: sender: 方法是在执行segue后,跳转之前调用这个方法,一般 ...