用Python写WebService接口并且调用
一、用ladon框架封装Python为Webservice接口
另用soaplib实现请看: http://www.jianshu.com/p/ad3c27d2a946
功能实现的同时,希望将接口开放给别人,而封装python接口的一个再简单不过的框架Ladon,而且提供不同的协议,包括SOAP和Json等格式的接口。本篇紧接着上上篇(Django部署)的。虽然很简单,但是官网的文档还是不够详细,下面介绍我配置的过程及遇到的问题。
1、安装Ladon包
使用Ladon框架,首先需要安装Ladon包(Ladon for Python),最新的是Ladon-0.8.9。
2、新建一个APP(接着上个项目的话,就取名叫appapi)
1)、在这个app下面新建一个文件handler.py(实际上就是一个views):
# Create your views here.

from ladon.server.wsgi import LadonWSGIApplication

import os

os.environ['DJANGO_SETTINGS_MODULE'] = 'appops.settings'   #这里是项目的名称设置

application = LadonWSGIApplication(

  ['appapi.views'],  #引用当前目录下views里的内容

  [os.path.join(os.path.dirname(__file__), os.path.pardir)],

  catalog_name='OPS APP API',

  catalog_desc='This is the root of my cool webservice catalog')
在Windows环境下,其实这时会报错,报各种No modules named XXX的错误(上述from ladon.server.wsgi import LadonWSGIApplication 这句话需要三个包),这个好办,缺什么包装什么包,有个这个巨无霸Windows-Python集成包网站,啥都不缺,Ctrl+F就行!注意版本,这里很全,目前Windows下所有python的包都能在这里找到,32位和64位的都有,配置过程中,我就缺了下面三个包:
Jinja2-2.7.2.win32-py2.7.exe
MarkupSafe-0.18.win32-py2.7.exe
docutils-0.11.win32-py2.7.exe
2)、写接口函数(就是APP下的Views.py里的内容),被上面引用的['appapi.views']
以一个加法和减法为例:
from ladon.ladonizer import ladonize

from ladon.types.ladontype import LadonType

class Calculator(object):

    @ladonize(int,int,rtype=int)

    def add(self,a,b):

        return a+b

    @ladonize(int,int,rtype=int)

    def Minus(self,a,b):

        return a-b

class MyService(object):

    @ladonize(int,rtype=int)

    def mytest(self,a):

         return a*a
这里要注意两点:
a、要封装的方法必须写在一个类里(如这里的Class XXX)
b、类下面的方法如果需要封装,则方法前面必须加修饰符@ladonize,后面的参数分别是输入参数的类型和输出参数(return type)的类型
3、编辑配置文件
可以在apache_django_wsgi.conf文件里配置也可以在apache下的httpd.conf文件下配置,加上这句:
WSGIScriptAlias /api "D:/OPSAPP/appops/appapi/handler.py"
意思就是可以通过在主域名(或IP)后面加上/api/就可以访问到接口,而不用在urls.py里的urlpattern里写url了。
这里需要注意:
a、这句与WSGIScriptAlias / "D:/OPSAPP/django.wsgi"的顺序,上述api的别名一定要放在django.wsgi引用的前面,否则导致/api/的页面不能访问(试了很多次,WSGIScriptAlias /api "D:/OPSAPP/appops/appapi/handler.py"这个配置在apache_django_wsgi.conf里有问题,会出现主页和api页面不能同时访问的情况。但是有的同事就可以,不知道哪里配置不一样。我是配置在httpd.conf里的)
b、如果不能访问api页面,错误日志会记录在apache目录下的logs/error.log里。配置过程中遇到了这个错误:assert sys.modules[modname] is old_mod
这个需要改动源码:C:\Python27\Lib\site-packages\win32\lib\pywintypes.py第113行那段改动如下:
if sys.version_info < (3,0):

        # assert sys.modules[modname] is old_mod

        # assert mod is old_mod

        pass

    else:

        assert sys.modules[modname] is not old_mod

        assert sys.modules[modname] is mod

        # as above - re-reset to the *old* module object then update globs.

        sys.modules[modname] = old_mod

        globs.update(mod.__dict__)
注意:每当修改过配置文件或者代码时,最好重启下apache服务,不然可能页面看不出改动后的效果。
至此没问题了,访问URL/api的界面如下:
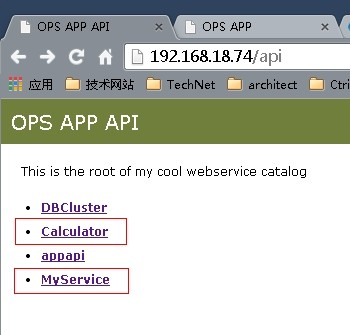
点击Calculator接口,他提供了不同格式的接口类型:
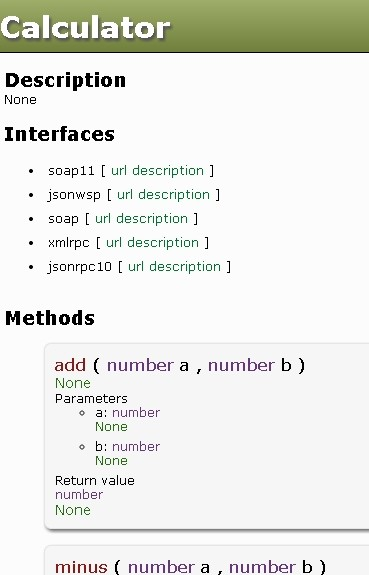
我常用的就是第一个soap11类型的接口,点进去如下(不明觉厉,有木有):
This XML file does not appear to have any style information associated with it. The document tree is shown below.

<wsdl:definitions xmlns:http="http://schemas.xmlsoap.org/wsdl/http/" xmlns:mime="http://schemas.xmlsoap.org/wsdl/mime/" xmlns:ns1="urn:Calculator" xmlns:soap="http://schemas.xmlsoap.org/wsdl/soap/" xmlns:soapenc="http://schemas.xmlsoap.org/soap/encoding/" xmlns:tns="urn:Calculator" xmlns:wsdl="http://schemas.xmlsoap.org/wsdl/" xmlns:xsd="http://www.w3.org/2001/XMLSchema" xmlns:xsi="http://www.w3.org/2001/XMLSchema-instance" name="Calculator" targetNamespace="urn:Calculator">

<wsdl:types>

<xsd:schema xmlns:ns1="urn:Calculator" targetNamespace="urn:Calculator">

<xsd:import namespace="http://schemas.xmlsoap.org/soap/encoding/"/>

</xsd:schema>

</wsdl:types>

<wsdl:message name="add">

<wsdl:part name="a" type="xsd:long"/>

<wsdl:part name="b" type="xsd:long"/>

</wsdl:message>

<wsdl:message name="addResponse">

<wsdl:part name="result" type="xsd:long"/>

</wsdl:message>

<wsdl:message name="minus">

<wsdl:part name="a" type="xsd:long"/>

<wsdl:part name="b" type="xsd:long"/>

</wsdl:message>

<wsdl:message name="minusResponse">

<wsdl:part name="result" type="xsd:long"/>

</wsdl:message>

<wsdl:portType name="CalculatorPortType">

<wsdl:operation name="add">

<wsdl:input message="tns:add"/>

<wsdl:output message="tns:addResponse"/>

</wsdl:operation>

<wsdl:operation name="minus">

<wsdl:input message="tns:minus"/>

<wsdl:output message="tns:minusResponse"/>

</wsdl:operation>

</wsdl:portType>

<wsdl:binding name="Calculator" type="tns:CalculatorPortType">

<soap:binding style="rpc" transport="http://schemas.xmlsoap.org/soap/http"/>

<wsdl:operation name="add">

<soap:operation soapAction="http://192.168.18.74/api/Calculator/soap11/add" style="rpc"/>

<wsdl:input>

<soap:body encodingStyle="http://schemas.xmlsoap.org/soap/encoding/" namespace="urn:Calculator" use="encoded"/>

</wsdl:input>

<wsdl:output>

<soap:body encodingStyle="http://schemas.xmlsoap.org/soap/encoding/" namespace="urn:Calculator" use="encoded"/>

</wsdl:output>

</wsdl:operation>

<wsdl:operation name="minus">

<soap:operation soapAction="http://192.168.18.74/api/Calculator/soap11/minus" style="rpc"/>

<wsdl:input>

<soap:body encodingStyle="http://schemas.xmlsoap.org/soap/encoding/" namespace="urn:Calculator" use="encoded"/>

</wsdl:input>

<wsdl:output>

<soap:body encodingStyle="http://schemas.xmlsoap.org/soap/encoding/" namespace="urn:Calculator" use="encoded"/>

</wsdl:output>

</wsdl:operation>

</wsdl:binding>

<wsdl:service name="Calculator">

<wsdl:documentation>Ladon generated service definition</wsdl:documentation>

<wsdl:port binding="tns:Calculator" name="Calculator">

<soap:address location="http://192.168.18.74/api/Calculator/soap11"/>

</wsdl:port>

</wsdl:service>

</wsdl:definitions>
二、接口调用方法
1、调用Soap11的接口
需要安装soap 的Client端包,大名叫做Suds(我的版本是suds-0.4),调用很简单,如下一个示例,不解释,聪明的你一看就明白:

#encoding:utf-8

import json

# import urllib,urllib2

from suds.client import Client

# import logging

# logging.basicConfig(level=logging.INFO)

# logging.getLogger('suds.client').setLevel(logging.DEBUG)


# username = 'api_user'
# password = 'api_pwd'

url="http://192.168.18.74/api/Calculator/soap11/description" #接口的URL

headers = {'Content-Type': 'application/soap+xml; charset="UTF-8"'}

client = Client(url,headers=headers,faults=False,timeout=15)

def call_api_test(num1,num2):

    try:

        #--WSDL请求Header----------------------------------------------

        # auth = client.factory.create('AuthenticationInfo')

        # auth.userName = username

        # auth.password = password

        # client.set_options(soapheaders=auth)

        #--WSDL请求Body----------------------------------------------

        result = client.service.add(a=num1,b=num2)

        #print result

        if result[0] == 200:

            return (True, result[1])

        else:

            return (False, result[1])

    except Exception as e:

        return (False, e)

if __name__ == '__main__': #get_software

    a= call_api_test(2,3)

    print (json.loads(a[1]))
2、调用Json格式的接口
……
用Python写WebService接口并且调用的更多相关文章
- 用ladon框架封装Python为Webservice接口以及调用接口的方法
一.用ladon框架封装Python为Webservice接口 功能实现的同时,希望将接口开放给别人,而封装python接口的一个再简单不过的框架Ladon,而且提供不同的协议,包括SOAP和Json ...
- java写webservice接口
有一个需求:要求根据设备mac和终端设备类型来查询设备库存状态. 接口协议是采用webservice协议,信息交互方式为xml格式信息 输入参数存放到XML各个节点下,并转为一个String,作为接口 ...
- 关于python测试webservice接口的视频分享
现在大公司非常流行用python做产品的测试框架,还有对于一些快速原型产品的开发也好,很好地支持OO编程,代码易读.Python的更新挺快的,尤其是第三方库. 对于测试人员,代码基础薄弱,用pytho ...
- python通过webservice接口实现配置下发
项目上要开发一个小工具,通过webservice接口实现配置下发,考虑到python的第三方库对soap的良好支持,果断决定用python来完成这一使命. Python的支持webservice的第三 ...
- Webservice接口的调用
一.开发webservice接口的方式 1.jdk开发. 2.使用第三方工具开发,如cxf.shiro等等. 我这边介绍jdk方式webservice接口调用. 二.使用jdk调用webservice ...
- java 写webservice接口解析xml报文
1 <!--解析xml报文--> 2 <dependency> 3 <groupId>dom4j</groupId> 4 <artifactId& ...
- 用python写http接口自动化测试框架
本文是转载张元礼的博客 http://blog.csdn.Net/vincetest 一.测试需求描述 对服务后台一系列的http接口功能测试. 输入:根据接口描述构造不同的参数输入值 输出:XML文 ...
- python测试webservice接口
1.下载库:https://pypi.python.org/pypi/suds-jurko 2.解压后,进入到解压目录,安装库:python3 setup.py install 3.测试获取手机归属地 ...
- python写测试接口
https://www.cnblogs.com/liuyl-2017/p/7815950.html
随机推荐
- 新闻网站开发-手机端-基于Wordpress
暂时写下来下面记录整个网站制作流程,由于是边学便用,代码质量和性能不能保证,仅仅为之前没做过的朋友提供个小小的参考: 下面先贴出网站,记得用手机或者[Opera Mobile Emulator]打开, ...
- LeetCode(39)-Intersection of Two Linked Lists
听歌曲初爱有感: 开头啰嗦两句,刚在做算法题目的时候,听到了杨宗纬的<初爱>,突然有了一种本科时候的感觉,想想自己现在研二了,青春喂了狗,我果断喝了一罐啤酒,循环这首歌到吐-.. 题目: ...
- SVN中更改连接用户
Eclipse中安装了SVN插件,当连接到SVN服务器后,便无法从客户端更改连接帐号 百度一下,也就知道 查看Eclipse中使用的是什么SVN Interface,位置在 windows > ...
- 2017 Gartner数据科学魔力象限出炉,16位上榜公司花落谁家?
https://www.leiphone.com/news/201703/iZGuGfnER4Sv2zRe.html 2017年Gartner数据科学平台(在2016年被称作“高级分析平台”)的魔力象 ...
- Python入门、练手、视频资源汇总,拿走别客气!
摘要:为方便朋友,重新整理汇总,内容包括长期必备.入门教程.练手项目.学习视频. 一.长期必备. 1. StackOverflow,是疑难解答.bug排除必备网站,任何编程问题请第一时间到此网站查找. ...
- 【已解决】C#中往SQLServer插入数据时遇到BUG
错误信息如下: “System.Data.SqlClient.SqlException”类型的未经处理的异常在 System.Data.dll 中发生 其他信息: “”附近有语法错误. 文字版代码如下 ...
- python logging method 02
基本用法 下面的代码展示了logging最基本的用法. 1 2 3 4 5 6 7 8 9 10 11 12 13 14 15 16 17 18 19 20 21 22 23 24 25 26 ...
- Linux环境安装配置JDK
本文安装环境为Ubuntu14 64位,jdk版本为jdk1.6.0_38,安装文件名为jdk-6u38-linux-x64.bin(根据系统不同,下载不同的安装文件) 下载地址:http://www ...
- 基于ubuntu16.04快速构建Hyperledger Fabric网络
前言 最近在参加一个比赛,使用到了区块链的开源软件hyperledger,由于之前从未接触过区块链,以及和区块链开发相关的内容,所有在网上查阅了大量的资料,并且通过学习yeasy(杨宝华)开源的入门书 ...
- ReenTrantLock可重入锁(和synchronized的区别)总结
ReenTrantLock可重入锁(和synchronized的区别)总结 可重入性: 从名字上理解,ReenTrantLock的字面意思就是再进入的锁,其实synchronized关键字所使用的锁也 ...