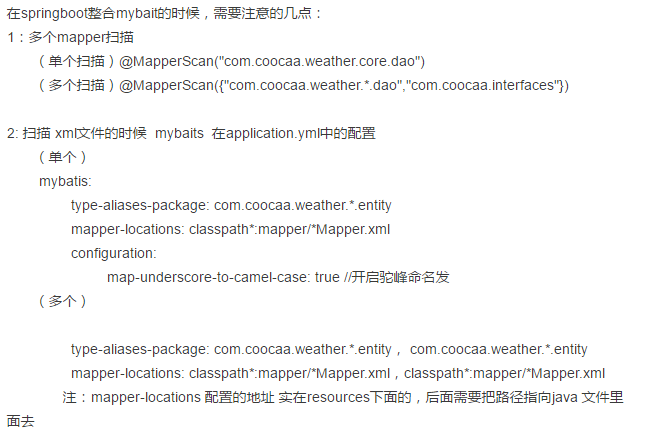
SpringBoot+thymeleaf+security+vue搭建后台框架 基础篇(一)
刚刚接触SpringBoot,说说踩过的坑,主要的还是要记录下来,供以后反省反省!
今天主要讲讲 thymeleaf+security 的搭建,SpringBoot的项目搭建应该比较简单,这里就不多说了。可以去网上找到很多。
一:首先,你需要有一个SpringBoot的基础项目!我这里用的是SpringBoot+mybasit来搭建的基础框架
基础的部分可以看看这个人的博客 http://blog.csdn.net/forezp?viewmode=contents 写的很详情,
需要注意的几点如下:
二:springboot在整合多个生产环境的配置:
在springboot中,通过@profileActive@ 来获取maven中的值,注意springboot中 用@@ 替代了${}
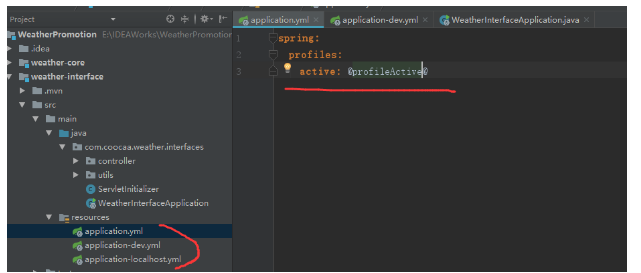
在maven中 配置 profileActive
 <profiles>
<profile>
<id>localhost</id>
<properties>
<profileActive>localhost</profileActive>
</properties>
<activation>
<activeByDefault>true</activeByDefault>
</activation>
</profile>
<profile>
<id>dev</id>
<properties>
<profileActive>dev</profileActive>
</properties>
</profile>
<profile>
<id>master</id>
<properties>
<profileActive>master</profileActive>
</properties>
</profile>
</profiles>
三:Springboot整合 配置 Web模板 thymeleaf
3.1 基本需求
Thymeleaf除了基本的模板引擎,还提供了一套Spring集成技术使得在Spring MVC中能够使用它完全替代JSP作为模板引擎,它的功能特性如下:
- Spring MVC中
@Controller中的方法可以直接返回模板名称,接下来Thymeleaf模板引擎会自动进行渲染 - 模板中的表达式支持Spring表达式语言(Spring EL)
- 表单支持,并兼容Spring MVC的数据绑定与验证机制
- 国际化支持
- Spring MVC中
如果你还不了解Thymeleaf,请一定先阅读新一代Java模板引擎Thymeleaf。
其引入方式很简单:在maven中添加依赖
<dependency>
   <groupId>org.springframework.boot</groupId>
   <artifactId>spring-boot-starter-thymeleaf</artifactId>
</dependency>
thymeleaf默认的资源文件的约定目录结构
Maven的资源文件目录:/src/Java/resources
spring-boot项目静态文件目录:/src/java/resources/static
spring-boot项目模板文件目录:/src/java/resources/templates
所以在默认的情况下 你的.html页面 需要放在这三个目录下面中的某一个中 ,当然你也可以自己指定资源模板位置,其在application.yml中的配置如下:
spring:
thymeleaf:
    prefix: classpath:/page/       //指定模板加载位置
    suffix: .html                 //指定走缀类型
    mode: HTML5
    encoding: UTF-8            //指定编码
    content-type: text/html
    cache: false                   //页面不缓存

这个时候 你的静态页面就放在page里面

3.2:另外就是.html格式的不同:

Command对象用来在Spring MVC中绑定表单与后端对象,Thymeleaf提供的th:object属性可以用来指定Command对象:
而且:html文件中 需要引入 模板
<!DOCTYPE html>
<html xmlns:th="http://www.thymeleaf.org">
<head>
    <title>index</title>
    <meta http-equiv="Content-Type" content="text/html; charset=UTF-8" />
</head>
<body>
html标签上使用th:开头标识作为前缀。
通过@{}引入web静态文件。
3.3:一个完整的例子如下:
@Controller

@RequestMapping("/")

public class TestController {

    @RequestMapping("")

    public String index(Model model) {

        UserEntity boy = new UserEntity();

        boy.setUserName("weber");

        boy.setNumber("1235");

        model.addAttribute("user", boy);

        return "index";

    }

}
我的index.html页面在 /src/Java/resources/page中
<!DOCTYPE html>

<html xmlns:th="http://www.thymeleaf.org">

<head>

    <title>index</title>

    <meta http-equiv="Content-Type" content="text/html; charset=UTF-8" />

</head>

<body>

<div style="text-align: center;margin:0 auto;width: 1000px; ">

    你的名称 <span th:text="${user.userName}"></span>

    你的编号 <span th:text="${user.number}"></span>

</div>

</body>

</html>
结果是:

这样 你就完成了thymeleaf基础模板的引用

 四:Springboot整合 配置 security权限框架

  详情可参考:http://emacoo.cn/backend/spring-boot-security/
首先需要引入依赖
<dependency>
   <groupId>org.springframework.boot</groupId>
   <artifactId>spring-boot-starter-security</artifactId>
</dependency>
在自己配置Spring Security
package com.coocaa.weather.admin.configs;

import org.springframework.beans.factory.annotation.Autowired;

import org.springframework.context.annotation.Configuration;

import org.springframework.security.config.annotation.authentication.builders.AuthenticationManagerBuilder;

import org.springframework.security.config.annotation.method.configuration.EnableGlobalMethodSecurity;

import org.springframework.security.config.annotation.web.builders.HttpSecurity;

import org.springframework.security.config.annotation.web.builders.WebSecurity;

import org.springframework.security.config.annotation.web.configuration.EnableWebSecurity;

import org.springframework.security.config.annotation.web.configuration.WebSecurityConfigurerAdapter;

import org.springframework.security.crypto.bcrypt.BCryptPasswordEncoder;

/**

 * Create by yugaofeng on 2017/11/30

 */

@Configuration

@EnableWebSecurity

@EnableGlobalMethodSecurity(prePostEnabled = true)

public class SecurityConfig extends WebSecurityConfigurerAdapter {

    @Override

    protected void configure(HttpSecurity http) throws Exception {

        http

                .authorizeRequests().antMatchers("/fail", "/login","/").permitAll().anyRequest().authenticated() //不拦截的请求

                .and().formLogin().loginPage("/login").permitAll().successForwardUrl("/success").failureUrl("/fail")

                .and().logout().permitAll();

    }

    @Override

    public void configure(WebSecurity web) throws Exception {

        web.ignoring().antMatchers("/js/**", "/css/**", "/images/**", "/**/favicon.ico"); //静态资源地址

    }

    @Override

    public void configure(AuthenticationManagerBuilder auth) throws Exception {

        auth

                .inMemoryAuthentication()

                .withUser("user").password("password").roles("USER","USER2");    //配置的用户信息地址

    }

}
此时,你还需要一个web页面 和 地址跳转
跳转到 login页面 因为在 .and().formLogin().loginPage("/login").permitAll().配置了 未登录的直接跳转这个地址

web页面 把数据提交到 /login中 框架会自动帮你验证登陆 用户名是 user 密码是 password 权限类别是USER
<!DOCTYPE html>

<html xmlns:th="http://www.thymeleaf.org">

<head>

    <title>index</title>

    <meta http-equiv="Content-Type" content="text/html; charset=UTF-8" />

</head>

<body>

<div style="text-align: center;margin:0 auto;width: 1000px; ">

        <form th:action="@{/login}" method="post">

            <div>

               用户名: <input type="text" name="username"/>

            </div>

            <div>

                密码: <input type="text" name="password"/>

            </div>

            <div>

               <input type="submit" value="登陆"/>

            </div>

        </form>

</div>

</body>

</html>
这个时候 你就可以登陆了,,成功的话执行 /success接口 失败调用 /fail接口
这个时候 我们也可以通过配置Service来验证登陆 修改 SecurityConfig 中的 public void configure(AuthenticationManagerBuilder auth) throws Exception 方法
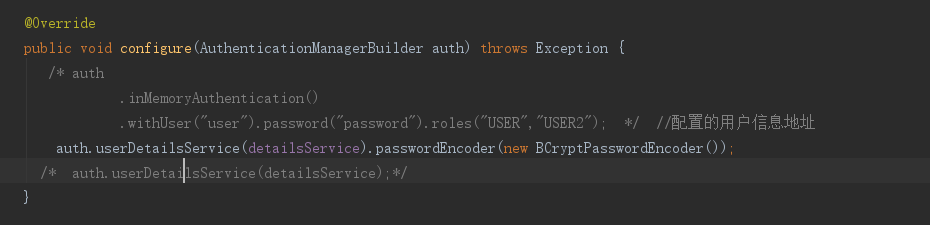
添加一个Service方法:
package com.coocaa.weather.admin.configs;

import com.coocaa.fire.utils.StringUtils;

import com.coocaa.weather.admin.entity.UserEntity;

import org.springframework.beans.factory.annotation.Autowired;

import org.springframework.security.core.GrantedAuthority;

import org.springframework.security.core.authority.SimpleGrantedAuthority;

import org.springframework.security.core.userdetails.User;

import org.springframework.security.core.userdetails.UserDetails;

import org.springframework.security.core.userdetails.UserDetailsService;

import org.springframework.security.core.userdetails.UsernameNotFoundException;

import org.springframework.security.crypto.bcrypt.BCryptPasswordEncoder;

import org.springframework.stereotype.Component;

import java.util.ArrayList;

import java.util.HashSet;

import java.util.List;

import java.util.Set;

/**

 * Create by yugaofeng on 2017/11/30

 */

@Component

public class MyUserDetailsService implements UserDetailsService {

    @Override

    public UserDetails loadUserByUsername(String userName) throws UsernameNotFoundException {

        List<SimpleGrantedAuthority> authorities = new ArrayList<>();

        authorities.add(new SimpleGrantedAuthority("USER"));

        //查询账号是否存在,是就返回一个UserDetails的对象,否就抛出异常!

        return new org.springframework.security.core.userdetails.User(

                "yugaofeng", new BCryptPasswordEncoder().encode("654321"),true, true, true, true, authorities);

    }

}
需要注意的是 这里的密码 需要用 new BCryptPasswordEncoder().encode("654321") 进行加密。因为你在 auth.userDetailsService(detailsService).passwordEncoder(new BCryptPasswordEncoder());添加了加密。。。所以在正式开发过程中 你需要用 new BCryptPasswordEncoder().encode(password)来加密用户注册时候的密码:
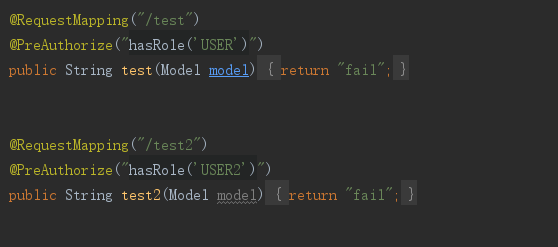
在后面的controller中 通过添加角色信息 来完成 页面的权限 例如 test地址 只有USER的权限 test2 只用USER2的权限
。。。。。持续更新中
SpringBoot+thymeleaf+security+vue搭建后台框架 基础篇(一)的更多相关文章
- easyui框架--基础篇(一)-->数据表格datagrid(php与mysql交互)
前 言 php easyui框架--本篇学习主要是 easyui中的datagrid(数据表格)框架. 本篇学习主要通过讲解一段代码加GIF图片学习datagrid(数据表格)中的一些常用属 ...
- 一步一步教你编写与搭建自动化测试框架——python篇
[本文出自天外归云的博客园] 这两天用python写了一个自动化测试框架,取名为Auty.准备用来做Web方面的接口测试,以下为Auty框架一步一步的搭建过程——
- 架构实战项目心得(七):使用SpringBoot+Dubbo+Mybatisplus+Oracle搭建后台项目框架(二)
接下来我们将整合mybatisplus+Oracle,实现一个简单的查询.(期间踩了很多坑,遇到一些问题,还好慢慢解决了.现在是通过配置文件的方式来进行dubbo服务的注册和发布,希望以后能在学习和实 ...
- [后台管理]一套用vue搭建的框架
1.提前的准备工作 前端开发工具有许多,当下流行的sublime等等都是前端比较受欢迎的,nodeJS和Vue等都是前端框架搭建流行的一套 安装nodeJS 设置环境变量 安装Visual Studi ...
- Vue搭建后台系统需要做的几点(持续更新中)
前言 持续更新 一.UI框架 推荐 Elemnet ui 二.图表 vue-schart npm install vue-schart -S <template> <div id=& ...
- vue搭建后台管理页面(点击左侧导航,切换右侧内容)
home.vue页面 <template> <div style="background-color: #EBEBEB;min-height:900px"> ...
- 初学后台框架总结篇二——快速了解CI框架
一.下载CI框架并安装,这里放置一张自己的项目目录结构图 目录框架搭建好之后开始将自己的项目与框架融合 二.更改相关配置 1.用任何文本编辑器打开 application/config/config. ...
- vue学习笔记之基础篇
本文主要记录学习vue的一些基础内容及常用知识点的记录. 1.搭建脚手架 vue init webpack vue-demo 初始化一个使用webpack打包的vue项目 npm install 安装 ...
- Bootstrap框架(基础篇)之按钮,网格,导航栏,下拉菜单
一,按钮 注意:虽然在Bootstrap框架中使用任何标签元素都可以实现按钮风格,但个人并不建议这样使用,为了避免浏览器兼容性问题,个人强烈建议使用button或a标签来制作按钮. 框架中提供了基础按 ...
随机推荐
- glibc溢出提权CVE-2018-1000001总结
遇到了好几个centos6.5,一直尝试想提权.暂未成功,靶机内核:2.6.32-696.18.7.el6.x86_64. glibc版本:ldd (GNU libc) 2.12 目前编译过程中都发现 ...
- springboot2.0拦截器和webconfigure配置
接下来介绍一下springboot如何配置拦截器,很简单,只需要两个配置文件就可以了 首先配置登陆拦截器 @Component public class LoginInterceptor implem ...
- 数据结构学习java(一点五)链式顺序表(链表)
java中没有将指针暴露给用户(以前做过看过一篇文章写有java中是有指针的,只是被藏起来了),所以得使用引用的方式. 何为引用请看下面这篇文章(写的很不错,当然肯定比我写的好): https://w ...
- JMeter 接口测试-if控制器
JMeter 接口测试-if控制器 使用场景: 当业务场景是用户登录才能支付操作, 不登录点击支付, 页面会跳转到登录页面. 对于接口也是这样, 一个接口需要执行前, 需要有前提条件, 比如0状态 ...
- 将CSV文件写入MySQL
先打开CSV文件查看第一行有哪些字段,然后新建数据库,新建表.(若字段内容很多建议类型text,如果设成char后续会报错) 命令如下: load data infile '路径XXXX.csv' i ...
- powershell-将powershell脚本排到JOB
Program/script下填写“Powershell”,表示这个脚本会在powershell环境下运行 Add arguments(optional)填写脚本绝对路径名称 Start in(Opt ...
- ASP.NET学习笔记 —— 一般处理程序之图片上传
简单图片上传功能目标:实现从本地磁盘读取图片文件,展示到浏览器页面.步骤:(1). 首先创建一个用于上传图片的HTML模板,命名为ImageUpload.html: <!DOCTYPE html ...
- python3 tkinter报错:_tkinter.TclError: cannot use geometry manager pack inside . which already has slaves managed by grid
报错: _tkinter.TclError: cannot use geometry manager pack inside . which already has slaves managed by ...
- Win7下emacs简单配置
;;win7下.emacs在C:\Users\用户名\AppData\Roaming目录下 在.emacs文件中添加 ;; cancel welcome page取消欢迎界面(setq inhibit ...
- SpringBoot使用qq邮箱发送邮件
最近公司要做一个邮箱注册和重置密码的功能,因为之前就做过,但是不是Springboot项目,所以相对来说还是比较容易的,在这里记录一下. 一.引用Maven依赖 这里使用spring自带的邮件jar包 ...