
Vue-router(基础)_滚动行为和history模式
一、前言
1、滚动事件
2、h5 history模式
二、主要内容
1、 (1)使用前度路由,当切换到新路由时,想要页面滚动到顶部,或者是保持原先滚动的位置,就像重新加载页面那样。vue-router的滚动行为,它让你可以自定义路由切换的时候页面如何滚动
但是:这个功能history.pushState 的浏览器中可以使用
(2)这个滚动行为只能在h5的history模式下使用,在使用滚动行为的时候必须要先将浏览器的hash模式,改成history模式
2、创建一个小例子模拟演示
(1)目录结构如下
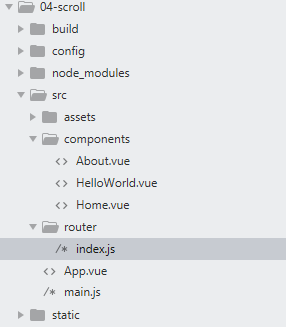
(2).vue文件如下.js文件如下
<template>

    <div>关于我页面</div>

</template>

<script type="text/javascript">

    export default{

        name:'About',

        data(){

            return {

            }

        }

    }

</script>

<style type="text/css" scoped></style>
About.vue
<template>

    <div>

        首页页面

    </div>

</template>

<script type="text/javascript">

    export default{

        name:'Home',

        data(){

            return {

            }

        }

    }

</script>

<style type="text/css" scoped=""></style>
Home.vue
import Vue from 'vue'

import Router from 'vue-router'

import HelloWorld from '@/components/HelloWorld'

import Home from '@/components/Home'

import About from '@/components/About'

Vue.use(Router)

export default new Router({

  routes: [

    {

      path: '/',

      name: 'Home',

      component: Home

    },

    {

        path:'/about',

        name:'Abut',

        component: About

    }

  ]

})
index.js
(3)hash模式是一上来就加载所有的请求,当你在切换路由的时候,不会再对后端发起情求,不会重载页面

(2)在index.js中设置为history模式,发现当切换路由的时候,默认还是保持在上一个路由的位置(这个功能浏览器已经帮我们做好了)
(3)现在要实现,切换路由的时候,页面停留在指定的位置
(4)在切换路由的时候没有调用这个savedPosition,会跳到上一次加载那个页面的时候滚动到的那个位置
import Vue from 'vue'

import Router from 'vue-router'

import HelloWorld from '@/components/HelloWorld'

import Home from '@/components/Home'

import About from '@/components/About'

Vue.use(Router)

export default new Router({

    mode:'history',

    scrollBehavior (to, from, savedPosition) {

              //只有调用了history.pushState()的时候才会触发这个方法,也就是当我们点击浏览器中的“<-” "->"的时候

             //用这个方法实现期望滚动到哪一位置,

             // return { x: 0, y: 400 }

             //判断如果滚动条的位置存在直接返回当前位置,否则返回到起点

             //savedPosition只有当用户点击前进后退,或者go(-1)的时候才会调用

             console.log(savedPosition)

             if(savedPosition){

                 return savedPosition;

             }else{

                 return {x:0,y:200}

             }

    },

  routes: [

    {

      path: '/',

      name: 'Home',

      component: Home

    },

    {

        path:'/about',

        name:'Abut',

        component: About

    }

  ]

})
3、history配合后端的例子
01-使用本地服务器演示(使用npm run build打包编译之后--->cd dist文件下-->执行hs -o -p 8888),可以发现可以看到我们的页面,但是将这个地址复制到一个新的标签中打开出现404
上面验证了使用history模式必须配合后端
02-使用node, 在打包编译后的dist文件夹下新建一个server.js如下
const express = require('express')

const http = require('http')

const fs = require('fs')

const httpPort = 8088

//app.use(express.static(path.join(__dirname, 'dist')))

http.createServer((req, res) => {

    if(req.url.startsWith('/static/js') || req.url.startsWith('/static/css')){

      fs.readFile('.'+req.url, (err,data)=>{

          res.end(data)

      })

      return;

    }

  fs.readFile('index.html', 'utf-8', (err, content) => {

    if (err) {

      console.log('We cannot open "index.htm" file.')

    }

    res.writeHead(200, {

      'Content-Type': 'text/html; charset=utf-8'

    })

    res.end(content)

  })

}).listen(httpPort, () => {

  console.log('Server listening on: http://localhost:%s', httpPort)

})
启动服务器,将该访问地址拿到一个新的网页中一样可以渲染出来
4、原理:下面模拟了点击a标签变更地址栏的操作,但是必须在服务器环境下才能运行h5的history模式
服务器代码:
const http = require('http')

const fs = require('fs')

const httpPort = 8088

http.createServer((req, res) => {

 //读取你要渲染的页面

  fs.readFile('./03-history.html', 'utf-8', (err, content) => {

    if (err) {

      console.log('We cannot open "index.htm" file.')

    }

    res.writeHead(200, {

      'Content-Type': 'text/html; charset=utf-8'

    })

    res.end(content)

  })

}).listen(httpPort, () => {

  console.log('Server listening on: http://localhost:%s', httpPort)

})
history-server
<!DOCTYPE html>

<html lang="en">

<head>

    <meta charset="UTF-8">

    <title></title>

</head>

<body>

    <a class="router-link" href="/">Home</a>

    <a class="router-link" href="/about">About</a>

    <div id="router-view">

    </div>

    <script type="text/javascript">

        //获取到上面两个a标签对象

        var aobj = document.querySelectorAll('a');

        var routerView = document.getElementById('router-view');

        function Content(href){

            switch (href){

                case '/':

                routerView.innerHTML = '<div>首页</div>';

                break;

                case '/about':

                routerView.innerHTML='<div>关于我们</div>'

                break;

            }

        }

        console.log(location.pathname) //使用window.location.pathname 拿到/url

        Content(location.pathname);//让一开始就出现内容

        for(var i=0; i<=aobj.length-1;i++){

            aobj[i].addEventListener('click',function(e){

                e.preventDefault();

                var href = e.target.getAttribute('href');

                //变更地址栏

                history.pushState({},'',href);

                Content(href);

            })

        }

    </script>

</body>

</html>
5、了解history.pushState()参考MDN:https://developer.mozilla.org/zh-CN/docs/Web/API/History_API
三、总结
Vue-router(基础)_滚动行为和history模式的更多相关文章
- [Vue 牛刀小试]:第十三章 - Vue Router 基础使用再探(命名路由、命名视图、路由传参)
一.前言 在上一章的学习中,我们简单介绍了前端路由的概念,以及如何在 Vue 中通过使用 Vue Router 来实现我们的前端路由.但是在实际使用中,我们经常会遇到路由传参.或者一个页面是由多个组件 ...
- Vue Router基础
路由 安装 vue-router 起步 <router-link to="/foo">Go to Foo</router-link> <router- ...
- vue Router——基础篇
vue--Router简介 vue-router是Vue.js官方的路由插件,它和vue.js是深度集成的,适合用于构建单页面应用. vue的单页面应用是基于路由和组件的,路由用于设定访问路径,并将路 ...
- Vue 路由的编程式导航与history模式
编程式导航 注意:官方文档写错了 通过javascript跳转 //第一种跳转方式 // this.$router.push({ path: 'news' }) // this.$router.pus ...
- Vue技术点整理-Vue Router
路由 Vue Router 对于单页面应用来说,如果涉及到多个页面的话,就必须要使用到路由,一般使用官方支持的 vue-router 库 一,Vue Router 在项目中的安装引用 1,在页面中使用 ...
- vue Router——进阶篇
vue Router--基础篇 1.导航守卫 正如其名,vue-router 提供的导航守卫主要用来通过跳转或取消的方式守卫导航.有多种机会植入路由导航过程中:全局的, 单个路由独享的, 或者组件级的 ...
- react router @4 和 vue路由 详解(一)vue路由基础和使用
完整版:https://www.cnblogs.com/yangyangxxb/p/10066650.html 1.vue路由基础和使用 a.大概目录 我这里建了一个router文件夹,文件夹下有in ...
- 「vue基础」一篇浅显易懂的 Vue 路由使用指南( Vue Router 上)
大家好,今天的内容,我将和大家一起聊聊 Vue 路由相关的知识,如果你以前做过服务端相关的开发,那你一定会对程序的URL结构有所了解,我没记错的话也是路由映射的概念,需要进行配置. 其实前端这些框架的 ...
- Vue Router的原理及history模式源码实现
Hash 模式 URL中 # 后面的内容作为路径地址,可以通过location.url直接切换路由地址,如果只改变了#后面的内容,浏览器不会向服务器请求这个地址,会把这个地址 记录到浏览器的访问历史中 ...
随机推荐
- SqlServer 操作 JSON
SqlServer 操作 JSON Intro Sql Server 从 2016 开始支持了一些 json 操作,最近的项目里也是好多地方直接用字段直接存成了 json ,需要了解一下怎么在 Sql ...
- Mysql--alter命令小特点
以下命令均在mysql命令行下执行.1. 修改表名称有2种方法,mysql命令行,没有区分大小写,方法1:mysql>ALTER TABLE 表名l RENAME TO 表名2; 方法2:mys ...
- 阿狸V任务页面爬取数据解析
需求: 爬取:https://v.taobao.com/v/content/video 所有主播详情页信息 首页分析 分析可以得知数据是通过ajax请求获取的. 分析请求头 详情页分析 详情页和详情页 ...
- WEB 性能测试用例设计以及总结
WEB 性能测试用例设计以及总结 WEB 性能测试用例设计模型是设计性能测试用例的一个框架,在实际项目中,需要对其进行适当的剪裁,从而确定性能测试用例的范围和类别.剪裁的依据是性能测试策略和测试范围, ...
- MUI版本升级更新程序IOS和andriod
var wgtVer=null; function plusReady(){ // 获取本地应用资源版本号 plus.runtime.getProperty(plus.runtime.appid,fu ...
- KVM宿主机上虚拟机动态添加新磁盘
(1)KVM宿主机查看运行的虚拟机 $ virsh list --all (2)将qcow2的磁盘移动到/var/lib/libvirt/images/,比如为centos.qcow2 (3)进入/e ...
- Servlet 易错点和注意点
目录 @WebServlet("/")与@WebServlet("/*")的区别 @WebServlet("/")与@WebServlet( ...
- tomcat 进程莫名停止
背景: 有一次晚上下班,发完版,刚把电脑合上走到楼下,就接到报警,说是线上有一个tomcat进程不存在了,想着以为是误报,但是还是回去看看了,发现线上确实是刚才发版的项目,进程不存在了,想了想,刚才测 ...
- redis 开启远程访问权限
1 开启redis端口访问权限 redis默认的端口是6379,要远程访问redis服务,确保服务器上的6379端口打开. 1.1 查看打开的端口 /etc/init.d/iptables statu ...
- Python进阶8---面向对象基础1
面向对象 语言的分类 Python的类 定义 class ClassName: pass class MyCalss: """A example class"& ...