用感知机(Perceptron)实现逻辑AND功能的Python3代码
之所以写这篇随笔,是因为参考文章(见文尾)中的的代码是Python2的,放到Python3上无法运行,我花了些时间debug,并记录了调试经过。
参考文章中的代码主要有两处不兼容Python3,一个是lambda函数的使用,另一个是map()的使用。
先放我修改调试后的代码和运行结果,再记录调试经过。
源代码:
 #coding=utf-8

 from functools import reduce  # for py3

 class Perceptron(object):

     def __init__(self, input_num, activator):

         '''

         初始化感知器,设置输入参数的个数,以及激活函数。

         激活函数的类型为double -> double

         '''

         self.activator = activator

         # 权重向量初始化为0

         self.weights = [0.0 for _ in range(input_num)]

         # 偏置项初始化为0

         self.bias = 0.0

     def __str__(self):

         '''

         打印学习到的权重、偏置项

         '''

         return 'weights\t:%s\nbias\t:%f\n' % (self.weights, self.bias)

     def predict(self, input_vec):

         '''

         输入向量,输出感知器的计算结果

         '''

         # 把input_vec[x1,x2,x3...]和weights[w1,w2,w3,...]打包在一起

         # 变成[(x1,w1),(x2,w2),(x3,w3),...]

         # 然后利用map函数计算[x1*w1, x2*w2, x3*w3]

         # 最后利用reduce求和

         #list1 = list(self.weights)

         #print ("predict self.weights:", list1)

         return self.activator(

             reduce(lambda a, b: a + b,

                    list(map(lambda tp: tp[0] * tp[1],   # HateMath修改

                        zip(input_vec, self.weights)))

                 , 0.0) + self.bias)

     def train(self, input_vecs, labels, iteration, rate):

         '''

         输入训练数据:一组向量、与每个向量对应的label;以及训练轮数、学习率

         '''

         for i in range(iteration):

             self._one_iteration(input_vecs, labels, rate)

     def _one_iteration(self, input_vecs, labels, rate):

         '''

         一次迭代,把所有的训练数据过一遍

         '''

         # 把输入和输出打包在一起,成为样本的列表[(input_vec, label), ...]

         # 而每个训练样本是(input_vec, label)

         samples = zip(input_vecs, labels)

         # 对每个样本,按照感知器规则更新权重

         for (input_vec, label) in samples:

             # 计算感知器在当前权重下的输出

             output = self.predict(input_vec)

             # 更新权重

             self._update_weights(input_vec, output, label, rate)

     def _update_weights(self, input_vec, output, label, rate):

         '''

         按照感知器规则更新权重

         '''

         # 把input_vec[x1,x2,x3,...]和weights[w1,w2,w3,...]打包在一起

         # 变成[(x1,w1),(x2,w2),(x3,w3),...]

         # 然后利用感知器规则更新权重

         delta = label - output

         self.weights = list(map( lambda tp: tp[1] + rate * delta * tp[0], zip(input_vec, self.weights)) ) # HateMath修改

         # 更新bias

         self.bias += rate * delta

         print("_update_weights() -------------")

         print("label - output = delta:" ,label, output, delta)

         print("weights ", self.weights)

         print("bias", self.bias)

 def f(x):

     '''

     定义激活函数f

     '''

     return 1 if x > 0 else 0

 def get_training_dataset():

     '''

     基于and真值表构建训练数据

     '''

     # 构建训练数据

     # 输入向量列表

     input_vecs = [[1,1], [0,0], [1,0], [0,1]]

     # 期望的输出列表,注意要与输入一一对应

     # [1,1] -> 1, [0,0] -> 0, [1,0] -> 0, [0,1] -> 0

     labels = [1, 0, 0, 0]

     return input_vecs, labels

 def train_and_perceptron():

     '''

     使用and真值表训练感知器

     '''

     # 创建感知器,输入参数个数为2(因为and是二元函数),激活函数为f

     p = Perceptron(2, f)

     # 训练,迭代10轮, 学习速率为0.1

     input_vecs, labels = get_training_dataset()

     p.train(input_vecs, labels, 10, 0.1)

     #返回训练好的感知器

     return p

 if __name__ == '__main__':

     # 训练and感知器

     and_perception = train_and_perceptron()

     # 打印训练获得的权重

     # 测试

     print (and_perception)

     print ('1 and 1 = %d' % and_perception.predict([1, 1]))

     print ('0 and 0 = %d' % and_perception.predict([0, 0]))

     print ('1 and 0 = %d' % and_perception.predict([1, 0]))

     print ('0 and 1 = %d' % and_perception.predict([0, 1]))
运行输出:
======================== RESTART: F:\桌面\Perceptron.py ========================

_update_weights() -------------

label - output = delta: 1 0 1

weights  [0.1, 0.1]

bias 0.1

_update_weights() -------------

label - output = delta: 0 1 -1

weights  [0.1, 0.1]

bias 0.0

_update_weights() -------------

label - output = delta: 0 1 -1

weights  [0.0, 0.1]

bias -0.1

_update_weights() -------------

label - output = delta: 0 0 0

weights  [0.0, 0.1]

bias -0.1

_update_weights() -------------

label - output = delta: 1 0 1

weights  [0.1, 0.2]

bias 0.0

_update_weights() -------------

label - output = delta: 0 0 0

weights  [0.1, 0.2]

bias 0.0

_update_weights() -------------

label - output = delta: 0 1 -1

weights  [0.0, 0.2]

bias -0.1

_update_weights() -------------

label - output = delta: 0 1 -1

weights  [0.0, 0.1]

bias -0.2

_update_weights() -------------

label - output = delta: 1 0 1

weights  [0.1, 0.2]

bias -0.1

_update_weights() -------------

label - output = delta: 0 0 0

weights  [0.1, 0.2]

bias -0.1

_update_weights() -------------

label - output = delta: 0 0 0

weights  [0.1, 0.2]

bias -0.1

_update_weights() -------------

label - output = delta: 0 1 -1

weights  [0.1, 0.1]

bias -0.2

_update_weights() -------------

label - output = delta: 1 0 1

weights  [0.2, 0.2]

bias -0.1

_update_weights() -------------

label - output = delta: 0 0 0

weights  [0.2, 0.2]

bias -0.1

_update_weights() -------------

label - output = delta: 0 1 -1

weights  [0.1, 0.2]

bias -0.2

_update_weights() -------------

label - output = delta: 0 0 0

weights  [0.1, 0.2]

bias -0.2

_update_weights() -------------

label - output = delta: 1 1 0

weights  [0.1, 0.2]

bias -0.2

_update_weights() -------------

label - output = delta: 0 0 0

weights  [0.1, 0.2]

bias -0.2

_update_weights() -------------

label - output = delta: 0 0 0

weights  [0.1, 0.2]

bias -0.2

_update_weights() -------------

label - output = delta: 0 0 0

weights  [0.1, 0.2]

bias -0.2

_update_weights() -------------

label - output = delta: 1 1 0

weights  [0.1, 0.2]

bias -0.2

_update_weights() -------------

label - output = delta: 0 0 0

weights  [0.1, 0.2]

bias -0.2

_update_weights() -------------

label - output = delta: 0 0 0

weights  [0.1, 0.2]

bias -0.2

_update_weights() -------------

label - output = delta: 0 0 0

weights  [0.1, 0.2]

bias -0.2

weights    :[0.1, 0.2]

bias    :-0.200000

1 and 1 = 1

0 and 0 = 0

1 and 0 = 0

0 and 1 = 0
可以看到,最后训练出来的权重是 [0.1, 0.2],偏置 -0.2,根据感知机模型得到公式:f(x, y) = 0.1x + 0.2y -0.2
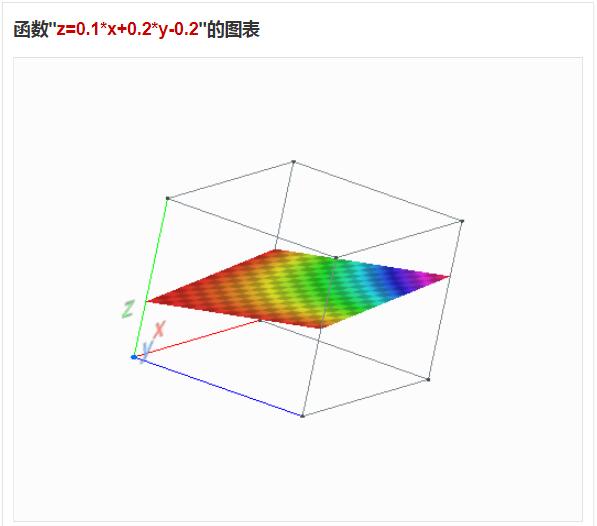
可以看到是个三维平面,这个平面实现了对样本中4个三维空间点分类。
调试经过:
1. lambda表达式的使用
第38和第70行中,原适用于Python2.7的代码无法正常运行,提示 invalid syntax。貌似是Python3中,在lambda表达式中使用元组的方式和Python2.7不一样。
我改了一下代码,语法问题没有了,可是预测结果不正常。于是就打印map()函数的返回值,试图调试。
2. 打印map()函数返回的对象
参见 https://www.cnblogs.com/lyy-totoro/p/7018597.html 的代码,先转为list再打印。
list1 = list(data)
print(list1)
打印输出表明,训练的值明显不对,到底是哪里的问题?
3. 真相【小】白
https://segmentfault.com/a/1190000000322433
关键句:在Python3中,如果不在map函数前加上list,lambda函数根本就不会执行。
于是加上list,就变成了最终的代码,工作正常。
只是“lambda函数根本就不会执行”这句,我没考证过,所以说真相小白。
原文链接:
零基础入门深度学习(1) - 感知器
https://www.zybuluo.com/hanbingtao/note/433855
用感知机(Perceptron)实现逻辑AND功能的Python3代码的更多相关文章
- 2. 感知机(Perceptron)基本形式和对偶形式实现
1. 感知机原理(Perceptron) 2. 感知机(Perceptron)基本形式和对偶形式实现 3. 支持向量机(SVM)拉格朗日对偶性(KKT) 4. 支持向量机(SVM)原理 5. 支持向量 ...
- 利用sublime的snippet功能快速创建代码段
在前端开发中我们经常会输入相同的一些基本代码,例如常用的jquery引用,bootstrap框架,cssreset等等,如果每次使用时在复制粘贴感觉很麻烦,这里介绍一种更为简洁的方法 利用sublim ...
- discuz论坛apache日志hadoop大数据分析项目:清洗数据核心功能解说及代码实现
discuz论坛apache日志hadoop大数据分析项目:清洗数据核心功能解说及代码实现http://www.aboutyun.com/thread-8637-1-1.html(出处: about云 ...
- 全国天气预报信息数据 API 功能简介与代码调用实战视频
此文章对开放数据接口 API 之「全国天气预报信息数据 API」进行了功能介绍.使用场景介绍以及调用方法的说明,供用户在使用数据接口时参考之用,并对实战开发进行了视频演示. 1. 产品功能 接口开放了 ...
- 感知机(perceptron)概念与实现
感知机(perceptron) 模型: 简答的说由输入空间(特征空间)到输出空间的如下函数: \[f(x)=sign(w\cdot x+b)\] 称为感知机,其中,\(w\)和\(b\)表示的是感知机 ...
- 20151227感知机(perceptron)
1 感知机 1.1 感知机定义 感知机是一个二分类的线性分类模型,其生成一个分离超平面将实例的特征向量,输出为+1,-1.导入基于误分类的损失函数,利用梯度下降法对损失函数极小化,从而求得此超平面,该 ...
- 感知机(perceptron)
- 神经网络 感知机 Perceptron python实现
import numpy as np import matplotlib.pyplot as plt import math def create_data(w1=3,w2=-7,b=4,seed=1 ...
- jquery.cookie.js 操作cookie实现记住密码功能的实现代码
jquery.cookie.js操作cookie实现记住密码功能,很简单很强大,喜欢的朋友可以参考下. 复制代码代码如下: //初始化页面时验证是否记住了密码 $(document).ready( ...
随机推荐
- linkin大话设计模式--模板方法模式
linkin大话设计模式--模板方法模式 准备一个抽象类,将部分逻辑以具体方法的形式实现,然后申明一些抽象方法来迫使子类实现剩余的逻辑.不同的子类可以以不同的方式实现这些抽象方法,从而对剩余的逻辑有不 ...
- JAVA中实现让程序等待一段时间的方法
JAVA中想让代码等待一段时间再继续执行,可以通过让当前线程睡眠一段时间的方式. 方法一:通过线程的sleep方法. Thread.currentThread().sleep(1000); 在需要程序 ...
- test for python socket
server: #!/usr/bin/python import socket import threading import time def tcplink(sock, addr): print ...
- ulua c#调用lua中模拟的类成员函数
项目使用ulua,我神烦这个东西.lua单纯在lua环境使用还好,一旦要跟外界交互,各种月经不调就来了.要记住贼多的细节,你才能稍微处理好.一个破栈,pop来push去,位置一会在-1,一会在-3,2 ...
- openstack开发基础
- 浅谈python模块的导入操作
1.什么是模块 在Python中有一个概念叫做模块(module). 所谓模块,就是将代码量较大的程序分割成多个有组织的,彼此独立但双能互相交互的代码片段, 这些自我包含的有组织的代码段就是模块. 2 ...
- Dell服务器R320在Centos6.5系统上安装MegaCli管理主板集成磁盘阵列卡
折腾了两天啊,我的神啊,,终于可以安装了 针对Dell服务器的R320版本主板集成的磁盘阵列卡,需要下载MegaCli 8或更新版本 下载链接: http://pan.baidu.com/s/1mgB ...
- 基于Vue2写的一个有关美食项目
刚学Vue练习的一个项目 使用Vue2+vue-router+vuex+axios+webpack router使用了默认的hash模式 引入了高德地图和element-ui 项目地址点击这里 演示地 ...
- web项目,ftl文件中的路径引入问题
路径问题的引入方式:绝对路径.相对路径 区别如图: =================================================
- instanceof、isInstance、isAssignableFrom的区别
https://stackoverflow.com/questions/3949260/java-class-isinstance-vs-class-isassignablefrom 1. MyCla ...