
Spring的Aop 注解配置
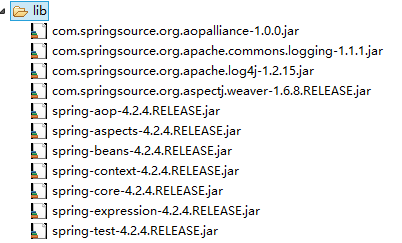
1,导包
2,准备目标对象
package com.songyan.anno;

public interface UserService {

     void save();

     void delete();

     void find( );

     void update();

}
package com.songyan.anno;

public class UserServiceImpl implements UserService {

    public void save()

    {

        System.out.println("添加用户");

    }

    public void delete()

    {

        System.out.println("删除用户");

    }

    public void find( )

    {

        System.out.println("查询用户");

    }

    public void update()

    {

        System.out.println("更新用户信息");

    }

}
<!--配置目标对象  -->

<bean id="userservice" class="com.songyan.anno.UserServiceImpl"></bean>
3,准备通知
<!--配置通知  -->

<bean id="myadvice" class="com.songyan.anno.Myadvice"></bean>
package com.songyan.anno;

import org.aspectj.lang.ProceedingJoinPoint;

import org.aspectj.lang.annotation.*;

/**

 * 通知类

 * @author sy

 */

public class Myadvice {

public void before()

    {

        System.out.println("前置通知");

    }

    public void after_returning()

    {

        System.out.println("后置通知");

    }

    public Object around(ProceedingJoinPoint pjp) throws Throwable {

        System.out.println("这是环绕通知之前的部分!!");

        Object proceed = pjp.proceed();//调用目标方法

        System.out.println("这是环绕通知之后的部分!!");

        return proceed;

    }

    public void  after_throuble()

    {

        System.out.println("异常后通知");

    }

    public void after()

    {

        System.out.println("后置通知(finally)");

    }

}
4,开启使用注解完成注入
s<!--开启使用注解完成织入  -->

<aop:aspectj-autoproxy></aop:aspectj-autoproxy>
完整xml
<?xml version="1.0" encoding="UTF-8"?>

<beans xmlns:xsi="http://www.w3.org/2001/XMLSchema-instance"

    xmlns="http://www.springframework.org/schema/beans" xmlns:context="http://www.springframework.org/schema/context"

    xmlns:aop="http://www.springframework.org/schema/aop"

    xsi:schemaLocation="http://www.springframework.org/schema/beans http://www.springframework.org/schema/beans/spring-beans-4.2.xsd http://www.springframework.org/schema/context http://www.springframework.org/schema/context/spring-context-4.2.xsd http://www.springframework.org/schema/aop http://www.springframework.org/schema/aop/spring-aop-4.2.xsd ">

    <!--配置目标对象 -->

    <bean id="userservice" class="com.songyan.anno.UserServiceImpl"></bean>

    <!--配置通知 -->

    <bean id="myadvice" class="com.songyan.anno.Myadvice"></bean>

    <!--开启使用注完成织入 -->

    <aop:aspectj-autoproxy></aop:aspectj-autoproxy>

</beans>
5,设置注解
package com.songyan.anno;

import org.aspectj.lang.ProceedingJoinPoint;

import org.aspectj.lang.annotation.*;

/**

 * 通知类

 * @author sy

 */

@Aspect//该注解表示这是一个通知类

public class Myadvice {

    //该注解表示该方法为前置注解,参数是对应的方法

    @Before("execution(* com.songyan.anno.*ServiceImpl.*(..))")

    public void before()

    {

        System.out.println("前置通知");

    }

    @AfterReturning("execution(* com.songyan.anno.*ServiceImpl.*(..))")

    public void after_returning()

    {

        System.out.println("后置通知");

    }

    @Around("execution(* com.songyan.anno.*ServiceImpl.*(..))")

    public Object around(ProceedingJoinPoint pjp) throws Throwable {

        System.out.println("这是环绕通知之前的部分!!");

        Object proceed = pjp.proceed();//调用目标方法

        System.out.println("这是环绕通知之后的部分!!");

        return proceed;

    }

    @AfterThrowing("execution(* com.songyan.anno.*ServiceImpl.*(..))")

    public void  after_throuble()

    {

        System.out.println("异常后通知");

    }

    @After("execution(* com.songyan.anno.*ServiceImpl.*(..))")

    public void after()

    {

        System.out.println("后置通知(finally)");

    }

}
6,测试类
package com.songyan.anno;

import org.springframework.context.ApplicationContext;

import org.springframework.context.support.ClassPathXmlApplicationContext;

public class Client {

    public static void main(String[] args) {

        ApplicationContext applicationContext=new ClassPathXmlApplicationContext("com/songyan/anno/beans.xml");

        UserService u=(UserService)applicationContext.getBean("userservice");

        u.save();

    }

}

以上代码还存在不足:
execution(* com.songyan.anno.*ServiceImpl.*(..))此内容重复出现多次
因此:
@Aspect//该注解表示这是一个通知类

public class Myadvice {

    @Pointcut("execution(* com.songyan.anno.*ServiceImpl.*(..))")

    public  void pc(){};

    //该注解表示该方法为前置注解,参数是对应的方法

    @Before("Myadvice.pc()")

    public void before()

    {

        System.out.println("前置通知");

    }
以这种方式声明一次,多次调用。
Spring的Aop 注解配置的更多相关文章
- Spring之AOP注解配置
1.导入相应jar包 2.引入约束并配置XML文件 <beans xmlns="http://www.springframework.org/schema/beans" xm ...
- spring aop注解配置
spring aop是面向切面编程,使用了动态代理的技术,这样可以使业务逻辑的代码不掺入其他乱七八糟的代码 可以在切面上实现合法性校验.权限检验.日志记录... spring aop 用的多的有两种配 ...
- Spring学习之旅(八)Spring 基于AspectJ注解配置的AOP编程工作原理初探
由小编的上篇博文可以一窥基于AspectJ注解配置的AOP编程实现. 本文一下未贴出的相关代码示例请关注小编的上篇博文<Spring学习之旅(七)基于XML配置与基于AspectJ注解配置的AO ...
- 【Spring】AOP注解方式实现机制
一.概述 二.@EnableAspectJAutoProxy 注解分析 三.分析AnnotationAwareAspectJAutoProxyCreator 四.执行流程 1. registerBea ...
- springAop:Aop(Xml)配置,Aop注解配置,spring_Aop综合案例,Aop底层原理分析
知识点梳理 课堂讲义 0)回顾Spring体系结构 Spring的两个核心:IoC和AOP 1)AOP简介 1.1)OOP开发思路 OOP规定程序开发以类为模型,一切围绕对象进行,OOP中完成某个任务 ...
- Spring MVC4 纯注解配置教程
阅读本文需要又一定的sping基础,最起码要成功的运行过一个SpringMvc项目. 在传统的Spring项目中,我们要写一堆的XML文件.而这些XML文件格式要求又很严格,很不便于开发.而网上所谓的 ...
- spring mvc 基于注解 配置默认 handlermapping
spring mvc 是类似于 Struts 的框架.他们都有一个最主要的功能就是URL路由.URL路由能将请求与响应请求处理逻辑的类(在Struts中即是action,在spring mvc 中即是 ...
- Spring IOC-基于注解配置的容器
Spring中提供了基于注解来配置bean的容器,即AnnotationConfigApplicationContext 1. 开始 先看看在Spring家族中,AnnotationConfigApp ...
- 采用spring的schedule注解配置定时任务
1 在springmvc配置文件中新增以下配置 <!-- 此处对于定时时间的配置会被注解中的时间配置覆盖,因此,以注解配置为准 --> <task:scheduled-tasks s ...
随机推荐
- [CVPR2017]Online Video Object Segmentation via Convolutional Trident Network
基于三端卷积网络的在线视频目标分割 针对半监督视频目标分割任务,作者采取了和MaskTrace类似的思路,以optical flow为主. 本文亮点在于: 1. 使用共享backbone,三输出的自编 ...
- 知问前端——工具提示UI
工具提示(tooltip),是一个非常实用的UI.它彻底扩展了HTML中的title属性,让提示更加丰富,更加可控制,全面提升了用户体验. 调用tooltip()方法 在调用tooltip()方法之前 ...
- Spring Session使用及源码解析
参照: http://blog.csdn.net/wojiaolinaaa/article/details/62424642 总结点spring session的一些知识点: spring通过过滤器, ...
- php 中foreach比for快之原因
这里首先要谈到php 的hashtabletypedef struct _hashtable { uint nTableSize; // hash Bucket的大小,最小为8,以2x增长. uint ...
- [object-c 2.0 程序设计]object-c file handle (二)
// // main.m // cmdTry // // Created by Calos Chen on 2017/8/21. // Copyright © 2017年 Calos Chen. Al ...
- 从setting文件导包
两种方式 from project.settings.py import s3_key 第二种: from django.conf import setting s3_key = settings.S ...
- 编辑器KindEditor的使用
1.具体使用方法看点这里 2.下载点这里 3.文件夹说明 ├── asp asp示例,删掉 ├── asp.net asp.net示例,删掉 ├── attached 空文件夹,放置关联文件attac ...
- Backbone Collection 源码简谈
一切由一个例子引发: var Man=Backbone.Model.extend({ initilize:function(){ this.bind('change:name',function(){ ...
- Selenium2+python自动化71-多个浏览器之间的切换【转载】
前言 有时候一些业务的功能涉及到多个系统,需要在web系统1打开造一些数据,然后用到某些参数是动态生成的,需要调用web系统2里面的参数. 举个简单例子:在做某些业务的时候,需要手机短信验证码,我不可 ...
- 第一篇:动态防火墙firewalld和静态防火墙iptables
动态防火墙firewalld firewalld提供了一个动态管理的防火墙,它支持网络(network)/防火墙区域(firewall zones )来定义网络连接( network connecti ...