Emgu-WPF学习使用-识别二维码的位置
参考链接:http://blog.csdn.net/gaobobo138968/article/details/47663607
我完全参照该链接实现了二维码的位置锁定,向原作者致敬。
由于我使用的为最新版本的Emgu,很多封装函数调用方法有所变化,新手接触Emgu,尝试做了调整,部分参数也做了微调!
我使用的Emgu版本:emgucv-windesktop 3.2.0.2682
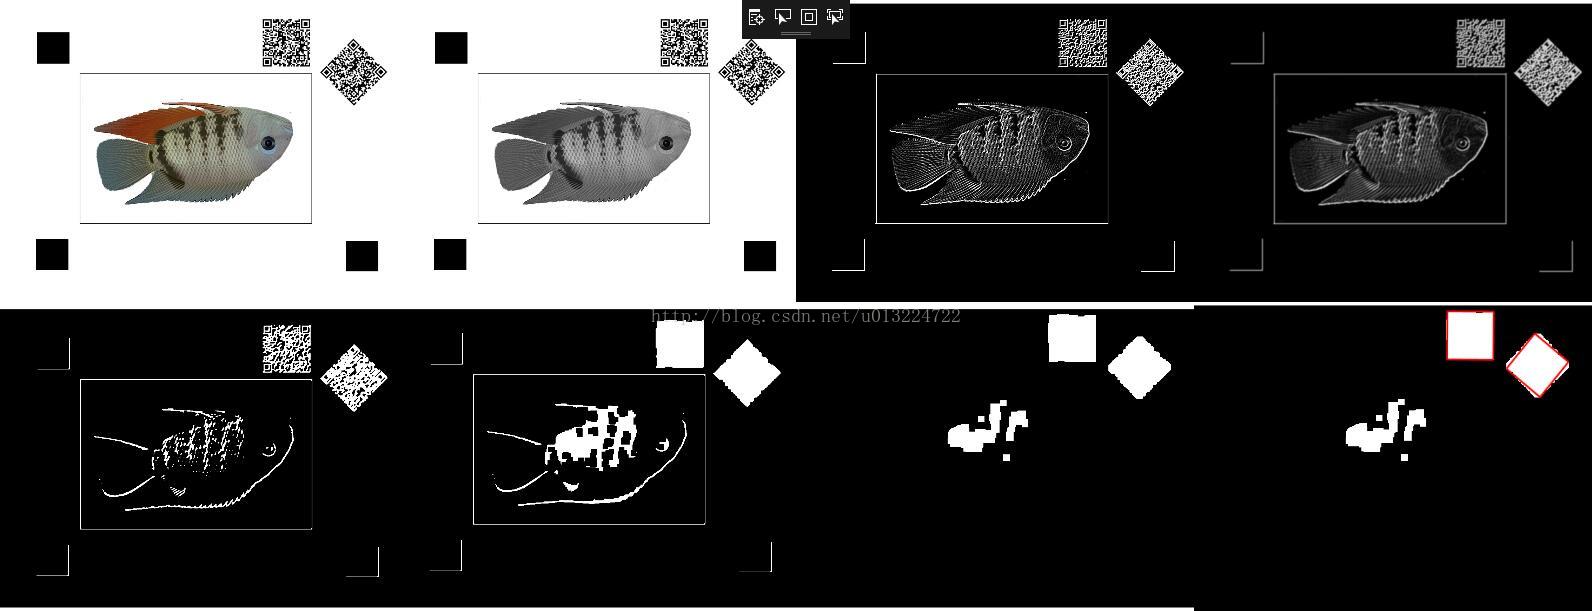
最终我实现的效果图如下:
前台xaml:
<Grid>
<Grid.ColumnDefinitions>
<ColumnDefinition/>
<ColumnDefinition/>
<ColumnDefinition/>
<ColumnDefinition/>
</Grid.ColumnDefinitions>
<Grid.RowDefinitions>
<RowDefinition/>
<RowDefinition/>
</Grid.RowDefinitions>
<Image x:Name="Img1" Grid.Column="0" />
<Image x:Name="Img2" Grid.Column="1" />
<Image x:Name="Img3" Grid.Column="2" />
<Image x:Name="Img4" Grid.Column="3" />
<Image x:Name="Img5" Grid.Column="0" Grid.Row="1"/>
<Image x:Name="Img6" Grid.Column="1" Grid.Row="1"/>
<Image x:Name="Img7" Grid.Column="2" Grid.Row="1"/>
<Viewbox Stretch="Fill" Grid.Column="3" Grid.Row="1">
<Grid Width="1134" Height="850" Background="Silver">
<Image x:Name="Img8"/>
<Canvas x:Name="CvMainZm"/>
</Grid>
</Viewbox>
</Grid>
后台源码:
private void ShowImage(System.Windows.Controls.Image oImage, UMat src)
{
this.Dispatcher.Invoke(() => {
oImage.Source = BitmapSourceConvert.ToBitmapSource(src);
});
}
private void ShowBgrImage(System.Windows.Controls.Image oImage, Image<Bgr, byte> src)
{
this.Dispatcher.Invoke(() => {
oImage.Source = BitmapSourceConvert.ToBitmapSource(src);
});
}
private void ShowGrayImage(System.Windows.Controls.Image oImage, Image<Gray, byte> src)
{
this.Dispatcher.Invoke(() => {
oImage.Source = BitmapSourceConvert.ToBitmapSource(src);
});
}
public MainWindow()
{
InitializeComponent();
this.Loaded += MainWindow_Loaded;
}
//参考链接 http://blog.csdn.net/gaobobo138968/article/details/47663607
private void MainWindow_Loaded(object sender, RoutedEventArgs e)
{
string sFile = AppDomain.CurrentDomain.BaseDirectory + "Test.jpg";
System.Drawing.Image img = System.Drawing.Image.FromFile(sFile);
Bitmap barcodeBitmap = new Bitmap(img);
Image<Bgr, byte> img_src = new Image<Bgr, byte>(barcodeBitmap);
this.ShowBgrImage(this.Img1, img_src);
//灰度化
Image<Gray, byte> imput_gray = new Image<Gray, byte>(img_src.Size);
CvInvoke.CvtColor(img_src, imput_gray, ColorConversion.Bgr2Gray);
this.ShowGrayImage(this.Img2, imput_gray);
//计算x,y方向梯度,相加
Image<Gray, byte> grad_x1 = new Image<Gray, byte>(img_src.Size);
Image<Gray, byte> grad_y1 = new Image<Gray, byte>(img_src.Size);
Image<Gray, byte> grad_all = new Image<Gray, byte>(img_src.Size);
CvInvoke.Sobel(imput_gray, grad_x1, DepthType.Default, 0, 1, 3);
CvInvoke.Sobel(imput_gray, grad_y1, DepthType.Default, 1, 0, 3);
CvInvoke.Add(grad_x1, grad_y1, grad_all, null);
this.ShowGrayImage(this.Img3, grad_all);
// 高斯模糊
grad_all = grad_all.SmoothGaussian(9);
this.ShowGrayImage(this.Img4, grad_all);
// 二值化
CvInvoke.Threshold(grad_all, grad_all, 100, 255, ThresholdType.Binary);
this.ShowGrayImage(this.Img5, grad_all);
//消除裂缝
Mat oMat1 = CvInvoke.GetStructuringElement(Emgu.CV.CvEnum.ElementShape.Rectangle,
new System.Drawing.Size(15, 15), new System.Drawing.Point(0, 0));
CvInvoke.MorphologyEx(grad_all, grad_all, Emgu.CV.CvEnum.MorphOp.Close, oMat1,
new System.Drawing.Point(0, 0), 1, BorderType.Default,
new MCvScalar(255, 0, 0, 255));
this.ShowGrayImage(this.Img6, grad_all);
//膨胀与腐蚀(消除杂点)
Mat oMat2 = CvInvoke.GetStructuringElement(Emgu.CV.CvEnum.ElementShape.Rectangle,
new System.Drawing.Size(5, 5), new System.Drawing.Point(0, 0));
CvInvoke.Erode(grad_all, grad_all, oMat2, new System.Drawing.Point(0, 0), 4,
BorderType.Default, new MCvScalar(255, 0, 0, 255));
CvInvoke.Dilate(grad_all, grad_all, oMat2, new System.Drawing.Point(0, 0), 4,
BorderType.Default, new MCvScalar(255, 0, 0, 255));
this.ShowGrayImage(this.Img7, grad_all);
//查找轮廓,绘制轮廓
#region Find triangles and rectangles
List<Triangle2DF> triangleList = new List<Triangle2DF>();
List<RotatedRect> boxList = new List<RotatedRect>(); //a box is a rotated rectangle
using (VectorOfVectorOfPoint contours = new VectorOfVectorOfPoint())
{
CvInvoke.FindContours(grad_all, contours, null, RetrType.List, ChainApproxMethod.ChainApproxSimple);
int count = contours.Size;
for (int i = 0; i < count; i++)
{
using (VectorOfPoint contour = contours[i])
using (VectorOfPoint approxContour = new VectorOfPoint())
{
CvInvoke.ApproxPolyDP(contour, approxContour, CvInvoke.ArcLength(contour, true) * 0.05, true);
if (CvInvoke.ContourArea(approxContour, false) > 500)
{
if (approxContour.Size == 3)
{
System.Drawing.Point[] pts = approxContour.ToArray();
triangleList.Add(new Triangle2DF(
pts[0],
pts[1],
pts[2]
));
}
else if (approxContour.Size == 4)
{
#region determine if all the angles in the contour are within [80, 100] degree
bool isRectangle = true;
System.Drawing.Point[] pts = approxContour.ToArray();
LineSegment2D[] edges = Emgu.CV.PointCollection.PolyLine(pts, true);
for (int j = 0; j < edges.Length; j++)
{
double angle = Math.Abs(
edges[(j + 1) % edges.Length].GetExteriorAngleDegree(edges[j]));
if (angle < 80 || angle > 100)
{
isRectangle = false;
break;
}
}
#endregion
if (isRectangle)
{
boxList.Add(CvInvoke.MinAreaRect(approxContour));
}
}
}
}
}
}
//this.Img8.Source = new BitmapImage(new Uri(sFile));
this.ShowGrayImage(this.Img8, grad_all);
foreach (RotatedRect box in boxList)
{
System.Drawing.Point[] pts = Array.ConvertAll(box.GetVertices(), System.Drawing.Point.Round);
for (int i = 0; i < pts.Length; i++)
{
System.Drawing.Point point = pts[i];
System.Drawing.Point point1 = new System.Drawing.Point();
if (i == pts.Length-1)
point1 = pts[0];
else
point1 = pts[i + 1];
Line oLine = new Line();
oLine.Stroke = new SolidColorBrush(Colors.Red);
oLine.StrokeThickness = 5;
oLine.X1 = point.X;
oLine.Y1 = point.Y;
oLine.X2 = point1.X;
oLine.Y2 = point1.Y;
this.CvMainZm.Children.Add(oLine);
}
}
#endregion
}
BitmapSourceConvert 类直接使用的SDK中的示例。
Emgu-WPF学习使用-识别二维码的位置的更多相关文章
- 【咸鱼教程】Egret可长按识别二维码(精确位置和大小)
教程目录一 实现原理二 实现过程三 Demo下载 本教程是在Egret中实现长按识别的二维码,并可以精确定位二维码的位置和大小,支持横屏和竖屏. 一 实现原理 微信中长按识别二维码,需要长按jpg或p ...
- Pyqt+QRcode 生成 识别 二维码
1.生成二维码 python生成二维码是件很简单的事,使用第三方库Python QRCode就可生成二维码,我用Pyqt给QRcode打个壳 一.python-qrcode介绍 python-qrco ...
- python实现树莓派生成并识别二维码
python实现树莓派生成并识别二维码 参考来源:http://blog.csdn.net/Burgess_Liu/article/details/40397803 设备及环境 树莓派2代 官方系统R ...
- HTML5实现扫描识别二维码/生成二维码
扫描识别二维码 思路: 1. 操作摄像头,获取图片.HTML5 WEBRTC的navigator.getUserMedia方法去实时获取摄像头资源. 2. 利用canvas使用相关算法分析图片识别图 ...
- iOS--iOS7摄像头识别二维码功能
iOS–iOS7摄像头识别二维码功能 属性介绍: AVFoundation 框架基于以下几个类实现图像捕捉 ,通过这些类可以访问来自相机设备的原始数据并控制它的组件. AVCaptureDevice ...
- C# ZXing.Net生成二维码、识别二维码、生成带Logo的二维码(二)
1.使用ZXint.Net生成带logo的二维码 /// <summary> /// 生成带Logo的二维码 /// </summary> /// <param name ...
- spa(单页应用)中,使用history模式时,微信长按识别二维码在ios下失效的问题
spa(单页应用,vue)中,使用history模式时,微信长按识别二维码在ios下失效的问题. 触发条件: spa单页应用: 路由模式 history 从其他页面跳转到带有微信二维码识别的页面(不是 ...
- python3 树莓派 + usb摄像头 做颜色识别 二维码识别
今天又啥也没干 我完蛋了哦 就是没办法沉下心来,咋办....还是先来条NLP吧.. 七,凡事必有至少三个解决方法 对事情只有一个方法的人,必陷入困境,因为别无选择. 对事情有两个方法的人也陷入困境, ...
- php 识别二维码(转载)
近段需要写一个通过PHP来识别二维码的功能,在网上查了很久才解决问题.以此来记录下来解决问题的方法. 最开始找的方法是一个叫 php-zbarcode 的扩展,自己照着网上的安装步骤安装了 Image ...
随机推荐
- ios开发网络学习四:NSURLConnection大文件断点下载
#import "ViewController.h" @interface ViewController ()<NSURLConnectionDataDelegate> ...
- 《大型网站技术架构》1:概述 分类: C_OHTERS 2014-05-07 20:40 664人阅读 评论(0) 收藏
参考自<大型网站技术架构>第1~3章 1.大型网站架构演化发展历程 (1)初始阶段的网站架构:一台服务器分别作为应用.数据.文件服务器 (2)应用服务和数据服务分离:三台服务器分别承担上述 ...
- python implementation for Qt's QDataStream(看一下QDataStream的结构)
#!/usr/bin/env python # -*- coding: utf- -*- from __future__ import print_function from __future__ i ...
- 深度理解IIS下部署ASP.NET Core2.1 Web应用拓扑图
原文:深度理解IIS下部署ASP.NET Core2.1 Web应用拓扑图 IIS部署ASP.NET Core2.1 应用拓扑图 我们看到相比Asp.Net, 出现了3个新的组件:ASP.NET Co ...
- amazeui中的js插件有哪些(详解功能)
amazeui中的js插件有哪些(详解功能) 一.总结 一句话总结: 二.amazeui中的js插件有哪些 1.UI 增强 警告框Alert 按钮交互Button 折叠面板Collapse 下拉组件D ...
- jar命令+7z:创建,替换,修改,删除Jar, war, ear包中的文件
虽然现在已经有各种智能的IDE可以为我们生成jar包,war包,ear包,甚至带上了自动替换,部署的功能.但一定会有那么些时候,你需要修改或是替换jar包,war包,ear包中的某个文件而不是整个重新 ...
- eclipse配置本地服务
1.下载安装eclipse 2.下载tomcat文件,并解压 3.下载tomcat插件 com.sysdeo.eclipse.tomcat_3.3.0 将com.sysdeo.eclipse.tomc ...
- WPF入门(四)->线形区域Path内容填充之填充图(ImageBrush)
原文:WPF入门(四)->线形区域Path内容填充之填充图(ImageBrush) 前面我们提到了LinearGradientBrush可以用来画渐变填充图,那么我们同时也可以使用ImageBr ...
- java常用api2
calendar calendar=calendar.getInstance(); StringBuilder和C#的用法一样 hashSet无序的,不可重复 LInkedHashSet有序的,不可重 ...
- SCM文章9类:外部中断示例程序
JP3遇见P0口,JP5遇见P3口,P1接受该发光二极管,什么时候P1所有的都是高时,,全亮度发光二极管.因为外部中断0和1用同样的方法.这里只是外部中断0计划. #include<reg51. ...