Python学习-终端字体高亮显示1
Python学习-终端字体高亮显示
1、采用原生转义字符序列,对Windows有的版本不支持(比如win7),完美支持Linux
实现过程:
终端的字符颜色是用转义序列控制的,是文本模式下的系统显示功能,和具体的语言无关。
转义序列是以ESC开头,即用\033来完成(ESC的ASCII码用十进制表示是27,用八进制表示就是033)。
格式:
开头部分:\033[显示方式;前景色;背景色m + 结尾部分:\033[0m
| 前景色 | 背景色 | 颜色 |
| 30 | 40 | 黑色 |
| 31 | 41 | 红色 |
| 32 | 42 | 绿色 |
| 33 | 43 | 黄色 |
| 34 | 44 | 蓝色 |
| 35 | 45 | 紫红色 |
| 36 | 46 | 青蓝色 |
| 37 | 47 | 白色 |
显示方式:
| 显示方式 | 意义 |
| 0 | 终端默认设置 |
| 1 | 高亮显示 |
| 4 | 使用下划线 |
| 5 | 闪烁 |
| 7 | 反白显示 |
| 8 | 不可见 |

1 #!/usr/bin/env python3
2 # -*- coding: utf-8 -*-
3 # @Time : 2018/4/29 10:27
4 # @Author : yang
5 # @File : Colored_Escape_character.py
6 # @Software: PyCharm
7 #--------------------------------
8 #显示格式:\033[显示方式;前景色;背景色m
9 #--------------------------------
10 #显示方式 说明
11 # 0 终端默认设置
12 # 1 高亮显示
13 # 4 使用下划线
14 # 5 闪烁
15 # 7 反白显示
16 # 8 不可见
17 # 22 非粗体
18 # 24 非下划线
19 # 25 非闪烁
20 #
21 #前景色 背景色 颜色
22 # 30 40 黑色
23 # 31 41 红色
24 # 32 42 绿色
25 # 33 43 黄色
26 # 34 44 蓝色
27 # 35 45 紫红色
28 # 36 46 青蓝色
29 # 37 47 白色
30 #---------------------------------------
31 class Colored(object):
32 RED = '\033[31m' #红色
33 GREEN = '\033[32m' #绿色
34 YELLOW = '\033[33m' #黄色
35 BLUE = '\033[34m' #蓝色
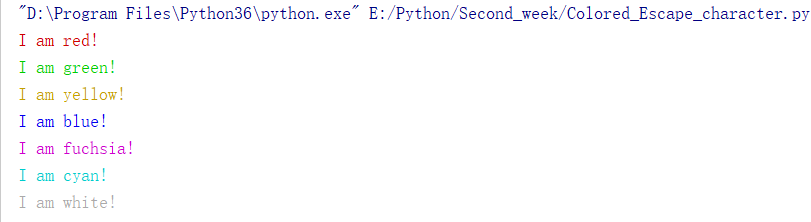
36 FUCHSIA = '\033[35m' #紫红色
37 CYAN = '\033[36m' #青蓝色
38 WHITE = '\033[37m' #白色
39 #:no color
40 RESET = '\033[0m' #终端默认颜色
41 def color_str(self,color,s):
42 return '{}{}{}'.format(getattr(self,color),s,self.RESET)
43
44 def red(self,s):
45 return self.color_str('RED',s)
46 def green(self,s):
47 return self.color_str('GREEN',s)
48 def yellow(self,s):
49 return self.color_str('YELLOW',s)
50 def blue(self,s):
51 return self.color_str('BLUE',s)
52 def fuchsia(self,s):
53 return self.color_str('FUCHSIA',s)
54 def cyan(self,s):
55 return self.color_str('CYAN',s)
56 def white(self,s):
57 return self.color_str('WHITE',s)
58 #-----------使用示例如下--------
59 color = Colored()
60 print(color.red('I am red!'))
61 print(color.green('I am green!'))
62 print(color.yellow('I am yellow!'))
63 print(color.blue('I am blue!'))
64 print(color.fuchsia('I am fuchsia!'))
65 print(color.cyan('I am cyan!'))
66 print(color.white('I am white!'))
输出结果:
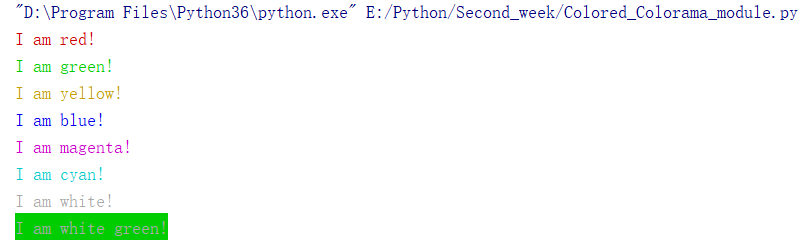
2、采用Python标准库colorama模块--兼容linux和windows各个版本:
 1 #!/usr/bin/env python3

 2 # -*- coding: utf-8 -*-

 3 # @Time    : 2018/4/29 10:57

 4 # @Author  : yang

 5 # @File    : Colored_Colorama_module.py

 6 # @Software: PyCharm

 7 #--------------colorama模块的一些常量-------

 8 #colorama是一个python专门用来在控制台、命令行输出彩色文字的模块,可以跨平台使用

 9 # 在windows下linux下都工作良好,如果你想让控制台的输出信息更漂亮一些,可以使用给这个模块。

10 # Fore: BLACK, RED, GREEN, YELLOW, BLUE, MAGENTA, CYAN, WHITE, RESET.

11 # Back: BLACK, RED, GREEN, YELLOW, BLUE, MAGENTA, CYAN, WHITE, RESET.

12 # Style: DIM, NORMAL, BRIGHT, RESET_ALL

13 from colorama import init,Fore,Back,Style

14 #init(autoreset=True)

15 class Colored(object):

16     def red(self,s):

17         return Fore.RED + s + Fore.RESET

18     def green(self,s):

19         return Fore.GREEN + s + Fore.RESET

20     def yellow(self,s):

21         return Fore.YELLOW + s + Fore.RESET

22     def blue(self,s):

23         return Fore.BLUE + s + Fore.RESET

24     def magenta(self,s):

25         return Fore.MAGENTA + s + Fore.RESET

26     def cyan(self,s):

27         return Fore.CYAN + s + Fore.RESET

28     def white(self,s):

29         return Fore.WHITE + s + Fore.RESET

30     def balck(self,s):

31         return Fore.BLACK

32     def white_green(self,s):

33         return Fore.WHITE + Back.GREEN + s + Fore.RESET + Back.RESET

34 color = Colored()

35 print(color.red('I am red!'))

36 print(color.green('I am green!'))

37 print(color.yellow('I am yellow!'))

38 print(color.blue('I am blue!'))

39 print(color.magenta('I am magenta!'))

40 print(color.cyan('I am cyan!'))

41 print(color.white('I am white!'))

42 print(color.white_green('I am white green!'))
输出结果:
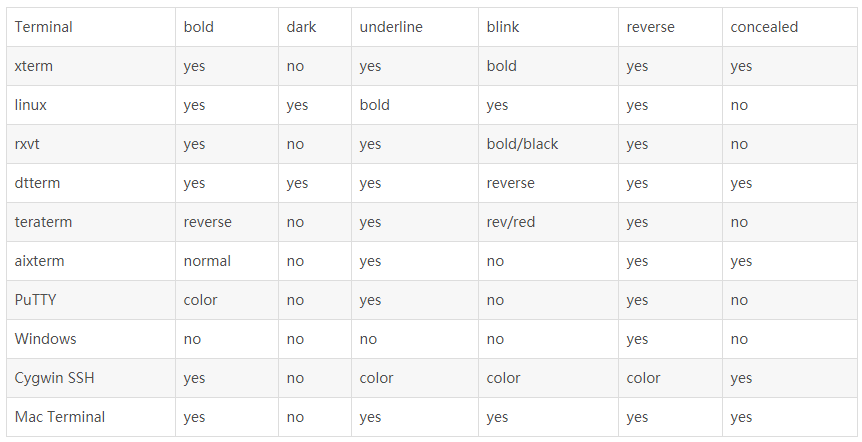
termcolor是一个python包,可以改变控制台输出的颜色,支持各种terminal(WINDOWS的cmd.exe除外)。
支持下列的文字颜色:
grey, red, green, yellow, blue, magenta, cyan, white
支持下列的背景高亮:
on_grey, on_red, on_green, on_yellow, on_blue, on_magenta, on_cyan, on_white
支持下列属性:
bold, dark, underline, blink, reverse, concealed
 1 #!/usr/bin/env python3

 2 # -*- coding: utf-8 -*-

 3 # @Time    : 2018/4/29 16:49

 4 # @Author  : yang

 5 # @File    : Colored_Termcolor_module.py

 6 # @Software: PyCharm

 7 import sys

 8 from termcolor import colored,cprint

 9 text = colored('Hello,World!','red',attrs=['reverse','blink'])

10

11 #colored(text, color=None, on_color=None, attrs=None)

12 #    Available text colors:

13 #        red, green, yellow, blue, magenta, cyan, white.

14

15 #    Available text highlights:

16 #        on_red, on_green, on_yellow, on_blue, on_magenta, on_cyan, on_white.

17

18 #    Available attributes:

19 #        bold, dark, underline, blink, reverse, concealed.

20 #print('\033[5;7;31mHello,World!\033[0m')

21

22 print(text)

23

24 cprint('Hello,World!','green','on_red')

25 #cprint('Hello,World!','green','on_red',attrs=['bold'])

26 #def cprint(text, color=None, on_color=None, attrs=None, **kwargs)

27

28 print_red_on_cyan = lambda x:cprint(x,'red','on_cyan')

29 print_red_on_cyan('Hello,World!')

30 print_red_on_cyan('Hello,Universe!')

31 for i in range(10):

32     cprint(i,'magenta',end=' ')

33 cprint('Attention!','red',attrs=['bold'],file = sys.stderr)
输出结果:

参考:
1、https://pypi.org/project/colorama/
2、https://pypi.org/project/termcolor/#description
3、https://www.cnblogs.com/hellojesson/p/5961570.html
4、https://stackoverflow.com/questions/287871/print-in-terminal-with-colors/3332860#3332860
Python学习-终端字体高亮显示1的更多相关文章
- Python学习-终端字体高亮显示
1.采用原生转义字符序列,对Windows有的版本不支持(比如win7),完美支持Linux 实现过程: 终端的字符颜色是用转义序列控制的,是文本模式下的系统显示功能,和具体的语言无关. 转义序列是以 ...
- Python学习随笔:使用xlwings设置和操作excel多行多列数据以及设置数据字体颜色填充色对齐方式的方法
☞ ░ 前往老猿Python博文目录 ░ 在前面老猿的文章中,<Python学习随笔:使用xlwings读取和操作Excel文件>.<Python学习随笔:使用xlwings读取和操 ...
- Python之路【第二十四篇】:Python学习路径及练手项目合集
Python学习路径及练手项目合集 Wayne Shi· 2 个月前 参照:https://zhuanlan.zhihu.com/p/23561159 更多文章欢迎关注专栏:学习编程. 本系列Py ...
- 色彩缤纷的python(改变字体颜色及样式不完全版)
色彩缤纷的python(改变字体颜色及样式) *补上昨天随笔中提到的改变字体颜色样式的方法,昨日随笔https://www.cnblogs.com/Du704/p/11265958.html 在项目过 ...
- 色彩缤纷的Python(改变字体颜色及样式)
色彩缤纷的python(改变字体颜色及样式) 在项目过程中,我们常常会因为输出信息的颜色与样式过于单调以至于让人在视觉上感到很杂乱,所以看下文: 在Linux终端中,使用转义序列来进行如上所述的显示, ...
- Python 学习小结
python 学习小结 python 简明教程 1.python 文件 #!/etc/bin/python #coding=utf-8 2.main()函数 if __name__ == '__mai ...
- python学习心得第一章
初始python 1什么是程序 计算机程序是一组执行某种动作的的指令.和那些电路.芯片.显卡.硬盘等不同,它不是计算机本身可以触摸的部分,而是隐藏在背后运行在硬件上面的东西.程序就是一系列告诉没有知觉 ...
- Python学习资料整理以及书籍、开发工具推荐
我不知道大家学习Python的时候是不是和我一样感觉很无助,不知道在入门或者进阶的时候应该掌握哪些知识点,下面我就梳理下我自己学习Python开 发的过程及资料分享给大家,这些方法资料可能并不适合所有 ...
- python 学习笔记 9 -- Python强大的自省简析
1. 什么是自省? 自省就是自我评价.自我反省.自我批评.自我调控和自我教育,是孔子提出的一种自我道德修养的方法.他说:“见贤思齐焉,见不贤而内自省也.”(<论语·里仁>)当然,我们今天不 ...
随机推荐
- js原生回到顶部
<!DOCTYPE html><html><head> <meta content="测试demo" name="Keyword ...
- Win10系列:C#应用控件基础5
ListBox控件 上一小节介绍的ComboBox控件在外观上仅显示当前选中的选项,通过单击此控件文本框才能看到其他选项,而ListBox控件能够以列表形式始终显示选项.在ListBox控件中可以添加 ...
- Win10系列:VC++绘制几何图形1
本小节主要介绍如何使用Direct2D来绘制几何图形,其中会使用到FillGeometry函数和FillEllipse函数,FillGeometry函数用于填充几何图形的内部区域,而FillEllip ...
- Java 算法(背包,队列和栈)
Dijkstra的双栈算术表达式求值算法: import java.util.*; public class Main { public static double evaluate(String a ...
- 向量空间模型(VSM)在文档相似度计算上的简单介绍
C#实现在: http://blog.csdn.net/Felomeng/archive/2009/03/25/4023990.aspx 向量空间模型(VSM:Vector space model)是 ...
- (C/C++学习笔记) 八. 程序控制语句
八. 程序控制语句 ● 基础知识 算法的基本控制结构: 顺序结构(sequential structure), 选择结构(case structure), 循环结构(loop structure) c ...
- SQL-33 创建一个actor表,包含如下列信息
题目描述 创建一个actor表,包含如下列信息 列表 类型 是否为NULL 含义 actor_id smallint(5) not null 主键id first_name varchar(45) ...
- MII接口介绍(转)
1.简介 MII (Media Independent Interface(介质无关接口)或称为媒体独立接口,它是IEEE-802.3定义的以太网行业标准.它包括一个数据接口和一个MAC和PHY之间的 ...
- Centos7安装RabbitMQ解决Erlang依赖报错
通过yum等软件仓库都可以直接安装RabbitMQ,但版本一般都较为保守. RabbitMQ官网提供了新版的rpm包(http://www.rabbitmq.com/download.html),但是 ...
- idea没有错误出现红色波浪线怎么去掉?
在有波浪线的代码上Alt+Enter,弹出的菜单中第一项的子菜单选择disable inspection