
ES系列一、CentOS7安装ES 6.3.1、集成IK分词器
Elasticsearch 6.3.1 地址:
wget https://artifacts.elastic.co/downloads/elasticsearch/elasticsearch-6.3.1.tar.gz
2.安装配置
1.拷贝
拷贝到服务器上,解压:tar -xvzf elasticsearch-6.3.1.tar.gz 。解压后路径:/home/elasticsearch-6.3.1
3.创建用户
创建用户,创建esdata目录,并赋予权限
[root@bogon home]# adduser esuser

[root@bogon home]# cd /home

[root@bogon home]# mkdir -p esdata/data

[root@bogon home]# mkdir -p esdata/log

[root@bogon home]# chown -R esuser elasticsearch-6.3.1

[root@bogon home]# chown -R esuser esdata
4.配置es节点
# ======================== Elasticsearch Configuration =========================
#
# NOTE: Elasticsearch comes with reasonable defaults for most settings.
# Before you set out to tweak and tune the configuration, make sure you
# understand what are you trying to accomplish and the consequences.
#
# The primary way of configuring a node is via this file. This template lists
# the most important settings you may want to configure for a production cluster.
#
# Please consult the documentation for further information on configuration options:
# https://www.elastic.co/guide/en/elasticsearch/reference/index.html
#
# ---------------------------------- Cluster -----------------------------------
#
# Use a descriptive name for your cluster:
#
cluster.name: my-application
#
# ------------------------------------ Node ------------------------------------
#
# Use a descriptive name for the node:
#
node.name: node-1
#
# Add custom attributes to the node:
#
node.attr.rack: r1
#
# ----------------------------------- Paths ------------------------------------
#
# Path to directory where to store the data (separate multiple locations by comma):
#
path.data: /home/esdata/data
#
# Path to log files:
#
path.logs: /home/esdata/log
#
# ----------------------------------- Memory -----------------------------------
#
# Lock the memory on startup:
#
bootstrap.memory_lock: true
#
# Make sure that the heap size is set to about half the memory available
# on the system and that the owner of the process is allowed to use this
# limit.
#
# Elasticsearch performs poorly when the system is swapping the memory.
#
# ---------------------------------- Network -----------------------------------
#
# Set the bind address to a specific IP (IPv4 or IPv6):
# 允许访问的ip,0.0.0.0表示任意ip可以访问
network.host: 0.0.0.0
#
# Set a custom port for HTTP:
# 对外端口
http.port: 9200
#
# For more information, consult the network module documentation.
#
# --------------------------------- Discovery ----------------------------------
#
# Pass an initial list of hosts to perform discovery when new node is started:
# The default list of hosts is ["127.0.0.1", "[::1]"]
# 集群其他节点IP,只有一个节点写本机ip
discovery.zen.ping.unicast.hosts: ["host1", "host2"]
#
# Prevent the "split brain" by configuring the majority of nodes (total number of master-eligible nodes / 2 + 1):
#
#discovery.zen.minimum_master_nodes:
#
# For more information, consult the zen discovery module documentation.
#
# ---------------------------------- Gateway -----------------------------------
#
# Block initial recovery after a full cluster restart until N nodes are started:
# 集群节点数量
gateway.recover_after_nodes: 1
#
# For more information, consult the gateway module documentation.
#
# ---------------------------------- Various -----------------------------------
#
# Require explicit names when deleting indices:
#
action.destructive_requires_name: true
3.配置系统参数
[root@bogon bin]#  vim /etc/security/limits.conf(在文件最后添加)

esuser hard nofile 65536

esuser soft nofile 65536

esuser soft memlock unlimited

esuser hard memlock unlimited
以上配置解决问题:
max file descriptors [4096] for elasticsearch process is too low, increase to at least [65536]

memory locking requested for elasticsearch process but memory is not locked
临时设置:sysctl -w vm.max_map_count=262144
永久修改:
修改vim /etc/sysctl.conf 文件,添加 “vm.max_map_count”设置
并执行:sysctl -p
以上配置解决问题:
max virtual memory areas vm.max_map_count [65530] is too low, increase to at least [262144]
[root@bogon logs]# visudo

。。。。。。。。

## Allow root to run any commands anywhere

root    ALL=(ALL)       ALL

esuser  ALL=(ALL)       ALL

。。。。。。。。
以上配置解决某些情况下无法读写的问题
1.ulimit -n和-u可以查看linux的最大进程数和最大文件打开数
1、vim /etc/security/limits.d/90-nproc.conf文件尾添加
* soft nproc 204800

* hard nproc 204800
2、vim /etc/security/limits.d/def.conf文件尾添加
* soft nofile 204800

* hard nofile 204800
这两个文件的设置将会覆盖前面的设置。重启后生效
以上配置解决问题:max number of threads [3895] for user [esuser] is too low, increase to at least [4096]
问题一:警告提示
[2016-11-06T16:27:21,712][WARN ][o.e.b.JNANatives ] unable to install syscall filter:
java.lang.UnsupportedOperationException: seccomp unavailable: requires kernel 3.5+ with CONFIG_SECCOMP and CONFIG_SECCOMP_FILTER compiled in
at org.elasticsearch.bootstrap.Seccomp.linuxImpl(Seccomp.java:349) ~[elasticsearch-5.0.0.jar:5.0.0]
at org.elasticsearch.bootstrap.Seccomp.init(Seccomp.java:630) ~[elasticsearch-5.0.0.jar:5.0.0]
报了一大串错误,其实只是一个警告。
解决:使用新的centOS版本,centOS7就不会出现此类问题了。
问题二:报错
报错:
ERROR: bootstrap checks failed
system call filters failed to install; check the logs and fix your configuration or disable system call filters at your own risk
原因:
这是在因为Centos6不支持SecComp,而ES5.2.0默认bootstrap.system_call_filter为true进行检测,所以导致检测失败,失败后直接导致ES不能启动。
解决:
在elasticsearch.yml中配置bootstrap.system_call_filter为false,注意要在Memory下面:
bootstrap.memory_lock: false
bootstrap.system_call_filter: false
4.启动

[root@bogon ~]# cd /home/elasticsearch-6.3.1/bin/

[root@bogon bin]# su esuser

[esuser@bogon bin]$ ./elasticsearch

[2018-07-17T10:17:30,139][INFO ][o.e.n.Node               ] [node-1] initializing ...

[2018-07-17T10:17:30,234][INFO ][o.e.e.NodeEnvironment    ] [node-1] using [1] data paths, mounts [[/ (rootfs)]], net usable_space [22.1gb], net total_space [27.6gb], types [rootfs]

[2018-07-17T10:17:30,234][INFO ][o.e.e.NodeEnvironment    ] [node-1] heap size [1007.3mb], compressed ordinary object pointers [true]

[2018-07-17T10:17:30,236][INFO ][o.e.n.Node               ] [node-1] node name [node-1], node ID [cb69e4JjSBKeHJ9y-q-hNA]

[2018-07-17T10:17:30,236][INFO ][o.e.n.Node               ] [node-1] version[6.3.1], pid[26327], build[default/tar/eb782d0/2018-06-29T21:59:26.107521Z], OS[Linux/3.10.0-514.6.1.el7.x86_64/amd64], JVM[Oracle Corporation/Java HotSpot(TM) 64-Bit Server VM/1.8.0_92/25.92-b14]

[2018-07-17T10:17:30,236][INFO ][o.e.n.Node               ] [node-1] JVM arguments [-Xms1g, -Xmx1g, -XX:+UseConcMarkSweepGC, -XX:CMSInitiatingOccupancyFraction=75, -XX:+UseCMSInitiatingOccupancyOnly, -XX:+AlwaysPreTouch, -Xss1m, -Djava.awt.headless=true, -Dfile.encoding=UTF-8, -Djna.nosys=true, -XX:-OmitStackTraceInFastThrow, -Dio.netty.noUnsafe=true, -Dio.netty.noKeySetOptimization=true, -Dio.netty.recycler.maxCapacityPerThread=0, -Dlog4j.shutdownHookEnabled=false, -Dlog4j2.disable.jmx=true, -Djava.io.tmpdir=/tmp/elasticsearch.F1Jh0AOB, -XX:+HeapDumpOnOutOfMemoryError, -XX:HeapDumpPath=data, -XX:ErrorFile=logs/hs_err_pid%p.log, -XX:+PrintGCDetails, -XX:+PrintGCDateStamps, -XX:+PrintTenuringDistribution, -XX:+PrintGCApplicationStoppedTime, -Xloggc:logs/gc.log, -XX:+UseGCLogFileRotation, -XX:NumberOfGCLogFiles=32, -XX:GCLogFileSize=64m, -Des.path.home=/home/elasticsearch-6.3.1, -Des.path.conf=/home/elasticsearch-6.3.1/config, -Des.distribution.flavor=default, -Des.distribution.type=tar]

[2018-07-17T10:17:33,136][INFO ][o.e.p.PluginsService     ] [node-1] loaded module [aggs-matrix-stats]

[2018-07-17T10:17:33,136][INFO ][o.e.p.PluginsService     ] [node-1] loaded module [analysis-common]

[2018-07-17T10:17:33,137][INFO ][o.e.p.PluginsService     ] [node-1] loaded module [ingest-common]

。。。。。。
5.验证
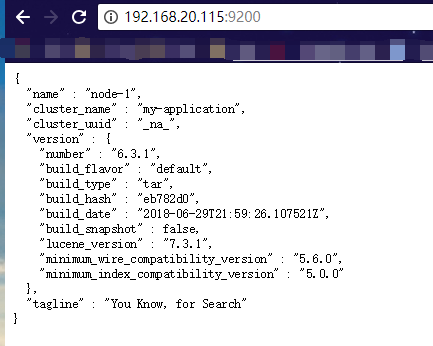
浏览器访问:http://192.168.20.115:9200/ (192.168.20.115是es服务器的IP,另外请确保9200端口能够被外部访问),返回:
{

  "name" : "node-1",

  "cluster_name" : "my-application",

  "cluster_uuid" : "_na_",

  "version" : {

    "number" : "6.3.1",

    "build_flavor" : "default",

    "build_type" : "tar",

    "build_hash" : "eb782d0",

    "build_date" : "2018-06-29T21:59:26.107521Z",

    "build_snapshot" : false,

    "lucene_version" : "7.3.1",

    "minimum_wire_compatibility_version" : "5.6.0",

    "minimum_index_compatibility_version" : "5.0.0"

  },

  "tagline" : "You Know, for Search"

}
当然最方便的安装方法还是下载docker镜像,官方安装手册:https://www.elastic.co/guide/en/elasticsearch/reference/current/docker.html 步骤:
1)下载镜像:docker pull docker.elastic.co/elasticsearch/elasticsearch:6.3.1
2)运行容器:docker run -p 9200:9200 -p 9300:9300 -e "discovery.type=single-node" docker.elastic.co/elasticsearch/elasticsearch:6.3.1
6.ElasticSearch Head安装
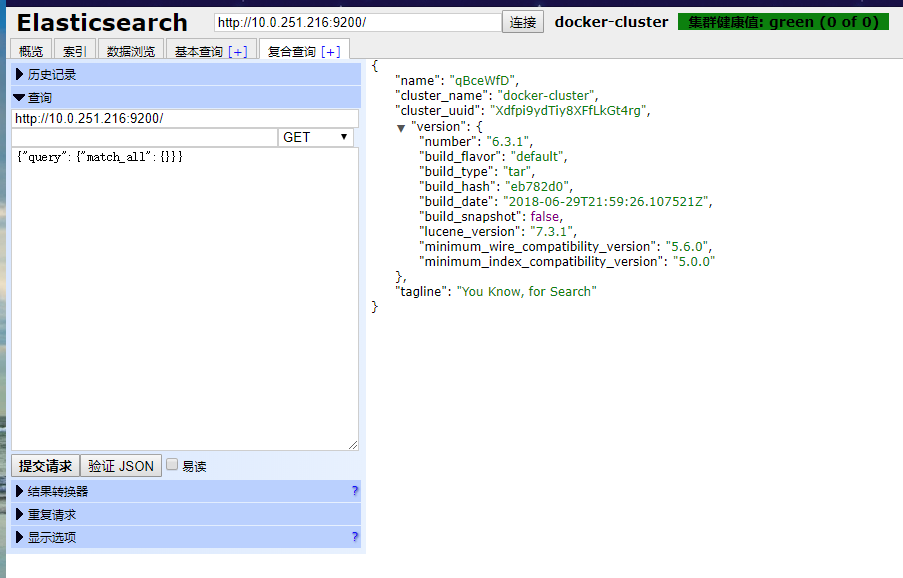
官方的模拟工具是控制台的curl,不是很直观,可以在chrome浏览器中安装head插件来作为请求的工具:head插件的地址:Cenos7安装ES head6.3.1
七、集成集成Ikanalyzer分词器
1. 获取 ES-IKAnalyzer插件
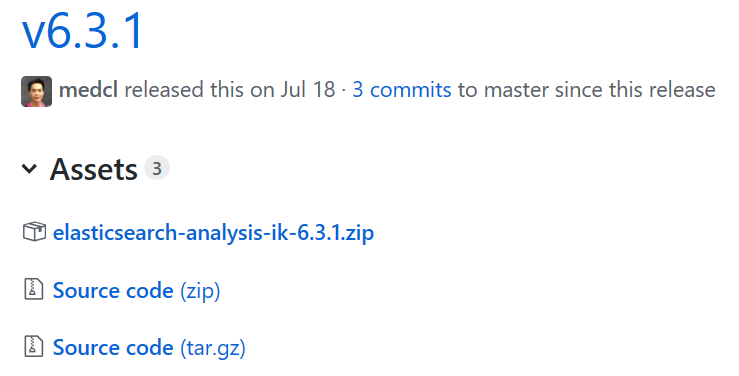
一定和ES的版本一致( 6.3.1)
地址: https://github.com/medcl/elasticsearch-analysis-ik/releases
2. 安装插件
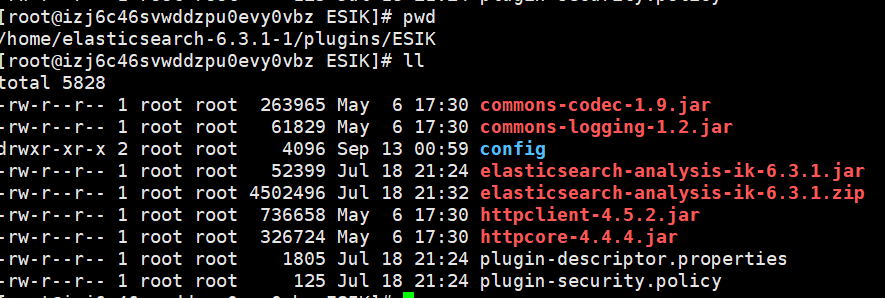
将 ik 的压缩包解压到 ES安装目录的plugins/目录下(最好把解出的目录名改一下,防止安装别的插件时同名冲突),然后重启ES。
3. 扩展词库
扩展词典可以修改配置文件config/IKAnalyzer.cfg.xml
<?xml version="1.0" encoding="UTF-8"?>

<!DOCTYPE properties SYSTEM "http://java.sun.com/dtd/properties.dtd">

<properties>

    <comment>IK Analyzer 扩展配置</comment>

    <!--用户可以在这里配置自己的扩展字典 -->

    <entry key="ext_dict">custom/mydict.dic;custom/single_word_low_freq.dic</entry>

     <!--用户可以在这里配置自己的扩展停止词字典-->

    <entry key="ext_stopwords">custom/ext_stopword.dic</entry>

    <!--用户可以在这里配置远程扩展字典 远程词库,可热更新,在一处地方维护-->

    <!-- <entry key="remote_ext_dict">words_location</entry> -->

    <!--用户可以在这里配置远程扩展停止词字典-->

    <!-- <entry key="remote_ext_stopwords">words_location</entry> -->

</properties>
4. 测试 IK
1、创建一个索引
http://start.com:9200/iktest

{

    "mappings":{

        "_doc":{

                "properties": {

                "content": {

                "type": "text",

                "analyzer": "ik_max_word",

                "search_analyzer": "ik_max_word"

                }

            }

        }

    }

}
2.分词测试
http://start.com:9200/_analyze

{

  "analyzer":"ik_smart",

  "text":"天团S.H.E昨在两厅院艺文广场举办17万人露天音乐会,3人献唱多首经典好歌,让现场粉丝听得如痴如醉"

}
结果:
{

    "tokens": [

        {

            "token": "天",

            "start_offset": ,

            "end_offset": ,

            "type": "CN_CHAR",

            "position":

        },

        {

            "token": "团",

            "start_offset": ,

            "end_offset": ,

            "type": "CN_CHAR",

            "position":

        },

        {

            "token": "s.h.e",

            "start_offset": ,

            "end_offset": ,

            "type": "LETTER",

            "position":

        },

        {

            "token": "昨在",

            "start_offset": ,

            "end_offset": ,

            "type": "CN_WORD",

            "position":

        },

        {

            "token": "两厅",

            "start_offset": ,

            "end_offset": ,

            "type": "CN_WORD",

            "position":

        },

        {

            "token": "院",

            "start_offset": ,

            "end_offset": ,

            "type": "CN_CHAR",

            "position":

        },

        {

            "token": "艺文",

            "start_offset": ,

            "end_offset": ,

            "type": "CN_WORD",

            "position":

        },

        {

            "token": "广场",

            "start_offset": ,

            "end_offset": ,

            "type": "CN_WORD",

            "position":

        },

        {

            "token": "举办",

            "start_offset": ,

            "end_offset": ,

            "type": "CN_WORD",

            "position":

        },

        {

            "token": "",

            "start_offset": ,

            "end_offset": ,

            "type": "ARABIC",

            "position":

        },

        {

            "token": "万人",

            "start_offset": ,

            "end_offset": ,

            "type": "CN_WORD",

            "position":

        },

        {

            "token": "露天",

            "start_offset": ,

            "end_offset": ,

            "type": "CN_WORD",

            "position":

        },

        {

            "token": "音乐会",

            "start_offset": ,

            "end_offset": ,

            "type": "CN_WORD",

            "position":

        },

        {

            "token": "3人",

            "start_offset": ,

            "end_offset": ,

            "type": "TYPE_CQUAN",

            "position":

        },

        {

            "token": "献",

            "start_offset": ,

            "end_offset": ,

            "type": "CN_CHAR",

            "position":

        },

        {

            "token": "唱",

            "start_offset": ,

            "end_offset": ,

            "type": "CN_CHAR",

            "position":

        },

        {

            "token": "多首",

            "start_offset": ,

            "end_offset": ,

            "type": "CN_WORD",

            "position":

        },

        {

            "token": "经典",

            "start_offset": ,

            "end_offset": ,

            "type": "CN_WORD",

            "position":

        },

        {

            "token": "好歌",

            "start_offset": ,

            "end_offset": ,

            "type": "CN_WORD",

            "position":

        },

        {

            "token": "让",

            "start_offset": ,

            "end_offset": ,

            "type": "CN_CHAR",

            "position":

        },

        {

            "token": "现场",

            "start_offset": ,

            "end_offset": ,

            "type": "CN_WORD",

            "position":

        },

        {

            "token": "粉丝",

            "start_offset": ,

            "end_offset": ,

            "type": "CN_WORD",

            "position":

        },

        {

            "token": "听得",

            "start_offset": ,

            "end_offset": ,

            "type": "CN_WORD",

            "position":

        },

        {

            "token": "如痴如醉",

            "start_offset": ,

            "end_offset": ,

            "type": "CN_WORD",

            "position":

        }

    ]

}
对比standard分词器:
http://start.com:9200/_analyze

{

  "analyzer":"standard",

  "text":"天团S.H.E昨在两厅院艺文广场 举办17万人露 天音乐会,3人献唱多首 经典好歌,让现场 粉丝听得如痴如醉"

}
结果:
{

    "tokens": [

        {

            "token": "天",

            "start_offset": ,

            "end_offset": ,

            "type": "<IDEOGRAPHIC>",

            "position":

        },

        {

            "token": "团",

            "start_offset": ,

            "end_offset": ,

            "type": "<IDEOGRAPHIC>",

            "position":

        },

        {

            "token": "s.h.e",

            "start_offset": ,

            "end_offset": ,

            "type": "<ALPHANUM>",

            "position":

        },

        {

            "token": "昨",

            "start_offset": ,

            "end_offset": ,

            "type": "<IDEOGRAPHIC>",

            "position":

        },

        {

            "token": "在",

            "start_offset": ,

            "end_offset": ,

            "type": "<IDEOGRAPHIC>",

            "position":

        },

        {

            "token": "两",

            "start_offset": ,

            "end_offset": ,

            "type": "<IDEOGRAPHIC>",

            "position":

        },

        {

            "token": "厅",

            "start_offset": ,

            "end_offset": ,

            "type": "<IDEOGRAPHIC>",

            "position":

        },

        {

            "token": "院",

            "start_offset": ,

            "end_offset": ,

            "type": "<IDEOGRAPHIC>",

            "position":

        },

        {

            "token": "艺",

            "start_offset": ,

            "end_offset": ,

            "type": "<IDEOGRAPHIC>",

            "position":

        },

        {

            "token": "文",

            "start_offset": ,

            "end_offset": ,

            "type": "<IDEOGRAPHIC>",

            "position":

        }

      。。。

    ]

}
standard分词器把中文都拆分成了单个字。IK分词器拆分成了字和词语。
ES系列一、CentOS7安装ES 6.3.1、集成IK分词器的更多相关文章
- [Linux] linux下安装配置 zookeeper/redis/solr/tomcat/IK分词器 详细实例.
今天 不知自己装的centos 出现了什么问题, 一直卡在 启动界面, 找了半天没找见原因(最后时刻还是发现原因, 只因自己手欠一怒之下将centos删除了, 而且选择的是在本地磁盘也删除. ..让我 ...
- Windows上安装ElasticSearch7的IK分词器
首先IK分词器和ES版本一定要严格对应,下面是版本对照表 IK分词器下载地址 https://github.com/medcl/elasticsearch-analysis-ik/releases 我 ...
- Elasticsearch学习系列一(部署和配置IK分词器)
Elasticsearch简介 Elasticsearch是什么? Elaticsearch简称为ES,是一个开源的可扩展的分布式的全文检索引擎,它可以近乎实时的存储.检索数据.本身扩展性很好,可扩展 ...
- 安装ik分词器以及版本和ES版本的兼容性
一.查看自己ES的版本号与之对应的IK分词器版本 https://github.com/medcl/elasticsearch-analysis-ik/blob/master/README.md 二. ...
- Centos7安装elasticsearch6.3及ik分词器,设置开机自启
参考Elasticsearch 在CentOs7 环境中开机启动 建议虚拟机的内存大小为4G 1. 新建一个用户john 出于安全考虑,elasticsearch默认不允许以root账号运行. 创建用 ...
- es之IK分词器
1:默认的分析器-- standard 使用默认的分词器 curl -XGET 'http://hadoop01:9200/_analyze?pretty&analyzer=standard' ...
- 【ELK】【docker】【elasticsearch】1. 使用Docker和Elasticsearch+ kibana 5.6.9 搭建全文本搜索引擎应用 集群,安装ik分词器
系列文章:[建议从第二章开始] [ELK][docker][elasticsearch]1. 使用Docker和Elasticsearch+ kibana 5.6.9 搭建全文本搜索引擎应用 集群,安 ...
- Elasticsearch入门之从零开始安装ik分词器
起因 需要在ES中使用聚合进行统计分析,但是聚合字段值为中文,ES的默认分词器对于中文支持非常不友好:会把完整的中文词语拆分为一系列独立的汉字进行聚合,显然这并不是我的初衷.我们来看个实例: POST ...
- Elasticsearch5.1.1+ik分词器+HEAD插件安装小记
一.安装elasticsearch 1.首先需要安装好java,并配置好环境变量,详细教程请看 http://tecadmin.net/install-java-8-on-centos-rhel-an ...
随机推荐
- django 关于视频播放
django实现视频播放并适配主流浏览器,应用比较广泛的就是videojs了. videojs: <head> <link href="http://vjs.zencdn. ...
- rsync同步官方zabbix仓库搭建本地yum源
1.同步资源 # rsync -vrt rsync://repo.zabbix.com/mirror/zabbix/3.4/rhel/7/x86_64/ /home/mirrors/zabbix/3. ...
- SpringBoot集成RocketMQ
实战,用案例来说话 前面已经说了JMS和RocketMQ一些概念和安装,下面使用SpringBoot来亲身操作一下. 生产者的操作 SpringBoot项目创建完成,引入依赖是第一步: <dep ...
- 获取泛型的class 反射
最近在使用Google的Gson包进行Json和Java对象之间的转化,对于包含泛型的类的序列化和反序列化Gson也提供了很好的支持,感觉有点意思,就花时间研究了一下. 由于Java泛型的实现机制,使 ...
- (转)如何优雅的在 Microsoft word中插入代码
背景:最近项目需要自己编写文档,在文档中需要插入部分代码,记录下这个方法. 一.工具 方法1.打开这个网页PlanetB; 方法2.或者谷歌搜索syntax highlight code in wor ...
- MySQL索引的使用方式和缺点
一,create CREATE INDEX可对表增加普通索引或UNIQUE索引. CREATE INDEX index_name ON table_name (column_list) CREATE ...
- 单机安装ELK
. 简介 1.1 介绍 ELK是三个开源工具组成,简单解释如下: Elasticsearch是个开源分布式搜索引擎,它的特点有:分布式,零配置,自动发现,索引自动分片,索引副本机制,restful风格 ...
- ASP.Net WebAPI中添加helppage帮助页面
一.自动创建带帮助的WebAPI 1.首先创建项目的时候选择WebAPI,如下图所示,生成的项目会自动生成帮助文档. 2.设置调用XML文档的代码 3.设置项目注释XML文档生成目录,项目——属性—— ...
- oracle解除锁表【原】
在日常操作中,经常会有不小心被锁表的情况发生 一般造成原因有: 开发人员不小心执行了 for update 查询语句后,没有解锁 不合理代码中开启事务(begin transaction)后,没有关闭 ...
- centos文件与权限
切换目录 cd:切换目录. 当我们需要进入到别的目录的时候,就需要使用到cd这个命令. ‘ cd这个命令主要有以下几种使用方式; cd [~]:进入当前用户的家目录,比如我是fuwh这个用户登陆的,则 ...