
练习|Django-单表
结构目录
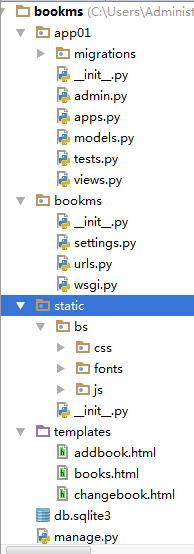
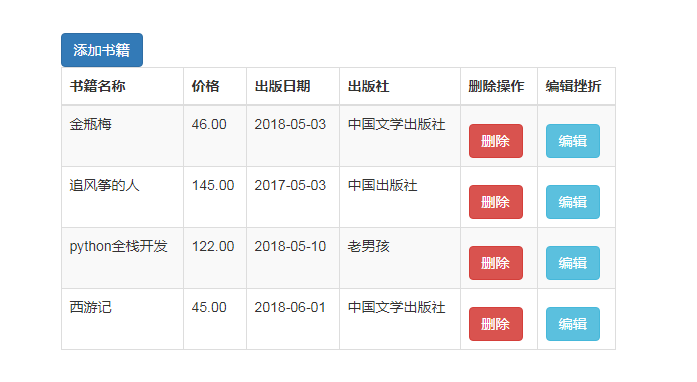
页面展示:
1创建Django,创建app01
在modules.py添加
class Book(models.Model):

     id=models.AutoField(primary_key=True)

     title=models.CharField(max_length=32)

     #state=models.BooleanField()

     pub_date=models.DateField()

     price=models.DecimalField(max_digits=8,decimal_places=2)

     publish=models.CharField(max_length=32)
2在settings里边添加app01
INSTALLED_APPS = [

    'django.contrib.admin',

    'django.contrib.auth',

    'django.contrib.contenttypes',

    'django.contrib.sessions',

    'django.contrib.messages',

    'django.contrib.staticfiles',

    "app01",

]
3在Terminal里边输入
C:\Users\Administrator\PycharmProjects\bookms>python manage.py makemigrations

Migrations for 'app01':

  app01\migrations\0001_initial.py

    - Create model Book

C:\Users\Administrator\PycharmProjects\bookms>python manage.py migrate

Operations to perform:

  Apply all migrations: admin, app01, auth, contenttypes, sessions

Running migrations:

  Applying contenttypes.0001_initial... OK

  Applying auth.0001_initial... OK

  Applying admin.0001_initial... OK

  Applying admin.0002_logentry_remove_auto_add... OK

  Applying app01.0001_initial... OK

  Applying contenttypes.0002_remove_content_type_name... OK

  Applying auth.0002_alter_permission_name_max_length... OK

  Applying auth.0003_alter_user_email_max_length... OK

  Applying auth.0004_alter_user_username_opts... OK

  Applying auth.0005_alter_user_last_login_null... OK

  Applying auth.0006_require_contenttypes_0002... OK

  Applying auth.0007_alter_validators_add_error_messages... OK

  Applying auth.0008_alter_user_username_max_length... OK

  Applying auth.0009_alter_user_last_name_max_length... OK

  Applying sessions.0001_initial... OK
4在urls.py中添加
from app01 import views

urlpatterns = [

    path('admin/', admin.site.urls),

    path('addbook/', views.addbook),

]
在views.py中加视图函数
def addbook(request):

    return render(request, addbook.html)
urls.py
from django.contrib import admin

from django.urls import path, re_path

from app01 import views

urlpatterns = [

    path('admin/', admin.site.urls),

    path('addbook/', views.addbook),

    path('books/', views.books),

    re_path(r"books/(\d+)/delete", views.delbook), #delbook(request,2) (\d+)是去捕获这个值;这个路径是给a标签写的,一点击就跳转了删除了

    re_path(r"books/(\d+)/change", views.changebook)

]
views.py
from django.shortcuts import render, HttpResponse, redirect

# Create your views here.

from app01.models import Book  #把这张表导入进来;

def addbook(request):

    if request.method == "POST":  #把数据全取出来

        title = request.POST.get("title")

        price = request.POST.get("price")

        date = request.POST.get("date")

        publish = request.POST.get("publish")

        book_obj = Book.objects.create(title=title, price=price, pub_date=date, publish=publish) #添加,左边是Book表的字段,右边是值

        return redirect("/books/")

    return render(request, "addbook.html")

def books(request):

    book_list = Book.objects.all() #拿出所有书籍,一个queryset对象 #[obj1, obj2,,,]

    return render(request, "books.html", locals()) #传给模板直接让它渲染就可以了

def delbook(request, id):

    Book.objects.filter(id=id).delete()

    return redirect("/books/")  #重定向

def changebook(request, id):

    book_obj = Book.objects.filter(id=id).first() #先获得那个编辑对象。无论get还是post请求都要获取

    if request.method=="POST":

        title = request.POST.get("title")

        price = request.POST.get("price")

        date = request.POST.get("date")

        publish = request.POST.get("publish")

        Book.objects.filter(id=id).update(title=title, price=price, pub_date=date, publish=publish)

        return redirect("/books/")

    return render(request, "changebook.html", {"book_obj":book_obj})
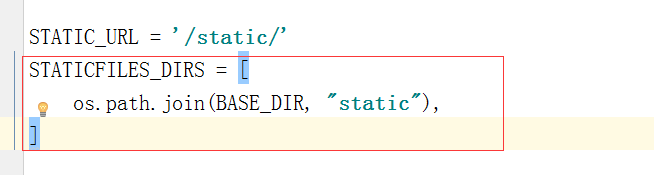
在settings里边配置:
addbook.html(添加页面)
引入bootstrap-3.3.7.2拿这个文件只需要拿dist就可以了,起名叫bs
<!DOCTYPE html>

<html lang="en">

<head>

    <meta charset="UTF-8">

    <title>Title</title>

    <link rel="stylesheet" href="/static/bs/css/bootstrap.css">

    <style>

        .container{

            margin-top:100px;

        }

        .btn{

            margin-top: 10px;

        }

    </style>

</head>

<body>

<h3>添加书籍</h3>

<div class="container">

    <div class="row">

        <div class="col-md-6 col-md-offset-3">

            <form action="" method="post">

                {% csrf_token %}  <!--为了通过防跨域请求验证-->

                <div>

                    <label for="">书籍名称</label>

                    <input type="text" class="form-control" name="title"> <!--有form-control就有样式了-->

                </div>

                <div>

                    <label for="">价格</label>

                    <input type="text" class="form-control" name="price">

                </div>

                <div>

                    <label for="">出版日期</label>

                    <input type="date" class="form-control" name="date">

                </div>

                <div>

                    <label for="">出版社</label>

                    <input type="text" class="form-control" name="publish">

                </div>

                <input type="submit" class="btn btn-success pull-right" >

            </form>

        </div>

    </div>

</div>

</body>

</html>
books.html(查看页面)
<!DOCTYPE html>

<html lang="en">

<head>

    <meta charset="UTF-8">

    <title>Title</title>

    <link rel="stylesheet" href="/static/bs/css/bootstrap.css">

    <style>

        .container{

            margin-top:100px;

        }

        .btn{

            margin-top: 10px;

        }

    </style>

</head>

<body>

<h3>查询书籍</h3>

<div class="container">

    <div class="row">

        <div class="col-md-6 col-md-offset-3">

            <a href="/addbook/" class="btn btn-primary">添加书籍</a>

            <table class="table table-striped table-bordered">

                <thead>

                    <tr>

                        <th>书籍名称</th>

                        <th>价格</th>

                        <th>出版日期</th>

                        <th>出版社</th>

                        <th>删除操作</th>

                        <th>编辑挫折</th>

                    </tr>

                </thead>

                <tbody>

                    {% for book in book_list %}  //每循环一次就创建一个tr标签

                        <tr>

                            <td>{{ book.title }}</td>

                            <td>{{ book.price }}</td>

                            <td>{{ book.pub_date|date:'Y-m-d' }}</td>

                            <td>{{ book.publish }}</td>

                            <td><a href="/books/{{ book.pk }}/delete" class="btn btn-danger">删除</a></td> //只要.pk不管主键叫id还是nid都可以拿到那个主键

                            <td><a href="/books/{{ book.pk }}/change" class="btn btn-info">编辑</a></td>

                        </tr>

                    {% endfor %}

                </tbody>

            </table>

        </div>

    </div>

</div>

</body>

</html>
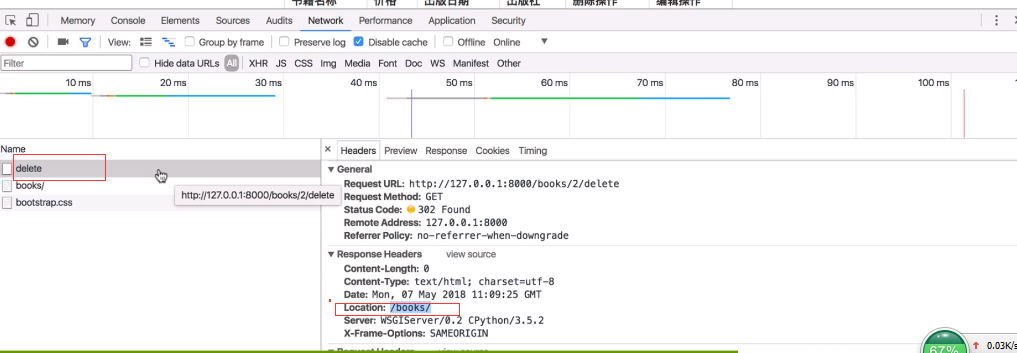
跟URL匹配成功之后就可以走delbook那个视图函数了
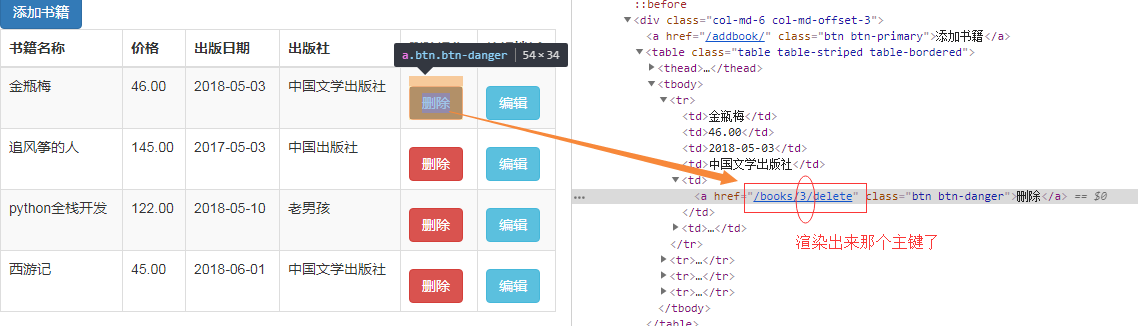
第一次发请求把这个数据从数据库里边删除了,接着告诉浏览器你再发一次请求 浏览器就又发了一次请求给books返回当前页面,当前books那个视图函数。它响应的是重定向。
changebook.html(编辑页面)
a标签默认是get请求,一点提交就是post请求了
<!DOCTYPE html>

<html lang="en">

<head>

    <meta charset="UTF-8">

    <title>Title</title>

    <link rel="stylesheet" href="/static/bs/css/bootstrap.css">

    <style>

        .container{

            margin-top:100px;

        }

        .btn{

            margin-top: 10px;

        }

    </style>

</head>

<body>

<h3>编辑书籍</h3>

<div class="container">

    <div class="row">

        <div class="col-md-6 col-md-offset-3">

            <form action="" method="post">

                {% csrf_token %}  <!--为了通过防跨域请求验证-->

                <div>

                    <label for="">书籍名称</label>

                    <input type="text" class="form-control" name="title" value="{{ book_obj.title }}"> <!--有form-control就有样式了-->

                </div>                                                         //value放编辑默认对象

                <div>

                    <label for="">价格</label>

                    <input type="text" class="form-control" name="price" value="{{ book_obj.price }}">

                </div>

                <div>

                     <label for="">出版日期</label>

                     <input type="date" class="form-control" name="date" value="{{ book_obj.pub_date|date:'Y-m-d'}}">

                </div>

                <div>

                     <label for="">出版社</label>

                     <input type="text" class="form-control" name="publish" value="{{ book_obj.publish }}">

                </div>

                <input type="submit" class="btn btn-success pull-right" >

            </form>

        </div>

    </div>

</div>

</body>

</html>
练习|Django-单表的更多相关文章
- Django单表操作
一.数据库相关设置 配置ORM的loggers日志: # 配置ORM的loggers日志 LOGGING = { 'version': 1, 'disable_existing_loggers': F ...
- Django单表查询及其方法
单表查询 前期准备 首先新建一个test的python文件,然后再manage.py中导入main语句及其下面的复制到新文件中 并导入django 写上django.setup() 就可以导入对应的m ...
- django单表操作,增、删、改、查
一.实现:增.删.改.查 1.获取所有数据显示在页面上 model.Classes.object.all(),拿到数据后,渲染给前端;前端通过for循环的方式,取出数据. 目的:通过classes(班 ...
- django单表操作 增 删 改 查
一.实现:增.删.改.查 1.获取所有数据显示在页面上 model.Classes.object.all(),拿到数据后,渲染给前端;前端通过for循环的方式,取出数据. 目的:通过classes(班 ...
- Django 单表查询
前言 如何只单独测试django中的某一个py文件呢?或者说如何书写测试脚本? 我们可以在任意一个py文件(应用下的tests或者自己新建一个)中书写以下代码: 前期准备 创建一个电影表 class ...
- Django --- 单表的增删改查
- Django学习手册 - ORM 单表数据获取
Django 单表数据的获取: 先建立数据表格 from django.db import models # Create your models here. class userinfo(model ...
- Django实现表单验证、CSRF、cookie和session、缓存、数据库多表操作(双下划綫)
通常验证用户输入是否合法的话,是前端js和后端共同验证的,这是因为前端js是可以被禁用的,假如被禁用了,那就没法用js实现验证合法与否了,也就是即使用户输入的不合法,但是也没提示,用户也不知道怎么输入 ...
- python运维开发(十九)----Django后台表单验证、session、cookie、model操作
内容目录: Django后台表单验证 CSRF加密传输 session.cookie model数据库操作 Django后台Form表单验证 Django中Form一般有2种功能: 1.用于做用户提交 ...
- django form表单验证
一. django form表单验证引入 有时时候我们需要使用get,post,put等方式在前台HTML页面提交一些数据到后台处理例 ; <!DOCTYPE html> <html ...
随机推荐
- Linux - 系统资源
查看剩余内存 free -m #-/+ buffers/cache: #6458M为真实使用内存 1649M为真实剩余内存(剩余内存+缓存+缓冲器) #linux会利用所有的剩余内存作为缓存,所以要保 ...
- resolution will not be reattempted until the update interval of repository-group has elapsed or updates are forced
Failed to execute goal on project safetan-web: Could not resolve dependencies for project com.safeta ...
- Mac下压力测试工具siege
安装: brew install siege 用法: siege -c 并发数 -t 运行测试时间 URL 如: siege -c 1000 -t 5S URL 这里要注意的是-t后面的时间要带单位, ...
- stm32中字节对齐问题(__align(n),__packed用法)
ARM下的对齐处理 from DUI0067D_ADS1_2_CompLib 3.13 type qulifiers 有部分摘自ARM编译器文档对齐部分 对齐的使用: 1.__align(n ...
- mysql逗逼的.frm文件恢复数据库
mysql数据库用.frm文件进行恢复. 背景:mac系统 .frm文件 (1)打开终端:输入cd /usr/local 回车. (2)输入 ls 回车. 这时候 打开finder ---> ...
- Generative Adversarial Nets(原生GAN学习)
学习总结于国立台湾大学 :李宏毅老师 Author: Ian Goodfellow • Paper: https://arxiv.org/abs/1701.00160 • Video: https:/ ...
- Ubuntu14.04+caffe+CPU
刚刚在上篇博客记录了windows10下GPU版本caffe的安装,正准备跑跑论文里的代码,发现好多命令都是.sh命令,这是linux系统的脚本文件.不能直接在windows下运行,于是我想把.sh转 ...
- java中集合的组成及特点
1:集合 Collection(单列集合) List(有序,可重复) ArrayList 底层数据结构是数组,查询快,增删慢 线程不安全,效率高 Vector 底层数据结构是数组,查询快,增删慢 线程 ...
- oracle 监听 添加ip
同时修改tnsnames.ora.listener.ora将这两个文件中HOST后面的主机都修改为127.0.0.1然后重启OracleServiceXE.OracleXETNSListener服务 ...
- igmp组播测试环境搭建
2.4G无线组播测试环境搭建: (1)组播源: VLC 或者 pixstream (2)无线: 2.4G AP (3)客户端PC: VLC播放器 有线直连 无线2.4G PC(组播源pixstream ...