
Android在listview添加checkbox实现单选多选操作问题(转)
转自:http://yangshen998.iteye.com/blog/1310183
在Android某些开发需求当中,有时候需要在listveiw中加入checkbox实现单选,多选操作。表面上看上去只是改变checkbox那么简单,然而实际开发中,实现起来并不是那么得心应手。尤其当listview比较多(比如屏幕最多只能显示10个item,但总共有12个item,也就是说listview的item数大于屏幕能够显示的item数)滑动屏幕的时候,由于适配器中getview()会重复使用被移除屏幕的item,所以会造成checkbox选择状态不正常的现象。自己在开发中碰到这样的问题很是苦恼,查了下资料,发现网上很少没有针对这类批量操作并没有一个完整的例子。搜了很多篇帖子才完美的实现这一常用的操作。所以在这里把这个Demo贴出来,供大家参考,希望能对大家有所帮助。
主界面的布局main.xml 这个就不多说什么
- <?xml version="1.0" encoding="utf-8"?>
- <LinearLayout xmlns:android="http://schemas.android.com/apk/res/android"
- android:layout_width="fill_parent"
- android:layout_height="wrap_content"
- android:orientation="vertical" >
- <LinearLayout
- android:orientation="vertical"
- android:layout_width="fill_parent"
- android:layout_height="wrap_content"
- >
- <TextView
- android:id="@+id/tv"
- android:layout_width="fill_parent"
- android:layout_height="50dip"
- android:textColor="#FCFCFC"
- android:textSize="11pt"
- android:gravity="center_vertical"
- android:layout_marginLeft="10dip"
- />
- <ListView
- android:id="@+id/lv"
- android:layout_width="fill_parent"
- android:layout_height="381dip"
- android:cacheColorHint ="#00000000"
- ></ListView>
- </LinearLayout>
- <RelativeLayout
- android:layout_width="fill_parent"
- android:layout_height="53dip"
- android:orientation="horizontal"
- >
- <Button
- android:id="@+id/selectall"
- android:layout_width="80dip"
- android:layout_height="50dip"
- android:layout_marginLeft="20dip"
- android:text="全选"
- android:gravity="center"
- />
- <Button
- android:id="@+id/inverseselect"
- android:layout_width="80dip"
- android:layout_height="50dip"
- android:layout_marginLeft="118dip"
- android:text="反选"
- android:gravity="center"
- />
- <Button
- android:id="@+id/cancel"
- android:layout_width="80dip"
- android:layout_height="50dip"
- android:layout_marginLeft="213dip"
- android:text="取消已选"
- android:gravity="center"
- />
- </RelativeLayout>
- </LinearLayout>
ListView每个item的布局,listviewitem.xml:
这里需要注意的是,由于checkbox的点击事件优先级比listview的高,所以要添加android:focusable="false"属性,使得checkbox初始的时候没有获取焦点。
另外这里是点击ListView的item控制checkbox的状态改变,也就是让item接收clik事件,所以需要加上android:focusableInTouchMode="false"这一属性。
- <?xml version="1.0" encoding="utf-8"?>
- <RelativeLayout xmlns:android="http://schemas.android.com/apk/res/android"
- android:layout_width="fill_parent"
- android:layout_height="55dip"
- android:orientation="horizontal"
- android:layout_marginTop="20dip"
- >
- <TextView
- android:id="@+id/item_tv"
- android:layout_width="267dip"
- android:layout_height="40dip"
- android:textSize="10pt"
- android:gravity="center_vertical"
- android:layout_marginLeft="10dip"
- />
- <CheckBox
- android:id="@+id/item_cb"
- android:layout_width="wrap_content"
- android:layout_height="wrap_content"
- android:focusable="false"
- android:focusableInTouchMode="false"
- android:clickable="false"
- android:layout_toRightOf="@id/item_tv"
- android:layout_alignParentTop="true"
- android:layout_marginRight="5dip"
- />
- </RelativeLayout >
ViewHolder类
- package simtice.test.listview.viewholder;
- import android.widget.CheckBox;
- import android.widget.TextView;
- public class ViewHolder {
- public TextView tv = null;
- public CheckBox cb = null;
- }
为listview自定义适配器,该类为主Activity类MainActivity.java的内部类
- public static class MyAdapter extends BaseAdapter {
- public static HashMap<Integer, Boolean> isSelected;
- private Context context = null;
- private LayoutInflater inflater = null;
- private List<HashMap<String, Object>> list = null;
- private String keyString[] = null;
- private String itemString = null; // 记录每个item中textview的值
- private int idValue[] = null;// id值
- public MyAdapter(Context context, List<HashMap<String, Object>> list,
- int resource, String[] from, int[] to) {
- this.context = context;
- this.list = list;
- keyString = new String[from.length];
- idValue = new int[to.length];
- System.arraycopy(from, 0, keyString, 0, from.length);
- System.arraycopy(to, 0, idValue, 0, to.length);
- inflater = LayoutInflater.from(context);
- init();
- }
- // 初始化 设置所有checkbox都为未选择
- public void init() {
- isSelected = new HashMap<Integer, Boolean>();
- for (int i = 0; i < list.size(); i++) {
- isSelected.put(i, false);
- }
- }
- @Override
- public int getCount() {
- return list.size();
- }
- @Override
- public Object getItem(int arg0) {
- return list.get(arg0);
- }
- @Override
- public long getItemId(int arg0) {
- return 0;
- }
- @Override
- public View getView(int position, View view, ViewGroup arg2) {
- ViewHolder holder = null;
- if (holder == null) {
- holder = new ViewHolder();
- if (view == null) {
- view = inflater.inflate(R.layout.listviewitem, null);
- }
- holder.tv = (TextView) view.findViewById(R.id.item_tv);
- holder.cb = (CheckBox) view.findViewById(R.id.item_cb);
- view.setTag(holder);
- } else {
- holder = (ViewHolder) view.getTag();
- }
- HashMap<String, Object> map = list.get(position);
- if (map != null) {
- itemString = (String) map.get(keyString[0]);
- holder.tv.setText(itemString);
- }
- holder.cb.setChecked(isSelected.get(position));
- return view;
- }
- }
最后,最重要的就是MainActivity.java中一些事件响应的处理
- public class MainActivity extends Activity {
- TextView tv = null;
- ListView lv = null;
- Button btn_selectAll = null;
- Button btn_inverseSelect = null;
- Button btn_calcel = null;
- String name[] = { "G1", "G2", "G3", "G4", "G5", "G6", "G7", "G8", "G9",
- "G10", "G11", "G12", "G13", "G14" };
- ArrayList<String> listStr = null;
- private List<HashMap<String, Object>> list = null;
- private MyAdapter adapter;
- @Override
- public void onCreate(Bundle savedInstanceState) {
- super.onCreate(savedInstanceState);
- setContentView(R.layout.main);
- tv = (TextView) this.findViewById(R.id.tv);
- lv = (ListView) this.findViewById(R.id.lv);
- btn_selectAll = (Button) this.findViewById(R.id.selectall);
- btn_inverseSelect = (Button) this.findViewById(R.id.inverseselect);
- btn_calcel = (Button) this.findViewById(R.id.cancel);
- showCheckBoxListView();
- //全选
- btn_selectAll.setOnClickListener(new OnClickListener(){
- @Override
- public void onClick(View arg0) {
- listStr = new ArrayList<String>();
- for(int i=0;i<list.size();i++){
- MyAdapter.isSelected.put(i,true);
- listStr.add(name[i]);
- }
- adapter.notifyDataSetChanged();//注意这一句必须加上,否则checkbox无法正常更新状态
- tv.setText("已选中"+listStr.size()+"项");
- }
- });
- //反选
- btn_inverseSelect.setOnClickListener(new OnClickListener(){
- @Override
- public void onClick(View v) {
- for(int i=0;i<list.size();i++){
- if(MyAdapter.isSelected.get(i)==false){
- MyAdapter.isSelected.put(i, true);
- listStr.add(name[i]);
- }
- else{
- MyAdapter.isSelected.put(i, false);
- listStr.remove(name[i]);
- }
- }
- adapter.notifyDataSetChanged();
- tv.setText("已选中"+listStr.size()+"项");
- }
- });
- //取消已选
- btn_calcel.setOnClickListener(new OnClickListener(){
- @Override
- public void onClick(View v) {
- for(int i=0;i<list.size();i++){
- if(MyAdapter.isSelected.get(i)==true){
- MyAdapter.isSelected.put(i, false);
- listStr.remove(name[i]);
- }
- }
- adapter.notifyDataSetChanged();
- tv.setText("已选中"+listStr.size()+"项");
- }
- });
- }
- // 显示带有checkbox的listview
- public void showCheckBoxListView() {
- list = new ArrayList<HashMap<String, Object>>();
- for (int i = 0; i < name.length; i++) {
- HashMap<String, Object> map = new HashMap<String, Object>();
- map.put("item_tv", name[i]);
- map.put("item_cb", false);
- list.add(map);
- adapter = new MyAdapter(this, list, R.layout.listviewitem,
- new String[] { "item_tv", "item_cb" }, new int[] {
- R.id.item_tv, R.id.item_cb });
- lv.setAdapter(adapter);
- listStr = new ArrayList<String>();
- lv.setOnItemClickListener(new OnItemClickListener() {
- @Override
- public void onItemClick(AdapterView<?> arg0, View view,
- int position, long arg3) {
- ViewHolder holder = (ViewHolder) view.getTag();
- holder.cb.toggle();// 在每次获取点击的item时改变checkbox的状态
- MyAdapter.isSelected.put(position, holder.cb.isChecked()); // 同时修改map的值保存状态
- if (holder.cb.isChecked() == true) {
- listStr.add(name[position]);
- } else {
- listStr.remove(name[position]);
- }
- tv.setText("已选中"+listStr.size()+"项");
- }
- });
- }
- }
- //为listview自定义适配器内部类
- public static class MyAdapter extends BaseAdapter {
- ...
- }
- }
好了,来看运行结果
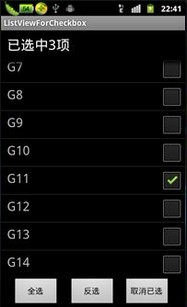
我选择了G2、G3、G11三项,现在屏幕滑动到底部,看以看到状态保存的很好,TextView显示已选中3项。全选、反选、取消全选功能正常,多选操作完美解决!
Android在listview添加checkbox实现单选多选操作问题(转)的更多相关文章
- Android在listview添加checkbox实现单选多选操作问题
android根据View的不同状态更换不同的背景http://www.eoeandroid.com/thread-198029-1-1.html android 模仿朋友网推出的菜单效果[改进版]h ...
- 完美解决Android在listview添加checkbox实现单选多选操作问题
在Android某些开发需求当中,有时候需要在listveiw中加入checkbox实现单选,多选操作.表面上看上去只是改变checkbox那么简单,然而实际开发中,实现起来并不是那么得心应手.尤其当 ...
- Android之listview添加数据篇
一.ListView: 1. ListView通常有两个职责: 1.向布局填充数据 2.处理选择点击等操作 2.ListView的创建需要3个元素: 1. ListView中的每一列的View. 2. ...
- Android中ListView结合CheckBox判断选中项
本文主要实现在自定义的ListView布局中加入CheckBox控件,通过判断用户是否选中CheckBox来对ListView的选中项进行相应的操作.通过一个Demo来展示该功能,选中ListView ...
- JsTree中节点添加CheckBox 以及 单选的实现
stree中添加checkbox,需要在初始化时设置plugins属性: 1 2 3 4 5 6 7 8 9 10 11 12 13 14 $('#DpTree').data('jstree', fa ...
- ListView加checkBox可以实现全选等功能
1.效果图 2.LIteView_item布局 <?xml version="1.0" encoding="utf-8"?> <Relativ ...
- checkbox的单选全选,反选,计算价格,删除
activity_main.xml <LinearLayout xmlns:android="http://schemas.android.com/apk/res/android&qu ...
- Android ListView带CheckBox实现单选
第1种方法: 首先是我们的bean: public class Bean { private boolean isChecked; private String msg = "这是一条测试数 ...
- Android 的 ListView 的CheckBox标题栏显示文本之后显示单选框
https://blog.csdn.net/u013790519/article/details/50036223 2.CheckBox的android:button=”@null”属性代码设置如下: ...
随机推荐
- 【leetcode】Substring with Concatenation of All Words
Substring with Concatenation of All Words You are given a string, S, and a list of words, L, that ar ...
- wxPython+Boa Constructor环境配置
配置之前先完成eclipse + Pydev的配置环境.详见http://www.cnblogs.com/dflower/archive/2010/05/13/1734522.html 1. 安装 w ...
- oracle 学习
一.数据库语言部分1. SQL语言:关系数据库的标准语言2. PL/SQL:过程化语言Procedural Language3. SQL*Plus:简单的报表,操作系统接口 4. Oracle 8.0 ...
- Zookeeper WINDOWS 安装配置
下载:zookeeper:http://mirrors.hust.edu.cn/apache/zookeeper/zookeeper-3.4.6/zookeeper-3.4.6.tar.gz 解压zo ...
- JS 循环练习
规律 大范围套小范围 循环 分支语句 switch case 嵌套 死循环 while(true) 打破循环 break continue while(true) ...
- mvc EF
一:数据库不存在时重新创建数据库 复制内容到剪贴板程序代码 Database.SetInitializer<testContext>(new CreateDatabaseIfNotExis ...
- 【leetcode】triangle(easy)
Given a triangle, find the minimum path sum from top to bottom. Each step you may move to adjacent n ...
- docker基础命令
docker version ...
- 获得同级iframe页面的指定ID元素的几种实现方法
1.JS实现: var object= window.parent.frames("要获得的iframe的name").contentDocument.getElementById ...
- [Android Pro] Java进阶学习:jar打包详解
jar文件听说过吗,没有?或者陌生!好,没关系,这就是我们的第一站:打包发布. 为什么会有这个玩意呢,首先,这是jar的全称:JavaTM Archive (JAR) file,是的,就是java存档 ...