Java WebService入门实例
Web Services是由企业发布的完成其特定商务需求的在线应用服务,其他公司或应用软件能够通过Internet来访问并使用这项在线服务。
Web Service的关键技术和规则:
1.XML:描述数据的标准方法.
2.SOAP:表示信息交换的协议(简单对象访问协议).
3.WSDL:Web服务描述语言.
4.UDDI:通用描述、发现与集成,他是一种独立于平台,基于XML语言的用于在互联网上描述商务的协议。
一、利用JDK web服务api实现,这里使用基于SOAP message的Web Service:
1.首先创建一个Web Services项目,作为Web services Endpoint.
2.创建一个HelloService.java类
- package com.yjpeng.hello;
- import javax.jws.WebService;
- import javax.jws.WebMethod;
- import javax.xml.ws.Endpoint;
- @WebService
- public class HelloService {
- @WebMethod
- public String sayHello(String message){
- return "Hello ," + message;
- }
- public static void main(String[] args) {
- //create and publish an endPoint
- HelloService hello = new HelloService();
- Endpoint endPoint = Endpoint.publish("http://localhost:8080/helloService", hello);
- }
- }
3.使用apt编译HelloService.java(例如: apt -d bin(bin存放编译后的文件目录) scr/com/yjpeng/hello/HelloService.java)后,会生成jaxws目录。
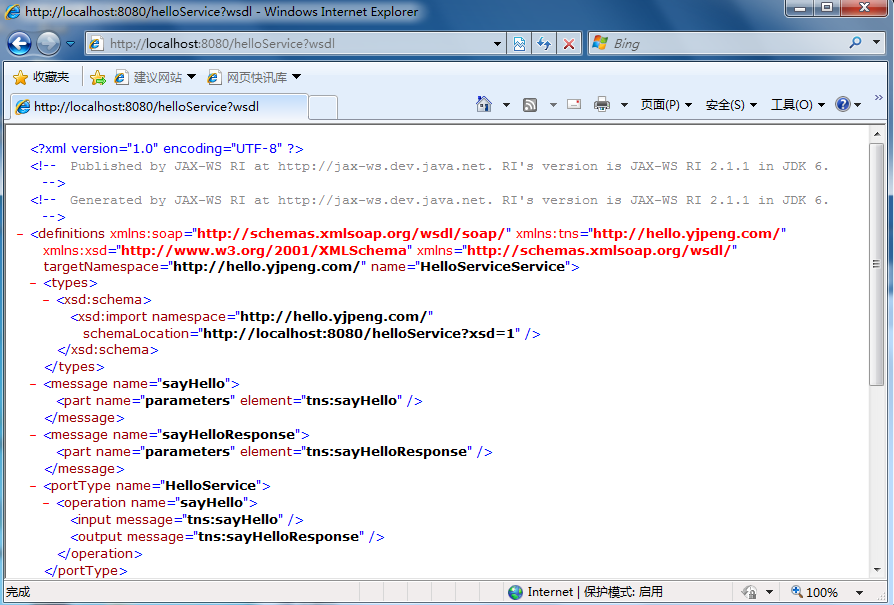
4.使用java com.yjpeng.hello.HelloService执行HelloService.java文件,在浏览器中输入http://localhost:8080/helloService?wsdl出现如下图
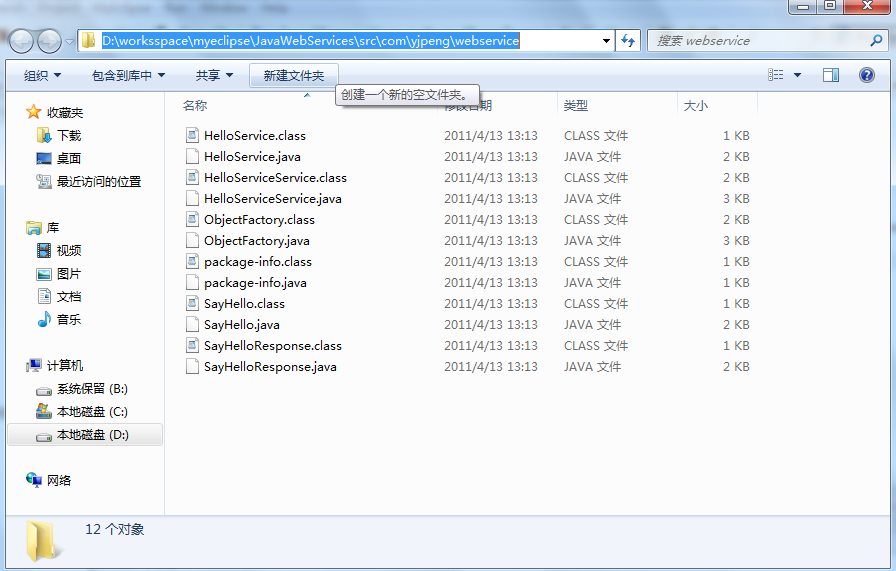
5.使用wsimport命令生成客户端:wsimport -p com.yjpeng.webservice -keep http://localhost:8080/helloService?wsdl 这时会在当前目录中生成如下文件:
6.编写好客户端文件HelloClient.java
- package com.yjpeng.hello;
- import com.yjpeng.webservice.HelloServiceService;
- public class HelloClient {
- public static
void main(String[] args) { - HelloServiceService helloServiceService =
new HelloServiceService(); - com.yjpeng.webservice.HelloService helloService = helloServiceService.getHelloServicePort();
- System.out.println(helloService.sayHello("你好"));
- }
- }
- package com.yjpeng.hello;
- import com.yjpeng.webservice.HelloServiceService;
- public class HelloClient {
- public static void main(String[] args) {
- HelloServiceService helloServiceService = new HelloServiceService();
- com.yjpeng.webservice.HelloService helloService = helloServiceService.getHelloServicePort();
- System.out.println(helloService.sayHello("你好"));
- }
- }
运行结果在控制台输出 hello,你好 证明利用JDK web服务API实现web service成功!
二、使用xfire框架,我这里使用的是MyEclipse集成的xfire进行测试,利用xfire开发WebService可以有三种方法:
a.一种是从JavaBean中生成。
b.一种是从wsdl文件中生成。
c.一种是自己建立webservice。
具体实现步骤如下:
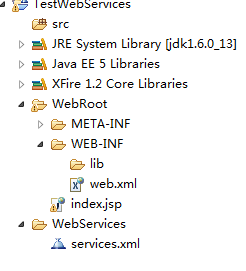
1.用Myeclipse建立webService工程(注意:Web Service&J2EE Details中的Framework选XFire),目录结构如下:
2.创建IHello.java接口
- package com.yjpeng.hello;
- public interface IHello {
- public String sayHello(String message);
- }
- package com.yjpeng.hello;
- public interface IHello {
- public String sayHello(String message);
- }
3.创建IHelloImpl.java实现IHello.java接口
- package com.yjpeng.hello;
- public class IHelloImpl implements IHello {
- public String sayHello(String message) {
- return message;
- }
- }
- package com.yjpeng.hello;
- public class IHelloImpl implements IHello {
- public String sayHello(String message) {
- return message;
- }
- }
4.修改Service.xml文件,加入以下代码
<service>
<!-- 为该Service起一个名字 -->
<name>HelloService</name>
<!-- service的接口类 -->
<serviceClass>
com.yjpeng.hello.IHello
</serviceClass>
<!-- service的接口实现类-->
<implementationClass>
com.yjpeng.hello.IHelloImpl
</implementationClass>
<!-- wsdl的样式-->
<style>wrapped</style>
<use>literal</use>
<scope>application</scope>
</service>
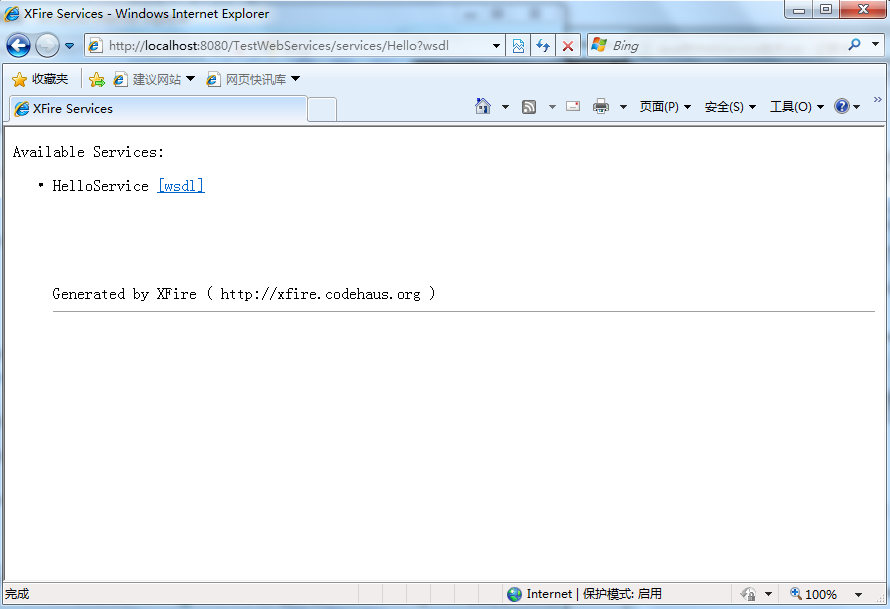
5.把该Web Service项目部署到tomcat里面启动tomcat在浏览器地址栏输入http://localhost:8080/TestWebServices/services/Hello?wsdl 出现如下图
6.然后在展开HelloService后面的wsdl可以看到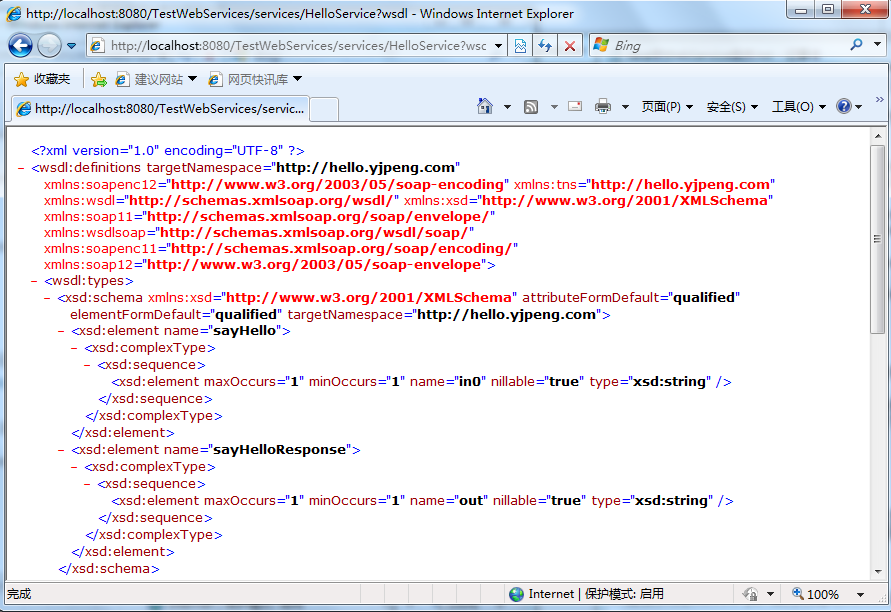
7.创建一个客户端HelloClient.java类
- import java.net.MalformedURLException;
- import java.net.URL;
- import org.codehaus.xfire.XFireFactory;
- import org.codehaus.xfire.client.Client;
- import org.codehaus.xfire.client.XFireProxyFactory;
- import org.codehaus.xfire.service.Service;
- import org.codehaus.xfire.service.binding.ObjectServiceFactory;
- import com.yjpeng.hello.IHello;
- public class HelloClient {
- public static
void main(String[] args) { - Service s = new ObjectServiceFactory().create(IHello.class);
- XFireProxyFactory xf = new XFireProxyFactory(XFireFactory.newInstance().getXFire());
- String url="http://192.168.122.128:8080/TestWebServices/services/HelloService";
- IHello hello;
- try {
- hello = (IHello)xf.create(s, url);
- System.out.println(hello.sayHello("你好"));
- } catch (MalformedURLException e) {
- e.printStackTrace();
- }
- try {
- //这个是在java端调用.net写的远程Web Service 如果调用本机写的只需要把URL中的地址换成本机能访问的地址即可
- Client c = new Client(new URL("http://www.webxml.com.cn/webservices/qqOnlineWebService.asmx?wsdl"));
- Object[] o = c.invoke("qqCheckOnline",
new String[]{"271751507"}); - System.out.println(o.length);
- } catch (Exception e) {
- e.printStackTrace();
- }
- }
- }
- import java.net.MalformedURLException;
- import java.net.URL;
- import org.codehaus.xfire.XFireFactory;
- import org.codehaus.xfire.client.Client;
- import org.codehaus.xfire.client.XFireProxyFactory;
- import org.codehaus.xfire.service.Service;
- import org.codehaus.xfire.service.binding.ObjectServiceFactory;
- import com.yjpeng.hello.IHello;
- public class HelloClient {
- public static void main(String[] args) {
- Service s = new ObjectServiceFactory().create(IHello.class);
- XFireProxyFactory xf = new XFireProxyFactory(XFireFactory.newInstance().getXFire());
- String url="http://192.168.122.128:8080/TestWebServices/services/HelloService";
- IHello hello;
- try {
- hello = (IHello)xf.create(s, url);
- System.out.println(hello.sayHello("你好"));
- } catch (MalformedURLException e) {
- e.printStackTrace();
- }
- try {
- //这个是在java端调用.net写的远程Web Service 如果调用本机写的只需要把URL中的地址换成本机能访问的地址即可
- Client c = new Client(new URL("http://www.webxml.com.cn/webservices/qqOnlineWebService.asmx?wsdl"));
- Object[] o = c.invoke("qqCheckOnline", new String[]{"271751507"});
- System.out.println(o.length);
- } catch (Exception e) {
- e.printStackTrace();
- }
- }
- }
运行HelloClient.java类可以输出 你好 1.
三、使用axis1.4开发webservice方法
首先下载axis1.4包和tomcat服务器,并将解压后的axis1.4包下面的webapps下的axis目录复制到tomcat服务器的webapps文件夹中。axis支持三种Web Service的部署和开发,分别为:
a.Dynamic Invocation Interface(DII)
b.Stubs 方式
c.Dynamic Proxy方式
1.编写DII(Dynamic Invocation Interface)方式Web Service
a.编写服务程序HelloClient.java
- public class HelloClient
- {
- public String getName(String name){
- return "hello," + name;
- }
- }
- public class HelloClient
- {
- public String getName(String name){
- return "hello," + name;
- }
- }
b.将HelloClient.java文件拷贝到axis_home下,重命名为HelloClient.jws.
c.访问链接http://localhost:8080/axis/HelloClient.jws?wsdl页面显示axis自动生成的wsdl文件
d.编写访问服务的客户端TestHelloClient.java需要导入相应的axis.jar包,在下载的axis的WEB-INF/lib/目录下。
- package com.yjpeng.webservice;
- import java.net.URL;
- import javax.xml.namespace.QName;
- import org.apache.axis.client.Call;
- import org.apache.axis.client.Service;
- public class TestHelloClient {
- public static
void main(String[] args){ - try{
- String endpoint = "http://localhost:8080/axis/HelloClient.jws";
- Service service = new Service();
- Call call = (Call)service.createCall();
- call.setOperationName(new QName(endpoint,
"getName")); - call.setTargetEndpointAddress(new URL(endpoint));
- String result = (String) call.invoke(new Object[]{"张三"});
- System.out.println(result);
- }catch (Exception e) {
- e.printStackTrace();
- }
- }
- }
- package com.yjpeng.webservice;
- import java.net.URL;
- import javax.xml.namespace.QName;
- import org.apache.axis.client.Call;
- import org.apache.axis.client.Service;
- public class TestHelloClient {
- public static void main(String[] args){
- try{
- String endpoint = "http://localhost:8080/axis/HelloClient.jws";
- Service service = new Service();
- Call call = (Call)service.createCall();
- call.setOperationName(new QName(endpoint, "getName"));
- call.setTargetEndpointAddress(new URL(endpoint));
- String result = (String) call.invoke(new Object[]{"张三"});
- System.out.println(result);
- }catch (Exception e) {
- e.printStackTrace();
- }
- }
- }
运行TestHelloClient.java在控制台输出hell,张三,测试成功.
2.编写Dynamci Proxy方式访问服务
a.编写部署服务端程序,用上边DII方式使用的HelloClient.java
- public class HelloClient
- {
- public String getName(String name){
- return "hello," + name;
- }
- }
- public class HelloClient
- {
- public String getName(String name){
- return "hello," + name;
- }
- }
b.编写代理接口HelloClientInterface.java需要扩展java.rmi.Remote类
- package com.yjpeng.dynamic.proxy;
- import java.rmi.Remote;
- import java.rmi.RemoteException;
- public interface HelloClientInterface extends Remote {
- public String getName(String name) throws RemoteException;
- }
- package com.yjpeng.dynamic.proxy;
- import java.rmi.Remote;
- import java.rmi.RemoteException;
- public interface HelloClientInterface extends Remote {
- public String getName(String name) throws RemoteException;
- }
c.编写访问服务的客户端TestHelloClient.java
- package com.yjpeng.dynamic.proxy;
- import java.net.URL;
- import javax.xml.namespace.QName;
- import javax.xml.rpc.Service;
- import javax.xml.rpc.ServiceFactory;
- public class TestHelloClient {
- public static
void main(String[] args){ - try{
- String wsdlUrl = "http://localhost:8080/axis/HelloClient.jws?wsdl";
- String nameSpaceUrl = "http://localhost:8080/axis/HelloClient.jws";
- String serviceName = "HelloClientService";
- String portName = "HelloClient";
- ServiceFactory serviceFactory = ServiceFactory.newInstance();
- Service afService = serviceFactory.createService(new URL(wsdlUrl),
new QName(nameSpaceUrl, serviceName)); - HelloClientInterface proxy = (HelloClientInterface)afService.getPort(new QName(nameSpaceUrl, portName),
- HelloClientInterface.class);
- System.out.println(proxy.getName("张三"));
- }catch (Exception e) {
- e.printStackTrace();
- }
- }
- }
- package com.yjpeng.dynamic.proxy;
- import java.net.URL;
- import javax.xml.namespace.QName;
- import javax.xml.rpc.Service;
- import javax.xml.rpc.ServiceFactory;
- public class TestHelloClient {
- public static void main(String[] args){
- try{
- String wsdlUrl = "http://localhost:8080/axis/HelloClient.jws?wsdl";
- String nameSpaceUrl = "http://localhost:8080/axis/HelloClient.jws";
- String serviceName = "HelloClientService";
- String portName = "HelloClient";
- ServiceFactory serviceFactory = ServiceFactory.newInstance();
- Service afService = serviceFactory.createService(new URL(wsdlUrl), new QName(nameSpaceUrl, serviceName));
- HelloClientInterface proxy = (HelloClientInterface)afService.getPort(new QName(nameSpaceUrl, portName),
- HelloClientInterface.class);
- System.out.println(proxy.getName("张三"));
- }catch (Exception e) {
- e.printStackTrace();
- }
- }
- }
运行TestHelloClient.java在控制台输出hell,张三,测试成功.
四、使用axis2开发webservice
研究中....
五、在java web项目中开放一个webservice接口实例
1.引入需要的jar包

2.创建一个接口类IAddNumbers.java
- package com.yjpeng.webservice;
- public interface IAddNumbers {
- public int addNumbers(int a,
int b); - }
- package com.yjpeng.webservice;
- public interface IAddNumbers {
- public int addNumbers(int a, int b);
- }
3.创建一个AddNumberImpl.java实现IAddnumbers.java接口类
- package com.yjpeng.webservice;
- import javax.jws.WebService;
- import com.sun.xml.ws.transport.http.servlet.WSServlet;
- @WebService(targetNamespace="http://webservice.yjpeng.com", serviceName="AddNumberImplService",
- portName="AddNumberImpl")
- public class AddNumberImpl implements IAddNumbers {
- public int addNumbers(int a,
int b) { - return a + b;
- }
- }
- package com.yjpeng.webservice;
- import javax.jws.WebService;
- import com.sun.xml.ws.transport.http.servlet.WSServlet;
- @WebService(targetNamespace="http://webservice.yjpeng.com", serviceName="AddNumberImplService",
- portName="AddNumberImpl")
- public class AddNumberImpl implements IAddNumbers {
- public int addNumbers(int a, int b) {
- return a + b;
- }
- }
4.在WEN-INF目录下创建一个sun-jaxws.xml文件
- <?xml version="1.0"?>
- <endpoints version="2.0"
- xmlns="http://java.sun.com/xml/ns/jax-ws/ri/runtime">
- <endpoint name="AddNumberImpl"
- implementation="com.yjpeng.webservice.AddNumberImpl"
- url-pattern="/addNumberImpl"/>
- </endpoints>
- <?xml version="1.0"?>
- <endpoints version="2.0"
- xmlns="http://java.sun.com/xml/ns/jax-ws/ri/runtime">
- <endpoint name="AddNumberImpl"
- implementation="com.yjpeng.webservice.AddNumberImpl"
- url-pattern="/addNumberImpl"/>
- </endpoints>
5.在web.xml文件中增加
- <servlet>
- <servlet-name>AddNumberService</servlet-name>
- <servlet-class>com.sun.xml.ws.transport.http.servlet.WSServlet</servlet-class>
- <load-on-startup>1</load-on-startup>
- </servlet>
- <servlet-mapping>
- <servlet-name>AddNumberService</servlet-name>
- <url-pattern>/addNumberImpl</url-pattern>
- </servlet-mapping>
- <listener>
- <listener-class>com.sun.xml.ws.transport.http.servlet.WSServletContextListener</listener-class>
- </listener>
6.部署web项目 启动相应部署服务器。访问http://localhost:8080/TestJaxWebService/addNumberImpl?wsdl 这样每次启动web服务器就开放了一个web service的接口。
相关:
cxf:源码:https://github.com/apache/cxf
axis1 和 axis2 的简单使用
利用AXIS开发Webservice(一) —— 如何发布自己的webservice
Java WebService入门实例的更多相关文章
- WebService入门实例教程
什么是WebService 通过使用WebService,您的应用程序可以向全世界发布信息,或提供某项功能,它是基于Web的服务,通过Web进行发布.查找和使用. WebService脚本平台需支持X ...
- 主题:Java WebService 简单实例
链接地址:主题:Java WebService 简单实例 http://www.iteye.com/topic/1135747 前言:朋友们开始以下教程前,请先看第五大点的注意事项,以避免不必要 ...
- java rmi 入门实例
java rmi 入门实例 (2009-06-16 16:07:55) 转载▼ 标签: java rmi 杂谈 分类: java-基础 java rmi即java远程接口调用,实现了2台虚拟机之 ...
- Java AIO 入门实例(转)
Java7 AIO入门实例,首先是服务端实现: 服务端代码 SimpleServer: public class SimpleServer { public SimpleServer(int port ...
- webservice入门实例,CXF方式
1.下载CXF,及先关jar包. CXF 下载地址:http://cxf.apache.org/download.html,选择"File"列中的zip格式下载.解压后可以看到一些 ...
- Java WebService 简单实例
前言:朋友们开始以下教程前,请先看第五大点的注意事项,以避免不必要的重复操作. 一.准备工作(以下为本实例使用工具) 1.MyEclipse10.7.1 2.JDK 1.6.0_22 二.创建服务端 ...
- Java WebService 简单实例[转]
http://www.cnblogs.com/yisheng163/p/4524808.html?utm_source=tuicool 前言:朋友们开始以下教程前,请先看第五大点的注意事项,以避免不必 ...
- Java WebService简单实例
一.准备工作(以下为本实例使用工具) 1.MyEclipse10.7.1 2.JDK 1.6.0_22 二.创建服务端 1.创建[Web Service Project],命名为[TheService ...
- Java WebService 简单实例[转载]
[注意,本文转载自 http://hyan.iteye.com/ ] 一.准备工作(以下为本实例使用工具) 1.MyEclipse10.7.1 2.JDK 1.6.0_22 二.创建服务端 1 ...
随机推荐
- 基础R绘图
前言: 在前面介绍了R的基础入门语法之后,现也将最近整理好的一些R的基础绘图实例提供给需要的朋友参考.(温馨提示:代码慎用!按照本博文实例进行练习的话最好能做到举一反三.代码多敲方为上策,切不可隔岸观 ...
- 重新认识unicode和utf8编码
重新认识unicode和utf8编码 直到今天,准确的说是刚才,我才知道UTF-8编码和Unicode编码是不一样的,是有区别的囧 他们之间是有一定的联系的,看看他们的区别: UTF-8的长度是不一定 ...
- Java反射API使用实例
/** * 访问Class对应的类所包含的注释:getAnnotation();getDelaredAnnotation(); * 访问Class对应的类所包含的内部类:getDecl ...
- hdu 2010 - 水仙花数
题意: 数学上有个水仙花数,他是这样定义的:"水仙花数"是指一个三位数,它的各位数字的立方和等于其本身,比如:153=1^3+5^3+3^3.现在要求输出所有在m和n范围内的水仙花 ...
- MySql中时间比较的实现
unix_timestamp 函数可以接受一个参数,也可以不使用参数.它的返回值是一个无符号的整数.不使用参数,它返回自1970年1月1日0时0分0秒到现在所经过的秒数,如果 使用参数,参数的 ...
- Mysql备份还原数据库之mysqldump实例及参数详细说明
[root@localhost myexport]# mysqldump -h211.100.75.204 -uroot -p@^#coopen -P5029 --single-transaction ...
- hihoCoder1284机会渺茫(唯一分解定理 + 约分)
题目链接 #1284 : 机会渺茫 时间限制:5000ms 单点时限:1000ms 内存限制:256MB 描述 小Hi最近在追求一名学数学的女生小Z.小Z其实是想拒绝他的,但是找不到好的说辞,于是提出 ...
- sql附加数据库错误5120
http://zhidao.baidu.com/link?url=p1o8EjUhn-RYFt1D4uIM-5HQF1oXZIRlPGaDiZ2FRMDzZDG1ooSARfkoPWG6SzTJTN6 ...
- 《零成本实现Web性能测试:基于Apache JMeter》读书笔记
1.性能测试概念 性能测试目的: 评估系统能力,验证系统是否符合预期性能指标 识别系统中的弱点 系统调优,改进系统性能 检测长时间运行可能发生的问题,揭示隐含问题 验证稳定性.可靠性 常见性能指标 B ...
- re正则表达式7_{}
curly brackets {} instead of one number, you can specify a range by writing a minimum,a comma,and a ...