【接口】SpringBoot+接口开发(一)
一、接口的简单介绍
1.什么是接口:接口及服务;
2.接口的分类:(1)系统的内部接口;(2)第三方的外部接口;
3.简述接口原理图:
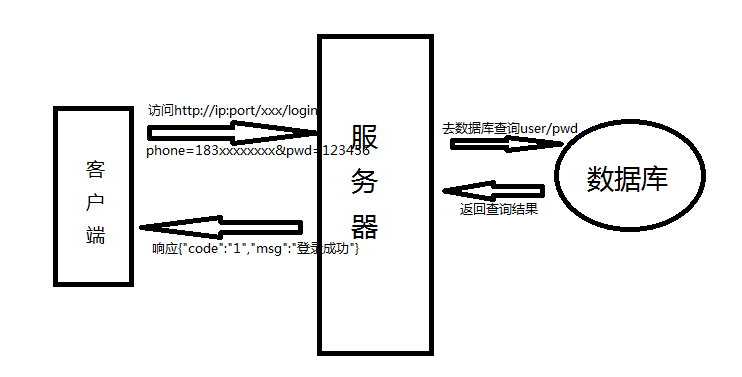
4.接口协议:是指客户端跟服务器之间或者接口与接口间进行的通讯时必须要遵从的约定和要求;
互联网上 应用最为广泛的一种网络协议--http协议(超文本传输协议),因此最常见的就是http协议的接口.(webservice接口,dubbo接口等都是基于http协议)
5.http协议的组成
请求:

1.url统一资源定位符(接口地址)

2.请求方式(get,post,put,delete)

3.请求参数

4.请求格式

5.请求头:携带服务器关于客户端的一些信息

6.协议版本

响应:

1.响应的状态码

2.响应头:携带客关于服务器的一些信息给客户端

3.响应报文
6.接口的本质
(1) 接口就是服务,功能的实现,本质就是基于某协议下实现的一个函数,例如登录界面请求xxx/login.html地址的时候,通过路径
映射,请求到login()函数进行处理.
(2) 接口的传参对应了函数的参数(接口测试参数--函数参数),接口的响应报文对应了函数定义的返回值(接口响应报文--函数的返回值)
二、引入微服务架构Spring Boot,我们只需要导入我们本次需求需要的依赖包即可!


 <!-- 引入springboot默认提供的一套依赖 -->

<parent>

    <groupId>org.springframework.boot</groupId>

    <artifactId>spring-boot-starter-parent</artifactId>

    <version>2.1.1.RELEASE</version>

</parent>

<dependencies>

    <!-- 提供了web模块的依赖  -->

    <dependency>

        <groupId>org.springframework.boot</groupId>

        <artifactId>spring-boot-starter-web</artifactId>

        <version>2.1.1.RELEASE</version>

    </dependency>

    <!-- 热部署  -->

    <dependency>

        <groupId>org.springframework.boot</groupId>

        <artifactId>spring-boot-devtools</artifactId>

        <scope>provided</scope>

        <optional>true</optional>

    </dependency>

    <dependency>

        <groupId>mysql</groupId>

        <artifactId>mysql-connector-java</artifactId>

        <version>8.0.13</version>

    </dependency>

</dependencies>
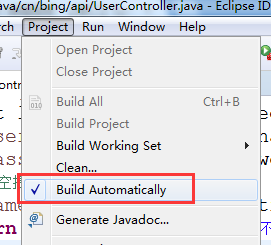
注入:eclipse导入热部署依赖后需要勾选项
导入mysql依赖:
<dependency>

    <groupId>mysql</groupId>

    <artifactId>mysql-connector-java</artifactId>

    <version>5.1.38</version>

</dependency>
三、代码实现简单接口功能如下:
1.get请求:http://IP:端口/user/login?username=xxx&password=123456

2.数据库验证,请求参数是否存在:username=xxx&password=123456,如果不存在提示检查信息,如果存在登录成功

2.json格式响应数据:{"status":"1","message":"登录成功"}
1.新建Application类,SpringBoot入口程序
package cn.bing.starter;

import org.springframework.boot.SpringApplication;

import org.springframework.boot.autoconfigure.SpringBootApplication;

import org.springframework.context.annotation.ComponentScan;

/**Spring boot 入口启动程序,sprint boot内置了tomcat

 * @author Administrator

 */

@ComponentScan(basePackages= {"cn.bing.api"})//扫描组件

@SpringBootApplication//定义sprintboot入口程序

public class Application {

    public static void main(String[] args) {

        SpringApplication.run(Application.class,args);

    }

}
2.实现SQL数据库查询工具类
(1)请根据自己实现情况,配置连接数据库参数jdbc.properties
jdbc.driver=com.mysql.jdbc.Driver

jdbc.url=jdbc:mysql://localhost:3306/my_test?serverTimezone=UTC&useUnicode=true&characterEncoding=utf-8

jdbc.username=sql-name

jdbc.password=sql-password
(2)实现SQlUtil工具类
package cn.bing.util;

import java.io.File;

import java.io.FileInputStream;

import java.sql.Connection;

import java.sql.DriverManager;

import java.sql.PreparedStatement;

import java.sql.ResultSet;

import java.sql.SQLException;

import java.util.HashMap;

import java.util.Properties;

import cn.bing.pojo.User;

public class SQLUtil {

    /**

        *   静态代码块加载后,用map来存储jdbc连接数据库的信息

     */

    public static HashMap<String, String> map = new HashMap<String, String>();

    static {

        //加载properties文件获取连接SQL数据库的参数

        Properties properties = new Properties();

        try {

            properties.load(new FileInputStream(new File("src/test/resources/jdbc.properties")));

        } catch (Exception e) {

            e.printStackTrace();

        }

        map.put("url", properties.getProperty("jdbc.url"));

        map.put("name", properties.getProperty("jdbc.username"));

        map.put("pwd", properties.getProperty("jdbc.password"));

    }

    /**传入user进入数据库查询是否存在,返回大于1存在,返回0则不存在

     * @param user

     */

    public static int findSQL(User user) {

        //根据SQL查询结果为数量num,假设没有查到为0

        int num =0;

        //取出需要查询的数据username和password

        String username = user.getUsername();

        String password = user.getPassword();

        String sql ="select count(*) as number from user_test where name='"+username+"'"+"and password='"+password+"'";

        Connection connection =null;

        try {

            //1.创建连接

            connection = DriverManager.getConnection(map.get("url"),map.get("name"),map.get("pwd"));

            //2.获得一个statement对象,将要执行的sql脚本封装到此对象中

            PreparedStatement statement =connection.prepareStatement(sql);

            ResultSet ResultSet = statement.executeQuery();

            while(ResultSet.next()) {

                num =ResultSet.getInt("number");

            }

        } catch (SQLException e) {

            e.printStackTrace();

        }finally {

            try {

                connection.close();//关闭连接

            } catch (SQLException e) {

                e.printStackTrace();

            }

        }

        return num;

    }

}
3.新建user对象
package cn.bing.pojo;

public class User {

    private String username;

    private String password;

    public String getUsername() {

        return username;

    }

    public void setUsername(String username) {

        this.username = username;

    }

    public String getPassword() {

        return password;

    }

    public void setPassword(String password) {

        this.password = password;

    }

    public User(String username, String password) {

        super();

        this.username = username;

        this.password = password;

    }

    public User() {

        super();

    }

}
4.新建Result对象,响应时=>序列化为json格式返回
package cn.bing.pojo;

public class Result {

    //接口返回状态标志:1:代表接口正常处理,返回成功; 0:代表处理异常,返回失败

    private String status;

    private String message;

    public String getStatus() {

        return status;

    }

    public void setStatus(String status) {

        this.status = status;

    }

    public String getMessage() {

        return message;

    }

    public void setMessage(String message) {

        this.message = message;

    }

    public Result(String status, String message) {

        super();

        this.status = status;

        this.message = message;

    }

    public Result() {

        super();

    }

    @Override

    public String toString() {

        return "Result [status=" + status + ", message=" + message + "]";

    }

}
5.中央控制器的实现类
package cn.bing.api; import org.springframework.web.bind.annotation.RequestMapping;
import org.springframework.web.bind.annotation.RestController; import cn.bing.pojo.Result;
import cn.bing.pojo.User;
import cn.bing.util.SQLUtil; /**controller:控制器(实现请求分发,一般会在控制器当中定义接口)
* @author Administrator
*
*/
@RestController//控制器类
@RequestMapping("/user")//映射路径
public class UserController {
//登录接口 http://ip:端口/user/login
@RequestMapping(value="/login")
public Result login(User user) {
String username = user.getUsername();
String password = user.getPassword();
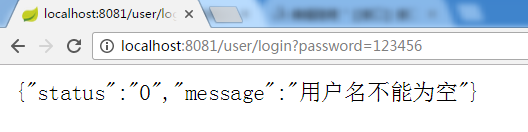
//1.用户名为空提示"用户名不能为空"
if(username==null || username.trim().length()==0) {
return new Result("0","用户名不能为空");
}
//2.密码为空,提示"密码不能为空"
if(password==null || password.trim().length()==0) {
return new Result("0","密码不能为空");
}
//3.用户名密码不为空的情况下jdbc完成数据库查询验证
if(username != null && password!=null) {
int num = SQLUtil.findSQL(user);
System.out.println("-------------------------"+num+"--------------------------------");
if(num>0) {
return new Result("1", "登录成功");
}
}
return new Result("0","请核对账密信息!");
}
}
四.运行Application类,启动SpringBoot程序,访问接口结果如下:


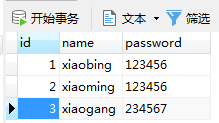
补充:数据库保存用户名及密码截图
五、扩展:
1.如果@RequestMapping(value="/login",method=RequestMethod.GET,仅支持get访问
@RestController//控制器类

@RequestMapping("/user")//映射路径

public class UserController {

    @RequestMapping(value="/login",method=RequestMethod.GET")

    public Result login(User user) {
    ... ...
    }
}

2.如果@RequestMapping(value="/login",method=RequestMethod.POST),仅支持post访问
@RestController//控制器类

@RequestMapping("/user")//映射路径

public class UserController {

    @RequestMapping(value="/login",method=RequestMethod.POST")

    public Result login(User user) {

    ... ...

    }

}

3.规定传参格式:consumes="application/json"
4. @RequestBody需要把所有请求参数作为json解析,因此,不能包含key=value这样的写法在请求url中,所有的请求参数都是一个json
//@RequestBody(required=false)

Whether body content is required.

Default is true, leading to an exception thrown in case there is no body content. Switch this to false if you prefer null to be passed when the body content is null.
百度翻译:默认值为true,在没有正文内容的情况下会引发异常。如果您希望在正文内容为null时传递null,请将其切换为false。
@RestController//控制器类

@RequestMapping("/user")//映射路径

public class UserController {

    @RequestMapping(value="/login",method=RequestMethod.POST,consumes="application/json")

    public Result login(@RequestBody(required=false)User user) {
    ... ...
  }
}
六、未完待优化。。。。。
【接口】SpringBoot+接口开发(一)的更多相关文章
- 2、SpringBoot接口Http协议开发实战8节课(1-6)
1.SpringBoot2.xHTTP请求配置讲解 简介:SpringBoot2.xHTTP请求注解讲解和简化注解配置技巧 1.@RestController and @RequestMapping是 ...
- 小D课堂【SpringBoot】接口Http协议开发实战
---恢复内容开始--- ====================2.SpringBoot接口Http协议开发实战 ============================= 1.SpringBoot ...
- Springboot接口简单实现生成MySQL插入语句
Springboot接口简单实现调用接口生成MySQL插入语句 在实际测试中,有这样一个需求场景,比如:在性能压力测试中,可能需要我们事先插入数据库中一些相关联的数据. 我们在实际测试中,遇到问题,需 ...
- SpringBoot接口 - 如何优雅的对接口返回内容统一封装?
在以SpringBoot开发Restful接口时,统一返回方便前端进行开发和封装,以及出现时给出响应编码和信息.@pdai SpringBoot接口 - 如何优雅的对接口返回内容统一封装? RESTf ...
- SpringBoot接口 - 如何优雅的对参数进行校验?
在以SpringBoot开发Restful接口时, 对于接口的查询参数后台也是要进行校验的,同时还需要给出校验的返回信息放到上文我们统一封装的结构中.那么如何优雅的进行参数的统一校验呢? @pdai ...
- SpringBoot接口 - 如何优雅的写Controller并统一异常处理?
SpringBoot接口如何对异常进行统一封装,并统一返回呢?以上文的参数校验为例,如何优雅的将参数校验的错误信息统一处理并封装返回呢?@pdai 为什么要优雅的处理异常 如果我们不统一的处理异常,经 ...
- SpringBoot接口 - 如何生成接口文档之非侵入方式(通过注释生成)Smart-Doc?
通过Swagger系列可以快速生成API文档,但是这种API文档生成是需要在接口上添加注解等,这表明这是一种侵入式方式: 那么有没有非侵入式方式呢, 比如通过注释生成文档? 本文主要介绍非侵入式的方式 ...
- SpringBoot接口 - API接口有哪些不安全的因素?如何对接口进行签名?
在以SpringBoot开发后台API接口时,会存在哪些接口不安全的因素呢?通常如何去解决的呢?本文主要介绍API接口有不安全的因素以及常见的保证接口安全的方式,重点实践如何对接口进行签名.@pdai ...
- SpringBoot接口服务处理Whitelabel Error Page(转)
To switch it off you can set server.error.whitelabel.enabled=false http://stackoverflow.com/question ...
随机推荐
- Linux系列(32) - rpm命令管理之RPM查询(4)
RPM包默认安装位置 RPM包默认安装路径 /etc/ 配置文件安装目录 /usr/bin/ 可执行的命令安装目录 /usr/lib/ 程序所使用的函数库保存位置 /usr/share/doc/ 基本 ...
- Winform 空闲时间(鼠标键盘无操作)
前言 Winform 在特定情况下,需要判断软件空闲时间(鼠标键盘无操作),然后在做一下一些操作. 实现 做了一个简单的例子,新建一个窗体,然后拖两个控件(Timer控件和label控件) using ...
- JavaEE & Tomcat 介绍
目录 企业开发介绍 JavaEE 规范 Web 概述 系统结构简介 C/S 结构 B/S 结构 两种结构的区别及优略 Tomcat Tomcat 介绍 关于服务器 Tomcat下载与安装 Tomcat ...
- Stream之高级函数
上回文说到了有关Stream一些数学函数的用法.今天来说下Stream一些高级的函数用法,这些函数在日常工作中也是必不可少的,测试数据还是引用上一篇的数据. Map 这个方法我个人称之为转换函数,把一 ...
- MYSQL小版本升级(5.7.21至5.7.25)
1.环境确认 [root@mysql ~]# ps -ef |grep -i mysql root 9173 1 0 2020 ? 00:00:00 /bin/sh /mysql/data/mysql ...
- JVM学习笔记——栈区
栈区 Stack Area 栈是运行时的单位,堆是存储单位,栈解决程序的运行问题,即程序如何执行,如何处理数据. 每个线程在创建时都创建一个该线程私有的虚拟机栈,每个栈里有许多栈帧,一个栈帧对应一个 ...
- 【nvidia jetson xavier】 Deepstream Yolov3示例模型运行
作者声明 版权声明:本文为博主原创文章,遵循CC 4.0 BY-SA版权协议,转载请附上原文出处链接和本声明. 原文链接:https://www.cnblogs.com/phoenixash/p/15 ...
- 前段之BOM ----DOM
一.介绍 BOM(Browser Object Model)是指浏览器对象模型,它使 JavaScript 有能力与浏览器进行"对话". DOM (Document Object ...
- 【Spring】IoC容器 - Spring Bean作用域Scope(含SpringCloud中的RefreshScope )
前言 上一章学习了[依赖来源],本章主要讨论SpringBean的作用域,我们这里讨论的Bean的作用域,很大程度都是默认只讨论依赖来源为[Spring BeanDefinition]的作用域,因为在 ...
- 一文看懂JVM内存区域分布与作用
那么我们在开始介绍Java内存区域之前,我们先放一张内存区域的图,方便我们后面介绍的时候可以对照着看. 须知,本文是根据JDK8来介绍的. 程序计数器 首先它是线程私有的,它也称为代码的行号指示器,字 ...