JSR310-LocalDateTime序列化 & 反序列化
问题
springboot 版本:spring-boot 2.3.12
今天在开发一个redis 热key服务端的过程中,碰到2个问题:
- jdk8的LocalDateTime,LocalDate,LocalTime类型的字段在序列化,会被序列成["2021","12","22","18","56","40"]这样的数组;
- 服务接受请求LocalDateTime类型的参数时,要求参数为 "2021-12-22T18:56",中间加"T"(ISO-8601) 才能够正常实现反序列化,yyyy-MM-dd HH:mm:ss 格式的字符串反序列化会报异常,异常信息如下:
org.springframework.http.converter.HttpMessageNotReadableException: Invalid JSON input: Cannot deserialize value of type `java.time.LocalDateTime` from String "2021-12-22 18:56:40": Failed to deserialize java.time.LocalDateTime: (java.time.format.DateTimeParseException) Text '2020-05-04 00:00' could not be parsed at index 10; nested exception is com.fasterxml.jackson.databind.exc.InvalidFormatException: Cannot deserialize value of type `java.time.LocalDateTime` from String "2021-12-22 18:56:40": Failed to deserialize java.time.LocalDateTime: (java.time.format.DateTimeParseException) Text '2021-12-22 18:56:40' could not be parsed at index 10 // 省略部分异常信息 Caused by: java.time.format.DateTimeParseException: Text '2021-12-22 18:56:40' could not be parsed at index 10
系统默认的序列化&反序列化方式给人感觉比较反人类,给所有功能相关都会带来困惑和额外的转化工作量,需要使用一种更符合大家使用习惯的方式解决一下。
方案职责的定位
LocalDateTime序列化&反序列化的使用应该是应用服务的共性问题,发挥作用的层次在springmvc 的HttpMessageConverter层次,个人想法-解决方案应该放在基础框架或脚手架层次(如果所在公司又自己的框架或脚手架),这样所有使用框架及脚手架的应用都会因此受益。
解决过程
定位问题
spring boot 在mvc请求的处理过程中,负责json 格式序列化和反序列化的是Jackson*HttpMessageConverter,具体哪个类定位一下即可,所有的请求response在spring boot里统一在RequestResponseBodyMethodProcessor这个类的handleReturnValue方法中进行的。
    @Override

    public void handleReturnValue(@Nullable Object returnValue, MethodParameter returnType,

            ModelAndViewContainer mavContainer, NativeWebRequest webRequest)

            throws IOException, HttpMediaTypeNotAcceptableException, HttpMessageNotWritableException {

        mavContainer.setRequestHandled(true);

        ServletServerHttpRequest inputMessage = createInputMessage(webRequest);

        ServletServerHttpResponse outputMessage = createOutputMessage(webRequest);

        //这里即是使用各种MessageConverter对返回的对象进行序列化处理的地方

        writeWithMessageConverters(returnValue, returnType, inputMessage, outputMessage);

    }
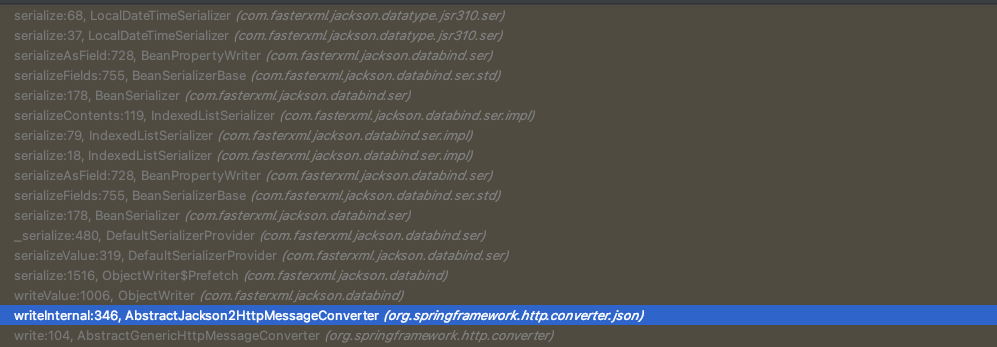
顺着writeWithMessageConverters方法继续往下debug,最终找到了Jackson的converter -> AbstractJackson2HttpMessageConverter的withInternal方法。
    @Override

    protected void writeInternal(Object object, @Nullable Type type, HttpOutputMessage outputMessage)

            throws IOException, HttpMessageNotWritableException {

        MediaType contentType = outputMessage.getHeaders().getContentType();

        JsonEncoding encoding = getJsonEncoding(contentType);

        OutputStream outputStream = StreamUtils.nonClosing(outputMessage.getBody());

        JsonGenerator generator = this.objectMapper.getFactory().createGenerator(outputStream, encoding);

        try {

            //此处忽略不相关的代码

            //此处即是将返回对象序列化的objectWriter

            ObjectWriter objectWriter = (serializationView != null ?

                    this.objectMapper.writerWithView(serializationView) : this.objectMapper.writer());

            if (filters != null) {

                objectWriter = objectWriter.with(filters);

            }

            if (javaType != null && javaType.isContainerType()) {

                objectWriter = objectWriter.forType(javaType);

            }

            SerializationConfig config = objectWriter.getConfig();

            if (contentType != null && contentType.isCompatibleWith(MediaType.TEXT_EVENT_STREAM) &&

                    config.isEnabled(SerializationFeature.INDENT_OUTPUT)) {

                objectWriter = objectWriter.with(this.ssePrettyPrinter);

            }

            //此处开始进行序列化

            objectWriter.writeValue(generator, value);

            writeSuffix(generator, object);

            generator.flush();

            generator.close();

        }

        catch (InvalidDefinitionException ex) {

            throw new HttpMessageConversionException("Type definition error: " + ex.getType(), ex);

        }

        catch (JsonProcessingException ex) {

            throw new HttpMessageNotWritableException("Could not write JSON: " + ex.getOriginalMessage(), ex);

        }

    }
objectWriter是真正执行序列化的,它是由ObjectMapper来创建的,再来看以下ObjectMapper,
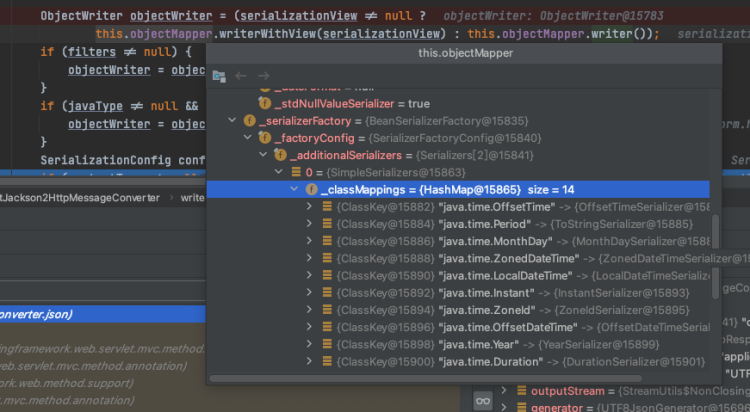
关键的序列化组件由_serializerFactory提供,由内部提供了很多类型对象序列化支撑。
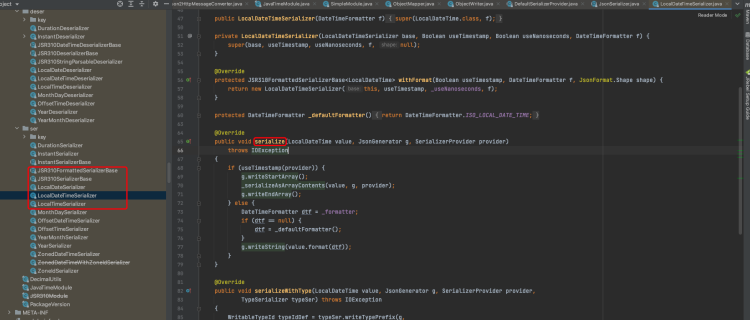
再继续跟踪,最终进入了LocalDateTime类型的序列化类->LocalDateTimeSerializer,通过serialize方法进行序列化,在包里我们还可以看到很多JSR310的日期类型的序列化类。
再来看serialize方法,其中有一个很重要的逻辑->useTimestamp方法,在父类JSR310FormattedSerializerBase中实现,单独摘出来
protected boolean useTimestamp(SerializerProvider provider) {

        if (_useTimestamp != null) {

            return _useTimestamp.booleanValue();

        }

        if (_shape != null) {

            if (_shape == Shape.STRING) {

                return false;

            }

            if (_shape == Shape.NUMBER_INT) {

                return true;

            }

        }

        //这里让人眼前一亮,意味着可以通过外置扩展的方式来给一个配置好的_formatter

        return (_formatter == null) && (provider != null)

                && provider.isEnabled(getTimestampsFeature());

    }
这个方法默认返回true,默认_formatter是null,provider.isEnabled也是true,这里我们应该已经找到解题之道了—我们可以试图给-LocalDateTimeSerializer一个定义好的_formatter,或者给定配置让它生成一个formatter.
整理一下调用链路
整理一下思路:LocalDateTimeSerializer->...->DefaultSerializerProvider->Prefetch->ObjectWritter->ObjectMapper
看一下不起眼的Prefetch的关键方法-_serializerProvider
protected DefaultSerializerProvider _serializerProvider() {

    return _serializerProvider.createInstance(_config, _serializerFactory);

}
通过此方法将ObjectWritter中的_serializerFactory来创建一个默认的DefaultSerializerProvider。
好了,回过头来溯源已经清楚了,其实还是ObjectMapper来传入进去的。那么我们就研究在ObjectMapper创建时如何做一下扩展,将自己的扩展解决方案融入到ObjectMapper中就可以了。
解决方案
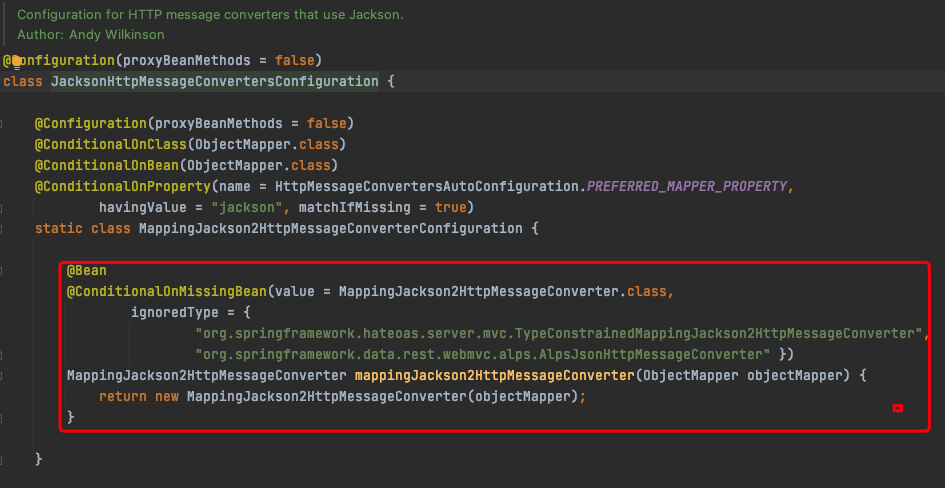
AbstractJackson2HttpMessageConverter的实现类MappingJackson2HttpMessageConverter,找到这个bean的创建位置
再看一下ObjectMapper的创建位置
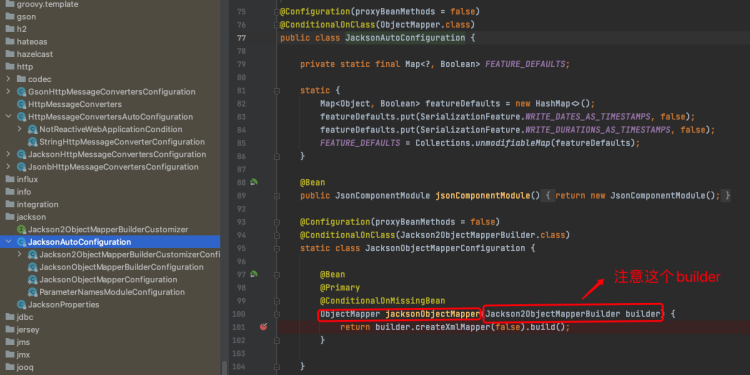
如图所示,MappingJackson2HtttMessageConverter的ObjectMapper在JacksonAutoConfiguration中创建的,并且通过Jackson2ObjectMapperBuilder 来创建的,这个类很重要,我们看一下这个build方法。
public <T extends ObjectMapper> T build() {

   ObjectMapper mapper;

   if (this.createXmlMapper) {

      mapper = (this.defaultUseWrapper != null ?

            new XmlObjectMapperInitializer().create(this.defaultUseWrapper, this.factory) :

            new XmlObjectMapperInitializer().create(this.factory));

   }

   else {

      mapper = (this.factory != null ? new ObjectMapper(this.factory) : new ObjectMapper());

   }

   //这里的configure就是配置mapper的,做包括序列在内的各种配置的

   configure(mapper);

   return (T) mapper;

}
configure方法:
public void configure(ObjectMapper objectMapper) {

        Assert.notNull(objectMapper, "ObjectMapper must not be null");

        MultiValueMap<Object, Module> modulesToRegister = new LinkedMultiValueMap<>();

        if (this.findModulesViaServiceLoader) {

            ObjectMapper.findModules(this.moduleClassLoader).forEach(module -> registerModule(module, modulesToRegister));

        }

        else if (this.findWellKnownModules) {

            registerWellKnownModulesIfAvailable(modulesToRegister);

        }

        if (this.modules != null) {

            this.modules.forEach(module -> registerModule(module, modulesToRegister));

        }

        if (this.moduleClasses != null) {

            for (Class<? extends Module> moduleClass : this.moduleClasses) {

                registerModule(BeanUtils.instantiateClass(moduleClass), modulesToRegister);

            }

        }

        List<Module> modules = new ArrayList<>();

        for (List<Module> nestedModules : modulesToRegister.values()) {

            modules.addAll(nestedModules);

        }

        objectMapper.registerModules(modules);

               //此处省去不关注的代码

}
这个Module是个抽象类,有这么多实现,JavaTimeModule就是时间相关的模块

看一下JavaTimeModule说明
Class that registers capability of serializing java.time objects with the Jackson core.
ObjectMapper mapper = new ObjectMapper();
mapper.registerModule(new JavaTimeModule());
Note that as of 2.x, if auto-registering modules, this package will register legacy version, JSR310Module, and NOT this module. 3.x will change the default. Legacy version has the same functionality, but slightly different default configuration: see JSR310Module for details.
再看一下JavaTimeModule的核心代码,它的构造方法里加入了这么多的序列化及反序列化类,不过是都是默认的,我们需要使用JavaTimeModule创建一个我们需要的类。
public final class JavaTimeModule extends SimpleModule

{

    private static final long serialVersionUID = 1L;

    public JavaTimeModule()

    {

        super(PackageVersion.VERSION);

        // First deserializers

        // // Instant variants:

        addDeserializer(Instant.class, InstantDeserializer.INSTANT);

        addDeserializer(OffsetDateTime.class, InstantDeserializer.OFFSET_DATE_TIME);

        addDeserializer(ZonedDateTime.class, InstantDeserializer.ZONED_DATE_TIME);

        // // Other deserializers

        addDeserializer(Duration.class, DurationDeserializer.INSTANCE);

        addDeserializer(LocalDateTime.class, LocalDateTimeDeserializer.INSTANCE);

        addDeserializer(LocalDate.class, LocalDateDeserializer.INSTANCE);

        addDeserializer(LocalTime.class, LocalTimeDeserializer.INSTANCE);

        addDeserializer(MonthDay.class, MonthDayDeserializer.INSTANCE);

        addDeserializer(OffsetTime.class, OffsetTimeDeserializer.INSTANCE);

        addDeserializer(Period.class, JSR310StringParsableDeserializer.PERIOD);

        addDeserializer(Year.class, YearDeserializer.INSTANCE);

        addDeserializer(YearMonth.class, YearMonthDeserializer.INSTANCE);

        addDeserializer(ZoneId.class, JSR310StringParsableDeserializer.ZONE_ID);

        addDeserializer(ZoneOffset.class, JSR310StringParsableDeserializer.ZONE_OFFSET);

        // then serializers:

        addSerializer(Duration.class, DurationSerializer.INSTANCE);

        addSerializer(Instant.class, InstantSerializer.INSTANCE);

        addSerializer(LocalDateTime.class, LocalDateTimeSerializer.INSTANCE);

        addSerializer(LocalDate.class, LocalDateSerializer.INSTANCE);

        addSerializer(LocalTime.class, LocalTimeSerializer.INSTANCE);

        addSerializer(MonthDay.class, MonthDaySerializer.INSTANCE);

        addSerializer(OffsetDateTime.class, OffsetDateTimeSerializer.INSTANCE);

        addSerializer(OffsetTime.class, OffsetTimeSerializer.INSTANCE);

        addSerializer(Period.class, new ToStringSerializer(Period.class));

        addSerializer(Year.class, YearSerializer.INSTANCE);

        addSerializer(YearMonth.class, YearMonthSerializer.INSTANCE);
回过头来继续看Jackson2ObjectMapperBuilder的创建,在JacksonAutoConfiguration中创建
@Configuration(proxyBeanMethods = false)

    @ConditionalOnClass(Jackson2ObjectMapperBuilder.class)

    static class JacksonObjectMapperBuilderConfiguration {

        @Bean

        @Scope("prototype")

        @ConditionalOnMissingBean

        Jackson2ObjectMapperBuilder jacksonObjectMapperBuilder(ApplicationContext applicationContext,

                List<Jackson2ObjectMapperBuilderCustomizer> customizers) {

            //这里有Jackson2ObjectMapperBuilderCustomizer,意味着我们可以通过自定义它的Cutomizer,

            //来做一下个性化扩展

            Jackson2ObjectMapperBuilder builder = new Jackson2ObjectMapperBuilder();

            builder.applicationContext(applicationContext);

            customize(builder, customizers);

            return builder;

        }

        private void customize(Jackson2ObjectMapperBuilder builder,

                List<Jackson2ObjectMapperBuilderCustomizer> customizers) {

            for (Jackson2ObjectMapperBuilderCustomizer customizer : customizers) {

                customizer.customize(builder);

            }

        }

    }
熟悉spring 设计风格的同学应该知道,这里的Customizer 类似于RestTemplateBuilder中的customizer,是方便我们做扩展用的,这就是spring 牛逼之处,再次深深膜拜一下,了解到这里几乎可以确定,我们扩展一个Jackson2ObjectMapperBuilderCustomizer的实现,就可以达成我们的目的了。
代码实现
给出代码设计
import com.fasterxml.jackson.databind.Module;

import com.fasterxml.jackson.datatype.jsr310.JavaTimeModule;

import com.fasterxml.jackson.datatype.jsr310.deser.LocalDateDeserializer;

import com.fasterxml.jackson.datatype.jsr310.deser.LocalDateTimeDeserializer;

import com.fasterxml.jackson.datatype.jsr310.deser.LocalTimeDeserializer;

import com.fasterxml.jackson.datatype.jsr310.ser.LocalDateSerializer;

import com.fasterxml.jackson.datatype.jsr310.ser.LocalDateTimeSerializer;

import com.fasterxml.jackson.datatype.jsr310.ser.LocalTimeSerializer;

import org.springframework.beans.factory.BeanFactoryUtils;

import org.springframework.beans.factory.ListableBeanFactory;

import org.springframework.boot.autoconfigure.jackson.Jackson2ObjectMapperBuilderCustomizer;

import org.springframework.boot.autoconfigure.jackson.JacksonProperties;

import org.springframework.context.ApplicationContext;

import org.springframework.context.annotation.Bean;

import org.springframework.context.annotation.Configuration;

import org.springframework.core.Ordered;

import org.springframework.http.converter.json.Jackson2ObjectMapperBuilder;

import org.springframework.util.CollectionUtils;

import java.time.LocalDate;

import java.time.LocalDateTime;

import java.time.LocalTime;

import java.time.format.DateTimeFormatter;

import java.util.Collection;

/**

 * @author zhaoxinbo

 * @name: ApplicationWebConfig

 * @description: web配置类

 * @date 2021/12/2120:40

 */

@Configuration

public class ApplicationWebConfig {

    private static final String STANDARD_LOCAL_DATETIME_FORMAT = "yyyy-MM-dd HH:mm:ss SSS";

    private static final String STANDARD_LOCAL_DATE_FORMAT = "yyyy-MM-dd";

    private static final String STANDARD_LOCAL_TIME_FORMAT = "HH:mm:ss SSS";

    @Bean

    public LocalJackson2ObjectMapperBuilderCustomizer localJackson2ObjectMapperBuilderCustomizer(ApplicationContext applicationContext,

                                                                                                 JacksonProperties jacksonProperties) {

        return new LocalJackson2ObjectMapperBuilderCustomizer(applicationContext, jacksonProperties);

    }

    /**

     * 创建应用自己的JavaTimeModule

     * <p>

     *     1. Jackson默认不会创建spring 容器管理的JavaTimeModule,我们可以创建这样一个实例去覆盖系统默认的;

     *     2. 在此我们可以自定义JSR310日期的序列化&反序列化对象

     * </p>

     * @return

     */

    @Bean

    public JavaTimeModule javaTimeModule() {

        JavaTimeModule module = new JavaTimeModule();

        /** serializers */

        LocalDateTimeSerializer localDateTimeSerializer = new LocalDateTimeSerializer(DateTimeFormatter.ofPattern(STANDARD_LOCAL_DATETIME_FORMAT));

        LocalDateSerializer localDateSerializer = new LocalDateSerializer(DateTimeFormatter.ofPattern(STANDARD_LOCAL_DATE_FORMAT));

        LocalTimeSerializer localTimeSerializer = new LocalTimeSerializer(DateTimeFormatter.ofPattern(STANDARD_LOCAL_TIME_FORMAT));

        module.addSerializer(LocalDateTime.class, localDateTimeSerializer);

        module.addSerializer(LocalDate.class, localDateSerializer);

        module.addSerializer(LocalTime.class, localTimeSerializer);

        /** deserializers */

        LocalDateTimeDeserializer localDateTimeDeserializer = new LocalDateTimeDeserializer(DateTimeFormatter.ofPattern(STANDARD_LOCAL_DATETIME_FORMAT));

        LocalDateDeserializer localDateDeserializer = new LocalDateDeserializer(DateTimeFormatter.ofPattern(STANDARD_LOCAL_DATE_FORMAT));

        LocalTimeDeserializer localTimeDeserializer = new LocalTimeDeserializer(DateTimeFormatter.ofPattern(STANDARD_LOCAL_TIME_FORMAT));

        module.addDeserializer(LocalDateTime.class, localDateTimeDeserializer);

        module.addDeserializer(LocalDate.class, localDateDeserializer);

        module.addDeserializer(LocalTime.class, localTimeDeserializer);

        return module;

    }

    /**

     * <p>

     *     1. 自定义Jackson2ObjectMapperBuilderCustomizer;

     *     2. 将自定义创建JavaTimeModule配置在 Jackson2ObjectMapperBuilder 中

     *     3. JacksonAutoConfiguration 中在创建ObjectMapper时就会把我们自己的JavaTimeModule初始化为对应的Serializer了

     * </p>

     */

    static final class LocalJackson2ObjectMapperBuilderCustomizer

            implements Jackson2ObjectMapperBuilderCustomizer, Ordered {

        private final ApplicationContext applicationContext;

        private final JacksonProperties jacksonProperties;

        LocalJackson2ObjectMapperBuilderCustomizer(ApplicationContext applicationContext,

                                                      JacksonProperties jacksonProperties) {

            this.applicationContext = applicationContext;

            this.jacksonProperties = jacksonProperties;

        }

        @Override

        public int getOrder() {

            return Ordered.LOWEST_PRECEDENCE - 100;

        }

        @Override

        public void customize(Jackson2ObjectMapperBuilder builder) {

            if (this.jacksonProperties.getDefaultPropertyInclusion() != null) {

                builder.serializationInclusion(this.jacksonProperties.getDefaultPropertyInclusion());

            }

            if (this.jacksonProperties.getTimeZone() != null) {

                builder.timeZone(this.jacksonProperties.getTimeZone());

            }

            configureModules(builder);

        }

        /**

         * 将自定义创建JavaTimeModule配置在 Jackson2ObjectMapperBuilder

         * @param builder

         */

        private void configureModules(Jackson2ObjectMapperBuilder builder) {

            Collection<Module> modules = getBeans(this.applicationContext, Module.class);

            if(CollectionUtils.isEmpty(modules)) {

                return;

            }

            builder.modulesToInstall(modules.toArray(new Module[0]));

        }

        private static <T> Collection<T> getBeans(ListableBeanFactory beanFactory, Class<T> type) {

            return BeanFactoryUtils.beansOfTypeIncludingAncestors(beanFactory, type).values();

        }

    }

}
效果展示
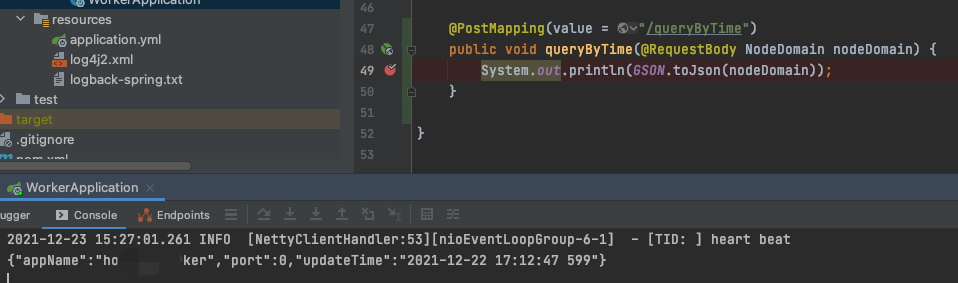
反序列化
发起请求
url:/worker/test/queryByTime
method: post
请求参数:
{

    "updateTime": "2021-12-22 17:12:47 599",

    "appName": "app-worker"

}
结果展示
序列化
发起请求
url:127.0.0.1:9000/worker/node/query?appName=app-worker
method: get
结果展示
{

    "code": "00000",

    "data": [

        {

            "id": 507,

            "appName": "app-worker",

            "ip": "10.255.22.204",

            "port": 11111,

            "createTime": "2021-12-22 17:12:47 000",

            "updateTime": "2021-12-23 11:10:34 000"

        },

        {

            "id": 511,

            "appName": "app-worker",

            "ip": "172.20.99.148",

            "port": 11111,

            "createTime": "2021-12-23 11:03:26 000",

            "updateTime": "2021-12-23 11:10:35 000"

        }

    ]

}
其他实现方案
在JSR310属性上使用@Jsonformat注解,在看代码过程中看到这种解决方式,不过所有JSR310属性都要加,不满足要求,这种方式我并未做验证,有空闲时间了可以做一下验证。
@JsonFormat(pattern = "yyyy-MM-dd HH:mm:ss", timezone = "GMT+8")
JSR310-LocalDateTime序列化 & 反序列化的更多相关文章
- php json与xml序列化/反序列化
在web开发中对象的序列化与反序列化经常使用,比较主流的有json格式与xml格式的序列化与反序列化,今天想写个jsop的小demo,结果发现不会使用php序列化,查了一下资料,做个笔记 简单数组js ...
- 序列化反序列化api(入门级)
定义: java序列化是指把Java对象转换为字节序列的过程:而Java反序列化是指把字节序列恢复为Java对象的过程. 为什么字符串通常也会进行序列化? 对象需要进行序列化的原因:保证对象的状态不变 ...
- python_way ,day5 模块,模块3 ,双层装饰器,字符串格式化,生成器,递归,模块倒入,第三方模块倒入,序列化反序列化,日志处理
python_way.day5 1.模块3 time,datetime, json,pickle 2.双层装饰器 3.字符串格式化 4.生成器 5.递归 6.模块倒入 7.第三方模块倒入 8.序列化反 ...
- C#之你懂得的序列化/反序列化
前言:写此文章一方面是为了巩固对序列化的认识,另一方面是因为本人最近在面试,面试中被问到“为什么要序列化”.虽然一直在使用,自己也反复的提到序列化,可至于说为什么要序列化,还真的没想过,所以本文就这样 ...
- springboot学习(三)——http序列化/反序列化之HttpMessageConverter
以下内容,如有问题,烦请指出,谢谢! 上一篇说掉了点内容,这里补上,那就是springmvc的http的序列化/反序列化,这里简单说下如何在springboot中使用这个功能. 使用过原生netty ...
- java序列化反序列化深入探究
When---什么时候需要序列化和反序列化: 简单的写一个hello world程序,用不到序列化和反序列化.写一个排序算法也用不到序列化和反序列化.但是当你想要将一个对象进行持久化写入文件,或者你想 ...
- java序列化反序列化深入探究(转)
When---什么时候需要序列化和反序列化: 简单的写一个hello world程序,用不到序列化和反序列化.写一个排序算法也用不到序列化和反序列化.但是当你想要将一个对象进行持久化写入文件,或者你想 ...
- C# XML序列化/反序列化参考
.NET提供了很不错的XML序列化/反序列化器,(它们所在的命名空间为System.Xml.Serialization)这是很方便的,下面对它的使用做一些总结,以供参考. 1,简单序列化 public ...
- 二进制数据的序列化反序列化和Json的序列化反序列化的重要区别
前言:最近一个一个很奇怪的问题,很明白的说,就是没看懂,参照下面的代码: /// <summary> /// 反序列化对象 /// </summary> /// <typ ...
随机推荐
- Qt5 connect 重载信号和槽
转载文章超哥的经验之谈---Qt5 connect使用之"重载信号和槽" 在Qt4中,关联信号与槽是要使用到SIGNAL()和SLOT()这两个宏. QLabel *label = ...
- Linux 使用wpa_supplicant手动配置连接wifi
Linux 使用wpa_supplicant手动配置连接wifi wpa_supplicant 简介 wpa_supplicant是Linux BSD, Mac OSX和Windows的WPA的服务, ...
- Codeforces 288E - Polo the Penguin and Lucky Numbers(数位 dp+推式子)
题目传送门 似乎我的解法和官方题解不太一样 纪念自己独立做出来的一道难度 2800 的题. 我们记 \(ans(x)\) 为 \([444...44,x]\) 的答案,显然答案为 \(ans(r)-a ...
- 基于MS SQL Server的数据库学习安排
序号 分类 学习内容 目标/要求 方式 学时 考核 参考资料 1 基础知识 数据库理论 理解数据库基本理论 面授 1 能阐述元素.数据记录.数据表.数据库的基本概念T-SQL语法要求 https:// ...
- 爬虫动态渲染页面爬取之selenium驱动chrome浏览器的使用
Selenium是一个用于Web应用程序测试的工具.Selenium测试直接运行在浏览器中,就像真正的用户在操作一样,可以用其进行网页动态渲染页面的爬取. 支持的浏览器包括IE(7, 8, 9, 10 ...
- ICCV2021 | TOOD:任务对齐的单阶段目标检测
前言 单阶段目标检测通常通过优化目标分类和定位两个子任务来实现,使用具有两个平行分支的头部,这可能会导致两个任务之间的预测出现一定程度的空间错位.本文提出了一种任务对齐的一阶段目标检测(TOOD) ...
- Vue2全家桶+Element搭建的PC端在线音乐网站
目录 1,前言 2,已有功能 3,使用 4,目录结构 5,页面效果 登录页 首页 排行榜 歌单列表 歌单详情 歌手列表 歌手详情 MV列表 MV详情 搜索页 播放器 1,前言 项目基于Vue2全家桶及 ...
- Flink(二)【架构原理,组件,提交流程】
目录 一.运行架构 1.架构 2.组件 二.核心概念 TaskManager . Slots Parallelism(并行度) Task .Subtask Operator Chains(任务链) E ...
- Linux基础命令---ntpdate网络时间服务器
ntpdate ntpdate指令通过轮询指定为服务器参数的网络时间协议(NTP)服务器来设置本地日期和时间,从而确定正确的时间. 此命令的适用范围:RedHat.RHEL.Ubuntu.CentOS ...
- pop回指定控制器
//OCNSArray *array = [NSMutableArray new]; array = self.navigationController.viewControllers; //1.返回 ...