
【C++】vector容器的用法
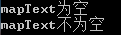
检测vector容器是否为空:
 1  #include <iostream>

 2  #include <string>

 3  #include <vector>

 4  using namespace std;

 5

 6 int main()

 7 {

 8     //检测容器是否为空

 9     vector<string>vecA;

10     if (vecA.empty())

11     {

12         cout << "mapText为空" << endl;

13     }

14     else

15     {

16         cout << "mapText不为空" << endl;

17     }

18

19     //向容器中添加元素

20     vecA.push_back("A");

21     vecA.push_back("B");

22     vecA.push_back("C");

23

24     if (vecA.empty())

25     {

26         cout << "mapText为空" << endl;

27     }

28     else

29     {

30         cout << "mapText不为空" << endl;

31     }

32

33     cin.get();

34     return 0;

35 }
访问vector容器中的元素:
 1  #include <iostream>

 2  #include <string>

 3  #include <vector>

 4  using namespace std;

 5

 6 int main()

 7 {

 8     vector<string>vecA;

 9     vecA.push_back("A");

10     vecA.push_back("B");

11     vecA.push_back("C");

12

13     cout << "第1个元素:" << vecA.front() << endl;

14     cout << "最后1个元素:" << vecA.back() << endl;

15     cout << endl;

16

17     cout << "第2个元素:" << *(vecA.begin() + 1) << endl;

18     cout << "倒数第2个元素:" << *(vecA.end() - 1 - 1) << endl;

19     cout << endl;

20

21     cout << "第1个元素:" << *(vecA.begin()) << endl;

22     cout << "最后1个元素:" << *(vecA.end() - 1) << endl;

23     cout << endl;

24

25     for (int i = 0; i < vecA.size(); i++)

26     {

27         cout << "第" << i + 1 << "个元素:" << vecA[i] << endl;

28     }

29     cout << endl;

30

31     //通过迭代器遍历

32     for (vector<string>::iterator pd = vecA.begin(); pd != vecA.end(); pd++)

33     {

34         cout << "第?个元素:" << *pd << endl;

35     }

36     cout << endl;

37

38     cin.get();

39     return 0;

40 }

合并两个Vector,遍历的方法效率极低,推荐使用insert()函数
 1  #include <iostream>

 2  #include <string>

 3  #include <vector>

 4 using namespace std;

 5 int main()

 6 {

 7     vector<string>vecA;

 8     vecA.push_back("A1");

 9     vecA.push_back("A2");

10

11     vector<string>vecB;

12     vecB.push_back("B1");

13     vecB.push_back("B2");

14

15     // 方法:insert() 函数

16     vector<string>vecAB;

17     vecAB.insert(vecAB.end(), vecA.begin(), vecA.end()); //将vecA插入

18     vecAB.insert(vecAB.end(), vecB.begin(), vecB.end()); //将vecB插入

19     for (int i = 0; i < vecAB.size(); i++)

20     {

21         cout << "vecAB=" << vecAB[i] << endl;

22     }

23     cin.get();

24     return 0;

25

26 }

将一个Vector的所有元素复制到另一个中
 1  #include <iostream>

 2  #include <string>

 3  #include <vector>

 4 using namespace std;

 5 int main()

 6 {

 7     vector<string>vecA;

 8     vecA.push_back("A1");

 9     vecA.push_back("A2");

10

11     //方法1:声明

12     vector<string> vecB(vecA);

13     for (int i = 0; i < vecB.size(); i++)

14     {

15         cout << "vecB=" << vecB[i] << endl;

16     }

17     cout << endl;

18

19     //方法2:使用函数assign进行赋值

20     vector<string> vecC;

21     vecC.assign(vecA.begin(), vecA.end());

22     for (int i = 0; i < vecC.size(); i++)

23     {

24         cout << "vecC=" << vecC[i] << endl;

25     }

26     cout << endl;

27

28     // 方法3:insert() 函数

29     vector<string>vecD;

30     vecD.insert(vecD.end(), vecA.begin(), vecA.end()); //将vecA插入

31     for (int i = 0; i < vecD.size(); i++)

32     {

33         cout << "vecD=" << vecD[i] << endl;

34     }

35     cout << endl;

36

37     cin.get();

38     return 0;

39 }
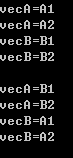
将两个Vector的元素互换
 1 #include <iostream>

 2 #include <string>

 3 #include <vector>

 4 using namespace std;

 5 int main()

 6 {

 7     vector<string>vecA;

 8     vecA.push_back("A1");

 9     vecA.push_back("A2");

10

11     vector<string>vecB;

12     vecB.push_back("B1");

13     vecB.push_back("B2");

14

15     for (int i = 0; i < vecA.size(); i++)

16     {

17         cout << "vecA=" << vecA[i] << endl;

18     }

19     for (int i = 0; i < vecB.size(); i++)

20     {

21         cout << "vecB=" << vecB[i] << endl;

22     }

23     cout << endl;

24

25     //方法:使用swap进行交换

26     vecB.swap(vecA);//交换

27

28     for (int i = 0; i < vecA.size(); i++)

29     {

30         cout << "vecA=" << vecA[i] << endl;

31     }

32     for (int i = 0; i < vecB.size(); i++)

33     {

34         cout << "vecB=" << vecB[i] << endl;

35     }

36

37     cin.get();

38     return 0;

39 }
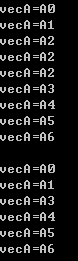
删除Vector元素
 1 #include <iostream>

 2 #include <string>

 3 #include <vector>

 4 using namespace std;

 5 int main()

 6 {

 7     vector<string>vecA;

 8     vecA.push_back("A0");

 9     vecA.push_back("A1");

10     vecA.push_back("A2");

11     vecA.push_back("A2");

12     vecA.push_back("A2");

13     vecA.push_back("A3");

14     vecA.push_back("A4");

15     vecA.push_back("A5");

16     vecA.push_back("A6");

17

18     for (int i = 0; i < vecA.size(); i++)

19     {

20         cout << "vecA=" << vecA[i] << endl;

21     }

22     cout << endl;

23

24     //删除最后一个元素

25     //vecA.pop_back();

26

27     //删除最后一个元素

28     //vecA.erase(vecA.end()-1);

29

30     //删除第2个元素

31     //vecA.erase(vecA.begin()+1);

32

33     //删除所有"A2"

34     for (vector<string>::iterator itor = vecA.begin(); itor != vecA.end(); /*++itor*/)

35     {

36         if (*itor == "A2")

37         {

38             itor = vecA.erase(itor);

39         }

40         else

41         {

42             ++itor;

43         }

44     }

45

46     for (int i = 0; i < vecA.size(); i++)

47     {

48         cout << "vecA=" << vecA[i] << endl;

49     }

50

51     cin.get();

52     return 0;

53 }
vector相关:
【C++】Vector判断元素是否存在,去重,求交集,求并集
【C++】vector容器的用法的更多相关文章
- vector容器的用法
转自一篇博客^-^: 1 基本操作 (1)头文件#include<vector>. (2)创建vector对象,vector<int> vec; (3)尾部插入数字:vec.p ...
- c++ vector容器基本用法
基本用法 #include<iostream> #include<string> #include<vector> using namespace std; cla ...
- vector容器的用法以及动态数组
vector容器不必去管大小 string申明的数组已经是动态的了 若是int类型的话,需要 cin>>N: int a[N]会出错 ,必须是int *p = new int[N] 然后再 ...
- (转载)C++STL中vector容器的用法
vector是C++标准模板库中的部分内容,它是一个多功能的,能够操作多种数据结构和算法的模板类和函数库.vector之所以被认为是一个容器,是因为它能够像容器一样存放各种类型的对象,简单地说vec ...
- vector容器经常用法
容器简单介绍 定义及初始化 末尾插入元素 遍历 size 函数是能够动态添加的 通过下标操作添加改变vector内容不是安全的操作 仅能对已存在元素进行下标操作不存在会crash 将元素一个容器复制给 ...
- Vector 容器简单介绍
# Vector STL简要介绍 关于STL中的vector容器,以下做一些相关介绍. #### vector 简要概述 vector 称作向量类,属于容器类,实现了动态的数组,用于元素数量变化的对象 ...
- STL:vector容器用法详解
vector类称作向量类,它实现了动态数组,用于元素数量变化的对象数组.像数组一样,vector类也用从0开始的下标表示元素的位置:但和数组不同的是,当vector对象创建后,数组的元素个数会随着ve ...
- vector容器用法详解
vector类称作向量类,它实现了动态数组,用于元素数量变化的对象数组.像数组一样,vector类也用从0开始的下标表示元素的位置:但和数组不同的是,当vector对象创建后,数组的元素个数会随着ve ...
- STL之二:vector容器用法详解
转载于:http://blog.csdn.net/longshengguoji/article/details/8507394 vector类称作向量类,它实现了动态数组,用于元素数量变化的对象数组. ...
随机推荐
- 浅谈自动特征构造工具Featuretools
简介 特征工程在机器学习中具有重要意义,但是通过手动创造特征是一个缓慢且艰巨的过程.Python的特征工程库featuretools可以帮助我们简化这一过程.Featuretools是执行自动化特征工 ...
- 一个入门级CTF的Reverse
这道题是XCTF攻防世界上的一道新手入门题目! 年前刚接触逆向时IDA,OD了这些工具都不会用(负基础),当时做这些题的时候觉得挺难(主要是缺少练习,没思路无从下手).现在回头再来看这些题目感觉确实是 ...
- ALPHA任务拆解
项目 内容 这个作业属于哪个课程 BUAA2020软件工程 这个作业的要求在哪里 作业要求 我们在这个课程的目标是 学会团队合作,共同开发一个完整的项目 这个作业在哪个具体方面帮助我们实现目标 团队任 ...
- 2Spring对象创建小结
Spring的对象创建 Spring学习笔记 周芋杉2021/5/15 原理:工厂设计模式,通过反射创建对象. Spring工厂分类 非web环境:ClassPathXmlApplicationCon ...
- [bug] vue cli 部署在 springboot中报404
复制资源时,在static目录下新建了一个static目录,估计是引起了spring解析的混乱,改为one后即可正常访问 参考 https://www.cnblogs.com/qianjinyan/p ...
- python文件对象几种操作模式区别——文件操作方法详解
文件对象的字节模式/b模式(以utf-8编码为例) 读操作 写操作 指针操作 ASCII字节 返回bytes/字节类型的Ascii 写入bytes类型字节 例如:b'This is ascii' 使用 ...
- 047.Python前端html
一 HTTP协议 1.1 HTTP请求 URL: 协议/IP:端口/路径?GET参数 基于请求响应 请求协议格式 GET URL路径?a=1&b=2 HTTP # 请求首行 user-age ...
- centos 7安装freescale交叉编译工具链
方法1:可以直接下载gcc包,把文件夹放到/usr/local下即可,然后修改PATH环境变量,既可以使用 方法2:可以下载.rpm包,在本地进行安装,下载地址为(http://www.panduod ...
- 10.7 netstat:查看网络状态
netstat命令 用于显示本机网络的连接状态.运行端口和路由表等信息. netstat命令的参数选项及说明 -r 显示路由表信息,该功能类似于前面学过的route 和ip route-g 显示多播功 ...
- JMicro微服务之超时&重试
JMicro是本人开发的基于Java实现的微服务框架,当前正式版本为0.0.3,并已发布到maven中央仓库.项目源码github:https://github.com/mynewworldyyl/j ...