Deep Residual Learning for Image Recognition (ResNet)
@article{he2016deep,
title={Deep Residual Learning for Image Recognition},
author={He, Kaiming and Zhang, Xiangyu and Ren, Shaoqing and Sun, Jian},
pages={770--778},
year={2016}}
主要内容
深度一直是CNN很重要的一个点, 作者发现, 当仅仅增加层数不一定会带来优势, 甚至会误差会加大, 而且这个误差并非是过拟合导致的.
设输入为\(x\), 一般的网络的输出可以表示为\(\mathcal{H}(x)\), 作者考虑的是
\mathcal{F}(x):=\mathcal{H}(x)-x.
\]
实际上看到这里是有困惑的, 为什么\(\mathcal{H}(x)-x\)是成立的? 这不就意味着网络的输出和输入是同样大小的? 那还怎么分类.
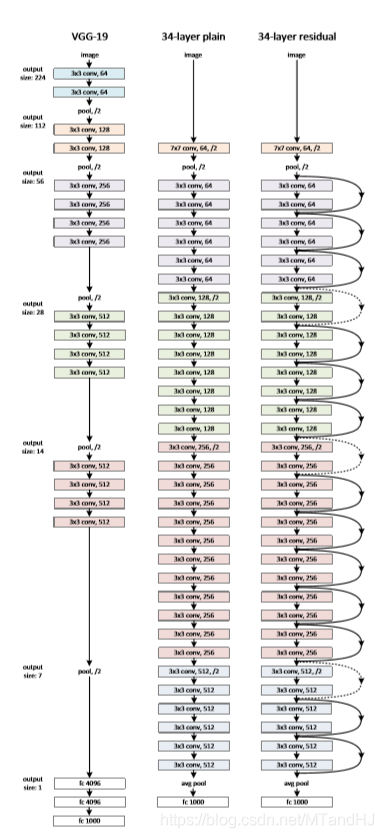
从上面的图中可以看到, 其实\(\mathcal{H}(x)\)并非是整个网络的输出, 而是某些层的输出,图中每俩个层就会进行一次残差的操作. 所以用网络去学习\(\mathcal{F}(x)\), 能够把前者的信息更好的传递下去. 就像作者说的, 如果前面部分的层能够很好的完成任务, 后面的层只需要称为恒等映射就行了. 但是恒等映射不一定能够被很好的逼近, 这将导致网络加深反而误差变大, 但是如果改成学习残差就很容易了, 因为后面的层只需要将权重设置为0,那么后面每一块的输出都会是\(x\)(为某一层的输出), 这至少能够保证深度加深结果不会变坏.
当然还有最后一个问题, \(x\)的大小终究是要变化的, 所以我们没法保证\(\mathcal{F}(x)\)和\(x\)的尺寸是一致的, 一种解决办法是增加一个线性映射
\mathcal{F}(x)+W_s x,
\]
代码里用的便是1x1的卷积核, 或者也可以通过补零来实现.
代码
"""
Resnet34训练于CIFAR10
epoches=1000
lr=0.01 论文中0.1开始 试了以下梯度炸了 可能是网络结构的原因
momentum=0.9
weight_decay=0.0001
"""
import torch
import torch.nn as nn
import torchvision
import torchvision.transforms as transforms
import numpy as np
import os
class Residualblock(nn.Module):
def __init__(self, in_channels, out_channels,
stride=1, shortcut=None):
super(Residualblock, self).__init__()
self.longway = nn.Sequential(
nn.Conv2d(in_channels, out_channels, 3, stride, 1),
nn.BatchNorm2d(out_channels),
nn.ReLU(inplace=True),
nn.Conv2d(out_channels, out_channels, 3, 1, 1),
nn.BatchNorm2d(out_channels),
nn.ReLU(inplace=True)
)
self.shortway = shortcut
def forward(self, x):
residual = self.longway(x)
identity = x if self.shortway is None else self.shortway(x)
return nn.functional.relu(identity + residual)
class ResNet(nn.Module):
def __init__(self, out_size=10, layers=None):
"""
:param out_size: 输出的类的数量
:param layers: 每组有多少块 说不清 回看论文
"""
super(ResNet, self).__init__()
if layers is None:
layers = (2, 3, 5, 2)
self.conv1 = nn.Sequential(
nn.Conv2d(3, 64, 7, 2, 3),
nn.BatchNorm2d(64),
nn.ReLU(inplace=True),
nn.MaxPool2d(3, 2, 1)
)
self.layer1 = self._make_layer(64, 64, layers[0])
self.layer2 = self._make_layer(64, 128, layers[1], 2)
self.layer3 = self._make_layer(128, 256, layers[2], 2)
self.layer4 = self._make_layer(256, 512, layers[3], 2)
#ada_avg: 将输入(N, C, H, W) -> (N, C, H*, W*)
#下面H*, W* = 1, 1
self.avg_pool = nn.AdaptiveAvgPool2d((1, 1))
self.fc = nn.Linear(512, out_size)
#直接从pytorch源码中搬来的初始化
for m in self.modules():
if isinstance(m, nn.Conv2d):
nn.init.kaiming_normal_(m.weight, mode='fan_out', nonlinearity='relu')
elif isinstance(m, (nn.BatchNorm2d, nn.GroupNorm)):
nn.init.constant_(m.weight, 1)
nn.init.constant_(m.bias, 0)
def _make_layer(self, in_channels, out_channels,
block_nums, stride=1):
shortcut = nn.Sequential(
nn.Conv2d(in_channels, out_channels, 1, stride)
)
layer = [nn.Sequential(
Residualblock(in_channels, out_channels, stride, shortcut)
)]
for block in range(block_nums):
layer.append(
Residualblock(out_channels, out_channels, 1)
)
return nn.Sequential(*layer)
def forward(self, x):
x = self.conv1(x)
x = self.layer1(x)
x = self.layer2(x)
x = self.layer3(x)
x = self.layer4(x)
x = self.avg_pool(x)
x = torch.flatten(x, 1) #展平 等价于.vier(x.size(0), -1)
out = self.fc(x)
return out
class Train:
def __init__(self, lr=0.01, momentum=0.9, weight_decay=0.0001):
self.net = ResNet()
self.criterion = nn.CrossEntropyLoss()
self.opti = torch.optim.SGD(self.net.parameters(),
lr=lr, momentum=momentum,
weight_decay=weight_decay)
self.gpu()
self.generate_path()
self.acc_rates = []
self.errors = []
def gpu(self):
self.device = torch.device("cuda:0" if torch.cuda.is_available() else "cpu")
if torch.cuda.device_count() > 1:
print("Let'us use %d GPUs" % torch.cuda.device_count())
self.net = nn.DataParallel(self.net)
self.net = self.net.to(self.device)
def generate_path(self):
"""
生成保存数据的路径
:return:
"""
try:
os.makedirs('./paras')
os.makedirs('./logs')
os.makedirs('./infos')
except FileExistsError as e:
pass
name = self.net.__class__.__name__
paras = os.listdir('./paras')
logs = os.listdir('./logs')
infos = os.listdir('./infos')
number = max((len(paras), len(logs), len(infos)))
self.para_path = "./paras/{0}{1}.pt".format(
name,
number
)
self.log_path = "./logs/{0}{1}.txt".format(
name,
number
)
self.info_path = "./infos/{0}{1}.npy".format(
name,
number
)
def log(self, strings):
"""
运行日志
:param strings:
:return:
"""
# a 往后添加内容
with open(self.log_path, 'a', encoding='utf8') as f:
f.write(strings)
def save(self):
"""
保存网络参数
:return:
"""
torch.save(self.net.state_dict(), self.para_path)
def derease_lr(self, multi=10):
"""
降低学习率
:param multi:
:return:
"""
self.opti.param_groups()[0]['lr'] /= multi
def train(self, trainloder, epochs=50):
data_size = len(trainloder) * trainloder.batch_size
part = int(trainloder.batch_size / 2)
for epoch in range(epochs):
running_loss = 0.
total_loss = 0.
acc_count = 0.
if (epoch + 1) % int(epochs / 2) is 0:
self.derease_lr()
self.log(#日志记录
"learning rate change!!!\n"
)
for i, data in enumerate(trainloder):
imgs, labels = data
imgs = imgs.to(self.device)
labels = labels.to(self.device)
out = self.net(imgs)
loss = self.criterion(out, labels)
_, pre = torch.max(out, 1) #判断是否判断正确
acc_count += (pre == labels).sum().item() #加总对的个数
self.opti.zero_grad()
loss.backward()
self.opti.step()
running_loss += loss.item()
if (i+1) % part is 0:
strings = "epoch {0:<3} part {1:<5} loss: {2:<.7f}\n".format(
epoch, i, running_loss / part
)
self.log(strings)#日志记录
total_loss += running_loss
running_loss = 0.
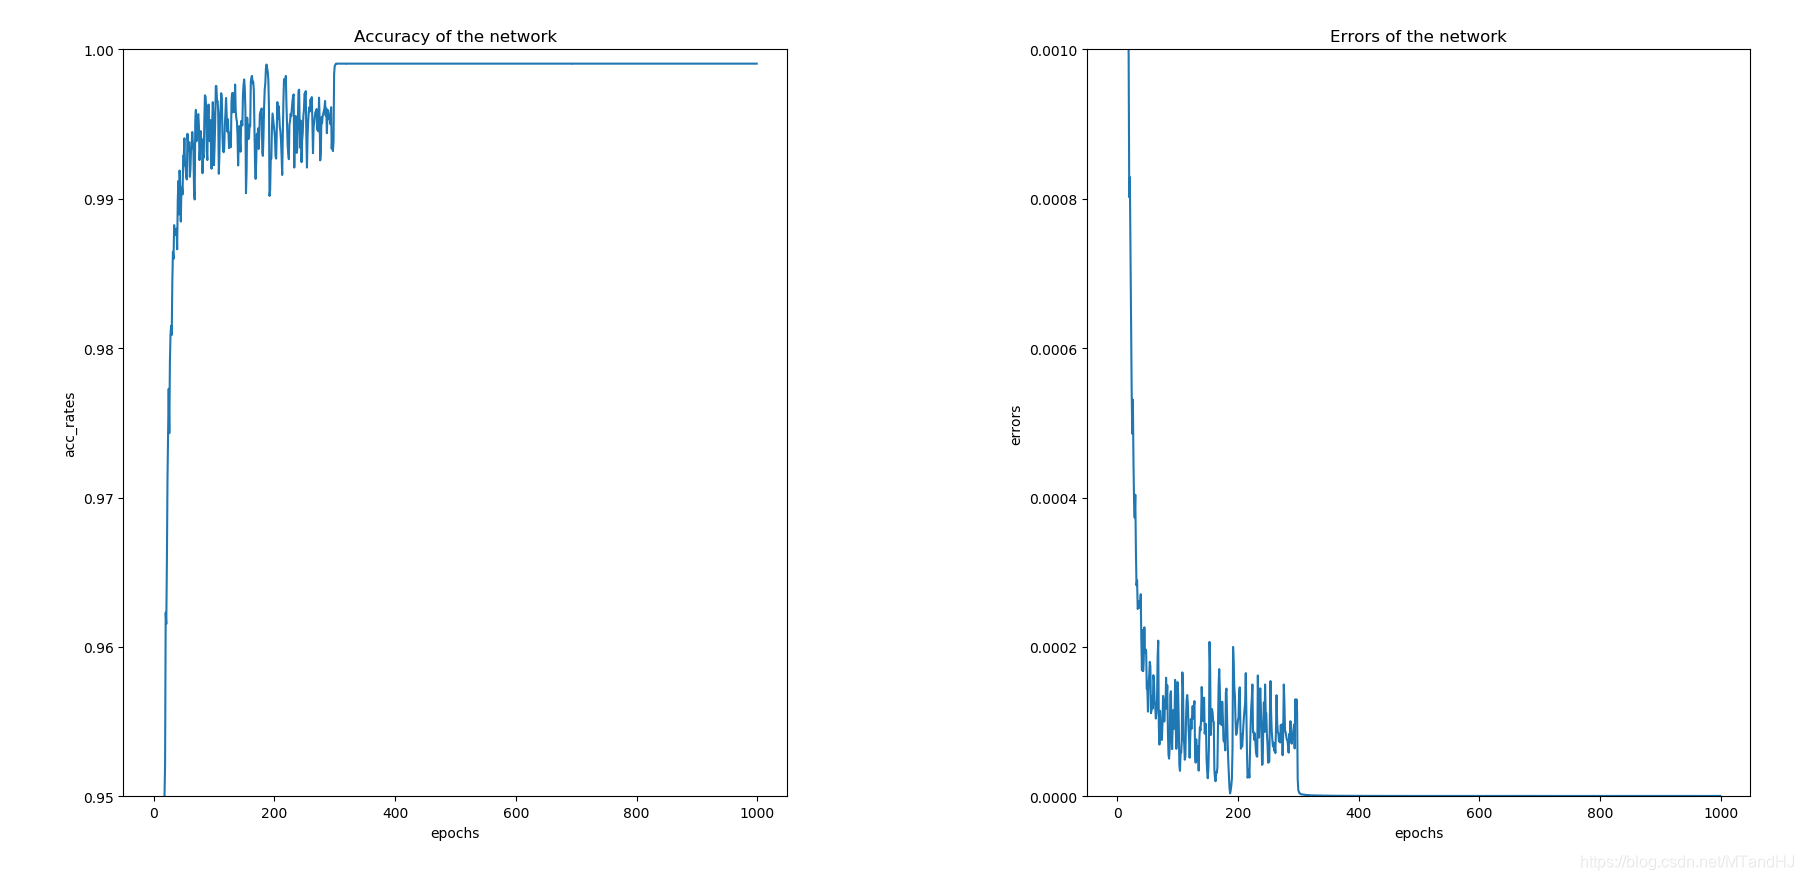
self.acc_rates.append(acc_count / data_size)
self.errors.append(total_loss / data_size)
self.log( #日志记录
"Accuracy of the network on %d train images: %d %%\n" %(
data_size, acc_count / data_size * 100
)
)
self.save() #保存网络参数
#保存一些信息画图用
np.save(self.info_path, {
'acc_rates': np.array(self.acc_rates),
'errors': np.array(self.errors)
})
if __name__ == "__main__":
root = "../../data"
trainset = torchvision.datasets.CIFAR10(root=root, train=True,
download=False,
transform=transforms.Compose(
[transforms.ToTensor(),
transforms.Normalize((0.5, 0.5, 0.5), (0.5, 0.5, 0.5))]
))
train_loader = torch.utils.data.DataLoader(trainset, batch_size=128,
shuffle=True, num_workers=0)
dog = Train()
dog.train(train_loader, epochs=1000)
Deep Residual Learning for Image Recognition (ResNet)的更多相关文章
- [论文阅读] Deep Residual Learning for Image Recognition(ResNet)
ResNet网络,本文获得2016 CVPR best paper,获得了ILSVRC2015的分类任务第一名. 本篇文章解决了深度神经网络中产生的退化问题(degradation problem). ...
- 论文笔记——Deep Residual Learning for Image Recognition
论文地址:Deep Residual Learning for Image Recognition ResNet--MSRA何凯明团队的Residual Networks,在2015年ImageNet ...
- [论文理解]Deep Residual Learning for Image Recognition
Deep Residual Learning for Image Recognition 简介 这是何大佬的一篇非常经典的神经网络的论文,也就是大名鼎鼎的ResNet残差网络,论文主要通过构建了一种新 ...
- Deep Residual Learning for Image Recognition这篇文章
作者:何凯明等,来自微软亚洲研究院: 这篇文章为CVPR的最佳论文奖:(conference on computer vision and pattern recognition) 在神经网络中,常遇 ...
- Deep Residual Learning for Image Recognition
Kaiming He, Xiangyu Zhang, Shaoqing Ren, Jian Sun Microsoft Research {kahe, v-xiangz, v-sh ...
- Deep Residual Learning for Image Recognition论文笔记
Abstract We present a residual learning framework to ease the training of networks that are substant ...
- Deep Residual Learning for Image Recognition(残差网络)
深度在神经网络中有及其重要的作用,但越深的网络越难训练. 随着深度的增加,从训练一开始,梯度消失或梯度爆炸就会阻止收敛,normalized initialization和intermediate n ...
- 【网络结构】Deep Residual Learning for Image Recognition(ResNet) 论文解析
目录 0. 论文链接 1. 概述 2. 残差学习 3. Identity Mapping by shortcuts 4. Network Architectures 5. 训练细节 6. 实验 @ 0 ...
- ResNet——Deep Residual Learning for Image Recognition
1. 摘要 更深的神经网络通常更难训练,作者提出了一个残差学习的框架,使得比过去深许多的的网络训连起来也很容易. 在 ImageNet 数据集上,作者设计的网络达到了 152 层,是 VGG-19 的 ...
随机推荐
- 大数据学习----day27----hive02------1. 分桶表以及分桶抽样查询 2. 导出数据 3.Hive数据类型 4 逐行运算查询基本语法(group by用法,原理补充) 5.case when(练习题,多表关联)6 排序
1. 分桶表以及分桶抽样查询 1.1 分桶表 对Hive(Inceptor)表分桶可以将表中记录按分桶键(某个字段对应的的值)的哈希值分散进多个文件中,这些小文件称为桶. 如要按照name属性分为3个 ...
- nodeJs-querystring 模块
JavaScript 标准参考教程(alpha) 草稿二:Node.js querystring 模块 GitHub TOP querystring 模块 来自<JavaScript 标准参考教 ...
- 【leetcode】1293 .Shortest Path in a Grid with Obstacles
You are given an m x n integer matrix grid where each cell is either 0 (empty) or 1 (obstacle). You ...
- 链栈(C++)
链栈,字面意思,就是用链表来实现一个栈的数据结构. 那么,只需将单链表的头节点当作栈顶,尾节点当作栈底.入栈只需要头插,出栈只需头删即可.所以只需要吧单链表稍微阉割一下就可以得到链式栈了.代码如下 / ...
- 【swift】用Xib实现自定义警告框(Alert)(安卓叫法:Dialog对话框)
在写这篇博客前,先感谢两篇博客 [如何自定义的思路]:https://www.cnblogs.com/apprendre-10-28/p/10507794.html [如何绑定Xib并且使用]:htt ...
- ORACLE 数据块PCTFREE和PCTUSED
PCTFREE表示一个数据块可用空间小于PCTFREE时,该数据块不在被记录在FREELIST中,即不能插入新数据. PCTUSED表示一个数据块已经用空间如果小于PCTUSED时,该数据块才会被重新 ...
- Spring Boot中使用Servlet与Filter
在Spring Boot中使用Servlet,根据Servlet注册方式的不同,有两种使用方式.若使用的是Servlet3.0+版本,则两种方式均可使用:若使用的是Servlet2.5版本,则只能使用 ...
- java中子类继承父类什么?
1.继承public和protected修饰的属性和方法,不管子类和父类是否在同一个包: 2.继承默认权限修饰符修饰的属性和方法,前提是子类和父类在同一个包.
- 手写IOC实践
一.IOC 1.什么是IOC? 控制反转(英语:Inversion of Control,缩写为IoC),是[面向对象编程]中的一种设计原则,可以用来减低计算机代码之间的[耦合度]其中最常见的方式叫做 ...
- myfs 操作系统课内实验 文件管理系统 Ext2
To 学弟学妹们: 写这个随笔原意是记录一下这个很有趣的实验 ,记录一下写的时候的细节和思路. 要是光是抄这个代码,反而使得这个实验失去了意义. 加油,这个实验收获真的很大. 任务描述: 用一个空白文 ...