iOS截屏并修改截图然后分享的功能实现
一. 实现的效果类似微博的截图分享
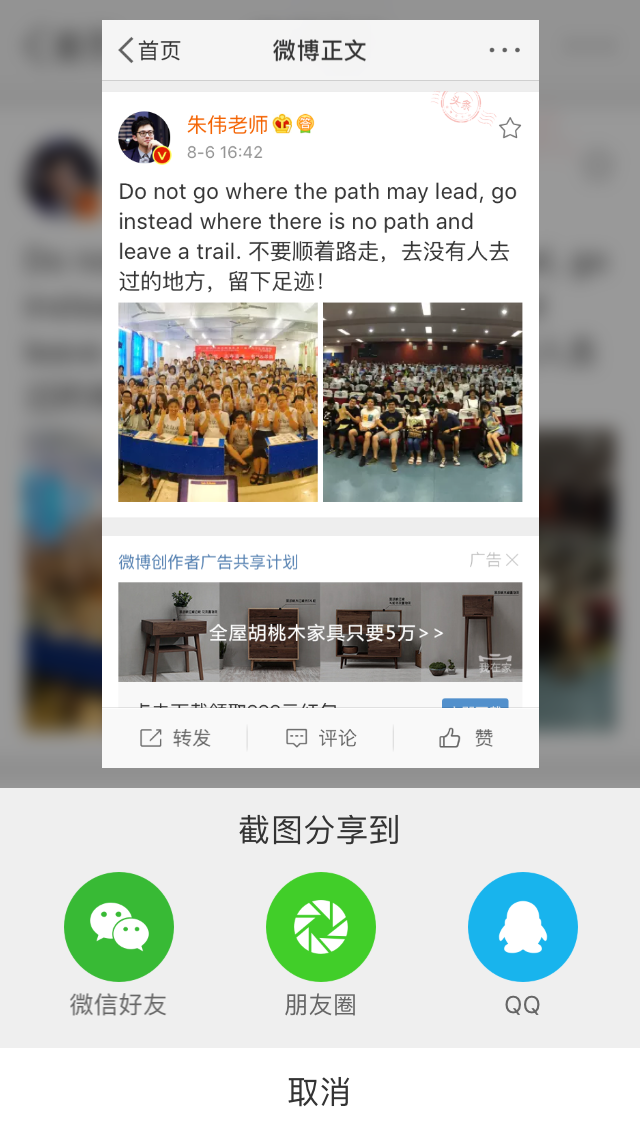

不仅截图分享的时候还进行图片的修改,增加自己的二维码
二.实现方式
苹果在ios7之后提供了一个新的通知类型:UIApplicationUserDidTakeScreenshotNotification,
这个通知会告知注册了此通知的对象已经发生了截屏事件,然后我们就可以在这个事件中实现自己的逻辑
1.注册通知
- (void)viewDidLoad {

    [super viewDidLoad];

    //注册用户的截屏操作通知

    [[NSNotificationCenter defaultCenter] addObserver:self

                                             selector:@selector(userDidTakeScreenshot:)

                                                 name:UIApplicationUserDidTakeScreenshotNotification object:nil];

}
2.接收通知 (获取截图并修改的图片,并展示,展示UI,可以自己修改)
//截屏响应

- (void)userDidTakeScreenshot:(NSNotification *)notification

{

    NSLog(@"检测到截屏");

    //人为截屏, 模拟用户截屏行为, 获取所截图片

    _testImg = [self imageWithScreenshot];

//    //添加显示

    UIImageView *imgvPhoto = [[UIImageView alloc]initWithImage:_testImg];

    imgvPhoto.frame = CGRectMake(, WIN_HEIGHT/, WIN_WIDTH/, WIN_HEIGHT/);

    imgvPhoto.backgroundColor = [UIColor orangeColor];

    imgvPhoto.userInteractionEnabled = YES;

    //添加边框

    CALayer * layer = [imgvPhoto layer];

    layer.borderColor = [[UIColor whiteColor] CGColor];

    layer.borderWidth = 5.0f;

    //添加四个边阴影

    imgvPhoto.layer.shadowColor = [UIColor blackColor].CGColor;

    imgvPhoto.layer.shadowOffset = CGSizeMake(, );

    imgvPhoto.layer.shadowOpacity = 0.5;

    imgvPhoto.layer.shadowRadius = 10.0;

    //添加两个边阴影

    imgvPhoto.layer.shadowColor = [UIColor blackColor].CGColor;

    imgvPhoto.layer.shadowOffset = CGSizeMake(, );

    imgvPhoto.layer.shadowOpacity = 0.5;

    imgvPhoto.layer.shadowRadius = 2.0;

    [self.view  addSubview:imgvPhoto];

    // 添加手势

    UITapGestureRecognizer *tap = [[UITapGestureRecognizer alloc]initWithTarget:self action:@selector(tapImgView:)];

    [imgvPhoto addGestureRecognizer:tap];

}
3. 截图并修改图片
/**

 *  截取当前屏幕 并修改

 *

 *  @return NSData *

 */

- (UIImage *)imageWithScreenshot

{

    CGSize imageSize = CGSizeZero;

    UIInterfaceOrientation orientation = [UIApplication sharedApplication].statusBarOrientation;

    if (UIInterfaceOrientationIsPortrait(orientation))

        imageSize = [UIScreen mainScreen].bounds.size;

    else

        imageSize = CGSizeMake([UIScreen mainScreen].bounds.size.height, [UIScreen mainScreen].bounds.size.width);

    UIGraphicsBeginImageContextWithOptions(imageSize, NO, );

    CGContextRef context = UIGraphicsGetCurrentContext();

    for (UIWindow *window in [[UIApplication sharedApplication] windows])

    {

        CGContextSaveGState(context);

        CGContextTranslateCTM(context, window.center.x, window.center.y);

        CGContextConcatCTM(context, window.transform);

        CGContextTranslateCTM(context, -window.bounds.size.width * window.layer.anchorPoint.x, -window.bounds.size.height * window.layer.anchorPoint.y);

        if (orientation == UIInterfaceOrientationLandscapeLeft)

        {

            CGContextRotateCTM(context, M_PI_2);

            CGContextTranslateCTM(context, , -imageSize.width);

        }else if (orientation == UIInterfaceOrientationLandscapeRight)

        {

            CGContextRotateCTM(context, -M_PI_2);

            CGContextTranslateCTM(context, -imageSize.height, );

        } else if (orientation == UIInterfaceOrientationPortraitUpsideDown) {

            CGContextRotateCTM(context, M_PI);

            CGContextTranslateCTM(context, -imageSize.width, -imageSize.height);

        }

        if ([window respondsToSelector:@selector(drawViewHierarchyInRect:afterScreenUpdates:)])

        {

            [window drawViewHierarchyInRect:window.bounds afterScreenUpdates:YES];

        }

        else

        {

            [window.layer renderInContext:context];

        }

        CGContextRestoreGState(context);

    }

    UIImage *image = UIGraphicsGetImageFromCurrentImageContext();

    UIGraphicsEndImageContext();

    // 修改图片

    NSData *imageData = UIImagePNGRepresentation(image);

    UIImage *LastImage = [UIImage imageWithData:imageData];

    UIImage *img = [UIImage imageNamed:@"ico_nursery.png"];

    CGImageRef imgRef = img.CGImage;

    CGFloat w = CGImageGetWidth(imgRef);

    CGFloat h = CGImageGetHeight(imgRef);

    //以1.png的图大小为底图

    UIImage *img1 = LastImage;

    CGImageRef imgRef1 = img1.CGImage;

    CGFloat w1 = CGImageGetWidth(imgRef1);

    CGFloat h1 = CGImageGetHeight(imgRef1);

    //以1.png的图大小为画布创建上下文

    UIGraphicsBeginImageContext(CGSizeMake(w1, h1 + ));

    [img1 drawInRect:CGRectMake(, , w1, h1)];//先把1.png 画到上下文中

    [img drawInRect:CGRectMake(, h1 + , , )];//再把小图放在上下文中

    UIImage *resultImg = UIGraphicsGetImageFromCurrentImageContext();//从当前上下文中获得最终图片

    UIGraphicsEndImageContext();//关闭上下文

    return  resultImg;

}
4.根据添加的事件进行分享 分享自己也可封装
// 点击图片改变imageView位置,打印图片信息 分享自己也可封装
- (void)tapImgView: (UITapGestureRecognizer *)tap { NSLog(@"点击了图片...");
// 微信
[MyAPIClient mobEvent:@"wechat"];
// [Helper shareImageName:_testImg type:SSDKPlatformSubTypeWechatSession];// 微信好友
[Helper shareImageName:_testImg type:SSDKPlatformSubTypeWechatTimeline];// 微信朋友圈
// [MyAPIClient mobEvent:@"QQ"];
// [Helper shareImageName:_testImg type:SSDKPlatformTypeQQ];// QQ }
5. 移除通知
- (void)dealloc

{

    [[NSNotificationCenter defaultCenter]removeObserver:self];

}
这样就可以了.展示一下测试
自身截图
截图修改分享图

ok,结束,需要补充的,欢迎大家留言讨论!
iOS截屏并修改截图然后分享的功能实现的更多相关文章
- iOS - 截屏,view截图的基本方法
推荐一个第三方好用的框架:SDScreenshotCapture #define SYSTEM_VERSION_GREATER_THAN_OR_EQUAL_TO(v) ([[[UIDevice cur ...
- iOS 截屏分享(包含状态栏与不包含状态栏)
iOS8以上的新方法PhotoKit 监听截图相册变化,取最后一张图片:http://www.hangge.com/blog/cache/detail_1515.html PhotoKit 获取本机相 ...
- Android 截屏与 WebView 长图分享经验总结
最近在做新业务需求的同时,我们在 Android 上遇到了一些之前没有碰到过的问题,截屏分享. WebView 生成长图以及长图在各个分享渠道分享时图片模糊甚至分享失败等问题,在这过程中踩了很多坑,到 ...
- ios截屏代码[转]
http://www.cnblogs.com/chenxiangxi/p/3547974.html 这位博主的连接中将ios自定义大小位置的截屏代码写的很不错,马上就能用的方法,对于只想马上用的程序员 ...
- iOS截屏代码
转载自:http://m.open-open.com/m/code/view/1420469506375 1.普通界面 /** *截图功能 */ -(void)screenShot{ UIGraphi ...
- iOS截屏保存至相册
#pragma mark 截屏并保存至相册 -(void)screenShotsComplete:(void(^)(UIImage * img)) complete { CGSize imageSiz ...
- iOS截屏方法
//获取屏幕截屏方法 - (UIImage *)capture { // 创建一个context UIGraphicsBeginImageContextWithOptions(self.view.bo ...
- iOS截屏功能
代码: - (void)viewDidLoad { [super viewDidLoad]; // Do any additional setup after loading the view. // ...
- IOS 截屏(保存到相册中)
@interface NJViewController () /** * 点击截屏按钮 */ - (IBAction)captureView:(UIButton *)sender; /** * 白色v ...
随机推荐
- Docker & ASP.NET Core (5):Docker Compose
第一篇:把代码连接到容器 第二篇:定制Docker镜像 第三篇:发布镜像 第四篇:容器间的连接 Docker Compose简介 Compose是一个用来定义和运行多容器Docker应用的工具.使用C ...
- 机器学习中如何处理不平衡数据(imbalanced data)?
推荐一篇英文的博客: 8 Tactics to Combat Imbalanced Classes in Your Machine Learning Dataset 1.不平衡数据集带来的影响 一个不 ...
- python接口自动化(九)--python中字典和json的区别(详解)
简介 这篇文章的由来是由于上一篇发送post请求的接口时候,参数传字典(dict)和json的缘故,因为python中,json和dict非常类似,都是key-value的形式,为啥还要这么传参,在群 ...
- 【Android Studio安装部署系列】十六、Android studio在layout目录下新建子目录
版权声明:本文为HaiyuKing原创文章,转载请注明出处! 概述 一般用于分类显示不同模块的layout布局文件. 在res/layout文件夹下创建子目录 res/layout鼠标右键——New— ...
- KnockoutJS-模板绑定
对于knockoutJS来讲,模板绑定和Mapping插件绑定是十分重要的功能,虽然模板绑定在我工作中用的及其少,但模板绑定的重要性不可忽视,在其他前端框架中,如Angular.Vue等等,模板存在的 ...
- Python的魔法函数系列 __getattrbute__和__getattr__
#!/usr/bin/env python # -*- coding: utf-8 -*- import sys __metaclass__ = type """ _ ...
- MIPI DSI之DBI DPI含义和区别(3-1)
一.MIPI MIPI(Mobile Industry Processor Interface/移动工业处理器接口)是2003年由ARM.Nokia.ST 等公司成立联盟并为移动应用处理器制定的一个开 ...
- Java多线程打辅助的三个小伙子
前言 之前学多线程的时候没有学习线程的同步工具类(辅助类).ps:当时觉得暂时用不上,认为是挺高深的知识点就没去管了.. 在前几天,朋友发了一篇比较好的Semaphore文章过来,然后在浏览博客的时候 ...
- 如何使用.net开发一款小而美的O2O移动应用? ——“家庭小秘”APP介绍及采访记录
“家庭小秘”是一款“互联网+生活服务”平台,为市民家庭提供优质家庭生活服务和企业后勤服务,包含了用户注册.购买预约.订单查询.充值付款.即时通讯等功能. 这款应用已上线至AppStore和安卓的应用商 ...
- 0422作业:基础(if,while)
""" 1.题目:企业发放的奖金根据利润提成.利润(I)低于或等于10万元时,奖金可提10%: 利润高于10万元,低于20万元时,低于10万元的部分按10%提成,高于10 ...