005 Ceph配置文件及用户管理
一、Ceph的配置文件
Ceph 配置文件可用于配置存储集群内的所有守护进程、或者某一类型的所有守护进程。要配置一系列守护进程,这些配置必须位于能收到配置的段落之下。默认情况下,无论是ceph的服务端还是客户端,配置文件都存储在/etc/ceph/ceph.conf文件中
如果修改了配置参数,必须使用/etc/ceph/ceph.conf文件在所有节点(包括客户端)上保持一致。
ceph.conf 采用基于 INI 的文件格式,包含具有 Ceph 守护进程和客户端相关配置的多个部分。每个部分具有一个使用 [name] 标头定义的名称,以及键值对的一个或多个参数
[root@ceph2 ceph]# cat ceph.conf
[global]   #存储所有守护进程之间通用配置。它应用到读取配置文件的所有进程,包括客户端。配置影响 Ceph 集群里的所有守护进程。

fsid = 35a91e48--4e96-a7ee-980ab989d20d     #这个ID和ceph -s查看的ID是一个

mon initial members = ceph2,ceph3,ceph4   #monitor的初始化配置,定义ceph最初安装的时候定义的monitor节点,必须在启动的时候就准备就绪的monitor节点。

mon host = 172.25.250.11,172.25.250.12,172.25.250.13

public network = 172.25.250.0/

cluster network = 172.25.250.0/

[osd]    #配置影响存储集群里的所有 ceph-osd 进程,并且会覆盖 [global] 下的同一选项

osd mkfs type = xfs

osd mkfs options xfs = -f -i size=

osd mount options xfs = noatime,largeio,inode64,swalloc

osd journal size =
注:配置文件使用#和;来注释,参数名称可以使用空格、下划线、中横线来作为分隔符。如osd journal size 、 osd_jounrnal_size 、 osd-journal-size是有效且等同的参数名称
1.1 osd介绍
一个裸磁盘给ceph后,会被格式化成xfs格式,并且会分两个分区,一个数据区和一个日志区
[root@ceph2 ceph]# fdisk -l

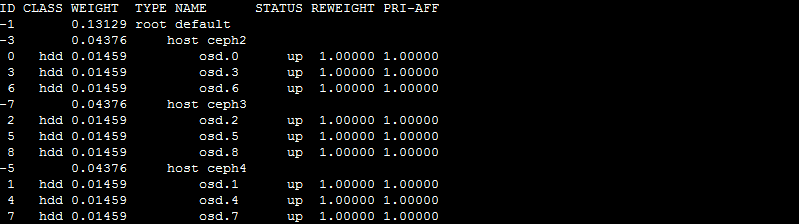
OSD的id和磁盘对应关系
[root@ceph2 ceph]# df -hT
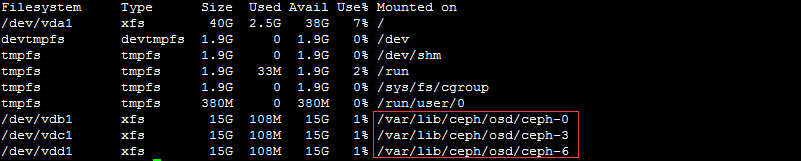
Ceph的配置文件位置和工作目录分别为:/etc/ceph和 cd /var/lib/ceph/
[root@ceph2 ceph]# ceph osd tree
二、删除一个存储池
2.1 修改配置文件
先配置一个参数为mon_allow_pool_delete为true
[root@ceph1 ceph-ansible]#  vim /etc/ceph/ceph.conf

[global]

fsid = 35a91e48--4e96-a7ee-980ab989d20d

mon initial members = ceph2,ceph3,ceph4

mon host = 172.25.250.11,172.25.250.12,172.25.250.13

public network = 172.25.250.0/

cluster network = 172.25.250.0/

[osd]

osd mkfs type = xfs

osd mkfs options xfs = -f -i size=

osd mount options xfs = noatime,largeio,inode64,swalloc

osd journal size =

[mon]    #添加配置

mon_allow_pool_delete = true
2.2 同步各个节点
[root@ceph1 ceph-ansible]# ansible all -m copy -a 'src=/etc/ceph/ceph.conf dest=/etc/ceph/ceph.conf owner=ceph group=ceph mode=0644'
ceph3 | SUCCESS => {

    "changed": true,

    "checksum": "18ad6b3743d303bdd07b8655be547de35f9b4e55",

    "dest": "/etc/ceph/ceph.conf",

    "failed": false,

    "gid": ,

    "group": "ceph",

    "md5sum": "8415ae9d959d31fdeb23b06ea7f61b1b",

    "mode": "",

    "owner": "ceph",

    "size": ,

    "src": "/root/.ansible/tmp/ansible-tmp-1552807199.08-216306208753591/source",

    "state": "file",

    "uid":

}

ceph4 | SUCCESS => {

    "changed": true,

    "checksum": "18ad6b3743d303bdd07b8655be547de35f9b4e55",

    "dest": "/etc/ceph/ceph.conf",

    "failed": false,

    "gid": ,

    "group": "ceph",

    "md5sum": "8415ae9d959d31fdeb23b06ea7f61b1b",

    "mode": "",

    "owner": "ceph",

    "size": ,

    "src": "/root/.ansible/tmp/ansible-tmp-1552807199.09-46038387604349/source",

    "state": "file",

    "uid":

}

ceph2 | SUCCESS => {

    "changed": true,

    "checksum": "18ad6b3743d303bdd07b8655be547de35f9b4e55",

    "dest": "/etc/ceph/ceph.conf",

    "failed": false,

    "gid": ,

    "group": "ceph",

    "md5sum": "8415ae9d959d31fdeb23b06ea7f61b1b",

    "mode": "",

    "owner": "ceph",

    "size": ,

    "src": "/root/.ansible/tmp/ansible-tmp-1552807199.04-33302205115898/source",

    "state": "file",

    "uid":

}

ceph1 | SUCCESS => {

    "changed": false,

    "checksum": "18ad6b3743d303bdd07b8655be547de35f9b4e55",

    "failed": false,

    "gid": ,

    "group": "ceph",

    "mode": "",

    "owner": "ceph",

    "path": "/etc/ceph/ceph.conf",

    "size": ,

    "state": "file",

    "uid":

}
输出结果
或者配置此选项
[root@ceph1 ceph-ansible]# vim /usr/share/ceph-ansible/group_vars/all.yml

重新执行palybook
[root@ceph1 ceph-ansible]# ansible-playbook site.yml
配置文件修改后不会立即生效,要重启相关的进程,比如所有的osd,或所有的monitor
[root@ceph2 ceph]# cat /etc/ceph/ceph.conf

同步成功
2.3 每个节点重启服务
[root@ceph2 ceph]# systemctl restart ceph-mon@serverc
或者
[root@ceph2 ceph]# systemctl restart ceph-mon.target
也可以使用ansible同时启动
[root@ceph1 ceph-ansible]#  ansible mons -m shell -a ' systemctl restart ceph-mon.target'  #这种操作坚决不允许在生产环境操作

ceph2 | SUCCESS | rc= >>

ceph4 | SUCCESS | rc= >>

ceph3 | SUCCESS | rc= >>
2.4 删除池
[root@ceph2 ceph]# ceph osd pool ls

testpool

EC-pool

[root@ceph2 ceph]# ceph osd pool delete EC-pool EC-pool --yes-i-really-really-mean-it

pool 'EC-pool' removed

[root@ceph2 ceph]# ceph osd pool ls

testpool
三、修改配置文件
3.1 临时修改一个配置文件
[root@ceph2 ceph]# ceph tell mon.* injectargs '--mon_osd_nearfull_ratio 0.85'     #在输出信息显示需要重启服务,但是配置已经生效

mon.ceph2: injectargs:mon_osd_nearfull_ratio = '0.850000' (not observed, change may require restart)

mon.ceph3: injectargs:mon_osd_nearfull_ratio = '0.850000' (not observed, change may require restart)

mon.ceph4: injectargs:mon_osd_nearfull_ratio = '0.850000' (not observed, change may require restart)

[root@ceph2 ceph]#  ceph tell mon.* injectargs '--mon_osd_full_ratio 0.95'

mon.ceph2: injectargs:mon_osd_full_ratio = '0.950000' (not observed, change may require restart)

mon.ceph3: injectargs:mon_osd_full_ratio = '0.950000' (not observed, change may require restart)

mon.ceph4: injectargs:mon_osd_full_ratio = '0.950000' (not observed, change may require restart)

[root@ceph2 ceph]# ceph daemon osd. config show|grep nearfull

    "mon_osd_nearfull_ratio": "0.850000",

[root@ceph2 ceph]# ceph daemon mon.ceph2 config show|grep mon_osd_full_ratio

    "mon_osd_full_ratio": "0.950000",
3.2 元变量介绍
所谓元变量是即Ceph内置的变量。可以用它来简化ceph.conf文件的配置:
$cluster:Ceph存储集群的名称。默认为ceph,在/etc/sysconfig/ceph文件中定义。例如,log_file参数的默认值是/var/log/ceph/$cluster-$name.log。在扩展之后,它变为/var/log/ceph/ceph-mon.ceph-node1.log
$type:守护进程类型。监控器使用mon;OSD使用osd,元数据服务器使用mds,管理器使用mgr,客户端应用使用client。如在[global]部分中将pid_file参数设定义为/var/run/$cluster/$type.$id.pid,它会扩展为/var/run/ceph/osd.0.pid,表示ID为0的 OSD。对于在ceph-node1上运行的MON守护进程,它扩展为/var/run/ceph/mon.ceph-node1.pid
$id:守护进程实例ID。对于ceph-node1上的MON,设置为ceph-node1。对于osd.1,它设置为1。如果是客户端应用,这是用户名
$name:守护进程名称和实例ID。这是$type.$id的快捷方式
$host:其上运行了守护进程的主机的名称
补充:
关闭所有ceph进程
[root@ceph2 ceph]# ps -ef|grep "ceph-"|grep -v grep|awk '{print $2}'|xargs kill -9
3.3 组件之间启用cephx认证配置
[root@ceph2 ceph]# ceph daemon osd.3 config show|grep grace

[root@ceph2 ceph]# ceph daemon mon.ceph2 config show|grep auth

修改配置文件
[root@ceph1 ceph-ansible]# vim /etc/ceph/ceph.conf
auth_cluster_required = cephx

auth_service_required = cephx

auth_client_required = cephx
[root@ceph1 ceph-ansible]# ansible all -m copy -a 'src=/etc/ceph/ceph.conf dest=/etc/ceph/ceph.conf owner=ceph group=ceph mode=0644'
[root@ceph1 ceph-ansible]# ansible mons -m shell -a ' systemctl restart ceph-mon.target'
[root@ceph1 ceph-ansible]# ansible mons -m shell -a ' systemctl restart ceph-osd.target'
[root@ceph1 ceph-ansible]# ansible mons -m shell -a ' systemctl restart ceph-mgr.target'
[root@ceph2 ceph]# ceph daemon mon.ceph2 config show|grep auth
cephx验证
四、Ceph用户管理
用户管理需要用户名和秘钥
[root@ceph2 ceph]# cat ceph.client.admin.keyring
[client.admin]

    key = AQD7fYxcnG+wCRAARyLuAewyDcGmTPb5wdNRvQ==

    caps mds = "allow *"

    caps mgr = "allow *"

    caps mon = "allow *"

    caps osd = "allow *"
假如没有秘钥环,在执行ceph -s等相关操作就会报错,如在ceph1执行
[root@ceph1 ceph-ansible]# ceph -s
-- ::31.824428 7fc87b255700 - auth: unable to find a keyring on /etc/ceph/ceph.client.admin.keyring,/etc/ceph/ceph.keyring,/etc/ceph/keyring,/etc/ceph/keyring.bin,: () No such file or directory

-- ::31.824437 7fc87b255700 - monclient: ERROR: missing keyring, cannot use cephx for authentication

-- ::31.824439 7fc87b255700   librados: client.admin initialization error () No such file or directory

[errno ] error connecting to the cluster
4.1 Ceph授权
Ceph把数据以对象的形式存于个存储池中,Ceph用户必须具有访问存储池的权限能够读写数据
Ceph用caps来描述给用户的授权,这样才能使用Mon,OSD和MDS的功能
caps也用于限制对某一存储池内的数据或某个命名空间的访问
Ceph管理用户可在创建或更新普通用户是赋予其相应的caps
Ceph常用权限说明:
r:赋予用户读数据的权限,如果我们需要访问集群的任何信息,都需要先具有monitor的读权限
w:赋予用户写数据的权限,如果需要在osd上存储或修改数据就需要为OSD授予写权限
x:赋予用户调用对象方法的权限,包括读和写,以及在monitor上执行用户身份验证的权限
class-read:x的子集,允许用户调用类的read方法,通常用于rbd类型的池
class-write:x的子集,允许用户调用类的write方法,通常用于rbd类型的池
*:将一个指定存储池的完整权限(r、w和x)以及执行管理命令的权限授予用户
profile osd:授权一个用户以OSD身份连接其它OSD或者Monitor,用于OSD心跳和状态报告
profile mds:授权一个用户以MDS身份连接其他MDS或者Monitor
profile bootstrap-osd:允许用户引导OSD。比如ceph-deploy和ceph-disk工具都使用client.bootstrap-osd用户,该用户有权给OSD添加密钥和启动加载程序
profile bootstrap-mds:允许用户引导MDS。比如ceph-deploy工具使用了client.bootstrap-mds用户,该用户有权给MDS添加密钥和启动加载程序
4.2 添加用户
[root@ceph2 ceph]# ceph auth add client.ning mon 'allow r' osd 'allow rw pool=testpool'  #当用户不存在,则创建用户并授权;当用户存在,当权限不变,则不进行任何输出;当用户存在,不支持修改权限

added key for client.ning

[root@ceph2 ceph]# ceph auth add client.ning mon  'allow r' osd 'allow rw'

Error EINVAL: entity client.ning exists but cap osd does not match

[root@ceph2 ceph]# ceph auth get-or-create client.joy mon 'allow r' osd 'allow rw pool=mytestpool'  #当用户不存在,则创建用户并授权并返回用户和key,当用户存在,权限不变,返回用户和key,,当用户存在,权限修改,则返回报错

[client.joy]

    key = AQBiBY5cJ2gBLBAA/ZCGDdp6JWkPuuU0YaLsrw==

[root@ceph2 ceph]#  cat ceph.client.admin.keyring

[client.admin]

    key = AQD7fYxcnG+wCRAARyLuAewyDcGmTPb5wdNRvQ==

    caps mds = "allow *"

    caps mgr = "allow *"

    caps mon = "allow *"

    caps osd = "allow *"

[root@ceph2 ceph]# ceph auth get-or-create client.joy  mon 'allow r' osd 'allow rw'   #当用户不存在,则创建用户并授权只返回key;当用户存在,权限不变,只返回key;当用户存在,权限修改,则返回报错

Error EINVAL: key for client.joy exists but cap osd does not match
4.3 删除用户
[root@ceph2 ceph]#  ceph auth get-or-create client.xxx   #创建一个xxx用户

[client.xxx]

    key = AQAOB45c4KIoCRAAF/kDd7r4uUjKEdEHOSP8Xw==

[root@ceph2 ceph]# ceph auth del client.xxx         #删除xxx用户

updated

[root@ceph2 ceph]# ceph auth get client.xxx         #用户已经删除

Error ENOENT: failed to find client.xxx in keyring

[root@ceph2 ceph]# ceph auth get client.ning

exported keyring for client.ning

[client.ning]

    key = AQAcBY5coY/rLxAAvq99xcSOrwLI1ip0WAw2Sw==

    caps mon = "allow r"

    caps osd = "allow rw pool=testpool"

[root@ceph2 ceph]# ceph auth get-key client.ning

AQAcBY5coY/rLxAAvq99xcSOrwLI1ip0WAw2Sw==[root@ceph2 ceph]#
4.4 导出用户
[root@ceph2 ceph]# ceph auth get-or-create client.ning -o ./ceph.client.ning.keyring

[root@ceph2 ceph]# ll ./ceph.client.ning.keyring

-rw-r--r--  root root  Mar  : ./ceph.client.ning.keyring

[root@ceph2 ceph]# cat ./ceph.client.ning.keyring

[client.ning]

    key = AQAcBY5coY/rLxAAvq99xcSOrwLI1ip0WAw2Sw==
ceph1上验证验证操作
[root@ceph2 ceph]# scp ./ceph.client.ning.keyring 172.25.250.10:/etc/ceph/    把秘钥传给cph1

[root@ceph1 ceph-ansible]# ceph -s      #发现没有成功,需要制定ID或用户

-- ::01.936939 7fbad2aae700 - auth: unable to find a keyring on /etc/ceph/ceph.client.admin.keyring,/etc/ceph/ceph.keyring,/etc/ceph/keyring,/etc/ceph/keyring.bin,: () No such file or directory

-- ::01.936950 7fbad2aae700 - monclient: ERROR: missing keyring, cannot use cephx for authentication

-- ::01.936951 7fbad2aae700   librados: client.admin initialization error () No such file or directory

[errno ] error connecting to the cluster

[root@ceph1 ceph-ansible]# ceph -s --name client.ning   #指定用户查看

  cluster:

    id:     35a91e48--4e96-a7ee-980ab989d20d

    health: HEALTH_OK

  services:

    mon:  daemons, quorum ceph2,ceph3,ceph4

    mgr: ceph4(active), standbys: ceph2, ceph3

    osd:  osds:  up,  in

  data:

    pools:    pools,  pgs

    objects:  objects,  bytes

    usage:    MB used,  GB /  GB avail

    pgs:      active+clean

[root@ceph1 ceph-ansible]# ceph osd pool ls --name client.ning

testpool

[root@ceph1 ceph-ansible]# ceph osd pool ls --id ning

testpool

[root@ceph1 ceph-ansible]#

[root@ceph1 ceph-ansible]# rados -p testpool ls --id ning

test2

test

[root@ceph1 ceph-ansible]# rados -p testpool put aaa /etc/ceph/ceph.conf --id ning   #验证数据的上传下载

[root@ceph1 ceph-ansible]# rados -p testpool ls --id ning

test2

aaa

test

[root@ceph1 ceph-ansible]# rados -p testpool get aaa /root/aaa.conf  --name client.ning

[root@ceph1 ceph-ansible]# diff  /root/aaa.conf /etc/ceph/ceph.conf
4.5 导入用户
[root@ceph2 ceph]# ceph auth export client.ning -o /etc/ceph/ceph.client.ning-.keyring

export auth(auid =  key=AQAcBY5coY/rLxAAvq99xcSOrwLI1ip0WAw2Sw== with  caps)

[root@ceph2 ceph]# ll

total

-rw-------  ceph ceph  Mar  : ceph.client.admin.keyring

-rw-r--r--  root root  Mar  : ceph.client.ning-.keyring

-rw-r--r--  root root   Mar  : ceph.client.ning.keyring

-rw-r--r--  ceph ceph  Mar  : ceph.conf

drwxr-xr-x  ceph ceph   Mar  : ceph.d

-rw-r--r--  root root   Nov    rbdmap

[root@ceph2 ceph]# cat ceph.client.ning-.keyring  #带有授权信息

[client.ning]

    key = AQAcBY5coY/rLxAAvq99xcSOrwLI1ip0WAw2Sw==

    caps mon = "allow r"

    caps osd = "allow rw pool=testpool"

[root@ceph2 ceph]# ceph auth get client.ning

exported keyring for client.ning

[client.ning]

    key = AQAcBY5coY/rLxAAvq99xcSOrwLI1ip0WAw2Sw==

    caps mon = "allow r"

    caps osd = "allow rw pool=testpool"
4.6 用户被删除,恢复用户
[root@ceph2 ceph]# cat ceph.client.ning.keyring #秘钥环没有权限信息

[client.ning]

    key = AQAcBY5coY/rLxAAvq99xcSOrwLI1ip0WAw2Sw==

[root@ceph2 ceph]# ceph auth del client.ning   #删除这个用户

updated

[root@ceph1 ceph-ansible]# ll /etc/ceph/ceph.client.ning.keyring  #在客户端,秘钥环依然存在

-rw-r--r--  root root  Mar  : /etc/ceph/ceph.client.ning.keyring

[root@ceph1 ceph-ansible]# ceph -s --name client.ning   #秘钥环的用户被删除,无效

-- ::13.896609 7f841eb27700   librados: client.ning authentication error () Operation not permitted

[errno ] error connecting to the cluster

[root@ceph2 ceph]# ceph auth import -i ./ceph.client.ning-.keyring #使用ning-.keyring恢复

imported keyring

[root@ceph2 ceph]# ceph auth list |grep ning  #用户恢复

installed auth entries:

client.ning

[root@ceph1 ceph-ansible]# ceph osd pool ls --name client.ning   #客户端验证,秘钥生效

testpool

EC-pool
4.7 修改用户权限
两种方法,一种是直接删除这个用户,重新创建具有新权限的用户,但是会导致使用这个用户连接的客户端,都将全部失效。可以使用下面的方法修改
ceph auth caps 用户修改用户授权。如果给定的用户不存在,直接返回报错。如果用户存在,则使用新指定的权限覆盖现有权限。所以,如果只是给用户新增权限,则原来的权限需要原封不动的带上。如果需要删除原来的权限,只需要将该权限设定为空即可。
[root@ceph2 ceph]# ceph auth get client.joy   #查看用户权限

exported keyring for client.joy

[client.joy]

    key = AQBiBY5cJ2gBLBAA/ZCGDdp6JWkPuuU0YaLsrw==

    caps mon = "allow r"

    caps osd = "allow rw pool=mytestpool"

[root@ceph2 ceph]# ceph osd pool ls

testpool

EC-pool

[root@ceph2 ceph]# ceph auth caps client.joy  mon 'allow r' osd 'allow rw pool=mytestpool,allow rw pool=testpool'  #对用户joy添加对testpool这个池的权限

updated caps for client.joy

[root@ceph2 ceph]# ceph auth get client.joy   #查看成功添加

exported keyring for client.joy

[client.joy]

    key = AQBiBY5cJ2gBLBAA/ZCGDdp6JWkPuuU0YaLsrw==

    caps mon = "allow r"

    caps osd = "allow rw pool=mytestpool,allow rw pool=testpool"

[root@ceph2 ceph]# rados -p testpool put joy /etc/ceph/ceph.client.admin.keyring --id joy    #但是没有秘钥,需要导出秘钥

-- ::36.602310 7ff35e71ee40 - auth: unable to find a keyring on /etc/ceph/ceph.client.joy.keyring,/etc/ceph/ceph.keyring,/etc/ceph/keyring,/etc/ceph/keyring.bin,: () No such file or directory

-- ::36.602337 7ff35e71ee40 - monclient: ERROR: missing keyring, cannot use cephx for authentication

-- ::36.602340 7ff35e71ee40   librados: client.joy initialization error () No such file or directory

couldn't connect to cluster: (2) No such file or directory

[root@ceph2 ceph]# ceph auth get-or-create client.joy -o /etc/ceph/ceph.client.joy.keyring  #导出秘钥

[root@ceph2 ceph]# rados -p testpool put joy /etc/ceph/ceph.client.admin.keyring --id joy    #上传数据测试测试

[root@ceph2 ceph]# rados -p testpool ls --id joy    #测试成功,用户权限修改成功

joy

test2

aaa

test

[root@ceph2 ceph]# ceph auth caps client.joy mon 'allow r' osd 'allow rw pool=testpool'   #去掉对mytestpool的权限

updated caps for client.joy

[root@ceph2 ceph]# ceph auth get client.joy    #修改成功

exported keyring for client.joy

[client.joy]

    key = AQBiBY5cJ2gBLBAA/ZCGDdp6JWkPuuU0YaLsrw==

    caps mon = "allow r"

    caps osd = "allow rw pool=testpool"

[root@ceph2 ceph]# ceph auth caps client.ning mon '' osd ''    #清除掉所有权限,但是必须保留对mon的读权限

Error EINVAL: moncap parse failed, stopped at end of ''

[root@ceph2 ceph]# ceph auth caps client.ning mon 'allow r' osd ''   #成功清除所有权限,但是还有mon的权限

updated caps for client.ning

[root@ceph2 ceph]# ceph auth get client.ning

exported keyring for client.ning

[client.ning]

    key = AQAcBY5coY/rLxAAvq99xcSOrwLI1ip0WAw2Sw==

    caps mon = "allow r"

    caps osd = ""

[root@ceph2 ceph]# ceph auth get-or-create  joyning    #即也不可以创建空权限用户,既没有monitor读权限的用户

Error EINVAL: bad entity name
4.8 推送用户
创建的用户主要用于客户端授权,所以需要将创建的用户推送至客户端。如果需要向同一个客户端推送多个用户,可以将多个用户的信息写入同一个文件,然后直接推送该文件
[root@ceph2 ceph]# ceph-authtool -C /etc/ceph/ceph.keyring     #创建一个秘钥文件

creating /etc/ceph/ceph.keyring

[root@ceph2 ceph]# ceph-authtool ceph.keyring --import-keyring ceph.client.ning.keyring   #把用户client.ning添加进秘钥文件

importing contents of ceph.client.ning.keyring into ceph.keyring

[root@ceph2 ceph]# cat ceph.keyring    #查看

[client.ning]

    key = AQAcBY5coY/rLxAAvq99xcSOrwLI1ip0WAw2Sw==

[root@ceph2 ceph]# ceph-authtool ceph.keyring --import-keyring ceph.client.joy.keyring    #把用户client.ning添加进秘钥文件

importing contents of ceph.client.joy.keyring into ceph.keyring

[root@ceph2 ceph]# cat ceph.keyring    #查看有两个用户,可以把这文件推送给客户端,就可以使用这两个用户的权限

[client.joy]

    key = AQBiBY5cJ2gBLBAA/ZCGDdp6JWkPuuU0YaLsrw==

[client.ning]

    key = AQAcBY5coY/rLxAAvq99xcSOrwLI1ip0WAw2Sw==
博主声明:本文的内容来源主要来自誉天教育晏威老师,由本人实验完成操作验证,需要的博友请联系誉天教育(http://www.yutianedu.com/),获得官方同意或者晏老师(https://www.cnblogs.com/breezey/)本人同意即可转载,谢谢!
005 Ceph配置文件及用户管理的更多相关文章
- linux 用户管理(一)
本节内容梗概: 1.用户管理配置文件 2.用户管理命令 3.用户组管理命令 4.批量添加用户 5.用户授权 学东西先讲原理,所以从配置文件入手 1.用户信息文件 /etc/passwd 存放了用户的 ...
- 用户管理 之 用户(User)和用户组(Group)配置文件详解
用户(User)和用户组(Group)的配置文件,是系统管理员最应该了解和掌握的系统基础文件之一,从另一方面来说,了解这些文件也是系统安全管理的重要组成部份:做为一个合格的系统管理员应该对用户和用户组 ...
- 网卡配置文件详解 用户管理与文件权限篇 文件与目录权限 软连接 tar解压命令 killall命令 linux防火墙 dns解析设置 计划任务crond服务 软件包安装 阿里云 yum源 安装
Linux系统基础优化及常用命令 Linux基础系统优化 引言没有,只有一张图. Linux的网络功能相当强悍,一时之间我们无法了解所有的网络命令,在配置服务器基础环境时,先了解下网络参数设定命令. ...
- linux和windows互传文件/用户配置文件和密码配置文件/用户组管理/用户管理
2.27linux和windows互传文件 3.1 用户配置文件和密码配置文件 3.2 用户组管理 3.3 用户管理 linux和windows互传文件 显示日期date [root@centos_1 ...
- Linux 用户篇——用户管理的配置文件
一.用户管理之配置文件的重要性 在Linux系统中,用户账户的相关信息是存放在相关配置文件中.而Linux安全系统的核心是用户账号,用户对系统中各种对象的访问权限取决于他们登录系统时用的账户,并且Li ...
- 【Linux学习】Linux用户管理2—用户配置文件
Linux用户管理2-用户配置文件 /etc/passwd: 存放系统用户的文件 输入 vi /etc/passwd /etc/shadow: 保存保密文件 /etc/group: 群组文件 输入 v ...
- Ceph 的用户管理与认证
目录 文章目录 目录 前言 Ceph 的用户管理 用户管理常规操作 CephX 认证系统 身份认证原理 使用 ceph-authtool 进行密钥环管理 注意事项 前言 常规的身份认证系统无非三点: ...
- Linux CentOS7 VMware linux和windows互传文件、用户配置文件和密码配置文件、用户组管理、用户管理
一. linux和windows互传文件 X-shell.Securecrt远程终端,与Windows之间互传文件. 安装一个工具lrzsz [root@davery ~]# yum install ...
- linux和windows互传文件、用户配置文件和密码配置文件、用户组管理、用户管理...
linux和windows互传文件 第一种:在linux主机上下载lrzsz软件包 1.yum install lrzsz 2.通过rz命令上传window的文件到linux主机上 用过sz 文件名下 ...
随机推荐
- JavaWeb登录、注销、退出、记住用户名和密码
应该是保存在Cookie里,session是放在服务器的内存里的.在用户关闭了网页窗口后,session就清空了.而Cookie是保存在用户的IE临时文件夹中的,再次登录时,读取其中的值传给服务器. ...
- part11.2-LED驱动设计
- 支付宝防并发方案之"一锁二判三更新"
每年支付宝在双11和双12的活动中,都展示了绝佳的技术能力.这个能力不但体现在处理高TPS量的访问,更体现在几乎不会出错,不会出现重复支付的情况,那这个是怎么做到的呢? 诚然,为了实现在高并发下仍不会 ...
- Android Animation动画实战(一): 从布局动画引入ListView滑动时,每一Item项的显示动画
前言: 之前,我已经写了两篇博文,给大家介绍了Android的基础动画是如何实现的,如果还不清楚的,可以点击查看:Android Animation动画详解(一): 补间动画 及 Android An ...
- Linux查看用户及其权限管理
https://www.cnblogs.com/fxlttkl/p/7601224.html 查看用户 请打开终端,输入命令: $ who am i 或者 $ who mom likes 输出的第一列 ...
- 得到Access数据库中所有表名
public static List<string> GetShemaTables(string db) { string pa ...
- 4-1 自动生成spider模板的命令
scrapy genspider 爬虫名 爬取得网站url例:scrapy genspider jobble2 blog.jobbole.com
- spring boot + thymeleaf 乱码问题
spring boot + thymeleaf 乱码问题 hellotrms 发布于 2017/01/17 15:27 阅读 1K+ 收藏 0 答案 1 开发四年只会写业务代码,分布式高并发都不会还做 ...
- H3C 什么是OSPF
- 几种常见排序算法的基本介绍,性能分析,和c语言实现
本文介绍6种常见的排序算法,以及他们的原理,性能分析和c语言实现: 为了能够条理清楚,本文所有的算法和解释全部按照升序排序进行 首先准备一个元素无序的数组arr[],数组的长度为length,一个交换 ...