
CDH的安装和设置
采用伪分布模式安装和设置CDH,前提是已经安装了Java和SSH。
1. 下载hadoop-2.6.0-cdh5.9.0,复制到/opt/下,再解压;
2. 进入/opt/hadoop-2.6.0-cdh5.9.0/etc/hadoop/,在hadoop-env.sh中添加:
export JAVA_HOME=/opt/jdk1.8.0_121

export HADOOP_HOME=/opt/hadoop-2.6.0-cdh5.9.0
修改配置文件core-tite.xml:
<?xml version="1.0" encoding="UTF-8"?>

<?xml-stylesheet type="text/xsl" href="configuration.xsl"?>

<!--

  Licensed under the Apache License, Version 2.0 (the "License");

  you may not use this file except in compliance with the License.

  You may obtain a copy of the License at

    http://www.apache.org/licenses/LICENSE-2.0

  Unless required by applicable law or agreed to in writing, software

  distributed under the License is distributed on an "AS IS" BASIS,

  WITHOUT WARRANTIES OR CONDITIONS OF ANY KIND, either express or implied.

  See the License for the specific language governing permissions and

  limitations under the License. See accompanying LICENSE file.

-->

<!-- Put site-specific property overrides in this file. -->

<configuration>

    <property>

        <name>hadoop.tmp.dir</name>

        <value>/home/hadoop/tmp</value>

    </property>

    <property>

        <name>fs.default.name</name>

        <value>hdfs://192.168.1.104:9000</value>

    </property>

</configuration>
其中hadoop.tmp.dir最好自己设置,不要采用默认的设置,因为默认的设置是在/tmp/下面,机器重启以后会被删除掉,造成Hadoop不能运行,要再次格式化NameNode才能运行。
hdfs-site.xml:
<?xml version="1.0" encoding="UTF-8"?>

<?xml-stylesheet type="text/xsl" href="configuration.xsl"?>

<!--

  Licensed under the Apache License, Version 2.0 (the "License");

  you may not use this file except in compliance with the License.

  You may obtain a copy of the License at

    http://www.apache.org/licenses/LICENSE-2.0

  Unless required by applicable law or agreed to in writing, software

  distributed under the License is distributed on an "AS IS" BASIS,

  WITHOUT WARRANTIES OR CONDITIONS OF ANY KIND, either express or implied.

  See the License for the specific language governing permissions and

  limitations under the License. See accompanying LICENSE file.

-->

<!-- Put site-specific property overrides in this file. -->

<configuration>

    <property>

        <name>dfs.replication</name>

        <value>1</value>

    </property>

    <property>

        <name>dfs.name.dir</name>

        <value>/opt/hdfs/name</value>

    </property>

    <property>

        <name>dfs.data.dir</name>

        <value>/opt/hdfs/data</value>

    </property>

    <property>

            <name>dfs.tmp.dir</name>

            <value>/opt/hdfs/tmp</value>

    </property>

</configuration>
mapred-site.xml:
<?xml version="1.0"?>

<?xml-stylesheet type="text/xsl" href="configuration.xsl"?>

<!--

  Licensed under the Apache License, Version 2.0 (the "License");

  you may not use this file except in compliance with the License.

  You may obtain a copy of the License at

    http://www.apache.org/licenses/LICENSE-2.0

  Unless required by applicable law or agreed to in writing, software

  distributed under the License is distributed on an "AS IS" BASIS,

  WITHOUT WARRANTIES OR CONDITIONS OF ANY KIND, either express or implied.

  See the License for the specific language governing permissions and

  limitations under the License. See accompanying LICENSE file.

-->

<!-- Put site-specific property overrides in this file. -->

<configuration>

    <property>

        <name>mapreduce.framework.name</name>

        <value>yarn</value>

    </property>

    <property>

        <name>mapred.job.tracker</name>

        <value>hdfs://192.168.1.104:9001</value>

    </property>

</configuration>
3. 在/etc/profile后面加上:
export HADOOP_HOME=/opt/hadoop-2.6.0-cdh5.9.0

export PATH=$PATH:$HADOOP_HOME/bin
并且输入命令:
source /etc/profile
使设置生效。
4. 输入命令:
hadoop namenode -format
格式化NameNode,如果结果提示Successful表明格式化成功。
5. 进入/opt/hadoop-2.6.0-cdh5.9.0/etc/hadoop/sbin,输入命令:
./start-all.sh
启动Hadoop。为了检验是否启动成功,输入命令:
jps
如果结果包含了以下几个进程,则表明启动成功:
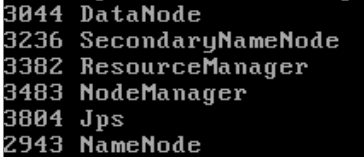
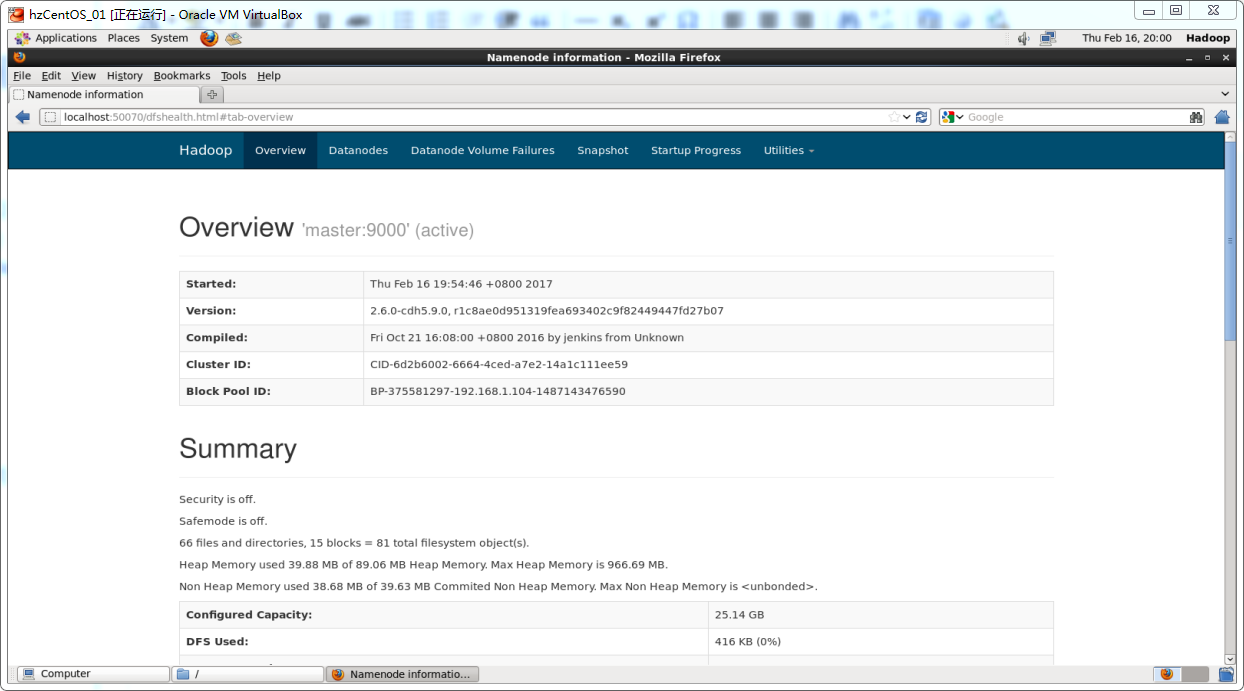
也可以在浏览器里面输入地址http://localhost:50070,检验是否启动成功:
CDH的安装和设置的更多相关文章
- CentOS7安装CDH 第五章:CDH的安装和部署-CDH5.7.0
相关文章链接 CentOS7安装CDH 第一章:CentOS7系统安装 CentOS7安装CDH 第二章:CentOS7各个软件安装和启动 CentOS7安装CDH 第三章:CDH中的问题和解决方法 ...
- Hadoop的安装与设置(1)
在Ubuntu下安装与设置Hadoop的主要过程. 1. 创建Hadoop用户 创建一个用户,用户名为hadoop,在home下创建该用户的主目录,就不详细介绍了. 2. 安装Java环境 下载Lin ...
- linux下MySQL安装及设置
转自:http://www.entage.net/1/viewspace-25420 1. 关于本文 本文将以MySQL 5.0.51为例,以CentOS 5为平台,讲述MySQL数据库的安装和 ...
- Coudera-Manager/CDH的安装和部署
由于之前部署的集群采用的是用apache hadoop的方式来实现,但是考虑到运维的成本问题,下面将apache hadoop转换成cloudera cdh.下面主要讲解一下cloudera cdh的 ...
- 在Ubuntu 12.04安装和设置Samba实现网上邻居共享
转载:http://www.startos.com/ubuntu/tips/2012031333097.html 有微小改动. Samba 是一款功能强大的共享工具,可以实现与win ...
- RESTheart安装与设置
作者:Maurizio Turatti, 最后在Feb 25, 2016时被 Andrea Di Cesare更新 安装与设置 1. 快速开始 Docker Vagrant Bare metal 2. ...
- cdh 上安装spark on yarn
在cdh 上安装spark on yarn 还是比较简单的,不需要独立安装什么模块或者组件. 安装服务 选择on yarn 模式:上面 Spark 在spark 服务中添加 在yarn 服务中添加 g ...
- 安装、设置与启动MySql绿色版的方法
原文:安装.设置与启动MySql绿色版的方法 1.解压 mysql-noinstall-5.1.30-win32.zip(下载地址http://dev.mysql.com/downloads/mysq ...
- ubuntu显卡驱动安装及设置
转自: Ubuntu 14.04 Nvidia显卡驱动安装及设置 更换主板修复grub 引导后,无法从Nvidia进入系统(光标闪烁), 可能是显卡驱动出了问题. 1. 进入BIOS设置, 从集成 ...
随机推荐
- 商业web漏扫神器——appscan篇
版权声明:本文为博主原创文章,未经博主允许不得转载. https://blog.csdn.net/dongfei2033/article/details/78472507 很快,已经到了三大商业漏 ...
- Android之取消ViewPage+Fragment的预加载
用过ViewPage+Fragment组合的童鞋自然知道这个问题,没有遇到的同学祝愿你们永远不会遇到,呵呵.直接上关键代码 注释:setUserVisibleHint每次fragment显示与隐藏都会 ...
- QML与C++交互:在qml中使用QSqlQueryModel显示数据库数据
QML与C++交互:在qml中使用QSqlQueryModel显示数据库数据 本文博客链接:http://blog.csdn.net/jdh99,作者:jdh,转载请注明. 參考链接: http:// ...
- 在MFC内竟然不可以解析“Mat”
调试了好久,在MFC内竟然不可以解析“Mat” 总是显示"Mat"没有定义,改动include.lib.依赖库, 不断地改动: #include "opencv2/img ...
- 【转】从源码来分析ListView
原文:http://yanmingming.sinaapp.com/?p=1251 原文其实不叫这个名字,本文对于原文有一定的修改,觉得这个名字比较适合本篇. 一.ListView 的工作原理 Ada ...
- 在自己建立的Thread中设置Handler,并接收消息
这里主要讲的是Android中线程的概念,自己的线程不能更新UI线程中的视图.如果把Handler设置在自己的线程中,那么必须建立一个Looper.至于为什么在Activity中建立Handler就不 ...
- SpringBoot整合Quartz定时任务 系统job Spring Boot教程 调度任务
原文地址:https://www.cnblogs.com/allalongx/p/8477368.html 构建工程 创建一个Springboot工程,在它的程序入口加上@EnableScheduli ...
- 什么是 Event Loop?
http://www.ruanyifeng.com/blog/2013/10/event_loop.html 什么是 Event Loop? 作者: 阮一峰 日期: 2013年10月21日 [2014 ...
- The Art of Deception
前言 一些黑客毁坏别人的文件甚至整个硬盘,他们被称为电脑狂人(crackers)或计算机破坏者(vandals).另一些新手省去学习技术的麻烦,直接下载黑客工具侵入别人的计算机,这些人被称为脚本小子( ...
- [leetcode]Spiral Matrix II @ Python
原题地址:https://oj.leetcode.com/problems/spiral-matrix-ii/ 题意: Given an integer n, generate a square ma ...