
tensorflow模型的保存与恢复
1.tensorflow中模型的保存
创建tf.train.saver,使用saver进行保存:
saver = tf.train.Saver()

saver.save(sess, './trained_variables.ckpt', global_step=1000)
1.1.在保存时需要注意参数在创建时需要传入name参数,读取参数时凭借name属性读取。
def weight_variable(shape, name):

    initial = tf.truncated_normal(shape, stddev=0.1, name=name)

    return tf.Variable(initial)

W_conv1 = weight_variable([5, 5, 1, 32], name='W_conv1')
1.2例子
import tensorflow as tf

from tensorflow.examples.tutorials.mnist import input_data

mnist = input_data.read_data_sets('data/', one_hot=True)

def weight_variable(shape, name):

    initial = tf.truncated_normal(shape, stddev=0.1, name=name)

    return tf.Variable(initial)

def bias_variable(shape, name):

    initial = tf.constant(0.1, shape=shape, name=name)

    return tf.Variable(initial)

def conv2d(x, W):

    return tf.nn.conv2d(x, W, strides=[1, 1, 1, 1], padding='SAME')

def max_pool_2x2(x):

    return tf.nn.max_pool(x, ksize=[1, 2, 2, 1], strides=[1, 2, 2, 1], padding='SAME')

x = tf.placeholder(tf.float32, [None, 784])

y_ = tf.placeholder(tf.float32, [None, 10])

x_image = tf.reshape(x, [-1, 28, 28, 1])

W_conv1 = weight_variable([5, 5, 1, 32], name='W_conv1')

b_conv1 = bias_variable([32], name='b_conv1')

h_conv1 = tf.nn.relu(conv2d(x_image, W_conv1) + b_conv1)

h_pool1 = max_pool_2x2(h_conv1)

W_conv2 = weight_variable([5, 5, 32, 64], name='W_conv2')

b_conv2 = bias_variable([64], name='b_conv2')

h_conv2 = tf.nn.relu(conv2d(h_pool1, W_conv2) + b_conv2)

h_pool2 = max_pool_2x2(h_conv2)

W_fc1 = weight_variable([7*7*64, 1024], name='W_fc1')

b_fc1 = bias_variable([1024], name='b_fc1')

h_pool2_flat = tf.reshape(h_pool2, [-1, 7*7*64])

h_fc1 = tf.nn.relu(tf.matmul(h_pool2_flat, W_fc1) + b_fc1)

keep_prob = tf.placeholder(tf.float32)

h_fc1_drop = tf.nn.dropout(h_fc1, keep_prob)

W_fc2 = weight_variable([1024, 10], name='W_fc2')

b_fc2 = bias_variable([10], name='b_fc2')

y_conv = tf.nn.softmax(tf.matmul(h_fc1_drop, W_fc2) + b_fc2)

cross_entropy = tf.reduce_sum(tf.nn.softmax_cross_entropy_with_logits(logits=y_conv, labels=y_))

# cross_entropy = tf.reduce_mean(-tf.reduce_sum(y_ * tf.log(y_conv), reduction_indices=[1]))

train_step = tf.train.AdamOptimizer(1e-4).minimize(cross_entropy)

correct_prediction = tf.equal(tf.argmax(y_conv, 1), tf.argmax(y_, 1))

accuracy = tf.reduce_mean(tf.cast(correct_prediction, tf.float32))

sess = tf.Session()

sess.run(tf.global_variables_initializer())

for i in range(500):

    batch = mnist.train.next_batch(100)

    train_step.run(session=sess, feed_dict={x: batch[0], y_: batch[1], keep_prob: 0.5})

    if i % 100 == 0:

        train_accuracy = accuracy.eval(session=sess, feed_dict={x: batch[0], y_: batch[1], keep_prob: 1.0})

        print('step %d, training accuracy %g' % (i, train_accuracy))

print("!!!!!")

print('test accuracy %g' % accuracy.eval(session=sess, feed_dict={

    x: mnist.test.images, y_: mnist.test.labels, keep_prob: 1.0

}))

saver = tf.train.Saver()

saver.save(sess, './trained_variables.ckpt', global_step=1000)

# with tf.Session() as sess:

#   new_saver = tf.train.import_meta_graph('my_test_model-1000.meta')

#   new_saver.restore(sess, tf.train.latest_checkpoint('./'))

# print(sess.run(W_conv1))
效果:
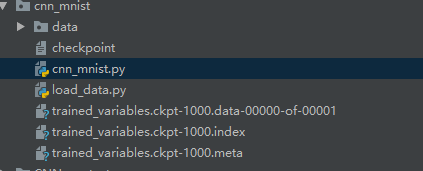
2.模型的恢复
2.1.开始会话-->找到参数存放的文件,使用import_meta_graph方法导入文件-->恢复参数:
sess = tf.Session()

new_saver = tf.train.import_meta_graph('trained_variables.ckpt-1000.meta')

new_saver.restore(sess, tf.train.latest_checkpoint('./'))
2.2创建恢复的graph对象:
graph = tf.get_default_graph()
2.3按照模型保存时的参数名来重新加载参数:
W_conv1 = graph.get_tensor_by_name("W_conv1:0")

b_conv1 = graph.get_tensor_by_name("b_conv1:0")
2.4例子
import tensorflow as tf

sess = tf.Session()

new_saver = tf.train.import_meta_graph('trained_variables.ckpt-1000.meta')

new_saver.restore(sess, tf.train.latest_checkpoint('./'))

graph = tf.get_default_graph()

W_conv1 = graph.get_tensor_by_name("W_conv1:0")

b_conv1 = graph.get_tensor_by_name("b_conv1:0")
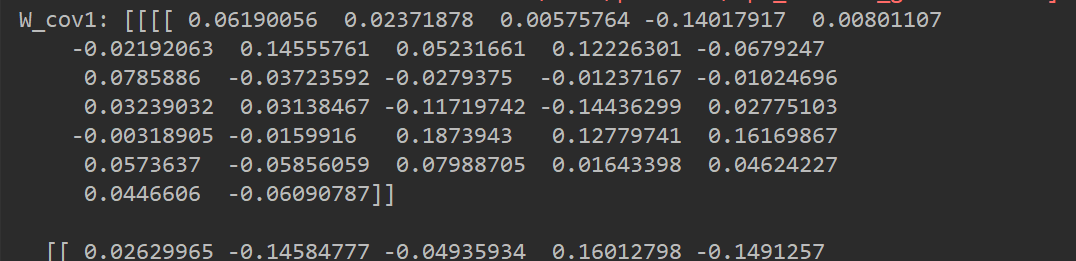
print('W_cov1:', sess.run(W_conv1))
效果:
tensorflow模型的保存与恢复的更多相关文章
- [翻译] Tensorflow模型的保存与恢复
翻译自:http://cv-tricks.com/tensorflow-tutorial/save-restore-tensorflow-models-quick-complete-tutorial/ ...
- tensorflow模型的保存与恢复,以及ckpt到pb的转化
转自 https://www.cnblogs.com/zerotoinfinity/p/10242849.html 一.模型的保存 使用tensorflow训练模型的过程中,需要适时对模型进行保存,以 ...
- tensorflow 1.0 学习:模型的保存与恢复(Saver)
将训练好的模型参数保存起来,以便以后进行验证或测试,这是我们经常要做的事情.tf里面提供模型保存的是tf.train.Saver()模块. 模型保存,先要创建一个Saver对象:如 saver=tf. ...
- tensorflow 1.0 学习:模型的保存与恢复
将训练好的模型参数保存起来,以便以后进行验证或测试,这是我们经常要做的事情.tf里面提供模型保存的是tf.train.Saver()模块. 模型保存,先要创建一个Saver对象:如 saver=tf. ...
- TensorFlow笔记-模型的保存,恢复,实现线性回归
模型的保存 tf.train.Saver(var_list=None,max_to_keep=5) •var_list:指定将要保存和还原的变量.它可以作为一个 dict或一个列表传递. •max_t ...
- Tensorflow模型变量保存
Tensorflow:模型变量保存 觉得有用的话,欢迎一起讨论相互学习~Follow Me 参考文献Tensorflow实战Google深度学习框架 实验平台: Tensorflow1.4.0 pyt ...
- 三、TensorFlow模型的保存和加载
1.模型的保存: import tensorflow as tf v1 = tf.Variable(1.0,dtype=tf.float32) v2 = tf.Variable(2.0,dtype=t ...
- 超详细的Tensorflow模型的保存和加载(理论与实战详解)
1.Tensorflow的模型到底是什么样的? Tensorflow模型主要包含网络的设计(图)和训练好的各参数的值等.所以,Tensorflow模型有两个主要的文件: a) Meta graph: ...
- tensorflow模型的保存与加载
模型的保存与加载一般有三种模式:save/load weights(最干净.最轻量级的方式,只保存网络参数,不保存网络状态),save/load entire model(最简单粗暴的方式,把网络所有 ...
随机推荐
- 【hyperscan】示例解读 pcapscan
示例位置: <hyperscan source>/examples/pcapscan.cc参考:http://01org.github.io/hyperscan/dev-reference ...
- Mac上搭建rtmp流媒体服务器(结合FFmpeg的使用)
1.确保安装homebrew ---安装则跳到第二步 ruby -e "$(curl -fsSL https://raw.githubusercontent.com/Homebrew/ins ...
- 条件变量 sync.Cond
sync.Cond 条件变量是基于互斥锁的,它必须有互斥锁的支撑才能发挥作用. sync.Cond 条件变量用来协调想要访问共享资源的那些线程,当共享资源的状态发生变化的时候,它可以用来通知被互斥锁阻 ...
- 【rocketMQ】1、搭建MQ服务器,生产一个订单与消费一个订单
1. 先解压 2. maven编译安装.(注意虚拟机采用nat网络模式,需要联网) mvn -Prelease-all -DskipTests clean install -U 启动nameser节点 ...
- Git for Windows之使用SSH协议开通公钥免密登陆功能
1.删除Https的通信方式,建立SSH的通信方式 (1).查看当前的通信方式 当前是使用Https的方式与远程仓库进行通信 (2).删除HTTPS的通信方式 ok,HTTPS通信方式已删除 (3). ...
- JVM(一)JVM的概述与运行流程
1.基本概念 JVM和普通虚拟机: 大家常用的两种虚拟机是VMWare和Visual Box,用来操作cpu指令. JVM是程序自己独立的运行环境,对堆栈.寄存器.字符码指令等操作. Java.JRu ...
- ES6快到碗里来---一个简单的爬虫指南
学习ES6的时候,没少看ES6入门,到现在也就明白了个大概(惭愧脸).这里不谈ES6,只谈怎么把ES6的页面爬下来放到一起成为一个离线文档. 之前居然没注意过作者把这本书开源了..瞎耽误功夫...地址 ...
- 【转】Windows 8 desktop app中dll搜索路径设置的诡异现象,Bug?
原文地址:http://blog.csdn.net/my_business/article/details/8850151 某个桌面程序在win 8上运行异常的问题困扰了我有近一周,今天终于找到了根本 ...
- 全网最全的Windows下Python2 / Python3里正确下载安装用来向微信好友发送消息的itchat库(图文详解)
不多说,直接上干货! 建议,你用Anaconda2或Anaconda3. 见 全网最全的Windows下Anaconda2 / Anaconda3里正确下载安装用来向微信好友发送消息的itchat库( ...
- mysql笔记-索引
什么是聚簇索引 聚簇索引:索引的叶节点就是数据节点(索引值).而非聚簇索引的叶节点仍然是索引节点(告诉你怎么在表中查找这一记录),只不过有一个指针指向对应的数据块. Innodb和MyIsam区别 转 ...