
python的定时任务模块--schedule
首先先安装一下模块
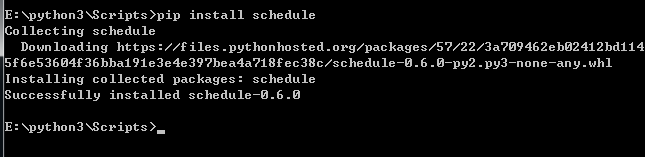
下面我们简单的学习一下schedule模块
先简单的看个示例
    import schedule

    def test(*args,**kwargs):

        print("hello world 1",datetime.datetime.now())

    schedule.every(1).minute.do(test)

    while True:

        schedule.run_pending()
结果如下,我们可以看到,每隔一分钟执行了一次test这函数

然后我们在看下一个例子
    import schedule

    import time

    def test1(*args,**kwargs):

        print("这是test1的函数")

        time.sleep(5)

        print("这是test1的函数",datetime.datetime.now())

    def test2(*args,**kwargs):

        print("这是test2的函数")

        time.sleep(5)

        print("这是test2的函数",datetime.datetime.now())

    schedule.every(10).seconds.do(test1)

    schedule.every(10).seconds.do(test2)

    while True:

        schedule.run_pending()
结果如下
这是test2的函数

这是test2的函数 2019-02-11 09:33:55.615493

这是test1的函数

这是test1的函数 2019-02-11 09:34:00.623102

这是test2的函数

这是test2的函数 2019-02-11 09:34:10.638319

这是test1的函数

这是test1的函数 2019-02-11 09:34:15.645928

这是test2的函数

这是test2的函数 2019-02-11 09:34:25.661146

这是test1的函数

这是test1的函数 2019-02-11 09:34:30.668755

这是test2的函数

这是test2的函数 2019-02-11 09:34:40.683972

这是test1的函数

这是test1的函数 2019-02-11 09:34:45.691581

这是test2的函数

这是test2的函数 2019-02-11 09:34:55.706799

这是test1的函数

这是test1的函数 2019-02-11 09:35:00.714407

这是test2的函数

这是test2的函数 2019-02-11 09:35:10.729625

这是test1的函数

这是test1的函数 2019-02-11 09:35:15.737234

这是test2的函数

这是test2的函数 2019-02-11 09:35:25.752451

这是test1的函数

这是test1的函数 2019-02-11 09:35:30.760060

这是test2的函数

这是test2的函数 2019-02-11 09:35:40.775278

这是test1的函数
从结果我们可以很清晰的看到,执行test1和test2两个函数,不是每隔10s执行一次,而是每隔15s执行一次,所以我们可以理解,schedule模块如果去同时执行多个函数的话,这些不同的函数不是开启多线程并行执行的,而是串行执行的,为了解决这个问题,我们可以用到python的多线程模块来解决这个问题
下面我们就通过多线程模块来解决这个问题
    import schedule

    import threading

    import time

    def test1(*args,**kwargs):

        print("这是test1的函数")

        time.sleep(5)

        print("这是test1的函数",datetime.datetime.now())

    def test2(*args,**kwargs):

        print("这是test2的函数")

        time.sleep(5)

        print("这是test2的函数",datetime.datetime.now())

    def sch_test1():

        threading.Thread(target=test1).start()

    def sch_test2():

        threading.Thread(target=test2).start()

    schedule.every(10).seconds.do(sch_test1)

    schedule.every(10).seconds.do(sch_test2)

    while True:

        schedule.run_pending()
结果如下
这是test1的函数

这是test2的函数

这是test2的函数 2019-02-11 09:42:03.022749

这是test1的函数 2019-02-11 09:42:03.022749

这是test2的函数

这是test1的函数

这是test2的函数 2019-02-11 09:42:13.037967

这是test1的函数 2019-02-11 09:42:13.053567

这是test1的函数

这是test2的函数

这是test2的函数 2019-02-11 09:42:23.053184

这是test1的函数 2019-02-11 09:42:23.068784

这是test1的函数

这是test2的函数

这是test2的函数 2019-02-11 09:42:33.068402

这是test1的函数 2019-02-11 09:42:33.068402

这是test1的函数

这是test2的函数

这是test1的函数 2019-02-11 09:42:43.083620

这是test2的函数 2019-02-11 09:42:43.083620

这是test2的函数

这是test1的函数

这是test2的函数 2019-02-11 09:42:53.098837

这是test1的函数 2019-02-11 09:42:53.114437

这是test2的函数

这是test1的函数

这是test1的函数 2019-02-11 09:43:03.114055

这是test2的函数 2019-02-11 09:43:03.114055

这是test1的函数

这是test2的函数

这是test2的函数 2019-02-11 09:43:13.129272

这是test1的函数 2019-02-11 09:43:13.160472

这是test1的函数

这是test2的函数

这是test1的函数 2019-02-11 09:43:23.144490

这是test2的函数 2019-02-11 09:43:23.144490
从上面的结果我们可以看到,2个函数之间没有干扰了,每隔10s后分别执行了2个函数
python的定时任务模块--schedule的更多相关文章
- python:定时任务模块schedule
1.安装 pip install schedule 2.文档 https://schedule.readthedocs.io/en/stable/faq.html#how-to-execute-job ...
- 定时任务模块 schedule
# coding:utf-8 from learning_python.Telegram_push.check_hardware import check_cpu import schedule im ...
- python实现定时任务
定时任务的实现方式有很多种,如windows服务,借助其他定时器jenkins运行脚本等方式.本文介绍的是python中的一个轻量级模块schedule. 安装 pip命令:pip install s ...
- ansible定时任务模块和用户组模块使用
接上篇,还是一些基础模块的使用,这里主要介绍的是系统模块的使用. 下面例子都进行过相关的实践,从而可以直接进行使用相关的命令. 3.用户模块的使用 用户模块主要用来管理用户账号和用户的属性(对远程主机 ...
- Python源码学习Schedule
关于我 一个有思想的程序猿,终身学习实践者,目前在一个创业团队任team lead,技术栈涉及Android.Python.Java和Go,这个也是我们团队的主要技术栈. Github:https:/ ...
- 【转】Python源码学习Schedule
原文:https://www.cnblogs.com/angrycode/p/11433283.html ----------------------------------------------- ...
- python的库有多少个?python有多少个模块?
这里列举了大概500个左右的库: ! Chardet字符编码探测器,可以自动检测文本.网页.xml的编码. colorama主要用来给文本添加各种颜色,并且非常简单易用. Prettytable主 ...
- python之platform模块
python之platform模块 ^_^第三个模块从天而降喽!! 函数列表 platform.system() 获取操作系统类型,windows.linux等 platform.platform() ...
- python之OS模块详解
python之OS模块详解 ^_^,步入第二个模块世界----->OS 常见函数列表 os.sep:取代操作系统特定的路径分隔符 os.name:指示你正在使用的工作平台.比如对于Windows ...
随机推荐
- DOM节点的增删改查以及class属性的操作
<!DOCTYPE html> <html lang="en"> <head> <meta charset="UTF-8&quo ...
- (笨方法)利用stat函数实现ls -l filename
学习了一段时间的Linux了,但是我感觉我做不出来啥子,后头选择利用系统IO函数实现命令,先从ls走起吧.先来看看ls -l filename给我们显示了什么吧 : 可以看到,一共八项:文件类型.用户 ...
- Zabbix3.0版Graphtree的安装配置
Graphtrees: https://github.com/OneOaaS/graphtrees 如果是采用yum安装的zabbix-server, 则使用以下方式: # mv /usr/shar ...
- getVisibleSize,getWinSize,getFrameSize,getViewPortRect
cc.director.getVisibleSize();//获取运行场景的可见大小 cc.director.getWinSize();//获取视图的大小,以点为单位 cc.director.getW ...
- java中break和continue跳出指定循环(转载)
java中break和continue跳出指定循环 java中break和continue可以跳出指定循环,break和continue之后不加任何循环名则默认跳出其所在的循环,在其后加指定循环名,则 ...
- 27.反射2.md
目录 1.反射 2.类对象获取 3.构造函数获取 4.函数获取 4.注解反射 1.反射 定义:把一个字节码文件加载到内存中,jvm对该字节码文件解析,创造一个Class对象,把字节码文件中的信息全部存 ...
- C++ 关于MFC List Control 控件的使用事项 原创
1\在开发项目时,使用到了 listcontrol 控件,就一些问题,做一下备注,以备以后使用 (1) 给list项目 删除所有的项目 DeleteAllItems(); (2) 给list项目 ...
- centos7.x修改网卡名字
1.编辑/etc/default/grub 加入如下代码 net.ifnames=0 biosdevname=0 2. 在执行以下 grub2-mkconfig -o /boot/grub2/gru ...
- CentsOS6 Tomcat7 报javax.management.InstanceNotFoundException 解决办法
警告: Failed to unregister MBean with name [Catalina:j2eeType=Servlet,name=UploadServlet,WebModule=//l ...
- linux c 编程相关资料
1. linux下的错误定义及其错误捕获:http://blog.csdn.net/tigerjibo/article/details/6819891 2. 在线 c 系统调用手册 http://c. ...