IOS使用批处理打包
一、注意
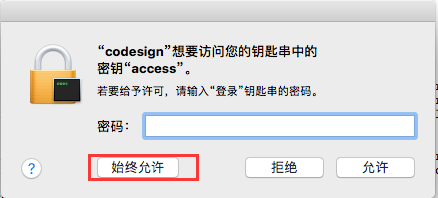
1、允许xcode访问钥匙串
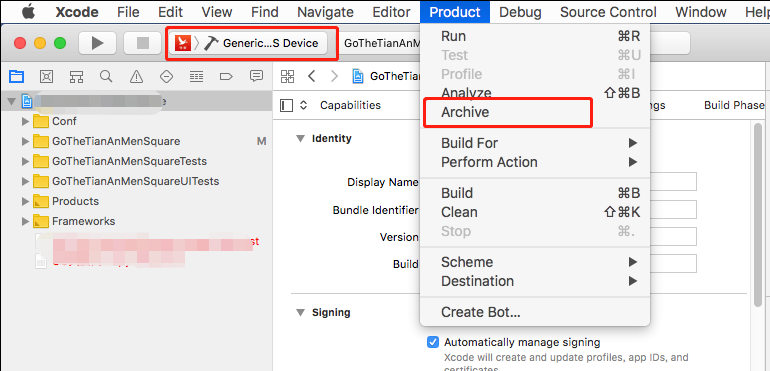
首先使用xcode提供的打包工具打包,看到如下提示后,输入用户密码后点击“始终允许”后再次打包即可。
选择“Generic IOS Device”然后单击Product->Archive
2、解除钥匙锁定
我们直接在mac电脑上使用命令打包导出ipa包一切正常,当使用ssh命令远程连接到mac电脑上打包就报如下错误。

原因是钥匙串被锁定,在打包前先执行如下命令解锁keychain。其中-p是当前用户的密码。
如果使用jenkins自动发布,需要使用jenkins主控机ssh登录mac系统然后执行解锁命令,也就是多一个客户端或多一个用户都要针对此用户解锁。
security unlock-keychain -p 123
二、手动管理证书-打包(转载)
之前咱们讲过 使用命令行打包 下面咱们介绍使用脚本打包,其实脚本和命令行没有太大的本质区别。
以下是脚本文件:
#注意:脚本目录和xxxx.xcodeproj要在同一个目录,如果放到其他目录,请自行修改脚本。

#工程名字(Target名字)

Project_Name="Target名字,系统默认和工程名字一样"

#配置环境,Release或者Debug

Configuration="Release"

#AdHoc版本的Bundle ID

AdHocBundleID="com.xxxxx"

#AppStore版本的Bundle ID

AppStoreBundleID="com.xxxxx"

#enterprise的Bundle ID

EnterpriseBundleID="com.xxxxx"

# ADHOC

#证书名#描述文件

ADHOCCODE_SIGN_IDENTITY="iPhone Distribution: xxxxx"

ADHOCPROVISIONING_PROFILE_NAME="xxxxx-xxxx-xxxxx-xxxxx"

#AppStore证书名#描述文件

APPSTORECODE_SIGN_IDENTITY="iPhone Distribution: xxxx"

APPSTOREROVISIONING_PROFILE_NAME="xxxx-xxxx-xxxx-xxxx-xxxx"

#企业(enterprise)证书名#描述文件

ENTERPRISECODE_SIGN_IDENTITY="iPhone Distribution: xxxx"

ENTERPRISEROVISIONING_PROFILE_NAME="693bc1e0-7f7a-4fba-8a08-977ffb7fb296"

#加载各个版本的plist文件

ADHOCExportOptionsPlist=./ADHOCExportOptionsPlist.plist

AppStoreExportOptionsPlist=./AppStoreExportOptionsPlist.plist

EnterpriseExportOptionsPlist=./EnterpriseExportOptionsPlist.plist

ADHOCExportOptionsPlist=${ADHOCExportOptionsPlist}

AppStoreExportOptionsPlist=${AppStoreExportOptionsPlist}

EnterpriseExportOptionsPlist=${EnterpriseExportOptionsPlist}

echo "~~~~~~~~~~~~选择打包方式(输入序号)~~~~~~~~~~~~~~~"

echo "		1 appstore"

echo "		2 adhoc"

echo "		3 enterprise"

# 读取用户输入并存到变量里

read parameter

sleep 0.5

method="$parameter"

# 判读用户是否有输入

if [ -n "$method" ]

then

#clean下

xcodebuild clean -xcodeproj ./$Project_Name/$Project_Name.xcodeproj -configuration $Configuration -alltargets

    if [ "$method" = "1" ]

    then

#appstore脚本

xcodebuild -project $Project_Name.xcodeproj -scheme $Project_Name -configuration $Configuration -archivePath build/$Project_Name-appstore.xcarchive clean archive build  CODE_SIGN_IDENTITY="${APPSTORECODE_SIGN_IDENTITY}" PROVISIONING_PROFILE="${APPSTOREROVISIONING_PROFILE_NAME}" PRODUCT_BUNDLE_IDENTIFIER="${AppStoreBundleID}"

xcodebuild -exportArchive -archivePath build/$Project_Name-appstore.xcarchive -exportOptionsPlist $AppStoreExportOptionsPlist -exportPath ~/Desktop/$Project_Name-appstore.ipa

    elif [ "$method" = "2" ]

    then

#adhoc脚本

xcodebuild -project $Project_Name.xcodeproj -scheme $Project_Name -configuration $Configuration -archivePath build/$Project_Name-adhoc.xcarchive clean archive build CODE_SIGN_IDENTITY="${ADHOCCODE_SIGN_IDENTITY}" PROVISIONING_PROFILE="${ADHOCPROVISIONING_PROFILE_NAME}" PRODUCT_BUNDLE_IDENTIFIER="${AdHocBundleID}"

xcodebuild -exportArchive -archivePath build/$Project_Name-adhoc.xcarchive -exportOptionsPlist $ADHOCExportOptionsPlist -exportPath ~/Desktop/$Project_Name-adhoc.ipa

    elif [ "$method" = "3" ]

    then

#企业打包脚本

xcodebuild -project $Project_Name.xcodeproj -scheme $Project_Name -configuration $Configuration -archivePath build/$Project_Name-enterprise.xcarchive clean archive build CODE_SIGN_IDENTITY="${ENTERPRISECODE_SIGN_IDENTITY}" PROVISIONING_PROFILE="${ENTERPRISEROVISIONING_PROFILE_NAME}" PRODUCT_BUNDLE_IDENTIFIER="${EnterpriseBundleID}"

xcodebuild -exportArchive -archivePath build/$Project_Name-enterprise.xcarchive -exportOptionsPlist $EnterpriseExportOptionsPlist -exportPath ~/Desktop/$Project_Name-enterprise.ipa

else

    echo "参数无效...."

    exit 1

    fi

fi
其中AppStore证书名、描述文件参考 证书(Certificate)与描述文件(Provisioning Profiles)
1.1、上文中需要的几个plist文件
ADHOCExportOptionsPlist.plist
<?xml version="1.0" encoding="UTF-8"?>

<!DOCTYPE plist PUBLIC "-//Apple//DTD PLIST 1.0//EN" "http://www.apple.com/DTDs/PropertyList-1.0.dtd">

<plist version="1.0">

<dict>

	<key>provisioningProfiles</key>

	<dict>

		<key>你的bundle ID</key>

		<string>描述文件UUID,和脚本中的一样</string>

	</dict>

	<key>method</key>

	<string>ad-hoc</string>

</dict>

</plist>
AppStoreExportOptionsPlist.plist
<?xml version="1.0" encoding="UTF-8"?>

<!DOCTYPE plist PUBLIC "-//Apple//DTD PLIST 1.0//EN" "http://www.apple.com/DTDs/PropertyList-1.0.dtd">

<plist version="1.0">

<dict>

	<key>provisioningProfiles</key>

	<dict>

		<key>你的bundle ID</key>

		<string>描述文件UUID,和脚本中的一样</string>

	</dict>

	<key>method</key>

	<string>app-store</string>

</dict>

</plist>
EnterpriseExportOptionsPlist.plist
<?xml version="1.0" encoding="UTF-8"?>

<!DOCTYPE plist PUBLIC "-//Apple//DTD PLIST 1.0//EN" "http://www.apple.com/DTDs/PropertyList-1.0.dtd">

<plist version="1.0">

<dict>

	<key>provisioningProfiles</key>

	<dict>

		<key>你的bundle ID</key>

		<string>描述文件UUID,和脚本中的一样</string>

	</dict>

	<key>method</key>

	<string>enterprise</string>

</dict>

</plist>
以上代码在这个地址可以下载: github下载地址
三、自动管理证书-打包
自动管理证书打包和手动管理区别不到,只是需要设置自动管理证书和打包还有导出时候不用指定证书常用名和描述文件名。
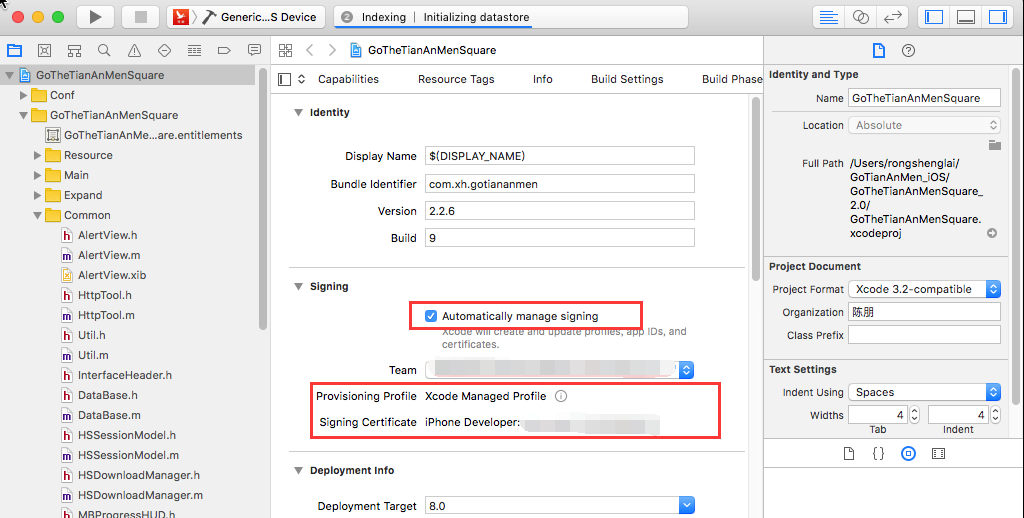
1、设置自动管理证书
勾选“automatically manage signing”选择相应的team即可
2、得到plist文件
在xcode中打包后,使用命令(命令中的plist文件可以些info.plist)导出一个ipa文件,在导出的目录中找到ExportOptions.plist将其复制到工程中,那个文件就是导出时使用的plist。
AppStoreExportOptions.plist
<?xml version="1.0" encoding="UTF-8"?>

<!DOCTYPE plist PUBLIC "-//Apple//DTD PLIST 1.0//EN" "http://www.apple.com/DTDs/PropertyList-1.0.dtd">

<plist version="1.0">

<dict>

        <key>method</key>

        <string>app-store</string>

        <key>signingStyle</key>

        <string>automatic</string>

        <key>stripSwiftSymbols</key>

        <true/>

        <key>uploadBitcode</key>

        <true/>

        <key>uploadSymbols</key>

        <true/>

</dict>

</plist>
EnterpriseExportOptions.plist
<?xml version="1.0" encoding="UTF-8"?>

<!DOCTYPE plist PUBLIC "-//Apple//DTD PLIST 1.0//EN" "http://www.apple.com/DTDs/PropertyList-1.0.dtd">

<plist version="1.0">

<dict>

	<key>compileBitcode</key>

	<true/>

	<key>method</key>

	<string>enterprise</string>

	<key>signingStyle</key>

	<string>automatic</string>

	<key>stripSwiftSymbols</key>

	<true/>

	<key>thinning</key>

	<string><none></string>

</dict>

</plist>
ADHOCExportOptions.plist
<?xml version="1.0" encoding="UTF-8"?>

<!DOCTYPE plist PUBLIC "-//Apple//DTD PLIST 1.0//EN" "http://www.apple.com/DTDs/PropertyList-1.0.dtd">

<plist version="1.0">

<dict>

        <key>compileBitcode</key>

        <true/>

        <key>method</key>

        <string>ad-hoc</string>

        <key>signingStyle</key>

        <string>automatic</string>

        <key>stripSwiftSymbols</key>

        <true/>

        <key>thinning</key>

        <string><none></string>

</dict>

</plist>
DevelopmentExportOptions.plist
<?xml version="1.0" encoding="UTF-8"?>

<!DOCTYPE plist PUBLIC "-//Apple//DTD PLIST 1.0//EN" "http://www.apple.com/DTDs/PropertyList-1.0.dtd">

<plist version="1.0">

<dict>

        <key>compileBitcode</key>

        <true/>

        <key>method</key>

        <string>development</string>

        <key>signingStyle</key>

        <string>automatic</string>

        <key>stripSwiftSymbols</key>

        <true/>

        <key>thinning</key>

        <string><none></string>

</dict>

</plist>
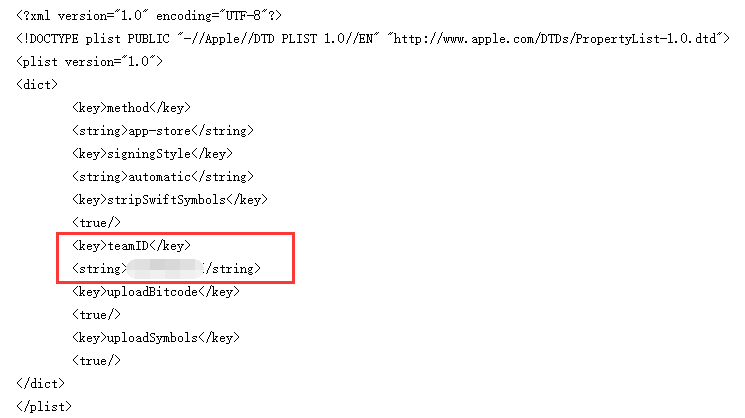
以上的这四个plist我都将如下两句去掉了,意思是导出app时候自动签名使用那个team。配置这个后你导出的app可以跟打包时候使用不同team,因为我的一样所以就去掉了。
3、生成导出描述文件
打包成功后下面需要将app导出,执行导出命令后会给出如下错误提示,提示没有导出的描述文件。
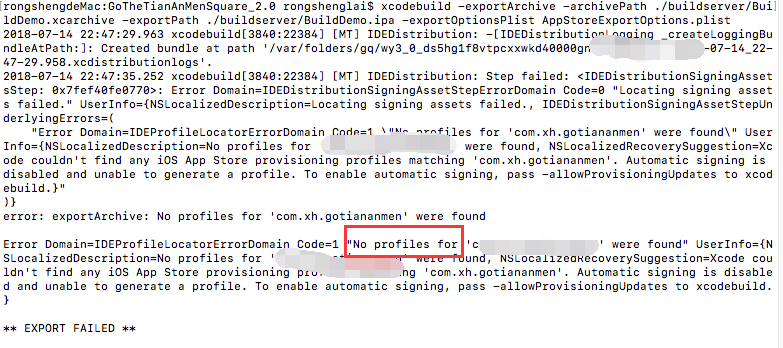
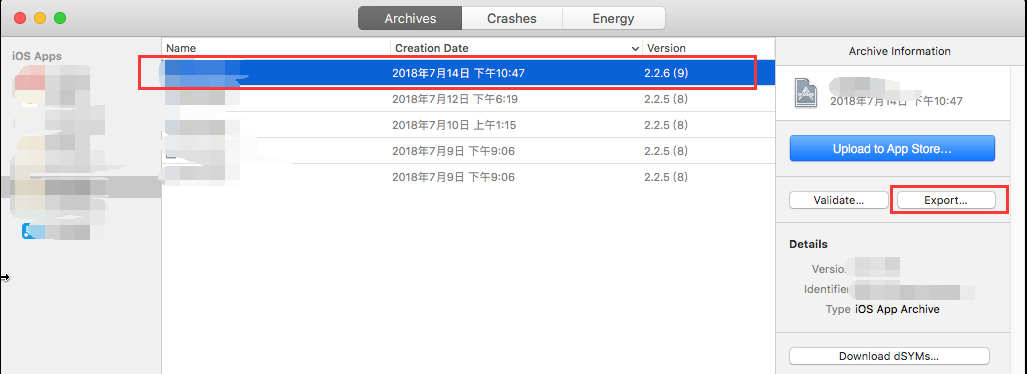
a)双击之前打包好.xcarchive文件,单击“Export”
b)选择App Store后单击“Next”
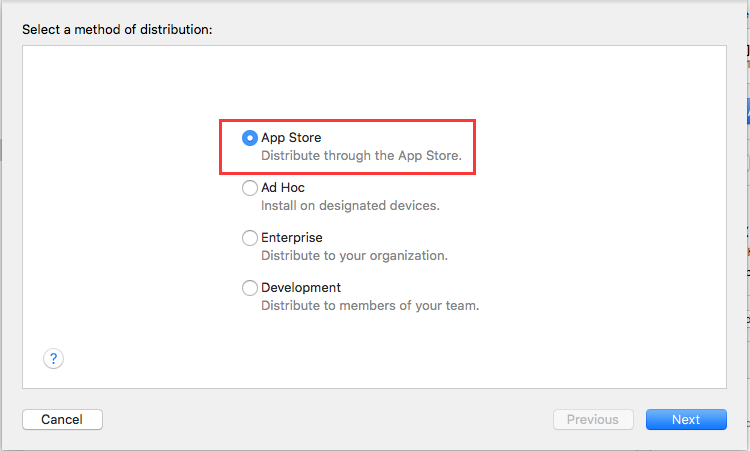 、
、
c)单击“Next”

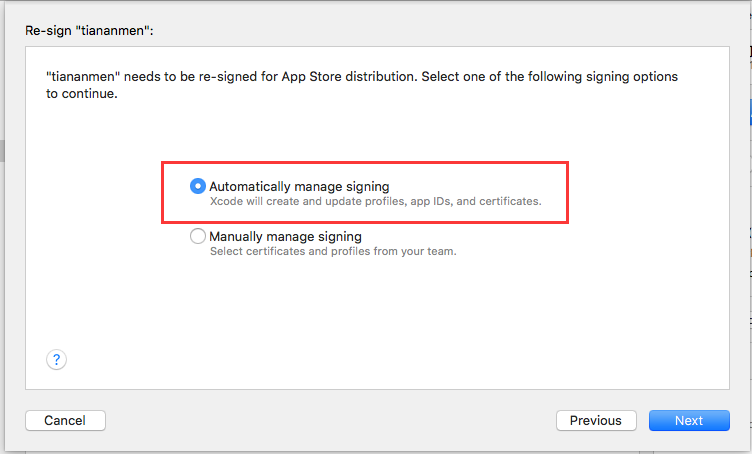
d)选择“Automatically manage signing”单击“next”,之后会自动连接开发者平台生成需要的描述文件
e)成功后再次执行导出命令则成功,同样需要导出AD hoc或企业版都需要按照如上方法执行一遍。
四、到底如何选择呢?
其实两种方式各有优缺点。
手动管理证书需要手动给每一个appid配置一个描述文件,当增加一个设备后还需要重新生成描述文件。有点是打包和导出只要一个描述文件即可,而且不需要在xcode中打包并打出项目(没有找到命令行方式自动配置描述文件)。
自动管理证书不用登录苹果开发者平台配置描述文件,但需要根据每一个appid运行一次打包和导出ipa包后,xcode才会自动生成描述文件并保存到本机。
两种方式都有一个缺点,就是描述文件有效期为一年,时间到了都需要重新来一遍。
参考文档
https://blog.csdn.net/qq_34047841/article/details/54144149
IOS使用批处理打包的更多相关文章
- iOS 解压打包静态库命令
p.p1 { margin: 0.0px 0.0px 0.0px 0.0px; font: 12.0px "Hannotate SC" } p.p2 { margin: 0.0px ...
- iOS 本地自动打包工具
1.为什么要自动打包工具? 每修改一个问题,测试都让你打包一个上传fir , 你要clean -> 编译打包 -> 上传fir -> 通知测试.而且打包速度好慢,太浪费时间了.如果有 ...
- iOS 制作自动打包脚本 Xcode8.3.2
本文包含以下内容: 前言 1.shell脚本的编写 2.xcodebuild命令 3.完整的可用示例 参考资料 前言 做iOS开发,打包APP是比较频繁的事情,每次都手动去配置一堆东西确实是比较乏味. ...
- 勾勾街:一个专业的苹果ios app 自助打包的网站,免越狱,免证书签名
众所周知,苹果的APP开发是需要基于MAC环境的,而我们很多的开发者并没有这样的条件,如果单单为发布一款app就去买一台价格昂贵的MAC那成本就太高了! 就算你有一台MAC,也有能力自己开发出一款基于 ...
- iOS - 自动化编译打包(Jenkins)
从xcodebuild到shenzhen,再到Jenkins,完美演绎自动化操作. Features xcodebuild自动构建命令 简介 构建 生成ipa文件 利用 shenzhen 进行打包 J ...
- iOS Jenkins 自动化打包构建
前言 在测试app项目过程中,通常都是需要开发打测试包给到测试,但是无论是iOS还是Android的打包过程都是相当漫长的,频繁的回归测试需要频繁的打包,对于开发同学影响还是蛮大的.因此在这种情况下, ...
- iOS 静态类库 打包 C,C++文件及和OC混编
iOS 静态类库 编译 C,C++ 我们都知道,OC 原生支持C, 在 创建的 OC类的 .m 里面,可以直接编写C的代码: 同样 Xcode 也支持 OC ,C++的混编,此时,我们通常把OC创建的 ...
- ios外包公司—北京动点软件分享:IOS工程自动打包并发布脚本实现
前言 IOS的开发过程中,当需要给测试人员发布测试包的时候,直接使用xcode来做的效率是非常低下的.尤其是当有一点小改动需要重新出包时,那简直是个折磨的人的工作.通过一番研究后,遂决定写一系列脚本, ...
- 【转】 iOS开发之打包上传到App Store——(一)各种证书的理解
OK,有日子没写iOS开发的相关文章啦,主要是最近的精力都没在这上面,不过既然产品已经快要出来了,就有必要了解一下各种证书啥的(众所周知iOS的一堆证书可是很让人头大呀),最近确实被这个搞得头大,然后 ...
随机推荐
- 选择排序的C、C++实现
一.选择排序 选择排序(Selection sort)是一种简单直观的排序算法.它的工作原理是每一次从待排序的数据元素中选出最小(或最大)的一个元素,存放在序列的起始位置,直到全部待排序的数据元素排完 ...
- Spring注入的不同方式
1.直接创建一个Bean <bean id="dboperate" class="study.spring2.Test"></bean> ...
- C#快速删除bin和obj文件夹的方法
C#程序总会生成bin和obj文件夹,为了减小源码的大小,就有必要将这两个文件夹删除,于是想到用批处理文件来删除. 以下是批处理的代码: @echo offset nowPath=%cd%cd /cd ...
- 使用doxygen静态分析开源代码
doxygen是一款生成开源代码说明文件的工具,因为不需要编译源码,用作代码的分析也十分方便. 一.安装 sudo apt-get install graphviz sudo apt-get inst ...
- The writing on the wall 南京网络赛2018B题
样例输入复制 2 3 3 0 3 3 1 2 2 样例输出复制 Case #1: 36 Case #2: 20 题目来源 ACM-ICPC 2018 南京赛区网络预赛 题意: 就是求图中去掉涂黑的方格 ...
- Benefit UVA - 11889(已知LCM和其中一个数,求另一个数)
首先对于C不能整除A的状况肯定排除 然后得到B=C/A 然后取G=GCD(A,B) 如果G==1,那么此时B就是解 否则的话,就证明A,B,的最小公倍数肯定不是C,因为其最小公倍数是A*B/G 那么我 ...
- Django_博客项目 注册用户引发 ValueError: The given username must be set
博客项目中 注册功能在ajax 提交数据时 报错 ValueError: The given username must be set 锁定到错误点为 判定为是无法获取到 username 字段 那先 ...
- MT【184】$\epsilon$助力必要性
已知满足不等式$|x^2-4x+a|+|x-3|\le5$的最大值为$3$,求实数$a$的值,并解该不等式. 证明:1)当$x=3$时,$|a-3|\le5$,得$a\in[-2,8]$2)$\for ...
- 【BZOJ1032】[JSOI2007]祖玛(动态规划)
[BZOJ1032][JSOI2007]祖玛(动态规划) 题面 BZOJ 洛谷 题解 听说是道假题,假的原因是因为出题人可能没有考虑到祖玛的骚套路,比如可以先打几个球进去再一波消掉.也就是出题人基本默 ...
- 解题:WC 2018 州区划分
题面 WC之前写的,补一补,但是基本就是学新知识了 首先可以枚举子集$3^n$转移,优化是额外记录每个集合选取的个数,然后按照选取个数从小到大转移.转移的时候先FWT成“点值”转移完了IFWT回去乘逆 ...