
haproxy + keepalived 实现网站高可靠
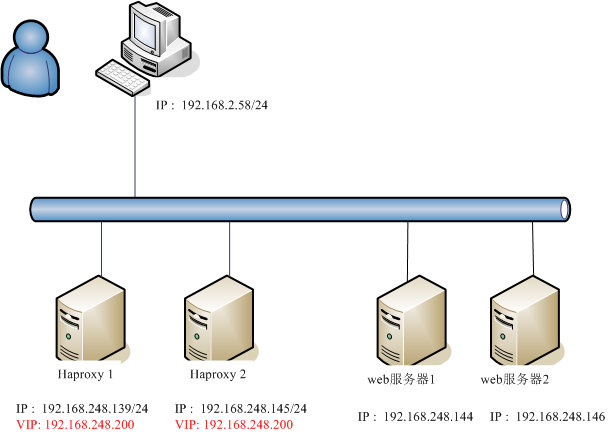
haproxy 1的配置文件,包括 keepalived 和 haproxy 的配置,分别如下:
【haproxy 1的keepalived 配置文件】 /etc/keepalived/keepalived.conf
global_defs {
router_id NodeB
}
vrrp_instance VI_1 {
state BACKUP #设置为主服务器
interface ens33 #监测网络接口
virtual_router_id 51 #主、备必须一样
priority 90 #(主、备机取不同的优先级,主机值较大,备份机值较小,值越大优先级越高)
advert_int 1 #VRRP Multicast广播周期秒数
authentication {
auth_type PASS #VRRP认证方式,主备必须一致
auth_pass 1111 #(密码)
}
virtual_ipaddress {
192.168.248.200
}
【haproxy 1的haproxy.conf 配置文件】 /etc/haproxy/haproxy.cfg
#---------------------------------------------------------------------
# Example configuration for a possible web application. See the
# full configuration options online.
#
# http://haproxy.1wt.eu/download/1.4/doc/configuration.txt
#
#---------------------------------------------------------------------
#---------------------------------------------------------------------
# Global settings
#---------------------------------------------------------------------
global
# to have these messages end up in /var/log/haproxy.log you will
# need to:
#
# 1) configure syslog to accept network log events. This is done
# by adding the '-r' option to the SYSLOGD_OPTIONS in
# /etc/sysconfig/syslog
#
# 2) configure local2 events to go to the /var/log/haproxy.log
# file. A line like the following can be added to
# /etc/sysconfig/syslog
#
# local2.* /var/log/haproxy.log
#
log 127.0.0.1 local2
chroot /var/lib/haproxy
pidfile /var/run/haproxy.pid
maxconn 4000
user haproxy
group haproxy
daemon
# turn on stats unix socket
stats socket /var/lib/haproxy/stats
#---------------------------------------------------------------------
# common defaults that all the 'listen' and 'backend' sections will
# use if not designated in their block
#---------------------------------------------------------------------
defaults
mode http
log global
option httplog
option dontlognull
option http-server-close
option forwardfor except 127.0.0.0/8
option redispatch
retries 3
timeout http-request 10s
timeout queue 1m
timeout connect 10s
timeout client 1m
timeout server 1m
timeout http-keep-alive 10s
timeout check 10s
maxconn 3000
#---------------------------------------------------------------------
# main frontend which proxys to the backends
#---------------------------------------------------------------------
frontend web *:80
frontend web1 192.168.248.200:80
# bind 192.168.248.200:80
mode http
use_backend app
#---------------------------------------------------------------------
# static backend for serving up images, stylesheets and such
#---------------------------------------------------------------------
backend static
balance roundrobin
server static 127.0.0.1:4331 check
#---------------------------------------------------------------------
# round robin balancing between the various backends
#---------------------------------------------------------------------
backend app
balance roundrobin
server app1 192.168.248.144:80 check
server app2 192.168.248.146:80 check
【haproxy 2的keepalived 配置文件】
global_defs {
router_id NodeB
}
vrrp_instance VI_1 {
state BACKUP #设置为主服务器
interface ens33 #监测网络接口
virtual_router_id 51 #主、备必须一样
priority 90 #(主、备机取不同的优先级,主机值较大,备份机值较小,值越大优先级越高)
advert_int 1 #VRRP Multicast广播周期秒数
authentication {
auth_type PASS #VRRP认证方式,主备必须一致
auth_pass 1111 #(密码)
}
virtual_ipaddress {
192.168.248.200
}
【haproxy 2的haproxy.cfg】 /etc/haproxy/haproxy.cfg
#---------------------------------------------------------------------
# Example configuration for a possible web application. See the
# full configuration options online.
#
# http://haproxy.1wt.eu/download/1.4/doc/configuration.txt
#
#---------------------------------------------------------------------
#---------------------------------------------------------------------
# Global settings
#---------------------------------------------------------------------
global
# to have these messages end up in /var/log/haproxy.log you will
# need to:
#
# 1) configure syslog to accept network log events. This is done
# by adding the '-r' option to the SYSLOGD_OPTIONS in
# /etc/sysconfig/syslog
#
# 2) configure local2 events to go to the /var/log/haproxy.log
# file. A line like the following can be added to
# /etc/sysconfig/syslog
#
# local2.* /var/log/haproxy.log
#
log 127.0.0.1 local2
chroot /var/lib/haproxy
pidfile /var/run/haproxy.pid
maxconn 4000
user haproxy
group haproxy
daemon
# turn on stats unix socket
stats socket /var/lib/haproxy/stats
#---------------------------------------------------------------------
# common defaults that all the 'listen' and 'backend' sections will
# use if not designated in their block
#---------------------------------------------------------------------
defaults
mode http
log global
option httplog
option dontlognull
option http-server-close
option forwardfor except 127.0.0.0/8
option redispatch
retries 3
timeout http-request 10s
timeout queue 1m
timeout connect 10s
timeout client 1m
timeout server 1m
timeout http-keep-alive 10s
timeout check 10s
maxconn 3000
#---------------------------------------------------------------------
# main frontend which proxys to the backends
#---------------------------------------------------------------------
frontend web *:80
frontend web1 192.168.248.200:80
# bind 192.168.248.200:80
mode http
use_backend app
#---------------------------------------------------------------------
# static backend for serving up images, stylesheets and such
#---------------------------------------------------------------------
backend static
balance roundrobin
server static 127.0.0.1:4331 check
#---------------------------------------------------------------------
# round robin balancing between the various backends
#---------------------------------------------------------------------
backend app
balance roundrobin
server app1 192.168.248.144:80 check
server app2 192.168.248.146:80 check
【web 服务器1 的http index文件内容】
[root@localhost zhou]# yum install -y httpd
[root@localhost zhou]# echo "Hello I am nginx-backend 1. " > /var/www/html/index.html
[root@localhost zhou]# service httpd start
Redirecting to /bin/systemctl start httpd.service
[root@localhost zhou]# firewall-cmd --permanent --add-port=80/tcp
success
[root@localhost zhou]# firewall-cmd --reload
success
[root@localhost zhou]#
【web 服务器2 的http index文件内容】
[root@localhost zhou]# yum install -y httpd
[root@localhost zhou]# echo "Hello I am nginx-backend 2. " > /var/www/html/index.html
[root@localhost zhou]# service httpd start
Redirecting to /bin/systemctl start httpd.service
[root@localhost zhou]# firewall-cmd --permanent --add-port=80/tcp
success
[root@localhost zhou]# firewall-cmd --reload
success
[root@localhost zhou]#
【haproxy 1的服务启动】 haproxy 2与之相同。
keepalived -f /etc/keepalived/keepalived.conf
haproxy -f /etc/haproxy/haproxy.cfg
firewall-cmd --permenant --add-port=80/tcp
firewall-cmd --reload
【验证结果】


如果关闭掉一个haproxy ,则不影响系统的正常工作,web网站还是可以正常访问,并且是轮询的结果。
haproxy + keepalived 实现网站高可靠的更多相关文章
- 实现基于Haproxy+Keepalived负载均衡高可用架构
1.项目介绍: 上上期我们实现了keepalived主从高可用集群网站架构,随着公司业务的发展,公司负载均衡服务已经实现四层负载均衡,但业务的复杂程度提升,公司要求把mobile手机站点作为单独的服务 ...
- Haproxy+Keepalived搭建Weblogic高可用负载均衡集群
配置环境说明: KVM虚拟机配置 用途 数量 IP地址 机器名 虚拟IP地址 硬件 内存3G 系统盘20G cpu 4核 Haproxy keepalived 2台 192.168.1.10 192 ...
- keepalived + lvs 网站高可用集群
一 ,四台服务器 master 端 : 192.168.1.3 backup 端: 192.168.1.4 REserver1 端 : 192.168.1.5 REserver2 端: 192.168 ...
- HAProxy & Keepalived L4-L7 高可用负载均衡解决方案
目录 文章目录 目录 HAProxy 负载均衡器 应用特性 性能优势 会话保持 健康检查 配置文件 负载均衡策略 ACL 规则 Web 监控平台 Keepalived 虚拟路由器 核心组件 VRRP ...
- rabbitmq+haproxy+keepalived高可用集群环境搭建
1.先安装centos扩展源: # yum -y install epel-release 2.安装erlang运行环境以及rabbitmq # yum install erlang ... # yu ...
- Haproxy+Keepalived高可用环境部署梳理(主主和主从模式)
Nginx.LVS.HAProxy 是目前使用最广泛的三种负载均衡软件,本人都在多个项目中实施过,通常会结合Keepalive做健康检查,实现故障转移的高可用功能. 1)在四层(tcp)实现负载均衡的 ...
- 基于HAProxy+Keepalived高可用负载均衡web服务的搭建
一 原理简介 1.HAProxyHAProxy提供高可用性.负载均衡以及基于TCP和HTTP应用的代理,支持虚拟主机,它是免费.快速并且可靠的一种解决方案.HAProxy特别适用于那些负载特大的web ...
- RabbitMQ集群安装配置+HAproxy+Keepalived高可用
RabbitMQ集群安装配置+HAproxy+Keepalived高可用 转自:https://www.linuxidc.com/Linux/2016-10/136492.htm rabbitmq 集 ...
- HAProxy实现网站高并发集群
简介:HAProxy提供高可用性.负载均衡以及基于TCP和HTTP应用的代理,支持虚拟主机,它是免费.快速并且可靠的一种解决方案.HAProxy特别适用于那些负载特大的web站点,这些站点通常又需要会 ...
随机推荐
- express传输buffer文件
最近要做一个功能,导出动态生成的excel文件,这个普普通通的功能却让我折腾了半天.大致流程是这样的,将数据结合excel模板通过ejsExcel库,动态生成excel文件,并发送到客户端. 在exp ...
- nodejs本地服务器自动重启
在我们开发node 应用的时候,一但你的应用已经启动了,这个时候如果你修改了服务端的文件,那么要是这个修改起作用,你必须手动停止服务然后再重新启动,这在开发过程中无疑是很烦人的一件事,最好是有一个能够 ...
- 【2017集美大学1412软工实践_助教博客】团队作业9——测试与发布(Beta版本)
题目 团队作业9--测试与发布(Beta版本)(http://www.cnblogs.com/happyzm/p/6917253.html) 团队作业9-1 测试与发布成绩 分值 1 0.5 0.5 ...
- Markdown编辑后
一个例子: 例子开始 1. 本章学习总结 今天主要学习了三个知识点 封装 继承 多态 2. 书面作业 Q1. java HelloWorld命令中,HelloWorld这个参数是什么含义? 今天学了一 ...
- headfirst设计模式(3)—装饰者模式
序 好久没写设计模式了,自从写了两篇之后,就放弃治疗了,主要还是工作太忙了啊(借口,都是借口),过完年以后一直填坑,填了好几个月,总算是稳定下来了,可以打打酱油了. 为什么又重新开始写设计模式呢?学习 ...
- Could not execute JDBC batch update; SQL [delete from role where roleId=?]; constraint [null]; neste
今天在写多个删除功能的时候出现了这么一个错误:意思是删除操作的时候,没有找到对应的外键. Cannot delete or update a parent row: a foreign key con ...
- MySQL集群(三)mysql-proxy搭建负载均衡与读写分离
前言 前面学习了主从复制和主主复制,接下来给大家分享一下怎么去使用mysql-proxy这个插件去配置MySQL集群中的负载均衡以及读写分离. 注意:这里比较坑的就是mysql-proxy一直没有更新 ...
- Unitty 3D 贪吃蛇 今日小记 -- 碰撞
当蛇头碰撞到蛋的时候 应该让蛋消失并且重新创建蛋. void OnTriggerEnter 可以使用这个方法 下面附有这个方法的介绍 其次需要对挂载在之上的Object check IsTr ...
- 在web中使用HTTPS
背景 目前网上流行的是HTTP协议,HTTPS协议还在逐步推广的过程中. HTTP协议以明文发送内容,容易被攻击者窃听.HTTPS在HTTP的基础上加入了SSL协议,SSL依靠证书来验证服务器的身份[ ...
- C#ZIP根据路径读取压缩包内文件数量
/// <summary> /// 根据压缩包路径读取此压缩包内文件个数 /// </summary> /// <param name="strAimPath& ...