
【CC2530入门教程-增强版】基础技能综合实训案例(基础版)-上位机源码
【CC2530入门教程-增强版】基础技能综合实训案例(基础版)-上位机源码
广东职业技术学院 欧浩源
一、需求分析
按照指定参数打开串口,与测控终端建立数据传输通道,并根据应用要求实现程序逻辑,具体需求详见《【CC2530入门教程-增强版】基础技能综合实训案例(基础版)-题目需求》。
二、界面设计
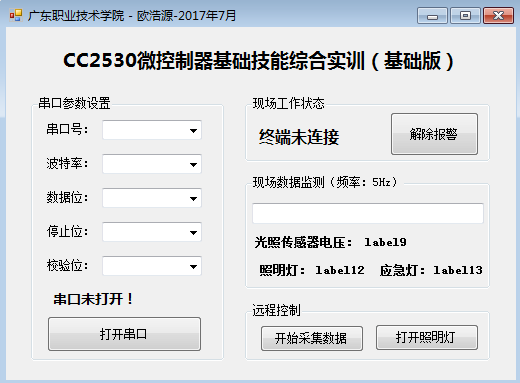
三、程序源码分析
using System;

using System.Collections.Generic;

using System.ComponentModel;

using System.Data;

using System.Drawing;

using System.Linq;

using System.Text;

using System.Threading.Tasks;

using System.Windows.Forms;

using System.Threading;

using System.IO.Ports;

namespace 基础技能综合实训_基础版_

{

    public partial class Form1 : Form

    {

        public Form1()

        {

            InitializeComponent();

        }

        SerialPort com = new SerialPort();          //实例化一个串口对象

        byte[] SendData = new byte[];              //定义一个8字节的发送数据缓存

        byte[] readBuffer = new byte[];            //实例化接收串口数据的数组

        private void Form1_Load(object sender, EventArgs e)

        {

            string[] ports = { "COM1", "COM2", "COM3", "COM4", "COM5" };

            foreach (string str in ports)

            {

                comboBox1.Items.Add(str);

            }

            comboBox1.SelectedIndex = ;

            string[] baudrate = { "", "", "", "", "", "" };

            foreach (string str in baudrate)

            {

                comboBox2.Items.Add(str);

            }

            comboBox2.SelectedIndex = ;

            comboBox3.Items.Add("");

            comboBox3.Items.Add("");

            comboBox3.Items.Add("");

            comboBox3.SelectedIndex = ;

            comboBox4.Items.Add("");

            comboBox4.Items.Add("1.5");

            comboBox4.Items.Add("");

            comboBox4.SelectedIndex = ;

            comboBox5.Items.Add("None");

            comboBox5.SelectedIndex = ;

            button2.Enabled = false;

            button3.Enabled = false;

            button4.Enabled = false;

            textBox1.ReadOnly = true;

            label14.Text = "终端未连接";

            label14.ForeColor = Color.Red;

            label9.Text = "0.00" + " V";

            label9.ForeColor = Color.Blue;

            label12.Text = "";

            label13.Text = "";

            label7.Text = "串口未连接!";

            label7.ForeColor = Color.Red;

            com.ReceivedBytesThreshold = ;   //设置串口接收到8个字节数据才触发DataReceived事件

            //为串口DataReceived事件添加处理方法

            com.DataReceived += new SerialDataReceivedEventHandler(DataReceivedHandler);

        }

        //串口数据接收DataReceived事件触发处理方法

        private void DataReceivedHandler(object sender, SerialDataReceivedEventArgs e)

        {

            string strRcv = "";

            int count = com.BytesToRead;                    //获取串口缓冲器的字节数

            if (count != )

            {

                return;

            }

            com.Read(readBuffer, , );                     //从串口缓冲区读出数据到数组

            com.DiscardInBuffer();

            for (int i = ; i < readBuffer.Length; i++)

            {

                strRcv += readBuffer[i].ToString("X2") + " ";   //16进制显示

            }

            this.BeginInvoke(new Action(() =>

            {

                textBox1.Text = strRcv;

            }));

            if (readBuffer[] == 0xAF && readBuffer[] == 0xFA) //判断数据的帧头和帧尾

            {

                this.BeginInvoke(new Action(() =>

                {

                    switch (readBuffer[])

                    {

                        case 0x10:

                            label14.Text = string.Format("{0}号终端在线", readBuffer[]);

                            label14.ForeColor = Color.Green;

                            button4.Enabled = false;

                            button2.Enabled = true;

                            button3.Text = "打开照明灯";

                            button2.Text = "开始采集数据";

                            label12.Text = "关闭";

                            label12.ForeColor = Color.Red;

                            label13.Text = "关闭";

                            label13.ForeColor = Color.Red;

                            break;

                        case 0x11:

                            Int32 ad = readBuffer[];

                            double advalue;

                            ad <<= ;

                            ad |= readBuffer[];                            //从数据帧中将电压数据取出

                            advalue = ad;

                            advalue = (advalue * 3.3) / ;              //将数据换算为实际的电压值

                            label9.Text = advalue.ToString("F2") + " V";

                            if ((readBuffer[] & 0x01) == 0x01)

                            {

                                label12.Text = "打开";

                                label12.ForeColor = Color.Blue;

                                button3.Text = "关闭照明灯";

                            }

                            else

                            {

                                label12.Text = "关闭";

                                label12.ForeColor = Color.Red;

                                button3.Text = "打开照明灯";

                            }

                            if ((readBuffer[] & 0x02) == 0x02)

                            {

                                label13.Text = "打开";

                                label13.ForeColor = Color.Blue;

                            }

                            else

                            {

                                label13.Text = "关闭";

                                label13.ForeColor = Color.Red;

                            }

                            break;

                        case 0x1f:

                            label14.Text = "现场报警!!!";

                            label14.ForeColor = Color.Red;

                            button4.Enabled = true;

                            button2.Enabled = false;

                            button3.Enabled = false;

                            break;

                      }

                   // com.DiscardInBuffer();

                }));

            }

        }

        private void button1_Click(object sender, EventArgs e)

        {

            if (button1.Text == "打开串口")

            {

                com.PortName = comboBox1.Text;                      //选择串口号

                com.BaudRate = int.Parse(comboBox2.Text);           //选择波特率

                com.DataBits = int.Parse(comboBox3.Text);           //选择数据位数

                com.StopBits = (StopBits)int.Parse(comboBox4.Text); //选择停止位数

                com.Parity = Parity.None;                           //选择是否奇偶校验

                try

                {

                    if (com.IsOpen)                                 //判断该串口是否已打开

                    {

                        com.Close();

                        com.Open();

                    }

                    else

                    {

                        com.Open();

                    }

                    label7.Text = "串口已成功连接!";

                    label7.ForeColor = Color.Blue;

                }

                catch (Exception ex)

                {

                    MessageBox.ReferenceEquals("错误:" + ex.Message, "串口通信");

                }

                button1.Text = "关闭串口";

            }

            else if (button1.Text == "关闭串口")

            {

                com.Close();                        //关闭串口

                label7.Text = "串口未连接!";

                label14.Text = "终端未连接";

                label14.ForeColor = Color.Red;

                label7.ForeColor = Color.Red;

                button1.Text = "打开串口";

                button2.Enabled = false;

                button3.Enabled = false;

                button4.Enabled = false;

                textBox1.Clear();

            }

        }

        private void SendUartData()

        {

            SendData[] = 0xAF;

            SendData[] = 0x00;

            SendData[] = 0x00;

            SendData[] = 0x00;

            SendData[] = 0x00;

            SendData[] = 0xFA;

            for (int i = ; i < ; i++)

            {

                SendData[] += SendData[i];

            }

            com.Write(SendData, , );

        }

        private void button2_Click(object sender, EventArgs e)

        {

            if (button2.Text == "开始采集数据")

            {

                button2.Text = "停止采集数据";

                button3.Enabled = true;

                SendData[] = 0x01;

                SendData[] = 0x01;

                SendUartData();

            }

            else

            {

                button2.Text = "开始采集数据";

                button3.Enabled = false;

                SendData[] = 0x01;

                SendData[] = 0x02;

                SendUartData();

            }

        }

        private void button3_Click(object sender, EventArgs e)

        {

            if (button3.Text == "打开照明灯")

            {

                button3.Text = "关闭照明灯";

                SendData[] = 0x01;

                SendData[] = 0x03;

                SendUartData();

            }

            else

            {

                button3.Text = "打开照明灯";

                SendData[] = 0x01;

                SendData[] = 0x04;

                SendUartData();

            }

        }

        private void button4_Click(object sender, EventArgs e)

        {

            SendData[] = 0x01;

            SendData[] = 0x0f;

            SendUartData();

        }

    }

}
【CC2530入门教程-增强版】基础技能综合实训案例(基础版)-上位机源码的更多相关文章
- 【CC2530入门教程-01】CC2530微控制器开发入门基础
[引言] 本系列教程就有关CC2530单片机应用入门基础的实训案例进行分析,主要包括以下6部分的内容:[1]CC2530微控制器开发入门基础.[2]通用I/O端口的输入和输出.[3]外部中断初步应用. ...
- 【CC2530入门教程-01】IAR集成开发环境的建立与项目开发流程
[引言] 本系列教程就有关CC2530单片机应用入门基础的实训案例进行分析,主要包括以下6部分的内容:1.CC2530单片机开发入门.2.通用I/O端口的输入和输出.3.外部中断初步应用.4.定时/计 ...
- 【CC2530入门教程-03】CC2530的中断系统及外部中断应用
第3课 CC2530的中断系统及外部中断应用 广东职业技术学院 欧浩源 一.中断相关的基础概念 内核与外设之间的主要交互方式有两种:轮询和中断. 轮询的方式貌似公平,但实际工作效率很低,且不能及 ...
- CC2530入门教程-02】CC2530的通用I/O端口输入和输出控制
第2课 CC2530的通用I/O端口输入和输出控制 广东职业技术学院 欧浩源 一.CC2530的引脚概述 CC2530微控制器采用QFN40封装,有40 个引脚.其中,有21个数字I/O端口,其中 ...
- 【CC2530入门教程-02】CC2530的通用I/O端口输入和输出控制
第2课 CC2530的通用I/O端口输入和输出控制 小蜜蜂科教 / 广东职业技术学院 欧浩源 [通用I/O端口视频教程:https://v.qq.com/x/page/x0793aol7us.ht ...
- 【专题教程第8期】基于emWin模拟器的USB BULK上位机开发,仅需C即可,简单易实现
说明:1.如果你会emWin话的,就可以轻松制作上位机.做些通信和控制类上位机,比使用C#之类的方便程度一点不差,而且你仅会C语言就可以.2.并且成功将emWin人性化,可以做些Windows系统上的 ...
- 【CC2530入门教程-06】CC2530的ADC工作原理与应用
第6课 CC2530的ADC工作原理与应用 广东职业技术学院 欧浩源 一.A/D转换的基本工作原理 将时间上连续变化的模拟量转化为脉冲有无的数字量,这一过程就叫做数字化,实现数字化的关键设备是AD ...
- 【CC2530入门教程-04】CC2530的定时/计数器原理与应用
第4课 CC2530的定时/计数器原理与应用 广东职业技术学院 欧浩源 一.定时/技术器的基本原理 定时/计数器,是一种能够对内部时钟信号或外部输入信号进行计数,当计数值达到设定要求时,向CPU提 ...
- 【CC2530入门教程-05】CC2530的串行接口原理与应用
第5课 CC2530的串行接口原理与应用 广东职业技术学院 欧浩源 一.并行通信与串行通信 微控制器与外设之间的数据通信,根据连线结构和传送方式的不同,可以分为两种:并行通信和串行通信. 并行通信 ...
随机推荐
- JPA实体类注解、springboot测试类、lombok的使用
前提准备: 搭建一个springboot项目,详情请参见其它博客:点击前往 1 引入相关依赖 web.mysql.jpa.lombok <?xml version="1.0" ...
- vbs的一些入门基础。。。
VBS(VBScript的进一步简写)是基于Visual Basic的脚本语言. Microsoft Visual Basic是微软公司出品的一套可视化编程工具, 语法基于Basic. 脚本语言, 就 ...
- zepto的返回顶部scrollTop的动画解决方法
写移动端的时候,引入的zepto.js里的animate不包括scrollTop,所以返回顶部的时候,没有动画的效果.这里我使用的是setInterval的方法.代码详情如下 <!DOCTYPE ...
- lesson - 12 课程笔记
一.w 命令 作用: 用于显示已经登录系统的用户列表, 并显示用户正在执行的指令. 执行这个命令可得知目前登入系统的用户有哪些人, 以及他们正在执行的程序. 单独执行w 命令会显示所有的用户, 您也 ...
- Linux第九讲随笔 -进程管理 、ps aux 、
Linux第九讲1,进程管理 Linux在执行每一个程序时,就会在内存中为这个程序建立一个进程,以便让内核可以管理这个运行中的进程,进程是系统分配各种资源,进程调度的基本单位. 怎么查看进程 一.ps ...
- lambda表达式不使用委托(delegate) 用FUNC
lLambda不使用delegate关键字,而使用 Lambda运算符 => goes to l 1.Func<int,string> getInput = (int age ...
- Automata
A deterministic finite automaton is represented formally by a 5-tuple (Q,Σ,δ,q0,F), where: Q is a fi ...
- centos7 卸载home 扩大root空间
=============================================== 2017/11/1_第1次修改 ccb_warlock == ...
- SpringBoot_02_servlet容器配置
二.参考资料 1.Spring boot 自定义端口 2.Spring Boot的Web配置(九):Tomcat配置和Tomcat替换
- Shader 1:能接受阴影的透明shader
第一次接触Shader,项目需要,直接说需求吧,需要一个透明并且能接受阴影的shader.unity系统自带的shader已经满足不了了.上一段代码吧 Shader "GreenArch/T ...