
iOS 折线图实现
图表绘制的过程实际上是坐标位置的计算过程,至于画线只要有了position,通过CAShapeLayer+BezierPath很快就可以画出来,这里提供一个绘制折线的demo,贵在思路,有需要的可以参考
demo下载地址:https://github.com/qqcc1388/TYLineViewDemo
话不多说,效果图和代码
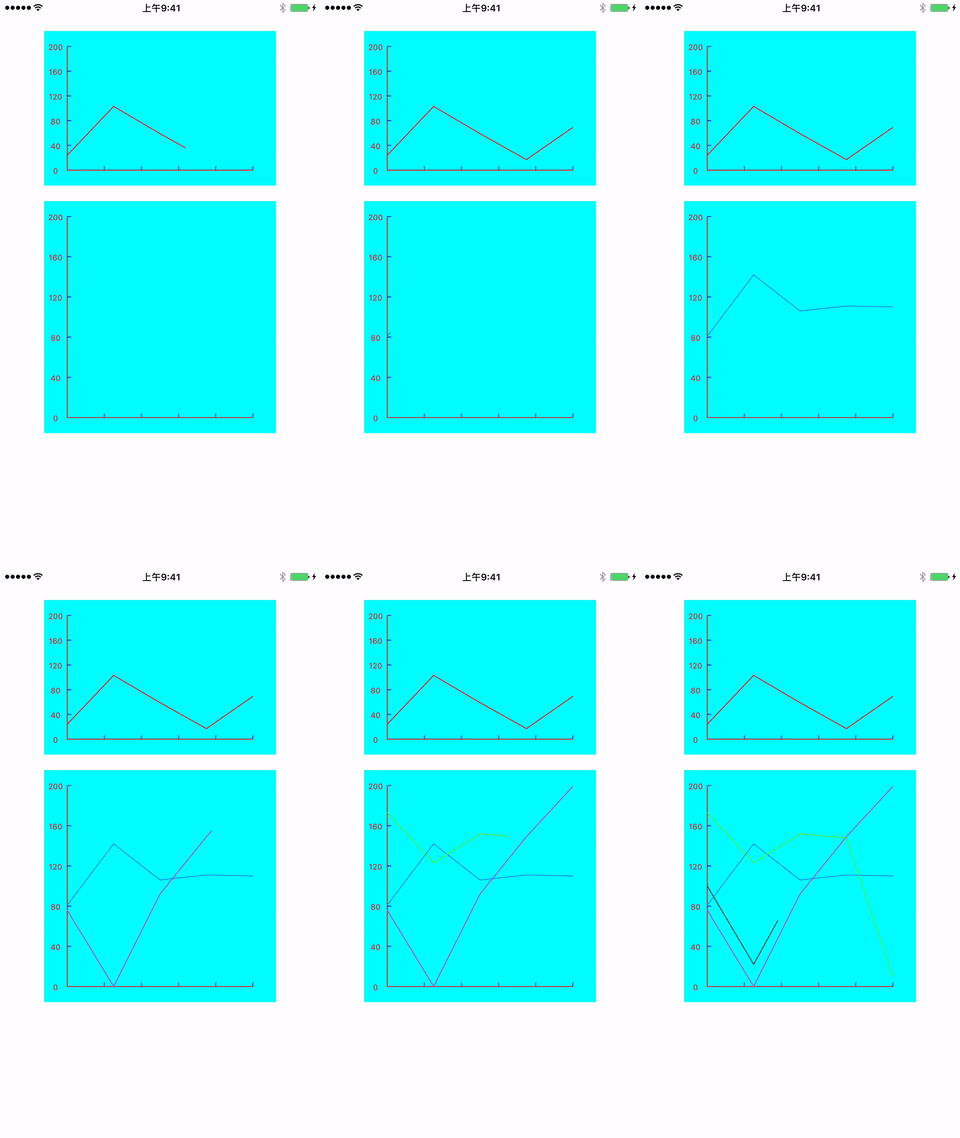
//单根折线实现
#import <UIKit/UIKit.h>

@interface TYLineView : UIView

@property (nonatomic,strong) NSArray *datas;

@property (nonatomic,strong) UIColor *lineColor;

/**

 是否显示灰色背景

 */

@property (nonatomic,assign) BOOL isShowBack;

@end

#import "TYLineView.h"

#define kMarginX        30

#define kMarginY        20

@interface TYLineView  ()

@property (nonatomic,strong)CAShapeLayer *shapeLayer;//划线layer

@property (nonatomic,strong) CAShapeLayer *backLayer; //背景

@property (nonatomic,assign)CGFloat  maxYvalue;     //最大y值

@property (nonatomic,assign) NSInteger xAxisCount;  //x轴点数

@property (nonatomic,assign) NSInteger yAxisCount;  //y轴点数

@end

@implementation TYLineView

-(instancetype)initWithFrame:(CGRect)frame

{

    if (self = [super initWithFrame:frame]) {

        [self initialize];

    }

    return self;

}

-(instancetype)initWithCoder:(NSCoder *)aDecoder

{

    if (self = [super initWithCoder:aDecoder]) {

        [self initialize];

    }

    return self;

}

-(void)initialize

{

    //闭合背景

    _backLayer = [[CAShapeLayer alloc] init];

    _backLayer.fillColor = [UIColor grayColor].CGColor;

    _backLayer.frame = self.bounds;

    [self.layer addSublayer:_backLayer];

    //主线段

    _shapeLayer = [[CAShapeLayer alloc] init];

    _shapeLayer.lineWidth = 1;

    _shapeLayer.lineCap = @"round";

    _shapeLayer.lineJoin = @"round";

    _shapeLayer.strokeColor = [UIColor redColor].CGColor;

    _shapeLayer.fillColor = [UIColor clearColor].CGColor;

    _shapeLayer.frame = self.bounds;

    [self.layer addSublayer:_shapeLayer];

    //初始化

    self.isShowBack = NO;

    self.yAxisCount = 5;

    self.backgroundColor = [UIColor cyanColor];

}

-(void)setDatas:(NSArray *)datas{

    //保存数据

    _datas = datas;

    //设置最大值

    self.maxYvalue = 200;

    //设置xAxisCount

    self.xAxisCount = datas.count;

    [self setNeedsDisplay];

    //划线

    [self drawLine];

}

-(void)drawLine

{

    CGFloat totalHeight = CGRectGetHeight(self.frame) - kMarginY*2;

//    CGFloat maxY = self.maxYvalue;

    CGFloat totoalWidth = CGRectGetWidth(self.frame) - kMarginX*2;

    //x轴每一段的宽度

    CGFloat perX = totoalWidth/(self.xAxisCount-1)*1.0;

    CGFloat yper = totalHeight/self.maxYvalue;  //y轴一个单位的高度

    //主线段曲线

    UIBezierPath *bezierPath = [UIBezierPath bezierPath];

    //背景曲线

    UIBezierPath *backPath = [UIBezierPath bezierPath];

    //原点

    CGPoint startPoint = CGPointMake(kMarginX,totalHeight + kMarginY);

    [backPath moveToPoint:startPoint];

    for (int i = 0; i < _datas.count; i++) {

        NSInteger valueY = [_datas[i] integerValue];

        CGFloat x = kMarginX + perX*i;

        CGFloat y = (totalHeight + kMarginY) - yper*valueY;

        CGPoint point = CGPointMake(x,y);

        if (i == 0) {

            [bezierPath moveToPoint:point];

        }else{

            [bezierPath addLineToPoint:point];

        }

        [backPath addLineToPoint:point];

    }

    //终点

    CGPoint endPoint = CGPointMake(kMarginX + perX*(self.datas.count-1), totalHeight + kMarginY);

    [backPath addLineToPoint:endPoint];

    //开始动画

    CABasicAnimation *animation = [CABasicAnimation animationWithKeyPath:@"strokeEnd"];

    animation.duration = 2.0f;

    animation.removedOnCompletion = NO;

    animation.fillMode = kCAFillModeForwards;

    animation.fromValue = @(0);

    animation.toValue =@(1);

    self.shapeLayer.path = bezierPath.CGPath;

    [self.shapeLayer addAnimation:animation forKey:@"strokeEnd"];

    self.backLayer.path = backPath.CGPath;

}

-(void)drawRect:(CGRect)rect

{

    [super drawRect:rect];

    UIBezierPath *path = [UIBezierPath bezierPath];

    [path setLineWidth:1.0f];

    [[UIColor redColor] set];

    CGFloat totalWidth = self.bounds.size.width;

    CGFloat totalHeight = self.bounds.size.height;

    //画坐标系

    //------> y轴

    [path moveToPoint:CGPointMake(kMarginX,kMarginY)];

    [path addLineToPoint:CGPointMake(kMarginX, totalHeight - kMarginY)];

    //------> x轴

    [path addLineToPoint:CGPointMake(totalWidth - kMarginX, totalHeight - kMarginY)];

    [path stroke];

    //线段 - y轴

    CGFloat perHeight = ((totalHeight - kMarginY*2)/(self.yAxisCount));

    for (int i = 0; i < self.yAxisCount; i++) {

        CGFloat y = perHeight*i + kMarginY;

        UIBezierPath *path = [UIBezierPath bezierPath];

        [path setLineWidth:1.0f];

        [[UIColor blueColor] set];

        [path moveToPoint:CGPointMake(kMarginX, y)];

        [path addLineToPoint:CGPointMake(kMarginX+ 5, y)];

        [path stroke];

    }

    //线段 - x轴

    CGFloat perWidth = (totalWidth - kMarginX*2)/(self.xAxisCount*1.0);

    for (int i = 0; i < self.xAxisCount; i++) {

        CGFloat x = perWidth*(i+1);

        CGFloat y = totalHeight - kMarginY;

        UIBezierPath *path = [UIBezierPath bezierPath];

        [path setLineWidth:1.0f];

        [[UIColor blueColor] set];

        [path moveToPoint:CGPointMake(x+kMarginX, y)];

        [path addLineToPoint:CGPointMake(x+kMarginX, y-5)];

        [path stroke];

    }

    //画y轴文字

    NSMutableArray *yArr = [NSMutableArray array];

    for (int i = 0; i < self.yAxisCount; i++) {

        [yArr  addObject:[NSString stringWithFormat:@"%.f",self.maxYvalue - self.maxYvalue/self.yAxisCount *i]];

    }

    [yArr addObject:@"0"];

    for (int i = 0; i < yArr.count ; i++) {

        NSString *title = yArr[i];

        CGFloat y = ((totalHeight - kMarginY*2)/(self.yAxisCount))*i + kMarginY;

        NSMutableParagraphStyle *style = [[NSMutableParagraphStyle alloc] init];

        [style setAlignment:NSTextAlignmentCenter];

        [title drawInRect:CGRectMake(0,y-5, kMarginX, 20) withAttributes:@{NSForegroundColorAttributeName:[UIColor redColor],NSFontAttributeName:[UIFont systemFontOfSize:10],NSParagraphStyleAttributeName:style}];

    }

}

#pragma mark setter getter

-(void)setLineColor:(UIColor *)lineColor{

    _lineColor = lineColor;

    self.shapeLayer.strokeColor = lineColor.CGColor;

}

-(void)setIsShowBack:(BOOL)isShowBack{

    _isShowBack = isShowBack;

    self.backLayer.hidden = !isShowBack;

}
多根线一起
#import <UIKit/UIKit.h>

@interface TYMultiLineView : UIView

-(void)addLineWithDatas:(NSArray *)datas lineColor:(UIColor *)color animated:(BOOL)animated;

@end

#import "TYMultiLineView.h"

#define kMarginX        30

#define kMarginY        20

@interface TYMultiLineView ()

@property (nonatomic,assign)CGFloat  maxYvalue;     //最大y值

@property (nonatomic,assign) NSInteger xAxisCount;  //x轴点数

@property (nonatomic,assign) NSInteger yAxisCount;  //y轴点数

@end

@implementation TYMultiLineView

-(instancetype)initWithFrame:(CGRect)frame

{

    if (self = [super initWithFrame:frame]) {

        [self initialize];

    }

    return self;

}

-(instancetype)initWithCoder:(NSCoder *)aDecoder

{

    if (self = [super initWithCoder:aDecoder]) {

        [self initialize];

    }

    return self;

}

-(void)initialize

{

    self.backgroundColor = [UIColor cyanColor];

    self.maxYvalue = 200;

    self.yAxisCount = 5;

    self.xAxisCount = 5;

    [self setNeedsDisplay];

}

-(void)addLineWithDatas:(NSArray *)datas lineColor:(UIColor *)color animated:(BOOL)animated{

    //设置最大值

    self.maxYvalue = 200;

    //设置xAxisCount

    self.xAxisCount = datas.count;

    CAShapeLayer* lineLayer = [[CAShapeLayer alloc] init];

    lineLayer.lineWidth = 1;

    lineLayer.lineCap = @"round";

    lineLayer.lineJoin = @"round";

    lineLayer.strokeColor = color.CGColor;

    lineLayer.fillColor = [UIColor clearColor].CGColor;

    lineLayer.frame = self.bounds;

    [self.layer addSublayer:lineLayer];

    UIBezierPath *path = [self prepareBezierPathDatas:datas];

    lineLayer.path = path.CGPath;

    if(animated){

        CABasicAnimation *animation = [CABasicAnimation animationWithKeyPath:@"strokeEnd"];

        animation.duration = 2.0f;

        animation.removedOnCompletion = NO;

        animation.fillMode = kCAFillModeForwards;

        animation.fromValue = @(0);

        animation.toValue =@(1);

        [lineLayer addAnimation:animation forKey:@"strokeEnd"];

    }

}

-(UIBezierPath *)prepareBezierPathDatas:(NSArray *)datas

{

    CGFloat totalHeight = CGRectGetHeight(self.frame) - kMarginY*2;

    //    CGFloat maxY = self.maxYvalue;

    CGFloat totoalWidth = CGRectGetWidth(self.frame) - kMarginX*2;

    //x轴每一段的宽度

    CGFloat perX = totoalWidth/(self.xAxisCount-1)*1.0;

    CGFloat yper = totalHeight/self.maxYvalue;  //y轴一个单位的高度

    //主线段曲线

    UIBezierPath *bezierPath = [UIBezierPath bezierPath];

    for (int i = 0; i < datas.count; i++) {

        NSInteger valueY = [datas[i] integerValue];

        CGFloat x = kMarginX + perX*i;

        CGFloat y = (totalHeight + kMarginY) - yper*valueY;

        CGPoint point = CGPointMake(x,y);

        if (i == 0) {

            [bezierPath moveToPoint:point];

        }else{

            [bezierPath addLineToPoint:point];

        }

    }

    return bezierPath;

}

-(void)drawRect:(CGRect)rect

{

    [super drawRect:rect];

    UIBezierPath *path = [UIBezierPath bezierPath];

    [path setLineWidth:1.0f];

    [[UIColor redColor] set];

    CGFloat totalWidth = self.bounds.size.width;

    CGFloat totalHeight = self.bounds.size.height;

    //画坐标系

    //------> y轴

    [path moveToPoint:CGPointMake(kMarginX,kMarginY)];

    [path addLineToPoint:CGPointMake(kMarginX, totalHeight - kMarginY)];

    //------> x轴

    [path addLineToPoint:CGPointMake(totalWidth - kMarginX, totalHeight - kMarginY)];

    [path stroke];

    //线段 - y轴

    CGFloat perHeight = ((totalHeight - kMarginY*2)/(self.yAxisCount));

    for (int i = 0; i < self.yAxisCount; i++) {

        CGFloat y = perHeight*i + kMarginY;

        UIBezierPath *path = [UIBezierPath bezierPath];

        [path setLineWidth:1.0f];

        [[UIColor blueColor] set];

        [path moveToPoint:CGPointMake(kMarginX, y)];

        [path addLineToPoint:CGPointMake(kMarginX+ 5, y)];

        [path stroke];

    }

    //线段 - x轴

    CGFloat perWidth = (totalWidth - kMarginX*2)/(self.xAxisCount*1.0);

    for (int i = 0; i < self.xAxisCount; i++) {

        CGFloat x = perWidth*(i+1);

        CGFloat y = totalHeight - kMarginY;

        UIBezierPath *path = [UIBezierPath bezierPath];

        [path setLineWidth:1.0f];

        [[UIColor blueColor] set];

        [path moveToPoint:CGPointMake(x+kMarginX, y)];

        [path addLineToPoint:CGPointMake(x+kMarginX, y-5)];

        [path stroke];

    }

    //画y轴文字

    NSMutableArray *yArr = [NSMutableArray array];

    for (int i = 0; i < self.yAxisCount; i++) {

        [yArr  addObject:[NSString stringWithFormat:@"%.f",self.maxYvalue - self.maxYvalue/self.yAxisCount *i]];

    }

    [yArr addObject:@"0"];

    for (int i = 0; i < yArr.count ; i++) {

        NSString *title = yArr[i];

        CGFloat y = ((totalHeight - kMarginY*2)/(self.yAxisCount))*i + kMarginY;

        NSMutableParagraphStyle *style = [[NSMutableParagraphStyle alloc] init];

        [style setAlignment:NSTextAlignmentCenter];

        [title drawInRect:CGRectMake(0,y-5, kMarginX, 20) withAttributes:@{NSForegroundColorAttributeName:[UIColor redColor],NSFontAttributeName:[UIFont systemFontOfSize:10],NSParagraphStyleAttributeName:style}];

    }

}
使用方法
lineView:

[self.lineView setDatas:[self prepareDatas]];

multiLineView:

    [self.multiLineView addLineWithDatas:[self prepareDatas] lineColor:[UIColor colorWithRed:arc4random_uniform(256)/255.0 green:arc4random_uniform(256)/255.0 blue:arc4random_uniform(256)/255.0 alpha:1] animated:YES];

-(NSArray *)prepareDatas{

    NSMutableArray *datas = [NSMutableArray array];

    for (int i = 0; i < 5; i++) {

        [datas addObject:@(arc4random_uniform(201)).stringValue];

    }

    return datas;

}
关于动画画线方法:给shapelayer添加strokeEnd动画
        CABasicAnimation *animation = [CABasicAnimation animationWithKeyPath:@"strokeEnd"];

        animation.duration = 2.0f;

        animation.removedOnCompletion = NO;

        animation.fillMode = kCAFillModeForwards;

        animation.fromValue = @(0);

        animation.toValue =@(1);

        [lineLayer addAnimation:animation forKey:@"strokeEnd"];
demo中还有很多地方需要完善,这里仅仅是抛砖引玉提供一种实现的方案,细节的处理和其他的特殊需求请参考demo,自己进行拓展
iOS 折线图实现的更多相关文章
- iOS 折线图、柱状图的简单实现
首先我得感谢某位博主,非常抱歉,因为之前直接下载博主提供这篇文章的demo,然后去研究了,没记住博主的名字.再次非常感谢. 而这个dome我又修改了一些,完善了一些不美观的bug,当然还有,后面会陆续 ...
- IOS折线图二
上周把项目的折线图给做了下,今天想着把它完善完善,自己设置了不同的数据源来测试,哈哈,还真遇到问题了, 就是给图表设置折点数为0时,视图显示的还是原来的,由于数据为空,应该将其设置为空,所以想着怎么把 ...
- IOS折线图
做项目要统计商品的销售情况,美工那边给了效果图,自己就按照效果图自定义了一个ScrollView.整体效果不错,在做的过程中遇到的问题也记录一下. 现在这个还有许多优化的地方: 1.一个表中只能画一个 ...
- iOS绘制坐标图,折线图-Swift
坐标图,经常会在各种各样的App中使用,最常用的一种坐标图就是折线图,根据给定的点绘制出对应的坐标图是最基本的需求.由于本人的项目需要使用折线图,第一反应就是搜索已经存在的解决方案,因为这种需求应该很 ...
- iOS 动画绘制线条颜色渐变的折线图
效果图 .................... 概述 现状 折线图的应用比较广泛,为了增强用户体验,很多应用中都嵌入了折线图.折线图可以更加直观的表示数据的变化.网络上有很多绘制折线图的demo,有 ...
- IOS绘制渐变背景色折线图的一种尝试
1.绘制折线图 上次在群里看到一个折线图划的很漂亮,自己想实现一个这样的 ,但是一直没什么头绪,不知道怎么做,就开始在网上查找划线,绘 制渐变色这一块的内容,用最笨的方式,自己尝试的写了一些,也没 有 ...
- UUChart的使用--iOS绘制折线图
UUChart是一个用于绘制图表的第三方,尤其适合去绘制折线图. 二.下载地址: https://github.com/ZhipingYang/UUChartView 三.使用 第一步.首先我们将下载 ...
- IOS使用Core-Plot画折线图
关于Core-Plot的配置.大家能够參考我的上一篇博客:http://1.wildcat.sinaapp.com/?p=99 版权全部.转载请注明原文转自:http://blog.csdn.net/ ...
- iOS:使用贝塞尔曲线绘制图表(折线图、柱状图、饼状图)
1.介绍: UIBezierPath :画贝塞尔曲线的path类 UIBezierPath定义 : 贝赛尔曲线的每一个顶点都有两个控制点,用于控制在该顶点两侧的曲线的弧度. 曲线的定义有四个点:起始点 ...
随机推荐
- mybatis学习笔记(五) -- maven+spring+mybatis从零开始搭建整合详细过程(附demo和搭建过程遇到的问题解决方法)
文章介绍结构一览 一.使用maven创建web项目 1.新建maven项目 2.修改jre版本 3.修改Project Facts,生成WebContent文件夾 4.将WebContent下的两个文 ...
- 将notepad++打造成java快速开发IDE
参考文章:http://blog.csdn.net/mdyyzc/article/details/7653096 有时候要试验一小段代码,打开eclipse又需要忍受漫长的煎熬(电脑配置较低,见谅). ...
- (转载)Apache与Tomcat 区别联系
原文链接:http://www.admin10000.com/document/974.html Apache 和 Tomcat 都是web网络服务器,两者既有联系又有区别,在进行HTML.PHP.J ...
- English - 被动语态的翻译原则
被动语态翻译原则 1. Passive ----> Active The bag is stolen by him. One the whole, such a conclusion can b ...
- windows安装程序无法将windows配置为在此计算机的硬件上运行
关于装windows系统时,出现一些安装中断的处理 该方法适用于 windows安装程序无法将windows配置为在此计算机的硬件上运行 计算机意外地重新启动或遇到错误. Windows 安装无法继续 ...
- 几个SQL语句(备忘)
1.三涨停 select biao1.代码,biao1.名称 from biao1,biao2,biao3 where (biao1.涨幅+ biao2.涨幅+biao3.涨幅)>0.27 an ...
- html5 audio play()方法部分ios机不能播放声音
前几天遇到了一个很奇葩的问题:执行audio.play方法,浏览器.安卓.部分ios可正常播放,部分ios不能播放部分声音,这就奇怪了. 我的第一反应是: 音频文件有问题 -- 写了一个domo验证 ...
- PHP运算符知识点
表达式 几乎所写的任何东西都是一个表达式,简单却最精确的定义一个表达式的方式就是"任何有值的东西". 算术运算符 Php中常用的有:+.-.*./.%(取模,得到余数) 左+ - ...
- ActiveMQ结合WebScoket应用例子以及介绍
一.ActiveMQ的介绍? 1.JMS基础概念 JMS(java Message Service) 即使java消息服务,它提供标准的产生.发送.接收的接口简化企业应用开发,它支持两种消息通信模型: ...
- JavaScript 值类型和引用类型的初次研究
今天遇到一个坑,具体的不多说,直接上代码 var a = [ [],[],[1,2,3] ] var b = ['颜色','大小','尺寸'] var arr = [] for(let i = 0; ...