Python Celery队列
Celery队列简介:
Celery 是一个 基于python开发的分布式异步消息任务队列,通过它可以轻松的实现任务的异步处理, 如果你的业务场景中需要用到异步任务,就可以考虑使用celery.
使用场景:
1.你想对100台机器执行一条批量命令,可能会花很长时间 ,但你不想让你的程序等着结果返回,而是给你返回 一个任务ID,你过一段时间只需要拿着这个任务id就可以拿到任务执行结果, 在任务执行ing进行时,你可以继续做其它的事情。
2.你想做一个定时任务,比如每天检测一下你们所有客户的资料,如果发现今天 是客户的生日,就给他发个短信祝福
Celery原理:
Celery 在执行任务时需要通过一个消息中间件来接收和发送任务消息,以及存储任务结果, 一般使用rabbitMQ or Redis 或者是数据库来存放消息的中间结果
Celery优点:
- 简单:一单熟悉了celery的工作流程后,配置和使用还是比较简单的
- 高可用:当任务执行失败或执行过程中发生连接中断,celery 会自动尝试重新执行任务
- 快速:一个单进程的celery每分钟可处理上百万个任务
- 灵活: 几乎celery的各个组件都可以被扩展及自定制
Celery缺点:
1.目前只能在Linux系统上有较好的支持
Celery工作流程图:
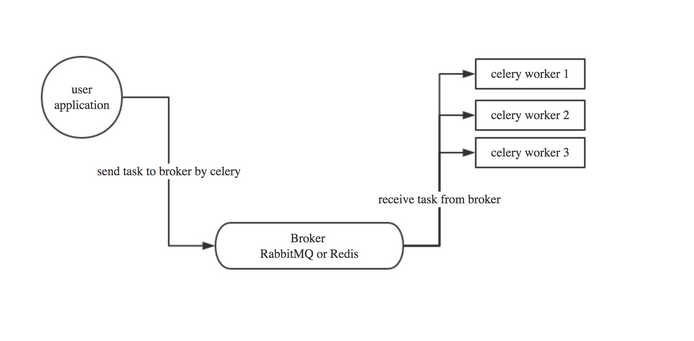
在传统的web应用中,Django的web页面通过url的映射到view,view再执行方法,如果方法需要调用大量的脚本,执行大量的任务,页面就会阻塞,如果在项目中使用Celery队列.首先用户的任务会被celery放到broker中进行中转,然后将任务分为一个个的task来执行,由于celery是异步机制,所以会直接给用户返回task_id,页面拿到task_id就可以执行后续的操作,比如查看任务进度,暂停任务,而无需等待所有任务全部执行完毕,才能看到页面
Celery的安装与使用
1.安装:
1.在linux(ubuntu)系统上首先安装Celery队列
pip3 install Celery
2.在linux安装redis
sudo apt-get install redis-server
3.在linux上安装redis-celery中间件
pip3 install -U "celery[redis]"
4.启动redis
sudo /etc/init.d/redis-server start
2.创建并执行一个简单的task
命名为tasks.py
 from celery import Celery

 app = Celery('tasks',

              broker='redis://localhost',

              backend='redis://localhost')

 @app.task

 def add(x,y):

     print("running...",x,y)

     return x+y
启动监听并开始执行该服务
celery -A tasks worker -l debug
在开启一个终端进行测试任务
进入python环境
 from tasks import add

 t = add.delay(3,3) #此时worker会生成一个任务和任务id

 t.get() #获取任务执行的结果

 t.get(propagate=False) #如果任务执行中出现异常,在client端不会异常退出

 t.ready()#查看任务是否执行完毕

 t.traceback #打印异常详细信息
3.在项目中创建celery
在当前的目录下创建文件夹celery_pro
mkdir celery_pro
在此目录下创建两个文件
目录结构:
 celery_proj

     /__init__.py

     /celery.py

     /tasks.py
celery.py(定义了celery的一些元信息)
 rom __future__ import absolute_import, unicode_literals

 from celery import Celery

 app = Celery('proj',

              broker='redis://localhost',   #消息中间接收

              backend='redis://localhost', #消息结果存放

              include=['proj.tasks'])          #执行任务的文件

 # Optional configuration, see the application user guide.

 app.conf.update(

     result_expires=3600,

 )

 if __name__ == '__main__':

     app.start()
tasks.py (定义任务执行的具体逻辑和调用的具体方法)
 from __future__ import absolute_import, unicode_literals

 from .celery import app

 @app.task

 def add(x, y):

     return x + y

 @app.task

 def mul(x, y):

     return x * y

 @app.task

 def xsum(numbers):

     return sum(numbers)
启动worker
celery -A celery_pro worker -l debug
再另一个窗口打开python命令模式进行测试
 from celery_pro import tasks

 t = tasks.add.delay(3,4)

 t.get()
Celery的分布式:多启动worker就可以自动实现负载均衡,无需手动管理
Celery永驻后台(开启&重启&关闭)
 celery multi start w1 -A celery_pro -l info  #开启后台celery任务

 celery  multi restart w1 -A proj -l info #重启该服务

 celery multi stop w1 -A proj -l info #关闭该服务
Celery定时任务
在celery_pro文件夹下创建periodic_tasks.py
目录结构:
  celery_proj

      /__init__.py

      /celery.py

      /tasks.py

      /periodic_tasks.py
文件内容如下:
 from __future__ import absolute_import, unicode_literals

 from .celery import app

 from celery.schedules import crontab

 @app.on_after_configure.connect

 def setup_periodic_tasks(sender, **kwargs):

     # Calls test('hello') every 10 seconds.

     sender.add_periodic_task(10.0, test.s('hello'), name='add every 10')

     # Calls test('world') every 30 seconds

     sender.add_periodic_task(30.0, test.s('world'), expires=10)

     # Executes every Monday morning at 7:30 a.m.

     sender.add_periodic_task(

         crontab(hour=21, minute=42, day_of_week=5),

         test.s('Happy Mondays!'),

     )

 @app.task

 def test(arg):

     print(arg)
修改celery.py,加入periodic_task.py
 from __future__ import absolute_import, unicode_literals

 from celery import Celery

 app = Celery('proj',

              broker='redis://localhost',

              backend='redis://localhost',

              include=['celery_pro.tasks','celery_pro.periodic_tasks'])

 # Optional configuration, see the application user guide.

 app.conf.update(

     result_expires=3600,

 )

 if __name__ == '__main__':

     app.start()

 ~

 ~
在服务端启动 celery -A celery_pro worker -l debug
在客户端启动 celery -A celery_pro.periodic_tasks beat -l debug
在服务端如果看到打印的hell ,world说明定时任务配置成功
上面是通过调用函数添加定时任务,也可以像写配置文件 一样的形式添加, 下面是每30s执行的任务
在celery.py中添加
 app.conf.beat_schedule = {

     'add-every-30-seconds': {

         'task': 'cerely_pro.tasks.add', #执行的具体方法

         'schedule': 5.5,  #每秒钟执行

         'args': (16, 16)   #执行的具体动作的参数

     },

 }

 app.conf.timezone = 'UTC'
更多定制
上面的定时任务比较简单,但如果你想要每周一三五的早上8点给你发邮件怎么办呢?用crontab功能,跟linux自带的crontab功能是一样的,可以个性化定制任务执行时间
 rom celery.schedules import crontab

 app.conf.beat_schedule = {

     #在每周一早上7:30执行

     'add-every-monday-morning': {

         'task': 'celery_pro.tasks.add',

         'schedule': crontab(hour=7, minute=30, day_of_week=1),

         'args': (16, 16),

     },
还有更多定时配置方式如下:
| Example | Meaning |
crontab() |
Execute every minute. |
crontab(minute=0, hour=0) |
Execute daily at midnight. |
crontab(minute=0, hour='*/3') |
Execute every three hours: midnight, 3am, 6am, 9am, noon, 3pm, 6pm, 9pm. |
|
Same as previous. |
crontab(minute='*/15') |
Execute every 15 minutes. |
crontab(day_of_week='sunday') |
Execute every minute (!) at Sundays. |
|
Same as previous. |
|
Execute every ten minutes, but only between 3-4 am, 5-6 pm, and 10-11 pm on Thursdays or Fridays. |
crontab(minute=0,hour='*/2,*/3') |
Execute every even hour, and every hour divisible by three. This means: at every hour except: 1am, 5am, 7am, 11am, 1pm, 5pm, 7pm, 11pm |
crontab(minute=0, hour='*/5') |
Execute hour divisible by 5. This means that it is triggered at 3pm, not 5pm (since 3pm equals the 24-hour clock value of “15”, which is divisible by 5). |
crontab(minute=0, hour='*/3,8-17') |
Execute every hour divisible by 3, and every hour during office hours (8am-5pm). |
crontab(0, 0,day_of_month='2') |
Execute on the second day of every month. |
|
Execute on every even numbered day. |
|
Execute on the first and third weeks of the month. |
|
Execute on the eleventh of May every year. |
|
Execute on the first month of every quarter. |
Celery+Django实现异步任务分发
1.在setting.py的文件同一级别创建celery.py
 from __future__ import absolute_import, unicode_literals

 import os

 from celery import Celery

 # 设置Django的环境变量

 os.environ.setdefault('DJANGO_SETTINGS_MODULE', 'PerfectCRM.settings')

 #设置app的默认处理方式,如果不设置默认是rabbitMQ

 app = Celery('proj',

              broker='redis://localhost',

              backend='redis://localhost'

 )

 #配置前缀

 app.config_from_object('django.conf:settings', namespace='CELERY')

 #自动扫描app下的tasks文件

 app.autodiscover_tasks()

 @app.task(bind=True)

 def debug_task(self):

     print('Request: {0!r}'.format(self.request))
2.修改当前目录下的__init__文件
 from __future__ import absolute_import, unicode_literals

 #启动时检测celery文件

 from .celery import app as celery_app

 __all__ = ['celery_app']
3.在app下新增tasks文件,写要执行的任务
 from __future__ import absolute_import, unicode_literals

 from celery import shared_task

 @shared_task

 def add(x, y):

     return x + y

 @shared_task

 def mul(x, y):

     return x * y

 @shared_task

 def xsum(numbers):

     return sum(numbers)
在另一个app下新增tasks文件
 from __future__ import absolute_import, unicode_literals

 from celery import shared_task

 import time,random

 @shared_task

 def randnum(start, end):

     time.sleep(3)

     return random.ranint(start,end)
在app下的urls.py文件中增加映射
 url(r'celery_call', views.celery_call),

 url(r'celery_result', views.celery_result),
在views下增加处理逻辑
 from crm import tasks

 from celery.result import AsyncResult

 import random

 #计算结果

 def celery_call(request):

     randnum =random.randint(0,1000)

     t = tasks.add.delay(randnum,6)

     print('randum',randnum)

     return HttpResponse(t.id)

 #获取结果

 def celery_result(request):

     task_id = request.GET.get('id')

     res = AsyncResult(id=task_id)

     if res.ready():

         return HttpResponse(res.get())

     else:

         return HttpResponse(res.ready())
测试
首先启动Django,从web端输入url调用celery_call方法
例:http://192.168.17.133:9000/crm/celery_call,此方法会返回一个task_id(41177118-3647-4830-b8c8-7be76d9819d7)
带着这个task_id 访问http://192.168.17.133:9000/crm/celery_result?id=41177118-3647-4830-b8c8-7be76d9819d7如果可以看到结果说明配置成功
Dnango+Celery实现定时任务
1.安装Django,Celery中间件
pip3 install django-celery-beat
2.在Django的settings文件中,新增app,名称如下
INSTALLED_APPS = (
.....,
'django_celery_beat', #新增的app
)
3.输入命令
python manage.py migrate #创建与Django有关定时计划任务的新表
4.通过celery beat开启定时任务
celery -A PrefectCRM beat -l info -S django
5.启动Django服务,进入admin配置页面
python3 manager.py runserver 0.0.0.0:9000
并设置settings.py中的
ALLOW_HOSTS=['*']
6.可以在原有业务表的基础之上看到新的三张表
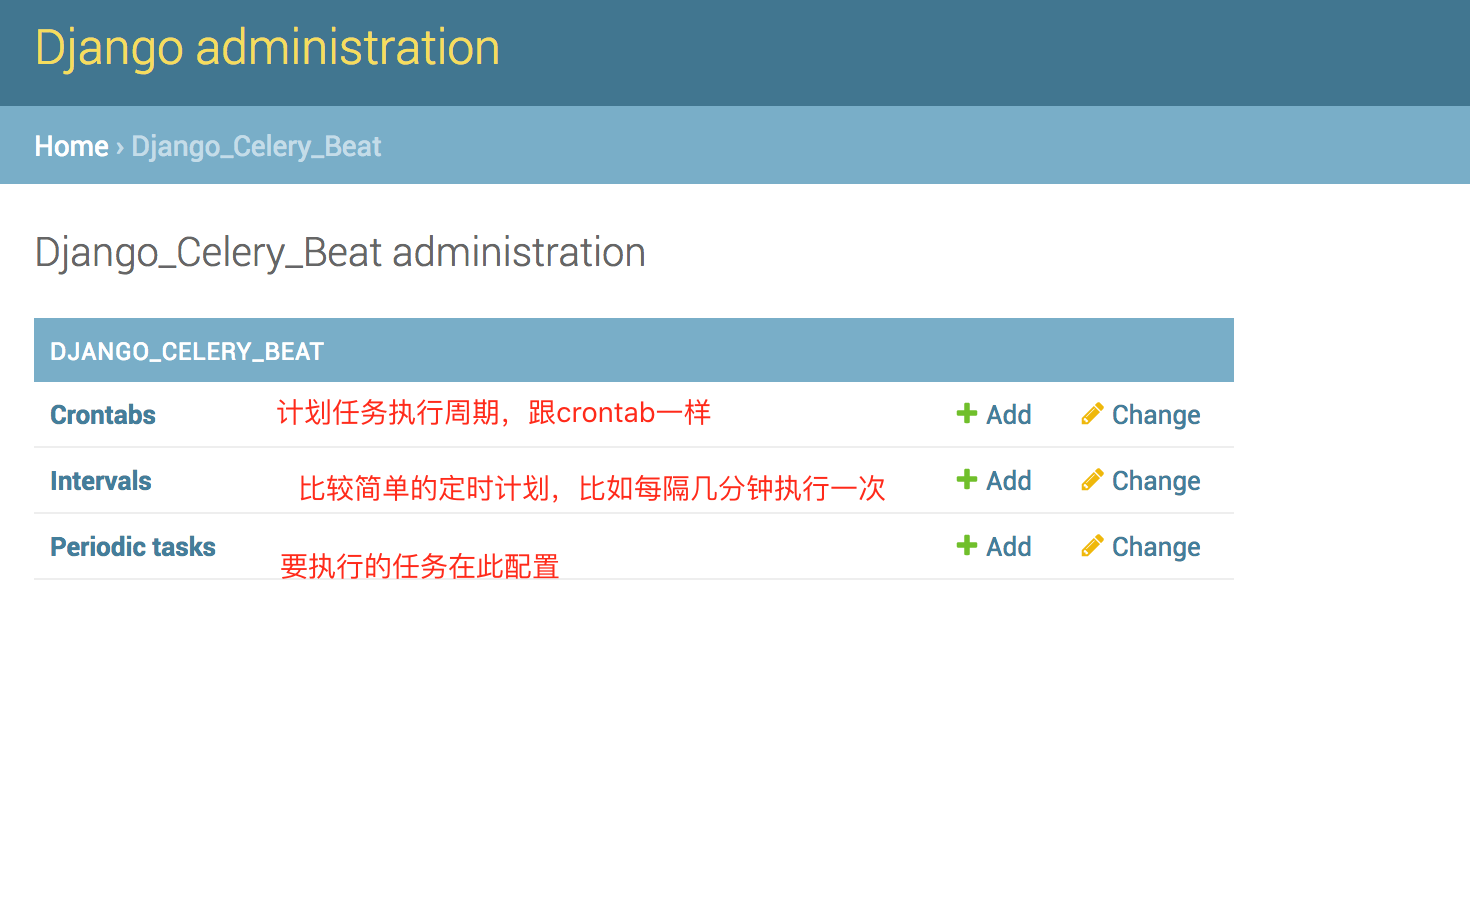
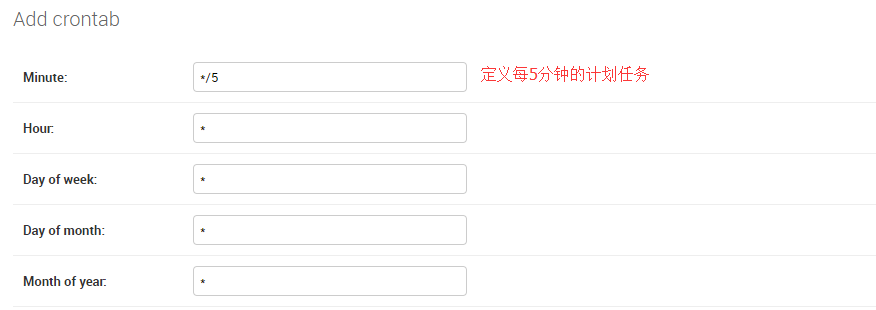
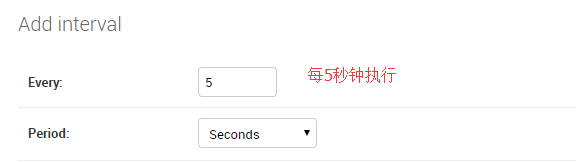
最后配置计划任务表,在此表中将定时任务和执行的频率相关联
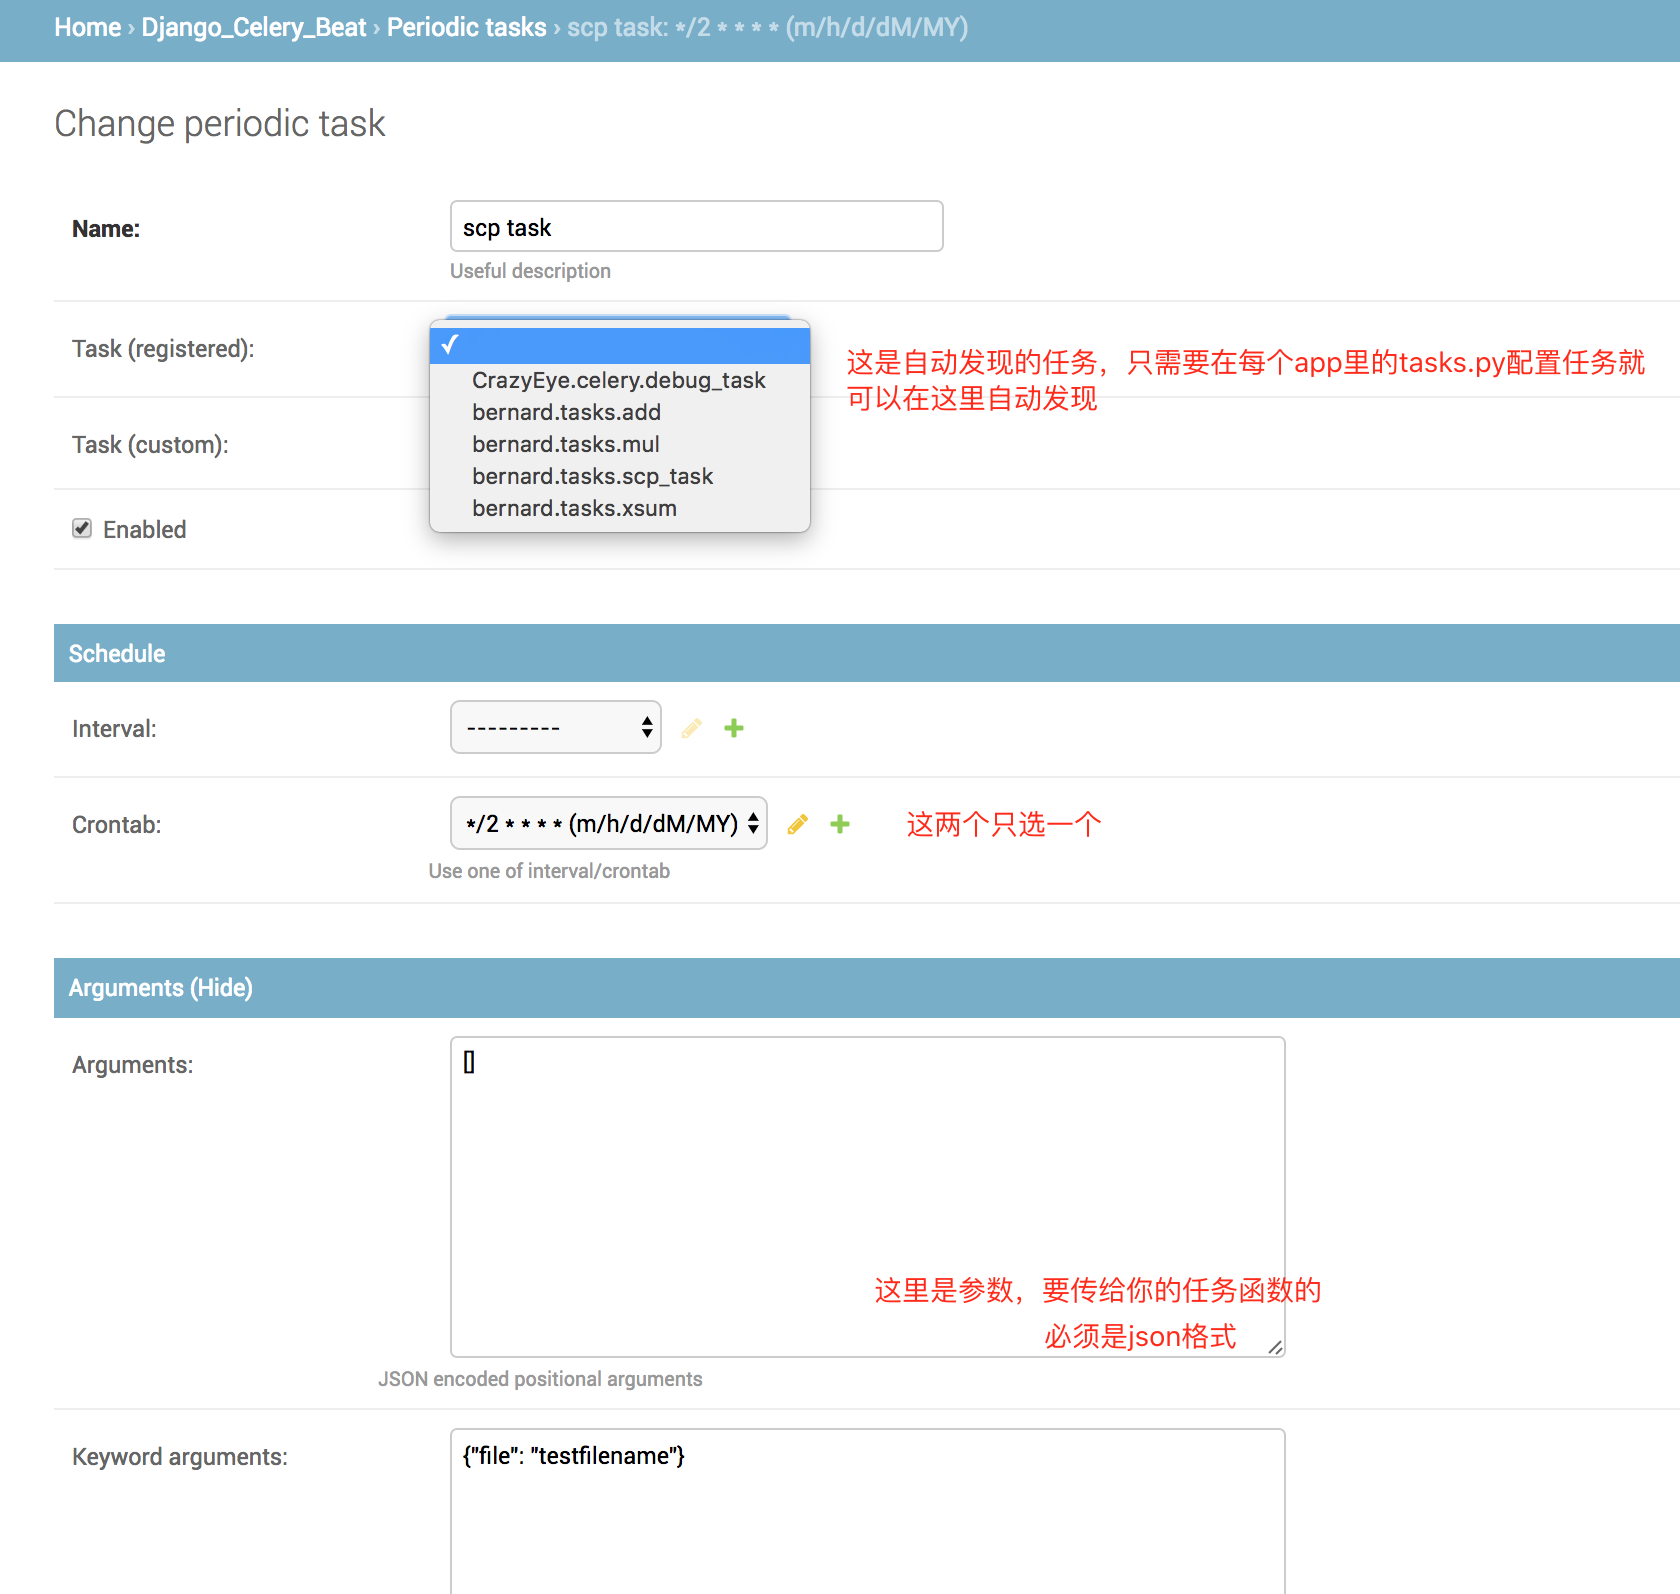
后记:经测试,每添加或修改一个任务,celery beat都需要重启一次,要不然新的配置不会被celery beat进程读到
'django_celery_beat
Python Celery队列的更多相关文章
- python celery多worker、多队列、定时任务
python celery多worker.多队列.定时任务
- python celery 多work多队列
1.Celery模块调用 既然celery是一个分布式的任务调度模块,那么celery是如何和分布式挂钩呢,celery可以支持多台不通的计算机执行不同的任务或者相同的任务. 如果要说celery的分 ...
- python之celery队列模块
一.celery队列简介 Celery 是一个 基于python开发的分布式异步消息任务队列,通过它可以轻松的实现任务的异步处理, 如果你的业务场景中需要用到异步任务,就可以考虑使用celery. 1 ...
- Python消息队列工具 Python-rq 中文教程
原创文章,作者:Damon付,如若转载,请注明出处:<Python消息队列工具 Python-rq 中文教程>http://www.tiangr.com/python-xiao-xi-du ...
- python celery + redis
redis http://debugo.com/python-redis celery http://docs.jinkan.org/docs/celery/getting-started/intro ...
- python消息队列snakemq使用总结
Python 消息队列snakemq总结 最近学习消息总线zeromq,在网上搜了python实现的消息总线模块,意外发现有个消息队列snakemq,于是拿来研究一下,感觉还是很不错的,入手简单使用也 ...
- python RabbitMQ队列使用(入门篇)
---恢复内容开始--- python RabbitMQ队列使用 关于python的queue介绍 关于python的队列,内置的有两种,一种是线程queue,另一种是进程queue,但是这两种que ...
- Python之队列Queue
今天我们来了解一下python的队列(Queue) queue is especiall useful in threaded programming when information must be ...
- Python 用队列实现多线程并发
# Python queue队列,实现并发,在网站多线程推荐最后也一个例子,比这货简单,但是不够规范 # encoding: utf-8 __author__ = 'yeayee.com' # 由本站 ...
随机推荐
- 深入浅出数据结构C语言版(12)——从二分查找到二叉树
在很多有关数据结构和算法的书籍或文章中,作者往往是介绍完了什么是树后就直入主题的谈什么是二叉树balabala的.但我今天决定不按这个套路来.我个人觉得,一个东西或者说一种技术存在总该有一定的道理,不 ...
- Qt For Android 开发环境配置
想了想,还是再写一篇关于Qt for Android开发环境配置的教程. 准备:Java jdk,Android sdk,Android adb,Android ndk,Android ant,Qt ...
- github 上传下载代码简单使用
很长时间,一直认为github很难操作,其实认真学了发现也不是很困难. 主要就3个命令 git clone 建立空间 git push 提交代码,git pull拉取代码. git clone htt ...
- 分享 C++图像处理的代码简易示例
采用Decoder:stb_image https://github.com/nothings/stb/blob/master/stb_image.h 采用Encoder:tiny_jpeghttps ...
- Python 发展历史
1. Python发展历史 起源 Python的作者,Guido von Rossum,荷兰人.1982年,Guido从阿姆斯特丹大学获得了数学和计算机硕士学位.然而,尽管他算得上是一位数学家,但他更 ...
- [POI2007]洪水pow 并查集
我们先得出一个结论:水泵要建在城市上.因为如果在非城市上建能把其他一些城市抽干,那么在城市上建也是一个效果(自己画图感性理解一下) 然后我们明白抽水的条件:周围的高度要>=自身的高度,这样会抽完 ...
- JS正则密码复杂度校验之:至少有多种字符中的其中几种
概述 续接上文的密码校验要求: 这个需求有两个难点,一,是如何使用正则匹配所有半角英文标点符号,二,是如何验证密码段中在要求的四种(大写字母,小写字母,数字,标点符号)类型中至少存在三种. 第一个难点 ...
- linux几个重要的按键
我们在用Windows系统时,有没有感觉快键键让我们工作更有效率,在Linux系统中仍有很好用的快捷键,这些快捷键可以辅助我们进行指令的编写与程序的中断呢,下面介绍几个经常用到的快捷键. 一.Tab- ...
- JavaScript入门(一)
一.什么叫JS? 1.JS的概念JS,是JavaScript的缩写形式,而JavaScript是一种基于对象和事件驱动并且具有相对安全性的客户端脚本语言.它在Web开发中JS占据着举足轻重的地位,所有 ...
- 为什么C++中声明和定义要分开写
现在开始写项目了,你会发现我们一般都要写一个cpp,对应的还得有一个h文件,那么为什么在C++中我们要这么做? .h就是声明,.cpp就是实现,而所谓分离式实现就是指"声明"和&q ...