android自定义listview实现圆角
在项目中我们会经常遇到这种圆角效果,因为直角的看起来确实不那么雅观,可能大家会想到用图片实现,试想上中下要分别做三张图片,这样既会是自己的项目增大也会增加内存使用量,所以使用shape来实现不失为一种更好的实现方式。在这里先看一下shape的使用:
<?xml version="1.0" encoding="utf-8"?>

<shape xmlns:android="http://schemas.android.com/apk/res/android"

       android:shape="rectangle"

       >

      <!-- 渐变 -->

       <gradient

       android:startColor="#B5E7B8"

       android:endColor="#76D37B"

       android:angle="270"

       />

      <!-- 描边 -->

      <stroke android:width="1dip"

       android:color="@color/blue"

       />

      <!-- 实心 -->

      <solid android:color="#FFeaeaea"

       />

      <!-- 圆角 -->

       <corners

       android:bottomRightRadius="4dip"

       android:bottomLeftRadius="4dip"

       android:topLeftRadius="4dip"

       android:topRightRadius="4dip"

       />

</shape>
solid:实心,就是填充的意思
android:color指定填充的颜色
gradient:渐变
android:startColor和android:endColor分别为起始和结束颜色,ndroid:angle是渐变角度,必须为45的整数倍。
另外渐变默认的模式为android:type="linear",即线性渐变,可以指定渐变为径向渐变,android:type="radial",径向渐变需要指定半径android:gradientRadius="50"。
stroke:描边
android:width="2dp" 描边的宽度,android:color 描边的颜色。
我们还可以把描边弄成虚线的形式,设置方式为:
android:dashWidth="5dp"
android:dashGap="3dp"
其中android:dashWidth表示'-'这样一个横线的宽度,android:dashGap表示之间隔开的距离。
corners:圆角
android:radius为角的弧度,值越大角越圆。
OK,下面开始自定义listview实现圆角的例子:
首先在drawable下定义只有一项的选择器app_list_corner_round.xml:
<?xml version="1.0" encoding="utf-8"?>

<shape xmlns:android="http://schemas.android.com/apk/res/android"

       android:shape="rectangle"

       >

      <!-- 渐变 -->

       <gradient

       android:startColor="#B5E7B8"

       android:endColor="#76D37B"

       android:angle="270"

       />

      <!-- 描边 -->

      <stroke android:width="1dip"

       android:color="@color/blue"

       />

      <!-- 实心 -->

      <solid android:color="#FFeaeaea"

       />

      <!-- 圆角 -->

       <corners

       android:bottomRightRadius="4dip"

       android:bottomLeftRadius="4dip"

       android:topLeftRadius="4dip"

       android:topRightRadius="4dip"

       />

</shape>
如果是顶部第一项,则上面两个角为圆角,app_list_corner_round_top.xml:
<?xml version="1.0" encoding="utf-8"?>

<shape xmlns:android="http://schemas.android.com/apk/res/android"

       android:shape="rectangle"

       >

       <gradient

       android:startColor="#B5E7B8"

       android:endColor="#76D37B"

       android:angle="270"

       />

      <stroke android:width="1dip"

       android:color="@color/blue"

       />

      <solid android:color="#FFeaeaea"

       />

       <corners

           android:topLeftRadius="4dip"

           android:topRightRadius="4dip"

       />

</shape>
如果是底部最后一项,则下面两个角为圆角,app_list_corner_round_bottom.xml:
<?xml version="1.0" encoding="utf-8"?>

<shape xmlns:android="http://schemas.android.com/apk/res/android"

       android:shape="rectangle"

       >

       <gradient

       android:startColor="#B5E7B8"

       android:endColor="#76D37B"

       android:angle="270"

       />

      <stroke android:width="1dip"

       android:color="@color/blue"

       />

      <solid android:color="#FFeaeaea"

       />

       <corners

       android:bottomRightRadius="4dip"

       android:bottomLeftRadius="4dip"

       />

</shape>
如果是中间项,则应该不需要圆角, app_list_corner_round_center.xml:
<?xml version="1.0" encoding="utf-8"?>

<shape xmlns:android="http://schemas.android.com/apk/res/android"

       android:shape="rectangle"

       >

       <gradient

       android:startColor="#B5E7B8"

       android:endColor="#76D37B"

       android:angle="270"

       />

      <stroke android:width="1dip"

       android:color="@color/blue"

       />

      <solid android:color="#FFeaeaea"

       />

      <corners

       android:bottomRightRadius="4dip"

       android:bottomLeftRadius="4dip"

       />

</shape>
listview的背景图片大家可以使用stroke描述,这里我使用了一张9PNG的图片,因为9PNG图片拉伸不失真。
定义好了圆角的shape接下来是自定义listview的实现:
package cn.com.karl.view;

import cn.com.karl.test.R;

import android.content.Context;

import android.util.AttributeSet;

import android.view.MotionEvent;

import android.widget.AdapterView;

import android.widget.ListView;

/**

 * 圆角ListView

 */

public class CornerListView extends ListView {

    public CornerListView(Context context) {

        super(context);

    }

    public CornerListView(Context context, AttributeSet attrs, int defStyle) {

        super(context, attrs, defStyle);

    }

    public CornerListView(Context context, AttributeSet attrs) {

        super(context, attrs);

    }

    @Override

    public boolean onInterceptTouchEvent(MotionEvent ev) {

        switch (ev.getAction()) {

        case MotionEvent.ACTION_DOWN:

            int x = (int) ev.getX();

            int y = (int) ev.getY();

            int itemnum = pointToPosition(x, y);

            if (itemnum == AdapterView.INVALID_POSITION)

                break;

            else {

                if (itemnum == 0) {

                    if (itemnum == (getAdapter().getCount() - 1)) {

                        //只有一项

                        setSelector(R.drawable.app_list_corner_round);

                    } else {

                        //第一项

                        setSelector(R.drawable.app_list_corner_round_top);

                    }

                } else if (itemnum == (getAdapter().getCount() - 1))

                    //最后一项

                    setSelector(R.drawable.app_list_corner_round_bottom);

                else {

                    //中间项

                    setSelector(R.drawable.app_list_corner_round_center);

                }

            }

            break;

        case MotionEvent.ACTION_UP:

            break;

        }

        return super.onInterceptTouchEvent(ev);

    }

}
下面看一下列表布局文件setting。xml:
<?xml version="1.0" encoding="utf-8"?>

<LinearLayout xmlns:android="http://schemas.android.com/apk/res/android"

    android:layout_width="fill_parent"

    android:layout_height="fill_parent"

    android:orientation="vertical" >

    <include layout="@layout/head" />

    <cn.com.karl.view.CornerListView

        android:id="@+id/setting_list"

        android:layout_width="fill_parent"

        android:layout_height="wrap_content"

        android:layout_margin="10dip"

        android:background="@drawable/corner_list_bg"

        android:cacheColorHint="#00000000" />

</LinearLayout>
自定义Listview对应的item文件 main_tab_setting_list_item.xml
<?xml version="1.0" encoding="utf-8"?>

    <LinearLayout xmlns:android="http://schemas.android.com/apk/res/android"

        android:layout_width="fill_parent"

        android:layout_height="wrap_content">

        <RelativeLayout

            android:layout_width="fill_parent"

            android:layout_height="50dp"

            android:gravity="center_horizontal">

            <TextView

                android:id="@+id/tv_system_title"

                android:layout_width="wrap_content"

                android:layout_height="wrap_content"

                android:layout_alignParentLeft="true"

                android:layout_centerVertical="true"

                android:layout_marginLeft="10dp"

                android:text="分享"

                android:textColor="@color/black"/>

            <ImageView

                android:id="@+id/iv_system_right"

                android:layout_width="wrap_content"

                android:layout_height="wrap_content"

                android:layout_alignParentRight="true"

                android:layout_centerVertical="true"

                android:layout_marginRight="10dp"

                android:src="@drawable/arrow1" />

        </RelativeLayout>

    </LinearLayout>
最后是在activity中填充适配器:
package cn.com.karl.test;

import java.util.ArrayList;

import java.util.HashMap;

import java.util.List;

import java.util.Map;

import cn.com.karl.view.CornerListView;

import android.os.Bundle;

import android.view.View;

import android.widget.SimpleAdapter;

public class SettingActivity extends BaseActivity {

    private CornerListView cornerListView = null;

    private List<Map<String, String>> listData = null;

    private SimpleAdapter adapter = null;

    @Override

    protected void onCreate(Bundle savedInstanceState) {

        // TODO Auto-generated method stub

        super.onCreate(savedInstanceState);

        setContentView(R.layout.setting);

        cornerListView = (CornerListView)findViewById(R.id.setting_list);

        setListData();

        adapter = new SimpleAdapter(getApplicationContext(), listData, R.layout.main_tab_setting_list_item ,

                new String[]{"text"}, new int[]{R.id.tv_system_title});

                        cornerListView.setAdapter(adapter);

        initHead();

        btn_leftTop.setVisibility(View.INVISIBLE);

        tv_head.setText("设置");

    }

    /**

     * 设置列表数据

     */

    private void setListData(){

        listData = new ArrayList<Map<String,String>>();

        Map<String,String> map = new HashMap<String, String>();

        map.put("text", "分享");

        listData.add(map);

        map = new HashMap<String, String>();

        map.put("text", "检查新版本");

        listData.add(map);

        map = new HashMap<String, String>();

        map.put("text", "反馈意见");

        listData.add(map);

        map = new HashMap<String, String>();

        map.put("text", "关于我们");

        listData.add(map);

        map = new HashMap<String, String>();

        map.put("text", "支持我们,请点击这里的广告");

        listData.add(map);

    }

}
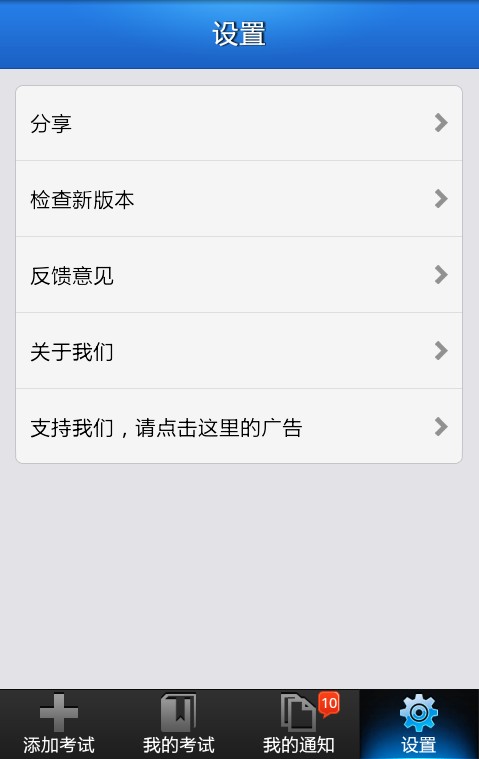
这样就完成了,虽然过程较繁杂,但是当做一个好的模板以后使用会方便很多,最后看一下实现效果和我们用图片实现的一样吗

【常用按钮style】
<?xml version="1.0" encoding="utf-8"?>

<layer-list xmlns:android="http://schemas.android.com/apk/res/android">

    <item>

        <shape>

            <gradient

                android:angle=""

                android:endColor="#d86212"

                android:startColor="#f9c468" />

            <stroke android:color="#ce5b18" android:width="1dp"/>

            <corners android:radius="5dip" />

        </shape>

    </item>

    <item>

        <selector>

            <item android:state_pressed="true">

                <shape>

                    <solid android:color="#dbdbdb" />

                    <corners android:radius="5dip" />

                </shape>

            </item>

        </selector>

    </item>

</layer-list>
android自定义listview实现圆角的更多相关文章
- Android 自定义ListView
本文讲实现一个自定义列表的Android程序,程序将实现一个使用自定义的适配器(Adapter)绑定 数据,通过contextView.setTag绑定数据有按钮的ListView. 系统显示列表(L ...
- Android 自定义 ListView 上下拉动“刷新最新”和“加载更多”歌曲列表
本文内容 环境 测试数据 项目结构 演示 参考资料 本文演示,上拉刷新最新的歌曲列表,和下拉加载更多的歌曲列表.所谓"刷新最新"和"加载更多"是指日期.演示代码 ...
- [置顶] android 自定义ListView实现动画特效
通过自定义ListView实现动画特效,被点击元素A向前移,A之前元素往后移动. 重点在于动画的实现: 具体代码如下: package com.open.widget; import java.uti ...
- Android 自定义ListView单击事件失效
因为自带的listView不能满足项目需求,通过实现自己的Adapter去继承ArrayAdapter 来实现自定义ListView的Item项目. 出现点击ListView的每一项都不会执行setO ...
- Android 自定义 ListView 显示网络上 JSON 格式歌曲列表
本文内容 环境 项目结构 演示自定义 ListView 显示网络上 JSON 歌曲列表 参考资料 本文最开始看的是一个国人翻译的文章,没有源代码可下载,根据文中提供的代码片段,自己新建的项目(比较可恶 ...
- Android 自定义 ListView 上下拉动刷新最新和加载更多
本文内容 开发环境 演示上下拉动刷新最新和加载更多 ListView 参考资料 本文演示上下拉动,刷新最新和加载更多,这个效果很常见,比如,新闻资讯类 APP,当向下拉动时,加载最新的资讯:向上拉动时 ...
- Android 自定义ListView实现底部分页刷新与顶部下拉刷新,androidlistview
在项目开发中,由于数据过大时,需要进行分页加载或下拉刷新,来缓解一次性加载的过长等待.本篇博文实例讲解通过自定义的ListView实现底部分页加载和顶部下拉刷新的效果. 其效果图: 一.ListVie ...
- Android 自定义ListView动态加载数据
我们都知道网络取数据是耗时操作,如果我们一次性请求所有数据,假如数据量不多那还可以接受,但是如果数据量特别多,那么带来的后果就是用户的愤怒(用户是很没有耐心的),所以这时候我们就需要动态的加载数据,分 ...
- android——自定义listView
都知道微信主机面 有个界面会一行一一行的聊天记录,那个效果就可以用listview来实现(当然这只是其中的一种) listView是一种比较常见的组件它用来展示列的view,它是根据数据的长度来显示数 ...
随机推荐
- BZOJ 1024 生日快乐
Description windy的生日到了,为了庆祝生日,他的朋友们帮他买了一个边长分别为 X 和 Y 的矩形蛋糕.现在包括windy,一共有 N 个人来分这块大蛋糕,要求每个人必须获得相同面积的蛋 ...
- BZOJ 1021 循环的债务
Description Alice.Bob和Cynthia总是为他们之间混乱的债务而烦恼,终于有一天,他们决定坐下来一起解决这个问题.不过,鉴别钞票的真伪是一件很麻烦的事情,于是他们决定要在清还债务的 ...
- codeforces C. Mashmokh and Numbers
题意:给你n和k,然后让你找出n个数使得gcd(a1,a2)+gcd(a3,a4)+......的和等于k: 思路:如果n为奇数,让前n-3个数的相邻两个数都为1,n-2和n-1两个数gcd为k-an ...
- 我的VSTO之路(四):深入介绍Word开发
原文:我的VSTO之路(四):深入介绍Word开发 在上一篇文章中,我介绍了Word的对象模型和一些基本开发技巧.为了更好的介绍Word插件开发,我为本文制作了一个Word书签的增强版,具体功能是让用 ...
- 设计模式之装饰者模式(Decorator Pattern)
一.什么是装饰者模式? 装饰者模式能够完美实现“对修改关闭,对扩展开放”的原则,也就是说我们可以在不修改被装饰者的前提下,扩展被装饰者的功能. 再来看看我们的文件操作代码: 1 InputStream ...
- 自己动手实现智能指针auto_ptr
面试的时候,我们经常会被问到如何自己动手实现智能指针auto_ptr.今天我就一边参考STL库中的源代码,一边将auto_ptr的实现敲一遍. auto_ptr归根到底是一个模版类,那么这个类要实现哪 ...
- 「Poetize7」Freda的访客
描述 Description 小猫们看到蛋糕比饼干大之后,普遍认为蛋糕比饼干要好>.<.所以,如果Freda 给了第i 只小猫蛋糕且这个小猫是第一个吃到蛋糕的,那么就必须给第i+2,i+4 ...
- OpenGL图形管线和坐标变换
转:http://blog.csdn.net/zhulinpptor/article/details/5897102 1. OpenGL 渲染管线 OpenGL渲染管线分为两大部分,模型观测变换(Mo ...
- HDOJ 2073 无限的路
Problem Description 甜甜从小就喜欢画图画,最近他买了一支智能画笔,由于刚刚接触,所以甜甜只会用它来画直线,于是他就在平面直角坐标系中画出如下的图形: 甜甜的好朋友蜜蜜发现上面的图还 ...
- Servlet的一些细节(1)
1. Servlet程序必须映射到一个URL地址 由于客户端是通过URL访问web服务器资源,所以Servlet程序必须映射到一个URL地址.这个工作在web.xml文件中使用<servlet ...