
Android Fragment实现分屏
在项目中碰到一个问题,新开发一个平板APP,项目要求是把原来的一个手机端APP放在项目左侧显示,右侧添加新加的功能。
首先想到了Fragment,以前做过Fragment的一些简单的Demo,但是都没有应用到项目中去过,这次倒是好好的运用了一把。
首先,考虑到已经存在的手机端APP代码繁多,且不怎么规范(代码里面大概有二三十个Activity文件,且命名及其他方面都极其不规范),所以就想不要在原来代码上太多的重构,在看了一篇文章之后,慢慢的有了些思路。(http://mp.weixin.qq.com/s?__biz=MzA3NTYzODYzMg==&mid=404548816&idx=1&sn=f042037982ed2e74210c57edf864e31a&scene=0#wechat_redirect)这篇文章也说了些重构的问题,不过看了之后觉得不适合自己的,只是很好的为自己提供了一个思路。于是就自己写了个Demo。
Demo的结构是这样的
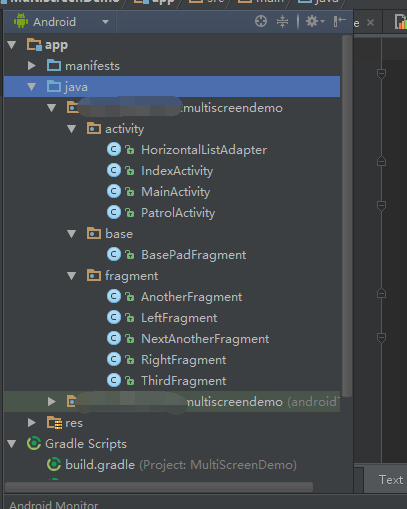
我先写了一个BasePadFragment,让所有的Fragment去实现这个基类,从而统一实现一些共通的方法。由于是Demo所以基类里面只提供了一个Fragment的跳转方法
BasePadFragment.java
import android.app.Fragment;

import android.app.FragmentManager;

import android.app.FragmentTransaction;

import android.content.Context;

import android.os.Bundle;

import android.support.v4.app.FragmentActivity;

import java.util.List;

/**

 * Created by Bob on 2016/4/11.

 */

public class BasePadFragment extends Fragment{

    public Context mContext;

    public void startToFragment(Context context,int container,Fragment newFragment){

        FragmentManager manager = getFragmentManager();

        FragmentTransaction transaction = manager.beginTransaction();

        transaction.replace(container,newFragment);

        transaction.addToBackStack(context.getClass().getName());

        transaction.commit();

    }

}
方法里面的参数分别是context:上下文;container:Fragment的容器;newFragment:要跳转到的Fragment的对象;
再看看方法体里面,首先获得Frament的一些主要操作对象FragmentManager/FragmentTransaction然后利用transaction进行fragment的置换,再将当前fragment进行压栈操作,这一步非常关键,因为如果不添加的话,按返回按钮是不能回到上一个fragment的。最后是提交commit方法。
主界面activity比较简单就是简单的一个onCreatView再后面的源码里面可以查看。
再来说主界面的布局:
activity_index.xml
<?xml version="1.0" encoding="utf-8"?>

<LinearLayout xmlns:android="http://schemas.android.com/apk/res/android"

    android:layout_width="match_parent"

    android:layout_height="match_parent"

    android:baselineAligned="false">

    <FrameLayout

        android:id="@+id/layout_container"

        android:layout_width="0dp"

        android:layout_height="match_parent"

        android:layout_weight="4">

        <fragment

            android:id="@+id/left_fragment"

            android:name="com.sailing.www.multiscreendemo.fragment.LeftFragment"

            android:layout_width="match_parent"

            android:layout_height="match_parent" />

    </FrameLayout>

    <View

        android:layout_width="5dp"

        android:layout_height="match_parent"

        android:background="#000000" />

    <FrameLayout

        android:layout_width="0dp"

        android:layout_height="match_parent"

        android:layout_weight="6">

        <fragment

            android:id="@+id/right_fragment"

            android:name="com.sailing.www.multiscreendemo.fragment.RightFragment"

            android:layout_width="match_parent"

            android:layout_height="match_parent" />

    </FrameLayout>

</LinearLayout>
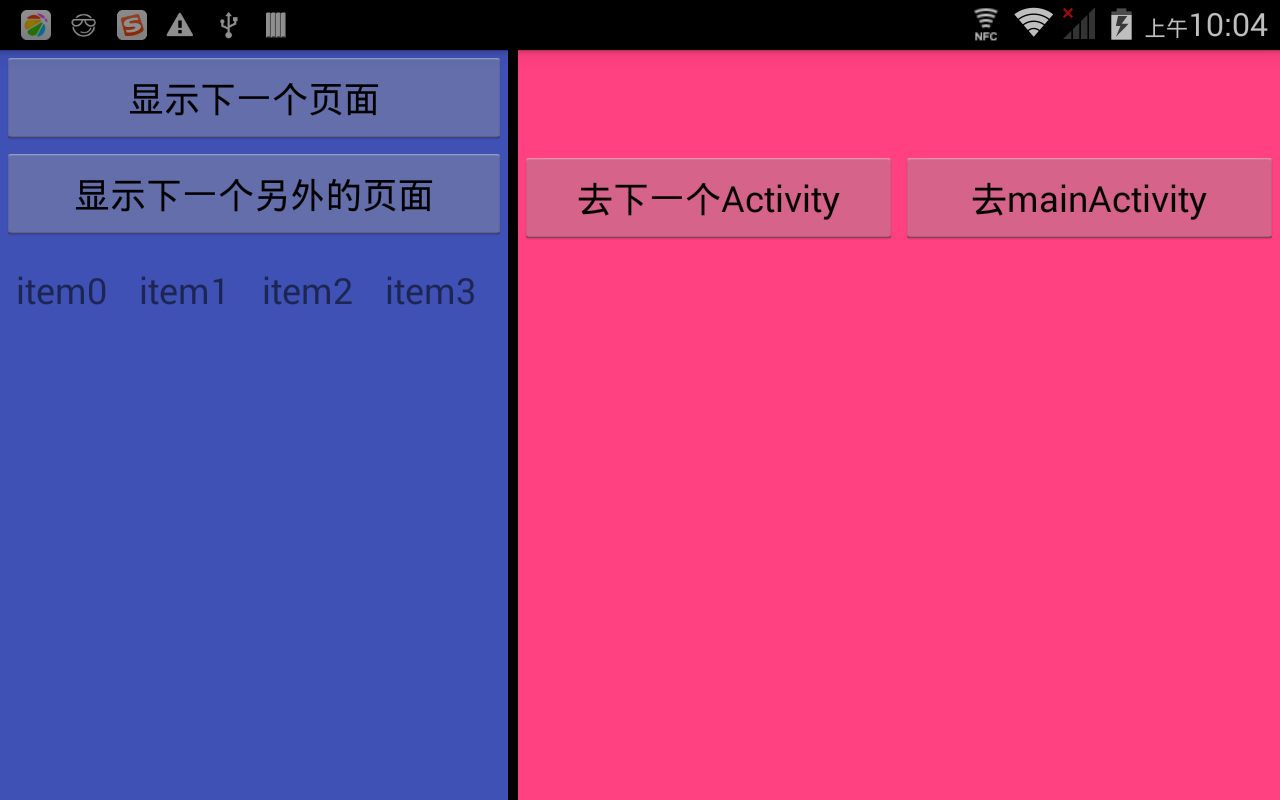
可以看到我在主界面里面添加了两个fragment;将这两个fragment水平的放在一个LinearLayout里面。在放入的时候切记要将fragment外面包裹一层parentView我用的是FrameLayout,因为在跳转的时候要针对container进行跳转,所以要在这个parentView就相当于是一个容器将fragment放在里面,所有的页面的替换都是在这个容器内进行操作。且这个容器一定要添加id,否则会报找不到view的错误。
界面效果是这样的。
左侧的Fragment
LeftFramgment:
import android.app.Fragment;

import android.app.FragmentManager;

import android.app.FragmentTransaction;

import android.os.Bundle;

import android.os.PersistableBundle;

import android.support.annotation.Nullable;

import android.support.v4.app.FragmentActivity;

import android.support.v7.widget.LinearLayoutManager;

import android.support.v7.widget.RecyclerView;

import android.view.LayoutInflater;

import android.view.View;

import android.view.ViewGroup;

import android.widget.Button;

import android.widget.ListView;

import android.widget.TextView;

/**

 * Created by Bob on 2016/4/5.

 */

public class LeftFragment extends BasePadFragment implements View.OnClickListener{

    private Button btnNextPage,btnNextAnother;

    private RecyclerView mRecyclerView;

    private HorizontalListAdapter horizontalListAdapter;

    @Override

    public View onCreateView(LayoutInflater inflater, ViewGroup container, Bundle savedInstanceState) {

        View view = inflater.inflate(R.layout.layout_left, null);

        btnNextPage = (Button)view.findViewById(R.id.btn_next_page);

        btnNextAnother = (Button)view.findViewById(R.id.btn_next_another);

        btnNextPage.setOnClickListener(this);

        btnNextAnother.setOnClickListener(this);

        mRecyclerView = (RecyclerView)view.findViewById(R.id.recycler_view);

        LinearLayoutManager layoutManager = new LinearLayoutManager(getActivity());

        layoutManager.setOrientation(LinearLayoutManager.HORIZONTAL);

        // 设置布局管理器

        mRecyclerView.setLayoutManager(layoutManager);

        String[] dataset = new String[100];

        for (int i = 0; i < dataset.length; i++) {

            dataset[i] = "item" + i;

        }

        RecyclerAdapter mAdapter = new RecyclerAdapter(dataset);

        mRecyclerView.setAdapter(mAdapter);

        return view;

    }

    @Override

    public void onClick(View v) {

        switch (v.getId()){

            case R.id.btn_next_page:

                AnotherFragment anotherFragment  = new AnotherFragment();

                startToFragment(getActivity(), R.id.layout_container, anotherFragment);

                break;

            case R.id.btn_next_another:

                NextAnotherFragment nextAnotherFragment = new NextAnotherFragment();

                startToFragment(getActivity(),R.id.layout_container,nextAnotherFragment);

                break;

            default:

                break;

        }

    }

    public class RecyclerAdapter extends RecyclerView.Adapter<RecyclerAdapter.ViewHolder> {

        private String[] mDataset;

        public RecyclerAdapter(String[] dataset) {

            mDataset = dataset;

        }

        public  class ViewHolder extends RecyclerView.ViewHolder {

            public TextView mTextView;

            public ViewHolder(View itemView) {

                super(itemView);

                mTextView = (TextView) itemView;

            }

        }

        @Override

        public int getItemCount() {

            return mDataset.length;

        }

      android.support.v7.widget.RecyclerView.Adapter#onBindViewHolder(android.support.v7.widget.RecyclerView.ViewHolder,

         *      int)

         */

        @Override

        public void onBindViewHolder(ViewHolder holder, int position) {

            holder.mTextView.setText(mDataset[position]);

        }

      android.support.v7.widget.RecyclerView.Adapter#onCreateViewHolder(android.view.ViewGroup,

         *      int)

         */

        @Override

        public ViewHolder onCreateViewHolder(ViewGroup parent, int viewType) {

            View view = View.inflate(parent.getContext(),

                    android.R.layout.simple_list_item_1, null);

            ViewHolder holder = new ViewHolder(view);

            return holder;

        }

    }

}
因为后续还在这个Demo里面进行了另外一些测试,所以有一些杂的控件在里面。我们只看代码的主要模块,就是按钮的操作,在点击了按钮之后我跳转到了另外的Framgment,直接用父类的startToFragment()方法,操作起来还是很简单的。
在第二个页面我在这里进行了参数的传递和获取。
AnotherFragment:
import android.app.Fragment;

import android.app.FragmentManager;

import android.app.FragmentTransaction;

import android.os.Bundle;

import android.support.annotation.Nullable;

import android.view.LayoutInflater;

import android.view.View;

import android.view.ViewGroup;

import android.widget.ArrayAdapter;

import android.widget.Button;

import android.widget.EditText;

import android.widget.Spinner;

/**

 * Created by Bob on 2016/4/5.

 */

public class AnotherFragment extends BasePadFragment implements View.OnClickListener {

    private Button btnToThirdPage;

    private EditText mEdtName;

    private Spinner mSpinText;

    @Override

    public View onCreateView(LayoutInflater inflater, ViewGroup container, Bundle savedInstanceState) {

        View view = inflater.inflate(R.layout.layout_another, null);

        mContext = getActivity();

        btnToThirdPage = (Button) view.findViewById(R.id.btn_another);

        mEdtName = (EditText)view.findViewById(R.id.edt_name);

        mSpinText = (Spinner)view.findViewById(R.id.spi_text);

        String [] textArray = getResources().getStringArray(R.array.text);

        ArrayAdapter<String> textAdapter = new ArrayAdapter<String>(mContext,R.layout.myspinner,textArray);

        textAdapter.setDropDownViewResource(android.R.layout.simple_spinner_dropdown_item);

        mSpinText.setAdapter(textAdapter);

        btnToThirdPage.setOnClickListener(this);

        return view;

    }

    @Override

    public void onClick(View v) {

        switch (v.getId()) {

            case R.id.btn_another:

                ThirdFragment thirdFragment = new ThirdFragment();

                String name = mEdtName.getText().toString();

                Bundle bundle = new Bundle();

                if(name != null){

                    bundle.putString("name",name);

                }

                bundle.putString("password","12345678");

                thirdFragment.setArguments(bundle);

                startToFragment(getActivity(), R.id.layout_container, thirdFragment);

                break;

            default:

                break;

        }

    }

}
同样在按钮的点击事件中,我利用Bundle进行数据的传递,使用起来也是挺简单的。在第三个界面进行数据的获取也挺简单。
ThirdFragment:
import android.app.Fragment;

import android.os.Bundle;

import android.support.annotation.Nullable;

import android.view.LayoutInflater;

import android.view.View;

import android.view.ViewGroup;

import android.widget.TextView;

/**

 * Created by Bob on 2016/4/11.

 */

public class ThirdFragment extends Fragment {

    private TextView tvName;

    @Nullable

    @Override

    public View onCreateView(LayoutInflater inflater, ViewGroup container, Bundle savedInstanceState) {

        View view = inflater.inflate(R.layout.layout_third_fragment, null);

        tvName = (TextView)view.findViewById(R.id.tv_name);

        Bundle bundle  = getArguments();

        String name =bundle.getString("name");

        String password = bundle.getString("password");

        if(null != name){

            tvName.setText(name+"    "+password);

        }

        return view;

    }

}
简单的思路,但是在引用到项目里面去的时候又发现了一个比较匪夷所思的问题,那就是尽管进行了fragment的跳转,但是上一个Fragment好像并没有被遮盖,就是说在当前的fragment还能操作上一个fragment。这个就有点坑爹了,后面在找了好些资料之后终于把问题解决。下面是最终的BasePadFragment的StartToFragment方法。
/**

     * 跳转到另外一个fragment的方法

     * @param  currentFragment 当前fragment

     * @param container:当前fragment所处的容器

     * @param newFragment 下一个fragment

     * */

    public void startToFragment(Fragment currentFragment,Context context,int container,Fragment newFragment){

        if(currentFragment != newFragment){

            manager = getFragmentManager();

            transaction = manager.beginTransaction();

            if(! newFragment.isAdded()){

                transaction.hide(currentFragment).add(container,newFragment);

                transaction.addToBackStack(context.getClass().getName());

                transaction.commit();

            }else{

               transaction.hide(currentFragment).show(newFragment);

                transaction.addToBackStack(context.getClass().getName());

                transaction.commit();

            }

        }

    }
这样就很好的处理了上一个Fragment不能被遮盖的问题。处理的逻辑是这样,先判断新的fragment是否被add了进来如果没有的话就hide掉上面的fragment,再把新的fragmentadd进来,如果add进来了就直接hide掉上一个fragment,直接压栈并提交。
源码地址:https://github.com/bobLion/MultiScreenDemo
Android Fragment实现分屏的更多相关文章
- 是时候学习Android分屏开发了
今年Google发布了Android N,Android N新增了不少功能,最受关注的自然就是分屏了. 这一功能对国内的很多手机用户并不陌生,其实很多第三方系统早已经实现了这一功能,如EMUI,Fly ...
- android分屏
上手了Android N Preview,第一个不能错过的新特性就是App分屏的支持.Android7.0原生系统就可以支持两个App横屏并排或者竖屏上下摆放了.第二个新特性就是在Android TV ...
- Android N分屏模式Activity生命周期的变化
昨天Google发布了Android N Preview, balabala....我是用模拟器去验证的, 通过长按多任务窗口(口)进入分屏模式, 这里只进行了简单的测试, 不排除通过配置哪个参数, ...
- Android分屏显示LogCat
Eclipse里有非常多界面组件,文件列表.编辑区.类结构等等,在这么多界面组件里,再打开一个Logcat就基本没有什么空间了.与其挤在一起还不如分开成两个窗体. 或者你有两个屏幕,想一个屏幕编辑,一 ...
- Android系统的三种分屏显示模式
Google在Android 7.0中引入了一个新特性——多窗口支持,允许用户一次在屏幕上打开两个应用.在手持设备上,两个应用可以在"分屏"模式中左右并排或上下并排显示.在电视设备 ...
- android仿系统Launcher界面,实现分屏,左右滑动效果(ViewSwitcher)
ViewSwitcher代表了视图切换组件, 本身继承了FrameLayout ,可以将多个View叠在一起 ,每次只显示一个组件.当程序控制从一个View切换到另个View时,ViewSwitche ...
- 【转】Android Fragment中使用SurfaceView切换时闪一下黑屏的解决办法
重构了下之前自己的一个新闻客户端,全部使用了Fragment来进行页面切换,只有一个入口Activity作为程序的启动Activity,其中有一个界面需要调用摄像头识别二维码, 于是就会用到Surfa ...
- win + linux + android 多任务分屏
Win10 的多任务分屏操作方法_百度经验http://jingyan.baidu.com/article/48206aeaf6ef35216ad6b336.html win+方向键 如果是想四分屏幕 ...
- Android 7.1 SystemUI--任务管理--场景一:长按某个缩略图,拖动分屏的流程
TaskView 类的长按事件 onLongClick 方法内发送了 DragStartEvent 事件消息,该 DragStartEvent 事件消息由 RecentsView,TaskStackV ...
随机推荐
- 如何快速学习bootstrap
bootstrap中文网http://www.bootcss.com/解决了我所有使用bootstrap的问题,从0开始,下面的全部链接都是该网站的子链接.例子http://v3.bootcss.co ...
- (转)教你如何使用php session
PHP session用法其实很简单它可以把用户提交的数据以全局变量形式保存在一个session中并且会生成一个唯一的session_id,这样就是为了多了不会产生混乱了,并且session中同一浏览 ...
- Centos6.5 安装 MariaDB-10.0.20-linux-x86_64.tar.gz
下载mariadb :https://downloads.mariadb.org/ 我选择mariadb-10.0.20-linux-x86_64.tar.gz这个版本 复制安装文件 /opt 目录 ...
- 获取SqlServer当前链接数
1.提供有关 Microsoft SQL Server 数据库引擎实例中的当前用户.会话和进程的信息,显示所有session sp_who 2.针对 SQL Server 上的每个经过身份验证的会话返 ...
- hadoop_并行写操作思路_2
如果想实现将 Client端的 File并行写入到 各个Datanode中, 首先, 应该修改的是,DistributedFileSystem中的create方法, 在create 内部调用FSNam ...
- 案例:latch: cache buffers chains event tuning
前两天对oracle数据库(single instance)进行了迁移升级从10.2.0.4 升到11.2.0.3,有一个项目迁完后第二天,cpu负载升到了130更高(16cpus). 向用户询问后使 ...
- SQL Server 索引和视图【转】
Ø 索引 1. 什么是索引 索引就是数据表中数据和相应的存储位置的列表,利用索引可以提高在表或视图中的查找数据的速度. 2. 索引分类 数据库中索引主要分为两类:聚集索引和非聚集索引.SQL Serv ...
- iOS-UI控件精讲之UIView
道虽迩,不行不至:事虽小,不为不成. 相关阅读 1.iOS-UI控件精讲之UIView(本文) 2.iOS-UI控件精讲之UILabel ...待续 UIView是所有UI控件的基类,在布局的时候通常 ...
- 利用SpringMVC参数绑定实现动态插入数据
javabean代码:public class User { private String firstName; private String lastName; public String getF ...
- C++ 虚函数与纯虚函数
#include<iostream> #include<string> using namespace std; class A{ public: virtual void f ...