
仿喜马拉雅实现ListView添加头布局和脚布局
ListView添加头布局和脚布局
之前学习喜马拉雅的时候做的一个小Demo,贴出来,供大家学习参考;
如果我们当前的页面有多个接口、多种布局的话,我们一般的选择无非就是1、多布局;2、各种复杂滑动布局外面套一层ScrollView(好low);3、头布局脚布局。有的时候我们用多布局并不能很好的实现,所以头布局跟脚布局就是我们最好的选择了;学过了ListView的话原理很简单,没啥理解的东西,直接贴代码了:
效果图:
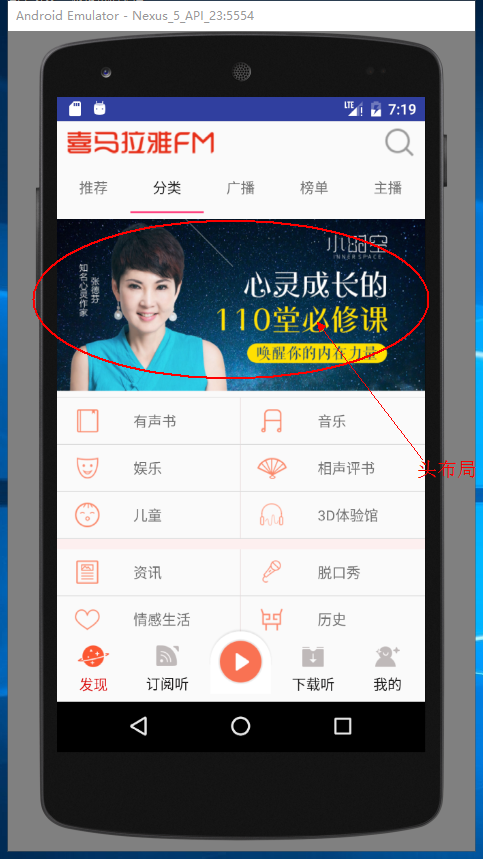
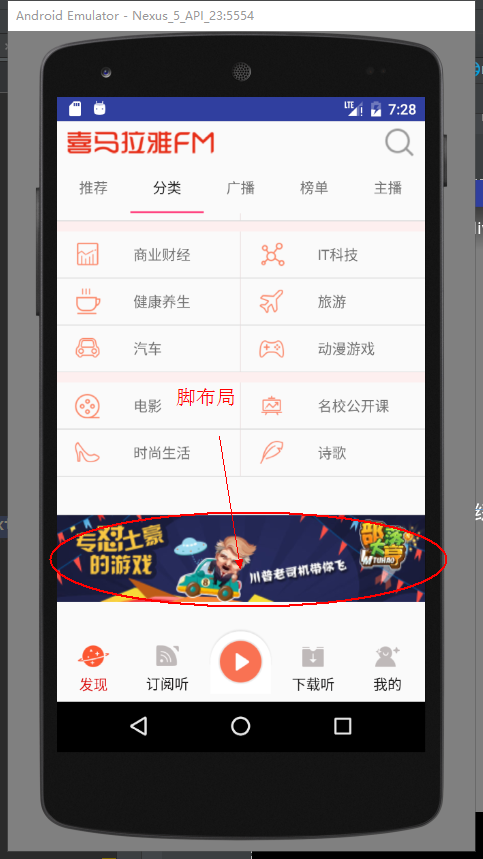
正文部分布局:
fragment_classify.xml
<?xml version="1.0" encoding="utf-8"?>

<LinearLayout xmlns:android="http://schemas.android.com/apk/res/android"

    android:orientation="vertical" android:layout_width="match_parent"

    android:layout_height="match_parent">

    <ListView

        android:id="@+id/teach_classify_listview"

        android:layout_width="match_parent"

        android:layout_height="match_parent"

        android:listSelector="#00000000"/>

</LinearLayout>
classify_item.xml
<?xml version="1.0" encoding="utf-8"?>

<LinearLayout xmlns:android="http://schemas.android.com/apk/res/android"

    android:layout_width="match_parent"

    android:layout_height="match_parent"

    android:orientation="vertical">

    <View

        android:id="@+id/teach_classify_item_divider"

        android:background="#f3fdeeee"

        android:layout_width="match_parent"

        android:layout_height="10dp"/>

    <LinearLayout

        android:layout_width="match_parent"

        android:layout_height="match_parent"

        android:orientation="horizontal">

        <RelativeLayout

            android:id="@+id/teach_classify_left"

            android:layout_width="0dp"

            android:background="@drawable/item_pressed"

            android:layout_height="match_parent"

            android:layout_marginLeft="15dp"

            android:layout_weight="1">

            <ImageView

                android:id="@+id/teach_classify_item_iamge01"

                android:layout_width="30dp"

                android:layout_height="30dp"

                android:layout_centerVertical="true"

                android:src="@mipmap/ic_launcher" />

            <TextView

                android:id="@+id/teach_classify_item_text01"

                android:layout_width="match_parent"

                android:layout_height="45dp"

                android:layout_centerVertical="true"

                android:layout_marginLeft="60dp"

                android:gravity="center_vertical"

                android:text="@string/app_name" />

        </RelativeLayout>

        <View

            android:layout_width="1dp"

            android:layout_height="match_parent"

            android:background="#efe6e6" />

        <RelativeLayout

            android:id="@+id/teach_classify_right"

            android:layout_width="0dp"

            android:background="@drawable/item_pressed"

            android:layout_height="match_parent"

            android:layout_marginLeft="15dp"

            android:layout_weight="1">

            <ImageView

                android:id="@+id/teach_classify_item_iamge02"

                android:layout_width="30dp"

                android:layout_height="30dp"

                android:layout_centerVertical="true"

                android:src="@mipmap/ic_launcher" />

            <TextView

                android:id="@+id/teach_classify_item_text02"

                android:layout_width="match_parent"

                android:layout_height="45dp"

                android:layout_centerVertical="true"

                android:layout_marginLeft="60dp"

                android:gravity="center_vertical"

                android:text="@string/app_name" />

        </RelativeLayout>

    </LinearLayout>

</LinearLayout>
头布局:
fragment_classify_header.xml
<?xml version="1.0" encoding="utf-8"?>

<LinearLayout xmlns:android="http://schemas.android.com/apk/res/android"

    android:orientation="vertical" android:layout_width="match_parent"

    android:layout_height="match_parent">

    <ImageView

        android:id="@+id/teach_classify_lv_header"

        android:src="@mipmap/ic_launcher"

        android:layout_width="match_parent"

        android:layout_height="180dp" />

</LinearLayout>
脚布局:
fragment_classify_bottom.xml
<?xml version="1.0" encoding="utf-8"?>

<LinearLayout xmlns:android="http://schemas.android.com/apk/res/android"

    android:orientation="vertical"       android:layout_width="match_parent"

    android:layout_height="match_parent">

    <ImageView

        android:id="@+id/teach_classify_bottom"

        android:src="@mipmap/ic_launcher"

        android:layout_width="match_parent"

        android:layout_height="160dp" />

</LinearLayout>
主页面:
public class ClassifyFragment extends BaseFragment implements ClassifyAdapter.OnClickItemListener{

    public static final String TAG = ClassifyFragment.class.getSimpleName();

    private ListView mListView;

    private ClassifyAdapter adapter;

    private ImageView mHeaderImage;

    private ImageView mBottomImage;

    @Nullable

    @Override

    public View onCreateView(LayoutInflater inflater, @Nullable ViewGroup container, @Nullable Bundle savedInstanceState) {

        layout = inflater.inflate(R.layout.fragment_classify, container, false);

        return layout;

    }

    @Override

    public void onActivityCreated(@Nullable Bundle savedInstanceState) {

        super.onActivityCreated(savedInstanceState);

        initView();

        setupView();

    }

    /**

     * Header的添加最好放在setAdapter之前,在Android4.4之前,Header添加必须放在设置Adapter之前

     */

    private void initView() {

        mListView = ((ListView) layout.findViewById(R.id.teach_classify_listview));

        //header

        View headerView = LayoutInflater.from(getActivity()).inflate(R.layout.fragment_classify_header,null);

        mHeaderImage = ((ImageView) headerView.findViewById(R.id.teach_classify_lv_header));

        //可以添加多个HeaderView

        mListView.addHeaderView(headerView);

        //bottom

        View bottomView = LayoutInflater.from(getActivity()).inflate(R.layout.fragment_classify_bottom,null);

        mBottomImage = ((ImageView) bottomView.findViewById(R.id.teach_classify_bottom));

        mListView.addFooterView(bottomView);

        adapter = new ClassifyAdapter(getActivity(), null);

        mListView.setAdapter(adapter);

    }

    /**

     * 网络请求

     */

    private void setupView() {

        HttpUtil.getStringAsync(HttpConstant.CLASSIFY_URL, new HttpUtil.RequestCallBack() {

            @Override

            public void onFailure() {

                Log.e(TAG, "onFailure: ");

            }

            @Override

            public void onSuccess(String result) {

                Log.e(TAG, "onSuccess: " + result);

                Gson gson = new Gson();

                ClassifyList classifyList = gson.fromJson(result, ClassifyList.class);

                List<Classify> list = classifyList.getList();

                //更新适配器

                adapter.updateRes(list);

                //更新Header

                ImageLoader.display(mHeaderImage,list.get(0).getCoverPath());

            }

            @Override

            public void onFinish() {

                Log.e(TAG, "onFinish: ");

            }

        });

        String URL_BOTTOM="http://adse.ximalaya.com/ting?device=android&name=cata_index_banner&network=wifi&operator=0&version=4.3.98";

        HttpUtil.getStringAsync(URL_BOTTOM, new HttpUtil.RequestCallBack() {

            @Override

            public void onFailure() {

            }

            @Override

            public void onSuccess(String result) {

                Gson gson = new Gson();

                ClassifyBottomList classifyBottomList = gson.fromJson(result, ClassifyBottomList.class);

                ImageLoader.display(mBottomImage, classifyBottomList.getData().get(0).getCover());

            }

            @Override

            public void onFinish() {

            }

        });

    }

    @Override

    public void onOnclickItem(int position) {

        Log.e(TAG, "onOnclickItem:------------- "+position );

    }

}
适配器:
public class ClassifyAdapter extends BaseAdapter implements View.OnClickListener {

    private static final String TAG = ClassifyAdapter.class.getSimpleName();

    private List<Classify> data;

    private LayoutInflater inflater;

    private OnClickItemListener listener;//持有接口

    public void setListener(OnClickItemListener listener){

            this.listener=listener;

    }

    public ClassifyAdapter(Context context,List<Classify>data) {

        inflater= (LayoutInflater) context.getSystemService(Context.LAYOUT_INFLATER_SERVICE);

        if (data!=null) {

            this.data=data;

        }

        else {

            this.data=new ArrayList<>();

        }

    }

    public void updateRes(List<Classify> data){

        if (data!=null) {

            this.data.clear();

            this.data.addAll(data);

            notifyDataSetChanged();

        }

    }

    @Override

    public int getCount() {

        int count=0;

        if (data!=null) {

            count=(data.size()-1)/2;

        }

        return count;

    }

    @Override

    public Classify getItem(int position) {

        return data.get(position);

    }

    @Override

    public long getItemId(int position) {

        return position;

    }

    @Override

    public View getView(int position, View convertView, ViewGroup parent) {

        ViewHolder holder=null;

        if (convertView==null) {

            convertView=inflater.inflate(R.layout.classify_item,parent,false);

            holder=new ViewHolder();

            holder.itemIamge01= (ImageView) convertView.findViewById(R.id.teach_classify_item_iamge01);

            holder.itemImage02= (ImageView) convertView.findViewById(R.id.teach_classify_item_iamge02);

            holder.itemText01= (TextView) convertView.findViewById(R.id.teach_classify_item_text01);

            holder.itemText02= (TextView) convertView.findViewById(R.id.teach_classify_item_text02);

            holder.topDivider=convertView.findViewById(R.id.teach_classify_item_divider);

            holder.leftItem=convertView.findViewById(R.id.teach_classify_left);

            holder.rightItem=convertView.findViewById(R.id.teach_classify_right);

            convertView.setTag(holder);

        }

        else {

            holder= (ViewHolder) convertView.getTag();

        }

        //根据条件判断是否显示分割线

        if (position%3==0&&position!=0) {

            holder.topDivider.setVisibility(View.VISIBLE);

        }else {

            holder.topDivider.setVisibility(View.GONE);

        }

        //加载数据

        holder.itemText01.setText(data.get(position*2+1).getTitle());

        holder.itemText02.setText(data.get(position*2+2).getTitle());

        //设置监听

        holder.leftItem.setOnClickListener(this);

        holder.rightItem.setOnClickListener(this);

        //设置标记

        holder.leftItem.setTag(position*2+1);

        holder.rightItem.setTag(position*2+2);

        //加载图片

        ImageLoader.display(holder.itemIamge01,data.get(position*2+1).getCoverPath());

        ImageLoader.display(holder.itemImage02,data.get(position*2+2).getCoverPath());

        return convertView;

    }

    @Override

    public void onClick(View v) {

        Integer position = (Integer) v.getTag();

        Log.e(TAG, "onClick: "+position );

        if (listener!=null) {

            listener.onOnclickItem(position);

        }

    }

    private static class ViewHolder{

        //左边的图片

        ImageView itemIamge01;

        //右边的图片

        ImageView itemImage02;

        //右边

        TextView itemText01;

        TextView itemText02;

        //分割线

        View topDivider;

        //左右布局

        View leftItem,rightItem;

    }

    public interface OnClickItemListener{

        void onOnclickItem(int position);

    }

}
model类:
public class Classify {

    private String title;

    private String coverPath;

    public String getTitle() {

        return title;

    }

    public void setTitle(String title) {

        this.title = title;

    }

    public String getCoverPath() {

        return coverPath;

    }

    public void setCoverPath(String coverPath) {

        this.coverPath = coverPath;

    }

}
public class ClassifyList {

    private List<Classify> list;

    public List<Classify> getList() {

        return list;

    }

    public void setList(List<Classify> list) {

        this.list = list;

    }

}
public class ClassifyBottom {

    private String cover;

    public String getCover() {

        return cover;

    }

    public void setCover(String cover) {

        this.cover = cover;

    }

}
public class ClassifyBottomList {

    private List<ClassifyBottom> data;

    public List<ClassifyBottom> getData() {

        return data;

    }

    public void setData(List<ClassifyBottom> data) {

        this.data = data;

    }

}
仿喜马拉雅实现ListView添加头布局和脚布局的更多相关文章
- 为ListView添加头和脚
转自:https://software.intel.com/zh-cn/blogs/2014/12/15/android-listview-addheaderview-addfooterview ...
- android 项目学习随笔九(ListView加头布局)
1.缓冲背景色 <ListView android:id="@+id/lv_list" android:layout_width="match_parent&quo ...
- android 项目学习随笔十二(ListView加脚布局)
1.ListView加脚布局 头布局initHeaderView,在onTouchEvent事件中进行显示隐藏头布局切换 脚布局initFooterView,实现接口OnScrollListener, ...
- 手把手教你给RecycleView添加头布局和尾布局
RecycleView想必大家都不陌生,它已他的高拓展性取代了传统布局显示,同时配合协调布局,可以实现很多意想不到的酷炫交互,今天就和大家介绍一下,如何给RecycleView添加头布局和尾布局,同时 ...
- Recyclerview添加头布局和尾布局,点击效果
简介: 本篇博客主要包括recyclerview添加多种布局以及添加头布局和尾布局,还有item点击事件 思路: 主要重写Recyclerview.Adapter中的一些方法 1.public int ...
- Android开发之ListView添加多种布局效果演示
在这个案例中展示的新闻列表,使用到ListView控件,然后在适配器中添加多种布局效果,这里通过重写BaseAdapter类中的 getViewType()和getItemViewType()来做判断 ...
- GridView不能添加头布局,并且scrollView与GridView冲突导致一些页面无法融合
此贴为标记贴 方便下次使用 在项目需求中原本是用ScrollView来进行整个页面的滑动,ScrollView里面包含的有图片轮播,文字轮播,与2列GridView的item 问题 使用原生的Grid ...
- Android开发3:Intent、Bundle的使用和ListView的应用 、RelativeLayout(相对布局)简述(简单通讯录的实现)
前言 啦啦啦~博主又来骚扰大家啦~大家是不是感觉上次的Android开发博文有点长呢~主要是因为博主也是小白,在做实验的过程中查询了很多很多概念,努力去理解每一个知识点,才完成了最终的实验.还有就是随 ...
- Android ListView相关 头和尾 headView footerView
ListView还可以添加头和尾部,而这头和尾就是View对象, 可以使用listView.addHeadView(view)方法和listView.addFootView(view)方法分别添加头和 ...
随机推荐
- 使用C#给Linux写Shell脚本
在这个逼格决定人格,鄙视链盛行的年头,尤其是咱们IT界,请问您今天鄙视与被鄙视的次数分别是多少?如果手中没有一点压箱的本事,那就只有看的份了.今天我们也要提升下自己的格调,学习些脑洞大开的东西,学完之 ...
- .Net中的AOP系列之《间接调用——拦截方法》
返回<.Net中的AOP>系列学习总目录 本篇目录 方法拦截 PostSharp方法拦截 Castle DynamicProxy方法拦截 现实案例--数据事务 现实案例--线程 .Net线 ...
- SSH免密码登录
每次用SSH登录服务器都要输入密码,次数多了就觉得有些麻烦,反正是自己个人用的电脑,安全应该有保障,如何能直接登录上去而不需要输入密码呢?其实一句话就讲清楚了:把自己公钥放在服务器上. Linux客户 ...
- Windows10自适应和交互式toast通知[1]
阅读目录: 概述 toast通知的结构 视觉区域(Visual) 行为(Actions) 特定场景下的Toast通知 带多内容的通知 带行为的通知(例子1) 带行为的通知(例子2) 带文本输入框和行为 ...
- PropertyGrid控件由浅入深(二):基础用法
目录 PropertyGrid控件由浅入深(一):文章大纲 PropertyGrid控件由浅入深(二):基础用法 控件的外观构成 控件的外观构成如下图所示: PropertyGrid控件包含以下几个要 ...
- JavaScript随笔2
JavaScript的组成:ECMA.DOM.BOM闭包,子函数可以使用父函数的局部变量 函数:arguments是个参数数组oDiv.style.width:只能操作行间的样式.在IE下oDiv.c ...
- 使用topshelf包装redis为windows服务
Redis服务端目前用的是控制台程序运行,部署的时候能作为windows服务后台运行感觉更好.找到一篇文章Running Redis as a Windows Service,利用win ...
- CSS系列目录
1. 在HTML中引入CSS的方法 2. CSS选择器 2.1 CSS3新增选择器 3. CSS的继承与层叠特性 4. CSS中盒子模型 5. CSS中盒子之间的关系 6. CSS中盒子的 ...
- 基本数据结构(2)——算法导论(12)
1. 引言 这一篇博文主要介绍链表(linked list),指针和对象的实现,以及有根树的表示. 2. 链表(linked list) (1) 链表介绍 我们在上一篇中提过,栈与队 ...
- Handler系列之内存泄漏
本篇简单的讲一下平常使用Handler时造成内存泄漏的问题. 什么是内存泄漏?大白话讲就是分配出去的内存,回收不回来.严重会导致内存不足OOM.下面来看一下造成内存泄漏的代码: public clas ...