
SpringMVC深入理解
核心类与接口
- DispatcherServlet 前置控制器
- HandlerMapping 请求映射(到Controller)
- HandlerAdapter 请求映射(到Controller类的方法上)
- Controller 控制器
- HandlerIntercepter 拦截器
- ViewResolver 视图映射
- View 视图处理
启动过程
Spring MVC启动过程大致分为两个过程:
- ContextLoaderListener初始化,读取context-param中的contextConfigLocation指定的配置文件,创建ROOT Context,通过调用继承自ContextLoader的initWebApplicationContext方法实例化Spring IoC容器,并将此容器实例注册到ServletContext中
- ContextLoaderListener初始化完毕后,开始初始化web.xml中配置的DispatcherServlet,DispatcherServlet的初始化又包括了视图管理器、异常处理器、映射管理等等;
    /**

      * Initialize the strategy objects that this servlet uses.

      * <p>May be overridden in subclasses in order to initialize further strategy objects.

      */

     protected void initStrategies(ApplicationContext context) {

         initMultipartResolver(context);

         initLocaleResolver(context);

         initThemeResolver(context);

         initHandlerMappings(context);

         initHandlerAdapters(context);

         initHandlerExceptionResolvers(context);

         initRequestToViewNameTranslator(context);

         initViewResolvers(context);

         initFlashMapManager(context);

     }
ContextLoaderListener初始化的是 WebApplicationContext, 创建后可以从ServletContext中获取,WebApplicationContext是应用程序内共享的,最多只有一个,如果寻求简单也可以不初始化此容器。与之不同 DispatcherServlet可以有多个,并共享一个WebApplicationContext容器,每一个DispatcherServlet有不同的配置,控制不同的WEB访问。一般将 DAO、Service 层Bean共享的放在ContextLoaderListener配置的容器中,将WEB层的Bean放在特定的DispatcherServlet配置的容器中。
SpringMVC利用Spring的注入特性初始化资源文件,只需要调用setPropertyValues方法就可将contextConfigLocation属性设置到对应实例中,也就是以依赖注入的方式初始化属性。
时序图如下(盗图):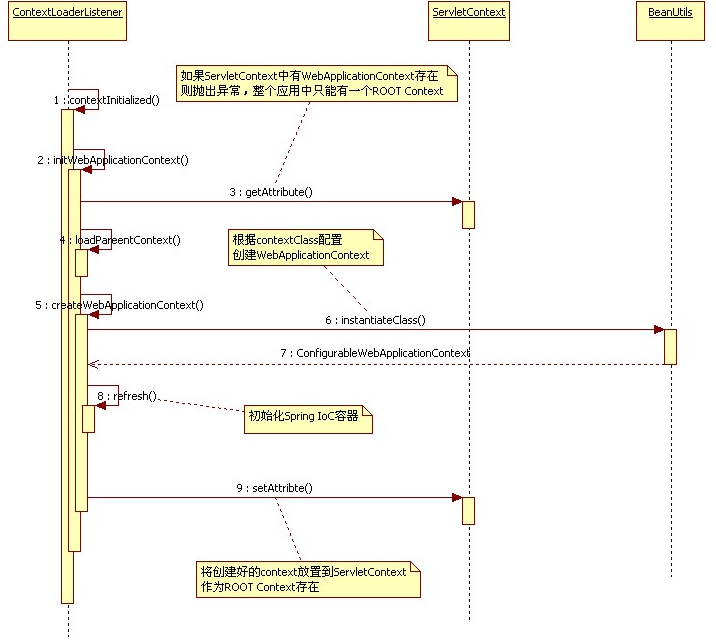
请求处理流程
官网上的图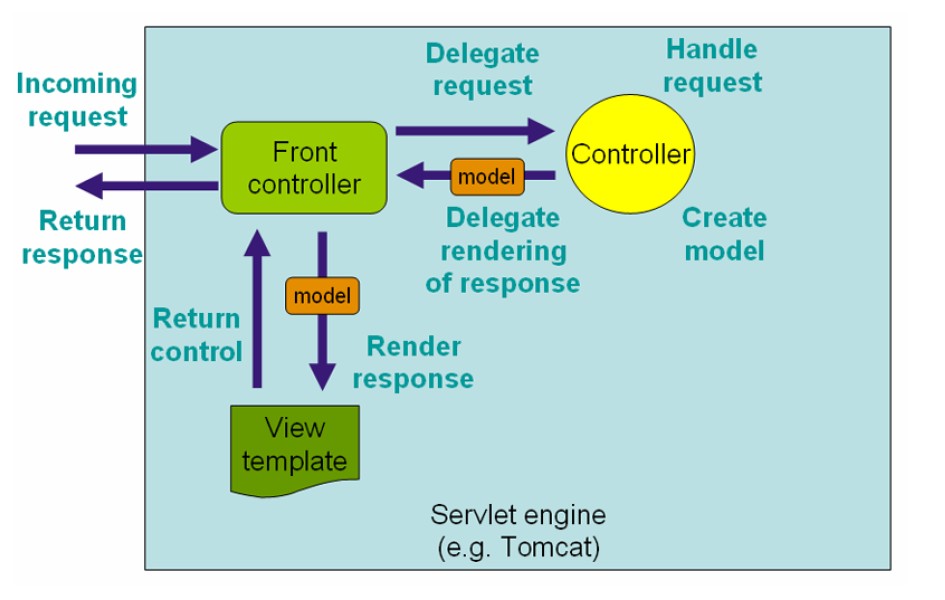
涉及到核心类与接口的过程描述:
客户端浏览器发送http请求,被`DispatcherServlet`捕获,调用关键的doDispatch方法,遍历所有注册为`Controller`的bean,为请求寻找关联映射,其中遍历查找的函数getHandler和getHandlerAdapter的源码:
 /**

      * Return the HandlerExecutionChain for this request.

      * <p>Tries all handler mappings in order.

      * @param request current HTTP request

      * @return the HandlerExecutionChain, or {@code null} if no handler could be found

      */

     protected HandlerExecutionChain getHandler(HttpServletRequest request) throws Exception {

         for (HandlerMapping hm : this.handlerMappings) {

             if (logger.isTraceEnabled()) {

                 logger.trace(

                         "Testing handler map [" + hm + "] in DispatcherServlet with name '" + getServletName() + "'");

             }

             HandlerExecutionChain handler = hm.getHandler(request);

             if (handler != null) {

                 return handler;

             }

         }

         return null;

     }

     /**

      * Return the HandlerAdapter for this handler object.

      * @param handler the handler object to find an adapter for

      * @throws ServletException if no HandlerAdapter can be found for the handler. This is a fatal error.

      */

     protected HandlerAdapter getHandlerAdapter(Object handler) throws ServletException {

         for (HandlerAdapter ha : this.handlerAdapters) {

             if (logger.isTraceEnabled()) {

                 logger.trace("Testing handler adapter [" + ha + "]");

             }

             if (ha.supports(handler)) {

                 return ha;

             }

         }

         throw new ServletException("No adapter for handler [" + handler +

                 "]: The DispatcherServlet configuration needs to include a HandlerAdapter that supports this handler");

     }
找到匹配的映射后`HandlerAdapter`会依次调用preHandle、handle(返回ModelAndView)、postHandle方法,所有步骤完成后调用processDispatchResult函数处理结果,并返回View给客户端。postDispatchResult函数和其中调用的render函数源码如下:
 /**

      * Handle the result of handler selection and handler invocation, which is

      * either a ModelAndView or an Exception to be resolved to a ModelAndView.

      */

     private void processDispatchResult(HttpServletRequest request, HttpServletResponse response,

             HandlerExecutionChain mappedHandler, ModelAndView mv, Exception exception) throws Exception {

         boolean errorView = false;

         if (exception != null) {

             if (exception instanceof ModelAndViewDefiningException) {

                 logger.debug("ModelAndViewDefiningException encountered", exception);

                 mv = ((ModelAndViewDefiningException) exception).getModelAndView();

             }

             else {

                 Object handler = (mappedHandler != null ? mappedHandler.getHandler() : null);

                 mv = processHandlerException(request, response, handler, exception);

                 errorView = (mv != null);

             }

         }

         // Did the handler return a view to render?

         if (mv != null && !mv.wasCleared()) {

             render(mv, request, response);

             if (errorView) {

                 WebUtils.clearErrorRequestAttributes(request);

             }

         }

         else {

             if (logger.isDebugEnabled()) {

                 logger.debug("Null ModelAndView returned to DispatcherServlet with name '" + getServletName() +

                         "': assuming HandlerAdapter completed request handling");

             }

         }

         if (WebAsyncUtils.getAsyncManager(request).isConcurrentHandlingStarted()) {

             // Concurrent handling started during a forward

             return;

         }

         if (mappedHandler != null) {

             mappedHandler.triggerAfterCompletion(request, response, null);

         }

     }

     /**

      * Render the given ModelAndView.

      * <p>This is the last stage in handling a request. It may involve resolving the view by name.

      * @param mv the ModelAndView to render

      * @param request current HTTP servlet request

      * @param response current HTTP servlet response

      * @throws ServletException if view is missing or cannot be resolved

      * @throws Exception if there's a problem rendering the view

      */

     protected void render(ModelAndView mv, HttpServletRequest request, HttpServletResponse response) throws Exception {

         // Determine locale for request and apply it to the response.

         Locale locale = this.localeResolver.resolveLocale(request);

         response.setLocale(locale);

         View view;

         if (mv.isReference()) {

             // We need to resolve the view name.

             view = resolveViewName(mv.getViewName(), mv.getModelInternal(), locale, request);

             if (view == null) {

                 throw new ServletException("Could not resolve view with name '" + mv.getViewName() +

                         "' in servlet with name '" + getServletName() + "'");

             }

         }

         else {

             // No need to lookup: the ModelAndView object contains the actual View object.

             view = mv.getView();

             if (view == null) {

                 throw new ServletException("ModelAndView [" + mv + "] neither contains a view name nor a " +

                         "View object in servlet with name '" + getServletName() + "'");

             }

         }

         // Delegate to the View object for rendering.

         if (logger.isDebugEnabled()) {

             logger.debug("Rendering view [" + view + "] in DispatcherServlet with name '" + getServletName() + "'");

         }

         try {

             if (mv.getStatus() != null) {

                 response.setStatus(mv.getStatus().value());

             }

             view.render(mv.getModelInternal(), request, response);

         }

         catch (Exception ex) {

             if (logger.isDebugEnabled()) {

                 logger.debug("Error rendering view [" + view + "] in DispatcherServlet with name '" +

                         getServletName() + "'", ex);

             }

             throw ex;

         }

     }
这就是一个完整的处理http请求的过程。盗图一张: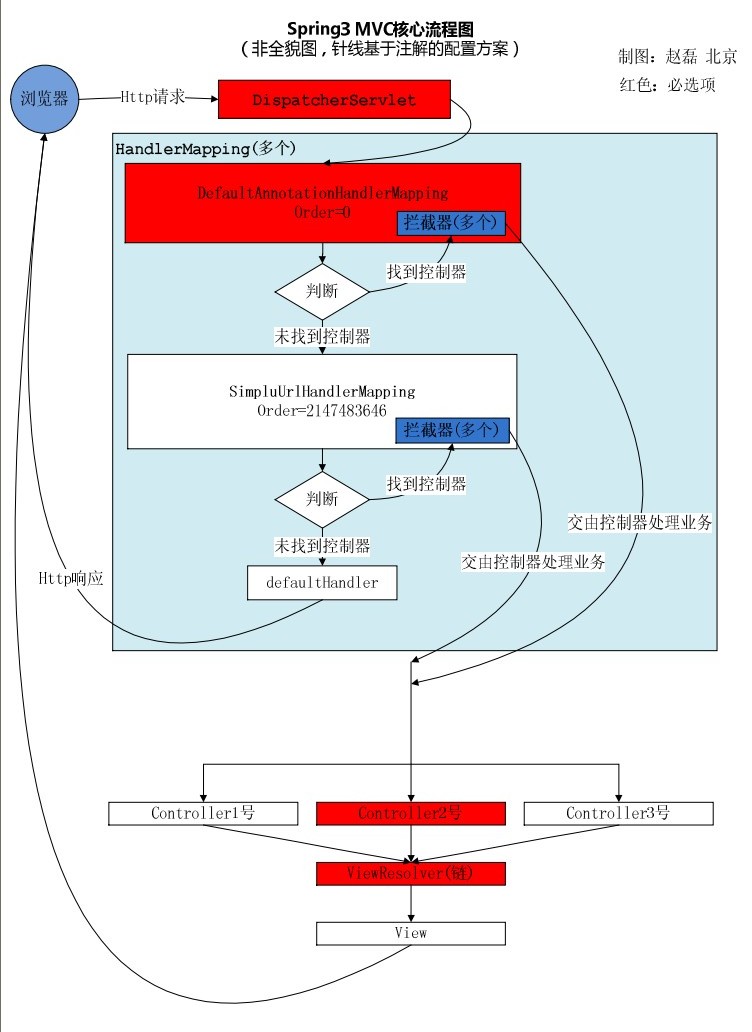
时序图如下(来源:http://neoremind.com/2016/02/springmvc%E7%9A%84%E4%B8%80%E4%BA%9B%E5%B8%B8%E7%94%A8%E6%9C%80%E4%BD%B3%E5%AE%9E%E8%B7%B5/):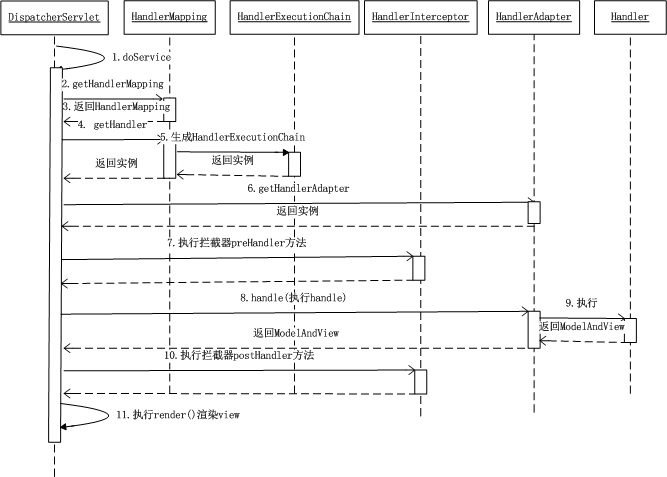
配置实例
这里放的是最简单的配置,可以通过这个简单的配置实例回顾一下上面的过程。
目录结构
-SpringMVCDemo
-src
-me.cyan
-WelcomeController
-web
-WEB-INF
-applicationContext.xml
-dispatcher-servlet.xml
-web.xml
-index.jsp
-pom.xml
pom.xml
引入的包
 <?xml version="1.0" encoding="UTF-8"?>

 <project xmlns="http://maven.apache.org/POM/4.0.0" xmlns:xsi="http://www.w3.org/2001/XMLSchema-instance"

          xsi:schemaLocation="http://maven.apache.org/POM/4.0.0 http://maven.apache.org/maven-v4_0_0.xsd">

     <modelVersion>4.0.0</modelVersion>

     <groupId>me.cyan</groupId>

     <artifactId>SpringMVCDemo</artifactId>

     <name>SpringMVCDemo</name>

     <packaging>war</packaging>

     <version>1.0.0</version>

     <properties>

         <spring-version>4.2.6.RELEASE</spring-version>

     </properties>

     <dependencies>

         <dependency>

             <groupId>org.springframework</groupId>

             <artifactId>spring-context</artifactId>

             <version>${spring-version}</version>

         </dependency>

         <dependency>

             <groupId>org.springframework</groupId>

             <artifactId>spring-core</artifactId>

             <version>${spring-version}</version>

         </dependency>

         <dependency>

             <groupId>org.springframework</groupId>

             <artifactId>spring-web</artifactId>

             <version>${spring-version}</version>

         </dependency>

         <dependency>

             <groupId>org.springframework</groupId>

             <artifactId>spring-beans</artifactId>

             <version>${spring-version}</version>

         </dependency>

         <dependency>

             <groupId>commons-logging</groupId>

             <artifactId>commons-logging</artifactId>

             <version>1.2</version>

         </dependency>

         <dependency>

             <groupId>org.springframework</groupId>

             <artifactId>spring-webmvc</artifactId>

             <version>${spring-version}</version>

         </dependency>

         <dependency>

             <groupId>org.springframework</groupId>

             <artifactId>spring-aop</artifactId>

             <version>${spring-version}</version>

         </dependency>

         <dependency>

             <groupId>org.springframework</groupId>

             <artifactId>spring-expression</artifactId>

             <version>${spring-version}</version>

         </dependency>

     </dependencies>

 </project>
web.xml
 <?xml version="1.0" encoding="UTF-8"?>

 <web-app xmlns="http://xmlns.jcp.org/xml/ns/javaee"

          xmlns:xsi="http://www.w3.org/2001/XMLSchema-instance"

          xsi:schemaLocation="http://xmlns.jcp.org/xml/ns/javaee http://xmlns.jcp.org/xml/ns/javaee/web-app_3_1.xsd"

          version="3.1">

     <!--配置文件路径-->

     <context-param>

         <param-name>contextConfigLocation</param-name>

         <param-value>/WEB-INF/applicationContext.xml</param-value>

     </context-param>

     <listener>

         <listener-class>org.springframework.web.context.ContextLoaderListener</listener-class>

     </listener>

     <!--SpringMVC核心servlet-->

     <servlet>

         <servlet-name>dispatcher</servlet-name>

         <servlet-class>org.springframework.web.servlet.DispatcherServlet</servlet-class>

         <load-on-startup>1</load-on-startup>

     </servlet>

     <servlet-mapping>

         <servlet-name>dispatcher</servlet-name>

         <url-pattern>/</url-pattern>

     </servlet-mapping>

 </web-app>
dispatcher-servlet.xml
 <?xml version="1.0" encoding="UTF-8"?>

 <beans xmlns="http://www.springframework.org/schema/beans"

        xmlns:xsi="http://www.w3.org/2001/XMLSchema-instance" xmlns:mvc="http://www.springframework.org/schema/mvc"

        xmlns:context="http://www.springframework.org/schema/context"

        xsi:schemaLocation="http://www.springframework.org/schema/beans http://www.springframework.org/schema/beans/spring-beans.xsd http://www.springframework.org/schema/mvc http://www.springframework.org/schema/mvc/spring-mvc.xsd http://www.springframework.org/schema/context http://www.springframework.org/schema/context/spring-context.xsd">

     <!-- 默认的注解映射的支持 -->

     <mvc:annotation-driven />

     <!-- 自动扫描的包名 -->

     <context:component-scan base-package="me.cyan" />

 </beans>
WelcomeController
 package me.cyan;

 import org.springframework.stereotype.Controller;

 import org.springframework.web.bind.annotation.RequestMapping;

 import org.springframework.web.bind.annotation.ResponseBody;

 /**

  * Created by cyan on 16/5/23.

  */

 @Controller

 public class welcomeController {

     @RequestMapping("/hello")

     public @ResponseBody String sayhello(){

         return "hello Spring MVC!";

     }

 }
运行结果
SpringMVC深入理解的更多相关文章
- 【Spring源码解析】—— 结合SpringMVC过程理解IOC容器初始化
关于IOC容器的初始化,结合之前SpringMVC的demo,对其过程进行一个相对详细的梳理,主要分为几个部分: 一.IOC的初始化过程,结合代码和debug过程重点说明 1. 为什么要debug? ...
- springMVC新理解
springmvc 中@Controller和@RestController的区别 1. Controller, RestController的共同点 都是用来表示spring某个类的是否可以接收HT ...
- 使用mybatis多表联查的时候结果异常及springmvc的理解
今天使用mybatis多表联查的时候,在dos窗口查询时可以出结果集,但是使用mybatis查询的时候最后返回的结果只有最后一个结果 然后研究了半天没弄出来,后来无意中发现添加了最外层从表的ID字段后 ...
- 对Spring与SpringMVC的理解
Spring 在我的Spring --简介及环境搭建跑通Hello提到关于Spring的基本结构与功能 SpringMVC 先上一张SpringMVC的流程图 Spring MVC 是一个模型 - 视 ...
- SSM-SpringMVC-04:SpringMVC深入浅出理解HandleMapping(源码刨析)
------------吾亦无他,唯手熟尔,谦卑若愚,好学若饥------------- 先从概念理解,从中央调度器,携带参数request,调度到HandleMapping处理器映射器,处理器映射器 ...
- SpringMVC的理解
SpringMVC工作原理 SpringMvc是基于过滤器对servlet进行了封装的一个框架,我们使用的时候就是在web.xml文件中配置DispatcherServlet类:SpringMvc工作 ...
- 对Spring 及SpringMVC的理解
spring是一个轻型容器(light-weight Container),其核心是Bean工厂(Bean Factory),用以构造我们所需要的M(Model).在此基础之上,Spring提供了AO ...
- Spring SpringMVC myBatis(简称SSM)理解
1对Spring的理解 (1)spring是什么? spring是Java SE(Java 标准版本)/Java EE(Java 企业版本)开发应用框架. (2)spring的作用 (a)spring ...
- SpringMVC学习
1,对SpringMVC的理解 a,基于MVC的设计理念 b,采用松散耦合可插拔组件结构,比其他MVC框架更具扩展性和灵活性 c,支持REST风格的URL请求 d,该框架围绕DispatcherSer ...
随机推荐
- Linux网络管理——Linux网络命令
3. Linux网络命令 .note-content {font-family: "Helvetica Neue",Arial,"Hiragino Sans GB&quo ...
- js创建对象的几种常用方式小结
第一种模式:工厂方式 var lev=function(){ return "666"; }; function Parent(){ var Child = new Object ...
- 在windows 8.1 64位配置python和opencv
之前在linux下安装python和opencv及相关的库,都可以直接命令行操作.最近需要在windows下配置一下,查了一些资料,发现网上有很多关于python和opencv的配置,但由于不同版本问 ...
- ThinkPHP中使用ajax接收json数据的方法
本文实例讲述了ThinkPHP中使用ajax接收json数据的方法.分享给大家供大家参考.具体分析如下: 这里通过ThinkPHP+jquery实现ajax,扩展了下,写了个查询,前台代码如下: 首先 ...
- Ubuntu 下开发环境的常规配置。
Install Chinese input (for Chinese peers) We Choose the Sougou pinying.(搜狗) $ sudo apt-get install g ...
- LA 5966 Blade and Sword (双向bfs + 想法) - from lanshui_Yang
题目大意:给你一张有n * m个网格的图,每个网格可能是如下符号: “#”:墙 “P”:出发点 “D”:终点 “.”:空地 “*”:传送机 有一个旅行家(假设名叫Mike),他要从点P到达点D,途中必 ...
- 在Mac上配置Apache+PHP环境
1.启用Apache/Web共享 打开终端,运行启动Apache命令: sudo apachectl start 然后输入系统密码,运行成功. 关闭命令: sudo apachectl stop 重启 ...
- Android4.0设置界面改动总结(三)
Android4.0设置界面改动总结大概介绍了一下设置改tab风格,事实上原理非常easy,理解两个基本的函数就可以: ①.invalidateHeaders(),调用此函数将又一次调用onBuild ...
- Effective JavaScript Item 36 实例状态仅仅保存在实例对象上
本系列作为EffectiveJavaScript的读书笔记. 一个类型的prototype和该类型的实例之间是"一对多"的关系.那么,须要确保实例相关的数据不会被错误地保存在pro ...
- 精简JRE的思路初探
引言: JRE是Java程序赖以执行的基础环境,眼下JRE已经很的庞大;即使为了执行一个简单的Hello World的程序.可能依旧须要依赖整个JRE,将近百兆大小的依赖性. 能否够对特定Java程序 ...