
CentOS 7.2配置Apache服务httpd(上)
http://www.jb51.net/article/97434.htm
二、安装Apache httpd
安装httpd以配置Web服务器, HTTP使用80 / TCP
|
1
2
3
4
5
6
7
8
9
10
11
12
13
14
15
16
17
18
19
20
21
22
23
24
25
26
27
28
29
30
31
32
33
34
35
|
[1] 安装 httpd.[root@linuxprobe ~]# yum -y install httpd# 删除默认欢迎页面[root@linuxprobe ~]# rm -f /etc/httpd/conf.d/welcome.conf[2] 配置httpd,将服务器名称替换为您自己的环境[root@linuxprobe ~]# vi /etc/httpd/conf/httpd.conf# line 86: 改变管理员的邮箱地址ServerAdmin root@linuxprobe.org# line 95: 改变域名信息ServerName www.linuxprobe.org:80# line 151: none变成AllAllowOverride All# line 164: 添加只能使用目录名称访问的文件名DirectoryIndex index.html index.cgi index.php# add follows to the end# server's response header(安全性)ServerTokens Prod# keepalive is ONKeepAlive On[root@linuxprobe ~]# systemctl start httpd[root@linuxprobe ~]# systemctl enable httpd[3] 如果Firewalld正在运行,请允许HTTP服务。,HTTP使用80 / TCP[root@linuxprobe ~]# firewall-cmd --add-service=http --permanentsuccess[root@linuxprobe ~]# firewall-cmd --reloadsuccess[4] 创建一个HTML测试页,并使用Web浏览器从客户端PC访问它。如果显示以下页面,是正确的[root@linuxprobe ~]# vi /var/www/html/index.html<html><body><div style="width: 100%; font-size: 40px; font-weight: bold; text-align: center;">Welcome access LinuxProbe.org,This is Test Page!</div></body></html> |
三、支持Perl
启用CGI执行并使用Perl脚本
|
1
2
3
4
5
6
7
8
9
10
11
12
13
14
15
16
17
18
19
20
21
22
23
24
25
26
27
28
29
30
|
[1] 安装Perl.[root@linuxprobe ~]# yum -y install perl perl-CGI[2] 默认情况下,在“/var/www/cgi-bin”目录下允许CGI。 可以使用Perl Scripts放在目录下。然而,它下面的所有文件都被处理为CGI。# 下面的设置是CGI的设置[root@linuxprobe ~]# grep -n "^ *ScriptAlias" /etc/httpd/conf/httpd.conf247: ScriptAlias /cgi-bin/ "/var/www/cgi-bin/"[3] 如果你想允许在其他目录中的CGI,配置如下。 例如,在“/var/www/html/cgi-enabled”中允许。[root@linuxprobe ~]# vi /etc/httpd/conf.d/cgi-enabled.conf# create new# processes .cgi and .pl as CGI scripts<Directory "/var/www/html/cgi-enabled"> Options +ExecCGI AddHandler cgi-script .cgi .pl</Directory>[root@linuxprobe ~]# systemctl restart httpd[4] 如果SELinux被启用,并且允许CGI在不是像上面[3]的默认目录下,更改规则如下。[root@linuxprobe ~]# chcon -R -t httpd_sys_script_exec_t /var/linuxprobe/html/cgi-enabled[root@linuxprobe ~]# semanage fcontext -a -t httpd_sys_script_exec_t /var/www/html/cgi-enabled[5] 创建一个CGI测试页面,并使用Web浏览器从客户端PC访问它。如果显示以下页面,说明配置正确。[root@linuxprobe ~]# vi /var/www/html/cgi-enabled/index.cgi#!/usr/bin/perlprint "Content-type: text/html\n\n";print "<html>\n<body>\n";print "<div style=\"width: 100%; font-size: 40px; font-weight: bold; text-align: center;\">\n";print "CGI Test Page";print "\n</div>\n";print "</body>\n</html>\n";[root@linuxprobe ~]# chmod 705 /var/www/html/cgi-enabled/index.cgi |
配置httpd以使用PHP脚本
[1] 安装PHP.
|
1
2
3
4
5
|
[root@linuxprobe ~]# yum -y install php php-mbstring php-pear[root@linuxprobe ~]# vi /etc/php.ini# line 878: 取消注释,设置时区date.timezone = "Asia/Shanghai"[root@linuxprobe ~]# systemctl restart httpd |
[2] 创建一个PHP测试页面,并使用Web浏览器从客户端PC访问它。如果显示以下页面,它是确定。
|
1
2
3
4
5
6
7
8
9
10
|
[root@linuxprobe ~]# vi /var/www/html/index.php<html><body><div style="width: 100%; font-size: 40px; font-weight: bold; text-align: center;"><?php print Date("Y/m/d");?></div></body></html> |
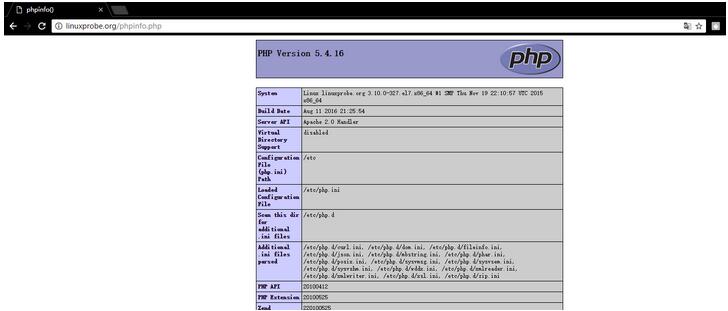
[3] 创建phpinfo测试页,确认是都开启php支持
[root@linuxprobe ~]# echo "<?php phpinfo(); ?>" > /var/www/html/phpinfo.php
九、创建SSL证书
创建自己的SSL证书。但是,如果您使用您的服务器作为业务,最好购买和使用来自Verisigh的正式证书等。
|
1
2
3
4
5
6
7
8
9
10
11
12
13
14
15
16
17
18
19
20
21
22
23
24
25
26
27
28
29
30
31
32
33
34
35
36
37
38
39
40
41
42
|
[root@linuxprobe ~]# cd /etc/pki/tls/certcert.pem certs/ [root@linuxprobe ~]# cd /etc/pki/tls/certs/[root@linuxprobe certs]# make server.keyumask 77 ; \/usr/bin/openssl genrsa -aes128 2048 > server.keyGenerating RSA private key, 2048 bit long modulus...............................................................+++....................................................................................................+++e is 65537 (0x10001)Enter pass phrase:Verifying - Enter pass phrase:[root@linuxprobe certs]# openssl rsa -in server.key -out server.keyEnter pass phrase for server.key:writing RSA key[root@linuxprobe certs]# make server.csrumask 77 ; \/usr/bin/openssl req -utf8 -new -key server.key -out server.csrYou are about to be asked to enter information that will be incorporatedinto your certificate request.What you are about to enter is what is called a Distinguished Name or a DN.There are quite a few fields but you can leave some blankFor some fields there will be a default value,If you enter '.', the field will be left blank.-----Country Name (2 letter code) [XX]:CN #国家后缀State or Province Name (full name) []:Shanghai #省Locality Name (eg, city) [Default City]:Shanghai #市Organization Name (eg, company) [Default Company Ltd]:LinuxProbe #公司Organizational Unit Name (eg, section) []:DevOps #部门Common Name (eg, your name or your server's hostname) []:linuxprobe.org #主机名Email Address []:root@linuxprobe.org #邮箱Please enter the following 'extra' attributesto be sent with your certificate requestA challenge password []: #默认An optional company name []: #默认#[root@linuxprobe certs]# openssl x509 -in server.csr -out server.crt -req -signkey server.key -days 3650Signature oksubject=/C=CN/ST=Shanghai/L=Shanghai/O=LinuxProbe/OU=DevOps/CN=linuxprobe.org/emailAddress=root@linuxprobe.orgGetting Private key |
十、配置SSL
[1] 配置SSL.
|
1
2
3
4
5
6
7
8
9
10
11
12
13
14
|
[root@linuxprobe ~]# yum -y install mod_ssl[root@linuxprobe ~]# vi /etc/httpd/conf.d/ssl.conf# line 59: 取消注释DocumentRoot "/var/www/html"# line 60: 取消注释,定义域名ServerName linuxprobe.org:443# line 75: 改变SSLProtocolSSLProtocol -All +TLSv1 +TLSv1.1 +TLSv1.2# line 100: 改成刚刚创建的server.crtSSLCertificateFile /etc/pki/tls/certs/server.crt# line 107: 改成刚刚创建的server.keySSLCertificateKeyFile /etc/pki/tls/certs/server.key[root@www ~]# systemctl restart httpd |
[2] 如果Firewalld正在运行,请允许HTTPS服务。 HTTPS使用443 / TCP
|
1
2
3
4
|
[root@www ~]# firewall-cmd --add-service=https --permanentsuccess[root@www ~]# firewall-cmd --reloadsuccess |
十一、启用基本身份验证
启用基本身份验证以限制特定网页的访问
[1]例如,在目录[/var/www/html/auth-basic]下设置基本身份验证设置。
|
1
2
3
4
5
6
7
8
9
10
11
12
13
14
15
16
17
18
19
20
21
22
23
24
25
26
27
28
29
|
[root@linuxprobe ~]# vi /etc/httpd/conf.d/auth_basic.conf# 创建新配置文件<Directory /var/www/html/auth-basic> AuthType Basic AuthName "Basic Authentication" AuthUserFile /etc/httpd/conf/.htpasswd require valid-user</Directory># 添加用户:使用“-c”创建新文件(仅为初始注册添加“-c”选项)[root@linuxprobe ~]# htpasswd -c /etc/httpd/conf/.htpasswd wangNew password: # set passwordRe-type new password: # confirmAdding password for user wang[root@linuxprobe ~]# systemctl restart httpd[root@linuxprobe ~]# mkdir /var/www/html/auth-basic[root@linuxprobe ~]# vi /var/www/html/auth-basic/index.html# create a test page<html><body><div style="width: 100%; font-size: 40px; font-weight: bold; text-align: wanger;">Test Page for Basic Auth</div></body></html> |
CentOS 7.2配置Apache服务httpd(上)的更多相关文章
- CentOS 7.2配置Apache服务httpd小伙伴们可以参考一下
这篇文章主要为大家详细介绍了CentOS 7.2配置Apache服务 httpd上篇,具有一定的参考价值,感兴趣的小伙伴们可以参考一下 一.Perl + mod_perl 安装mod_perl使Per ...
- CentOS 6.5配置nfs服务
CentOS 6.5配置nfs服务 网络文件系统(Network File System,NFS),一种使用于分散式文件系统的协议,由升阳公司开发,于1984年向外公布.功能是通过网络让不同的机器.不 ...
- CentOS 7安装配置Apache HTTP Server
原文 CentOS 7安装配置Apache HTTP Server RPM安装httpd # yum -yinstall httpd //安装httpd会自动安装一下依赖包: apr apr-ut ...
- 阿里云服务器下安装LAMP环境(CentOS Linux 6.3) 安装与配置 Apache 服务
想让我们的阿里云服务器成为一台 Web 服务器,我们需要安装一个 Web 服务器软件,比如 Apache ,或者 Nginx 等等.下面我们就一起来安装一个 Apache 服务. 我们可以使用 yum ...
- Mac下配置Apache服务
这篇文章主要是针对Mac用户,第一次搭建本地开发环境的同学,已经搭建过的同学可以忽略. Mac自带的Apache还是XAMPP? That is a question. 其实自带的apache也够用了 ...
- CentOS 安装以及配置Apache php mysql
准备篇: 1.配置防火墙,开启80端口.3306端口 vi /etc/sysconfig/iptables -A INPUT -m state –state NEW -m tcp -p tcp –dp ...
- Centos 下,配置 Apache + Python + Django + postgresSQL 开发环境
用 Python 搭建一个 Web 服务器 文章结构 一.安装 Apache.Python.django 二.安装 mod_wsgi,Apache 为 Python 提供的 wsgi 模块 三.将 ...
- 超详细 值得收藏 linux CentOS 7 配置Apache服务【转发+新增】
一.Apache简介 Apache HTTP Server(简称Apache)是Apache软件基金会的一个开放源代码的网页服务器软件,可以在大多数电脑操作系统中运行,由于其跨平台和安全性(尽管不断有 ...
- CentOS安装和配置Apache(httpd)
1. 安装httpd yum install httpd #安装apache 2. 启动httpd systemctl start httpd.service #启动apache 3. 随服务器自启动 ...
随机推荐
- H3C V7版本的系统默认权限
H3C (v7平台)Console口通过账号密码登陆配置教程 http://www.023wg.com/h3c/496.html H3C (v7平台)Console口通过账号密码登陆配置教程 看不懂的 ...
- 配置PHP,Apache
安装完windows 2003 server以后,还是个裸机,在安装limesurvey总是会有些问题,还好,问题都解决了,下面讲下配置的步骤: 第一步:先装上apache服务 apache服务启动以 ...
- 实现Runnable接口和继承Thread类
如果欲创建的线程类已经有一个父类了,就不能再继承Thread类了,java不支持多继承. 实现Runnable接口: package multyThread; public class MyRuna ...
- DOM库及常用方法封装
节点 nodeType nodeName nodeValue 元素节点 1 大写的标签名 null 文本节点 3 #text 文本内容 注释节点 8 #comment 注释内容 document 9 ...
- python 3389爆破机
前言: = =上学后的第一个星期假期,写了个3389爆破器 - 0x01 准备: hydra 钟馗之眼API 0x02代码: import optparse import os import requ ...
- 用PyMOL展示配体和受体相互作用的原子和氢键
转载于 https://mp.weixin.qq.com/s/P62sjqhSTxmWVicrEAk-RQ 为了简化展示过程,我们设计了一个pml脚本 (脚本内有很详细的解释),只需要修改脚本里面受体 ...
- svn代码回滚和合并的利器svn merge
1.svn merge可以将两个对象的diff体现到本地工作目录上. (1)两个对象 这个两个对象可以是同一个svn url的两个revison,也可以是不用的url,比如分支和主干. (2)diff ...
- http请求头设置
Curl curl -i -H 'Content-Type: application/json' -i/--include 输出时包括protocol头信息curl -x 10.12.15.1 ...
- Latex编译后Yap查看报错Not all fonts could be loaded
在用Latex写中文大论文时,编译后,用Yap查看DVI文件,打开时,Yap报错: "Not all fonts could be loaded. See 'File->Documen ...
- BIO模型
基本模型 代码: 客户端 package bhz.bio; import java.io.BufferedReader; import java.io.IOException; import java ...