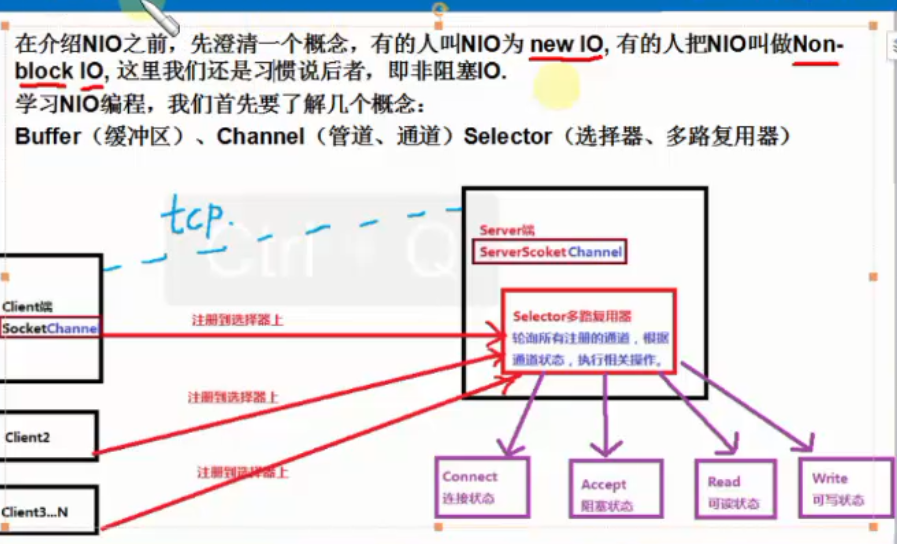
NIO编程介绍
代码:
package bhz.nio;

import java.io.IOException;

import java.net.InetSocketAddress;

import java.nio.ByteBuffer;

import java.nio.channels.SocketChannel;

public class Client {

    //需要一个Selector

    public static void main(String[] args) {

        //创建连接的地址

        InetSocketAddress address = new InetSocketAddress("127.0.0.1", 8765);

        //声明连接通道

        SocketChannel sc = null;

        //建立缓冲区

        ByteBuffer buf = ByteBuffer.allocate(1024);

        try {

            //打开通道

            sc = SocketChannel.open();

            //进行连接

            sc.connect(address);

            while(true){

                //定义一个字节数组,然后使用系统录入功能:

                byte[] bytes = new byte[1024];

                System.in.read(bytes);

                //把数据放到缓冲区中

                buf.put(bytes);

                //对缓冲区进行复位

                buf.flip();

                //写出数据

                sc.write(buf);

                //清空缓冲区数据

                buf.clear();

            }

        } catch (IOException e) {

            e.printStackTrace();

        } finally {

            if(sc != null){

                try {

                    sc.close();

                } catch (IOException e) {

                    e.printStackTrace();

                }

            }

        }

    }

}
package bhz.nio;

import java.io.IOException;

import java.net.InetSocketAddress;

import java.nio.ByteBuffer;

import java.nio.channels.SelectionKey;

import java.nio.channels.Selector;

import java.nio.channels.ServerSocketChannel;

import java.nio.channels.SocketChannel;

import java.util.Iterator;

public class Server implements Runnable{

    //1 多路复用器(管理所有的通道)

    private Selector seletor;

    //2 建立缓冲区

    private ByteBuffer readBuf = ByteBuffer.allocate(1024);

    //3

    private ByteBuffer writeBuf = ByteBuffer.allocate(1024);

    public Server(int port){

        try {

            //1 打开路复用器

            this.seletor = Selector.open();

            //2 打开服务器通道

            ServerSocketChannel ssc = ServerSocketChannel.open();

            //3 设置服务器通道为非阻塞模式

            ssc.configureBlocking(false);

            //4 绑定地址

            ssc.bind(new InetSocketAddress(port));

            //5 把服务器通道注册到多路复用器上,并且监听阻塞事件

            ssc.register(this.seletor, SelectionKey.OP_ACCEPT);

            System.out.println("Server start, port :" + port);

        } catch (IOException e) {

            e.printStackTrace();

        }

    }

    @Override

    public void run() {

        while(true){

            try {

                //1 必须要让多路复用器开始监听

                this.seletor.select();

                //2 返回多路复用器已经选择的结果集

                Iterator<SelectionKey> keys = this.seletor.selectedKeys().iterator();

                //3 进行遍历

                while(keys.hasNext()){

                    //4 获取一个选择的元素

                    SelectionKey key = keys.next();

                    //5 直接从容器中移除就可以了

                    keys.remove();

                    //6 如果是有效的

                    if(key.isValid()){

                        //7 如果为阻塞状态

                        if(key.isAcceptable()){

                            this.accept(key);

                        }

                        //8 如果为可读状态

                        if(key.isReadable()){

                            this.read(key);

                        }

                        //9 写数据

                        if(key.isWritable()){

                            //this.write(key); //ssc

                        }

                    }

                }

            } catch (IOException e) {

                e.printStackTrace();

            }

        }

    }

    private void write(SelectionKey key){

        //ServerSocketChannel ssc =  (ServerSocketChannel) key.channel();

        //ssc.register(this.seletor, SelectionKey.OP_WRITE);

    }

    private void read(SelectionKey key) {

        try {

            //1 清空缓冲区旧的数据

            this.readBuf.clear();

            //2 获取之前注册的socket通道对象

            SocketChannel sc = (SocketChannel) key.channel();

            //3 读取数据

            int count = sc.read(this.readBuf);

            //4 如果没有数据

            if(count == -1){

                key.channel().close();

                key.cancel();

                return;

            }

            //5 有数据则进行读取 读取之前需要进行复位方法(把position 和limit进行复位)

            this.readBuf.flip();

            //6 根据缓冲区的数据长度创建相应大小的byte数组,接收缓冲区的数据

            byte[] bytes = new byte[this.readBuf.remaining()];

            //7 接收缓冲区数据

            this.readBuf.get(bytes);

            //8 打印结果

            String body = new String(bytes).trim();

            System.out.println("Server : " + body);

            // 9..可以写回给客户端数据

        } catch (IOException e) {

            e.printStackTrace();

        }

    }

    private void accept(SelectionKey key) {

        try {

            //1 获取服务通道

            ServerSocketChannel ssc =  (ServerSocketChannel) key.channel();

            //2 执行阻塞方法

            SocketChannel sc = ssc.accept();

            //3 设置阻塞模式

            sc.configureBlocking(false);

            //4 注册到多路复用器上,并设置读取标识

            sc.register(this.seletor, SelectionKey.OP_READ);

        } catch (IOException e) {

            e.printStackTrace();

        }

    }

    public static void main(String[] args) {

        new Thread(new Server(8765)).start();;

    }

}
NIO编程介绍的更多相关文章
- NIO和IO(BIO)的区别及NIO编程介绍
IO(BIO)和NIO的区别:其本质就是阻塞和非阻塞的区别. 阻塞概念:应用程序在获取网络数据的时候,如果网络传输数据很慢,那么程序就一直等着,直到传输完毕为止. 非阻塞概念:应用程序直接可以获取已经 ...
- JDK NIO编程
我们首先需要澄清一个概念:NIO到底是什么的简称?有人称之为New I/O,因为它相对于之前的I/O类库是新增的,所以被称为New I/O,这是它的官方叫法.但是,由于之前老的I/O类库是阻塞I/O, ...
- Reactor 典型的 NIO 编程模型
Doug Lea 在 Scalable IO in Java 的 PPT 中描述了 Reactor 编程模型的思想,大部分 NIO 框架和一些中间件的 NIO 编程都与它一样或是它的变体.本文结合 P ...
- Java IO编程全解(四)——NIO编程
转载请注明出处:http://www.cnblogs.com/Joanna-Yan/p/7793964.html 前面讲到:Java IO编程全解(三)——伪异步IO编程 NIO,即New I/O,这 ...
- NIO 编程模型
NIO 编程模型 Doug Lea 在 Scalable IO in Java 的 PPT 中描述了 Reactor 编程模型的思想,大部分 NIO 框架和一些中间件的 NIO 编程都与它一样或是它的 ...
- 深入学习Netty(2)——传统NIO编程
前言 学习Netty编程,避免不了从了解Java 的NIO编程开始,这样才能通过比较让我们对Netty有更深的了解,才能知道Netty大大的好处.传统的NIO编程code起来比较麻烦,甚至有遗留Bug ...
- Java NIO简单介绍(二)
上一篇<NIO简单介绍(一)>中讲解了NIO中本地IO相关的内容,这篇重点介绍的NIO的非阻塞式网络通信 一.阻塞与非阻塞 传统的 IO 流都是阻塞式的.也就是说,当一个线程调用 read ...
- 关于NIO编程
NIO概述 什么是NIO? Java NIO(New IO)是一个可以替代标准Java IO API的IO API(从Java 1.4开始),Java NIO提供了与标准IO不同的IO工作方式. Ja ...
- C#多线程编程介绍——使用thread、threadpool、timer
C#多线程编程介绍——使用thread.threadpool.timer 在system.threading 命名空间提供一些使得能进行多线程编程的类和接口,其中线程的创建有以下三种方法:thread ...
随机推荐
- learn Linux sed command
learn Linux sed command 一.参考文档: . sed命令详解 http://qifuguang.me/2015/09/21/sed%E5%91%BD%E4%BB%A4%E8%AF ...
- asp.net core microservices 架构之 分布式自动计算(一)
一:简介 自动计算都是常驻内存的,没有人机交互.我们经常用到的就是console job和sql job了.sqljob有自己的宿主,与数据库产品有很关联,暂时不提.console job使 ...
- JanusGraph Server配置
转自:https://www.cnblogs.com/jiyuqi/p/320267ff0b5052fad4613945e58ea1f1.html JanusGraph使用Gremlin Server ...
- 常用的SQL语句大全
一.基础 1.说明:创建数据库CREATE DATABASE database-name 2.说明:删除数据库drop database dbname3.说明:备份sql server--- 创建 备 ...
- 开始学习jQuery
一 jQuery是什么? 1. jQuery由美国人John Resig创建,至今已吸引了来自世界各地的众多 javascript高手加入其team. 2.jQuery是继prototype之后又一个 ...
- docker could not find an available, non-overlapping IPv4 address pool among the defaults to assign to the network
原因: 无法进行网络分配了 解决方法: // 所有的网络 docker network ls // 删除不用的,腾出多余的 docker network rm <networkname> ...
- apache phoenix 安装试用
备注: 本次安装是在hbase docker 镜像的基础上配置的,主要是为了方便学习,而hbase搭建有觉得 有点费事,用镜像简单. 1. hbase 镜像 docker pull har ...
- BZOJ3261:最大异或和
浅谈\(Trie\):https://www.cnblogs.com/AKMer/p/10444829.html 题目传送门:https://lydsy.com/JudgeOnline/problem ...
- 安装xamp之后,appach、mysql等问题的总结
问题一:无法启动的问题 如果他们无法启动,大多数情况是端口号被占用. 首先就是查看端口号:点击“netstart“按钮查看端口号的使用详情 如果被占用就点击"config”按钮,进行端口号的 ...
- laravel的phpstorm插件laravel-ide-helper
地址https://github.com/barryvdh/laravel-ide-helper 简单记录下安装过程 项目目录下 composer require barryvdh/laravel-i ...