
Flask源码解读--所有可扩展点
一、前言
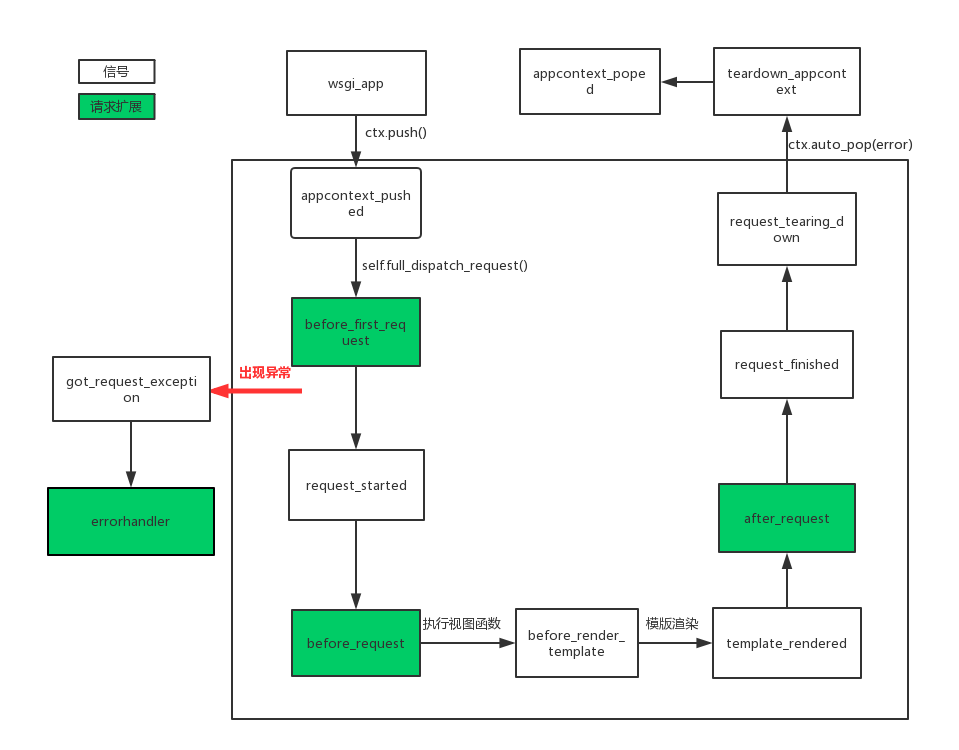
flask中有很多可扩展点(笔者这样称呼),其中包含了信号和请求钩子,这些信号和钩子有什么用呢?其主要作用用于帮助我们进行程序的耦合性,当然还可以让我们自定义一些行为。话不多说,通过阅读源码,笔者将这些所有的可扩展点的执行顺序进行总结(如下图),这样我们更能清楚的知道flask的内部请求流程,后面将对信号以及源码流程做说明,最后以下所有内容都是基于flask版本为1.0.2。重要:信号的触发可以在任何时候,以下流程只是源码的触发顺序。
二、信号
在django中同样也有信号,但django中是内置的,而Flask框架中的信号基于blinker,所以我们在使用flask信号时候需安装blinker。
pip3 install blinker
flask中所有的信号在其源码中都有定义:
request_started = _signals.signal('request-started')                # 请求到来前执行

request_finished = _signals.signal('request-finished')              # 请求结束后执行

before_render_template = _signals.signal('before-render-template')  # 模板渲染前执行

template_rendered = _signals.signal('template-rendered')            # 模板渲染后执行

got_request_exception = _signals.signal('got-request-exception')    # 请求执行出现异常时执行

request_tearing_down = _signals.signal('request-tearing-down')      # 请求执行完毕后自动执行(无论成功与否)

appcontext_tearing_down = _signals.signal('appcontext-tearing-down')# 应用上下文执行完毕后自动执行(无论成功与否)

appcontext_pushed = _signals.signal('appcontext-pushed')            # 应用上下文push时执行

appcontext_popped = _signals.signal('appcontext-popped')            # 应用上下文pop时执行

message_flashed = _signals.signal('message-flashed')                # 调用消息闪现时,自动触发
如何使用
使用信号的 connect() 方法订阅该信号,该方法的第一个参数是当信号发出时所调用的函数。第二个参数是可选参数,定义一个发送者。使用 disconnect() 方法可以退订信号。
示例:
from flask import Flask, signals, request

app = Flask(import_name=__name__)

def check_host(app, *args):

    print(app.config['DEBUG'])

    print("host is :", request.host)

signals.request_started.connect(receiver=check_host)  # 请求之前发送信号检查请求的host

@app.route("/")

def index():

    return 'index'

if __name__ == '__main__':

    app.run()

#结果

False

host is : 127.0.0.1:5000
在新的版本中还可以使用connect_via信号装饰器来订阅信号,以下代码可以修改为:
from flask import Flask, signals, request

app = Flask(import_name=__name__)

@signals.request_started.connect_via(app)

def check_host(app, *args):

    print(app.config['DEBUG'])

    print("host is :", request.host)

@app.route("/")

def index():

    return 'index'

if __name__ == '__main__':

    app.run()
自定义信号
自定义信号允许我们能跟多进行自定义操作,在自定义信号步骤:
- 定义信号
- 订阅信号
- 触发信号
示例:
rom flask import Flask

from blinker import Namespace

app = Flask(import_name=__name__)

model_signals=Namespace()

# 定义信号

model_update = model_signals.signal(name='model_update')

#触发信号是对应的操作

def logging(arg):

    print(arg)

    print('write log..')

#订阅信号

model_update.connect(logging)

@app.route("/")

def index():

    # 触发信号

    model_update.send('save model')

    return 'index'

if __name__ == '__main__':

    app.run()

结果:

save model

write log..
三、源码流程
在熟悉源码之前,你需要了解下flask的上线文管理,请移步这里, 之前在请求上下文源码中就介绍了请求进来会到wsgi_app,以下是源码定义:
def wsgi_app(self, environ, start_response):

    """The actual WSGI application. This is not implemented in

    :meth:`__call__` so that middlewares can be applied without

    losing a reference to the app object. Instead of doing this::

        app = MyMiddleware(app)

    It's a better idea to do this instead::

        app.wsgi_app = MyMiddleware(app.wsgi_app)

    Then you still have the original application object around and

    can continue to call methods on it.

    .. versionchanged:: 0.7

        Teardown events for the request and app contexts are called

        even if an unhandled error occurs. Other events may not be

        called depending on when an error occurs during dispatch.

        See :ref:`callbacks-and-errors`.

    :param environ: A WSGI environment.

    :param start_response: A callable accepting a status code,

        a list of headers, and an optional exception context to

        start the response.

    """

    ctx = self.request_context(environ)

    error = None

    try:

        try:

            ctx.push() #存储请求上下文

            response = self.full_dispatch_request() #处理请求,执行视图函数,返回响应

        except Exception as e:

            error = e

            response = self.handle_exception(e) # 处理异常

        except:

            error = sys.exc_info()[1]

            raise

        return response(environ, start_response) #返回给客户端

    finally:

        if self.should_ignore_error(error):

            error = None

        ctx.auto_pop(error) #删除栈中的请求上下文
在wsgi_app中会执行ctx.push方法将上线问push到栈中,此时触发1.appcontext_pushed,以下是源码部分:
def push(self):

    """Binds the app context to the current context."""

    self._refcnt += 1

    if hasattr(sys, 'exc_clear'):

        sys.exc_clear()

    _app_ctx_stack.push(self)

    appcontext_pushed.send(self.app) #触发appcontext_pushed信号
接着执行self.full_dispatch_request(),在改方法中主要是用于请求预处理、以及更具路由匹配执行视图函数,下面其源码:
def full_dispatch_request(self):

    """Dispatches the request and on top of that performs request

    pre and postprocessing as well as HTTP exception catching and

    error handling.

    .. versionadded:: 0.7

    """

    self.try_trigger_before_first_request_functions() #执行请求扩展before_first_request

    try:

        request_started.send(self)  #触发request_started信号

        rv = self.preprocess_request()

        if rv is None:

            rv = self.dispatch_request()

    except Exception as e:

        rv = self.handle_user_exception(e)  #处理异常

    return self.finalize_request(rv)  #最后对请求进行最后的处理
这里面执行请求扩展2.before_first_request,然后触发信号3.request_started信号,接着执行self.preprocess_request()进行请求预处理,源码:
bp = _request_ctx_stack.top.request.blueprint

funcs = self.url_value_preprocessors.get(None, ())

if bp is not None and bp in self.url_value_preprocessors:

    funcs = chain(funcs, self.url_value_preprocessors[bp])

for func in funcs:

    func(request.endpoint, request.view_args)

funcs = self.before_request_funcs.get(None, ()) #执行请求扩展before_request

if bp is not None and bp in self.before_request_funcs:

    funcs = chain(funcs, self.before_request_funcs[bp])

for func in funcs:

    rv = func()

    if rv is not None:

        return rv
在视图函数中如果使用了render_template(模版渲染),我们来看下其渲染方法:
def _render(template, context, app):

    """Renders the template and fires the signal"""

    before_render_template.send(app, template=template, context=context) # 触发before_render_template信号

    rv = template.render(context)   # 模版渲染

    template_rendered.send(app, template=template, context=context) ## 触发template_rendered信号

    return rv
渲染模版时候分别触发5.before_render_template以及6.template_rendered信号,在执行wsgi_app中的self.finalize_request(rv)对请求做最后的处理,源码:
def finalize_request(self, rv, from_error_handler=False):

    """Given the return value from a view function this finalizes

    the request by converting it into a response and invoking the

    postprocessing functions.  This is invoked for both normal

    request dispatching as well as error handlers.

    Because this means that it might be called as a result of a

    failure a special safe mode is available which can be enabled

    with the `from_error_handler` flag.  If enabled, failures in

    response processing will be logged and otherwise ignored.

    :internal:

    """

    response = self.make_response(rv)

    try:

        response = self.process_response(response)   #处理响应

        request_finished.send(self, response=response) # 触发request_finished信号

    except Exception:

        if not from_error_handler:

            raise

        self.logger.exception('Request finalizing failed with an '

                              'error while handling an error')

    return response
在触发request_finished之前会执行self.process_response,源码:
def process_response(self, response):

    """Can be overridden in order to modify the response object

    before it's sent to the WSGI server.  By default this will

    call all the :meth:`after_request` decorated functions.

    .. versionchanged:: 0.5

       As of Flask 0.5 the functions registered for after request

       execution are called in reverse order of registration.

    :param response: a :attr:`response_class` object.

    :return: a new response object or the same, has to be an

             instance of :attr:`response_class`.

    """

    ctx = _request_ctx_stack.top #获取请求上下文

    bp = ctx.request.blueprint  # 获取蓝图

    funcs = ctx._after_request_functions

    if bp is not None and bp in self.after_request_funcs:

        funcs = chain(funcs, reversed(self.after_request_funcs[bp]))#执行请求扩张after_request

    if None in self.after_request_funcs:

        funcs = chain(funcs, reversed(self.after_request_funcs[None]))

    for handler in funcs:

        response = handler(response)

    if not self.session_interface.is_null_session(ctx.session):

        self.session_interface.save_session(self, ctx.session, response)  # 保存session

    return response
所以这里先执行了请求扩展7.after_request然后触发信号8.request_finished信号,当在处理请求时候出现异常则会执行self.handle_exception(e),源码:
def handle_exception(self, e):

    """Default exception handling that kicks in when an exception

    occurs that is not caught.  In debug mode the exception will

    be re-raised immediately, otherwise it is logged and the handler

    for a 500 internal server error is used.  If no such handler

    exists, a default 500 internal server error message is displayed.

    .. versionadded:: 0.3

    """

    exc_type, exc_value, tb = sys.exc_info()

    got_request_exception.send(self, exception=e) #触发got_request_exception信号

    handler = self._find_error_handler(InternalServerError())

    if self.propagate_exceptions:

        # if we want to repropagate the exception, we can attempt to

        # raise it with the whole traceback in case we can do that

        # (the function was actually called from the except part)

        # otherwise, we just raise the error again

        if exc_value is e:

            reraise(exc_type, exc_value, tb)

        else:

            raise e

    self.log_exception((exc_type, exc_value, tb))

    if handler is None:

        return InternalServerError()

    return self.finalize_request(handler(e), from_error_handler=True)
def pop(self, exc=_sentinel):

    """Pops the request context and unbinds it by doing that.  This will

    also trigger the execution of functions registered by the

    :meth:`~flask.Flask.teardown_request` decorator.

    .. versionchanged:: 0.9

       Added the `exc` argument.

    """

    app_ctx = self._implicit_app_ctx_stack.pop()

    try:

        clear_request = False

        if not self._implicit_app_ctx_stack:

            self.preserved = False

            self._preserved_exc = None

            if exc is _sentinel:

                exc = sys.exc_info()[1]

            self.app.do_teardown_request(exc) # 触发request_tearing_down信号

            # If this interpreter supports clearing the exception information

            # we do that now.  This will only go into effect on Python 2.x,

            # on 3.x it disappears automatically at the end of the exception

            # stack.

            if hasattr(sys, 'exc_clear'):

                sys.exc_clear()

            request_close = getattr(self.request, 'close', None)

            if request_close is not None:

                request_close()

            clear_request = True

    finally:

        rv = _request_ctx_stack.pop()

        # get rid of circular dependencies at the end of the request

        # so that we don't require the GC to be active.

        if clear_request:

            rv.request.environ['werkzeug.request'] = None

        # Get rid of the app as well if necessary.

        if app_ctx is not None:

            app_ctx.pop(exc)  #触发teardown_appcontext信号

        assert rv is self, 'Popped wrong request context.  ' \

            '(%r instead of %r)' % (rv, self)
此时会触发9.request_tearing_down信号,然后执行到app_ctx.pop(exc):
def pop(self, exc=_sentinel):

    """Pops the app context."""

    try:

        self._refcnt -= 1

        if self._refcnt <= 0:

            if exc is _sentinel:

                exc = sys.exc_info()[1]

            self.app.do_teardown_appcontext(exc) #触发teardown_appcontext信号

    finally:

        rv = _app_ctx_stack.pop()

    assert rv is self, 'Popped wrong app context.  (%r instead of %r)' \

        % (rv, self)

    appcontext_popped.send(self.app) # 触发appcontext_poped信号
到pop app_ctx是先触发了10.teardown_appcontext信号再触发11.appcontext_poped信号,到此整个flask的所有信号以及所有可扩展点的所有顺序执行完毕。
最后,整体的执行顺序的流程图我已经在最开始放上了。
Flask源码解读--所有可扩展点的更多相关文章
- Python Web Flask源码解读(一)——启动流程
关于我 一个有思想的程序猿,终身学习实践者,目前在一个创业团队任team lead,技术栈涉及Android.Python.Java和Go,这个也是我们团队的主要技术栈. Github:https:/ ...
- Python Web Flask源码解读(二)——路由原理
关于我 一个有思想的程序猿,终身学习实践者,目前在一个创业团队任team lead,技术栈涉及Android.Python.Java和Go,这个也是我们团队的主要技术栈. Github:https:/ ...
- Python Web Flask源码解读(三)——模板渲染过程
关于我 一个有思想的程序猿,终身学习实践者,目前在一个创业团队任team lead,技术栈涉及Android.Python.Java和Go,这个也是我们团队的主要技术栈. Github:https:/ ...
- Python Web Flask源码解读(四)——全局变量
关于我 一个有思想的程序猿,终身学习实践者,目前在一个创业团队任team lead,技术栈涉及Android.Python.Java和Go,这个也是我们团队的主要技术栈. Github:https:/ ...
- 【mybatis源码学习】mybtias扩展点
[1]org.apache.ibatis.reflection.ReflectorFactory 该扩展点,主要是对javaBean对象,进行反射操作. org.apache.ibatis.refle ...
- Flask源码解读(一)
Flask是一个使用 Python 编写的轻量级 Web 应用框架.Flask 本身只是 Werkezug 和 Jinja2 的之间的桥梁,前者实现一个合适的 WSGI 应用,后者处理模板. 当然, ...
- flask 源码专题(九):flask扩展点
1. 信号(源码) 信号,是在flask框架中为我们预留的钩子,让我们可以进行一些自定义操作. pip3 install blinker 2. 根据flask项目的请求流程来进行设置扩展点 中间件 # ...
- Flask(4)- flask请求上下文源码解读、http聊天室单聊/群聊(基于gevent-websocket)
一.flask请求上下文源码解读 通过上篇源码分析,我们知道了有请求发来的时候就执行了app(Flask的实例化对象)的__call__方法,而__call__方法返回了app的wsgi_app(en ...
- flask的请求上下文源码解读
一.flask请求上下文源码解读 通过上篇源码分析( ---Flask中的CBV和上下文管理--- ),我们知道了有请求发来的时候就执行了app(Flask的实例化对象)的__call__方法,而__ ...
随机推荐
- 【转】巧用DOS tree命令+批处理 实现 指定文件 批量复制!
转自:http://www.cnblogs.com/looky/archive/2010/01/24/1655292.html 今天一朋友叫我帮忙解决指定文件批量复制的问题,于是找了一大堆批处理命令, ...
- JMeter—配置元件(七)
参考<全栈性能测试修炼宝典JMeter实战>第六章 JMeter 元件详解中第二节配置元件JMeter配置元件可以用来初始化默认值和变量,以便后续采样器使用.将在其作用域的初始化阶段处理. ...
- Access删除某一字段重复的数据但是要保留一条
如下图所示,Checktime这个字段有很多重复数据,我需要把所有Checktime这个字段重复的都删掉,但是还需要保留一条: 在Access做删除查询怎么做呀,来个Access高手,复制粘贴党请手下 ...
- Linux进程描述符task_struct结构体详解--Linux进程的管理与调度(一)【转】
Linux内核通过一个被称为进程描述符的task_struct结构体来管理进程,这个结构体包含了一个进程所需的所有信息.它定义在include/linux/sched.h文件中. 谈到task_str ...
- Kubernetes 核心概念
什么是Kubernetes? Kubernetes(k8s)是自动化容器操作的开源平台,这些操作包括部署,调度和节点集群间扩展.如果你曾经用过Docker容器技术部署容器,那么可以将Docker看成K ...
- python 从外部获取传入的参数
有时候我们在执行python程序的时需要接收到外部传入的参数 python的 sys.argv[]就能实现 # test.py import sys #引入模块 str = sys.argv[1]pr ...
- ELK-elasticsearch-6.3.2插件【head,bigdesk,cerebro[kopf]】安装
参考博客:linux下ElasticSearch.6.2.2集群安装与head.Kibana.X-Pack..插件的配置安装 参考博客:ELK5.5.1 插件安装实践纪要(head/bigdesk/k ...
- Linux 内存使用率
文章参考: 1.正确计算linux系统内存使用率 2.Linux系统内存消失与slab使用之谜 例如当前主机内存信息如下: [zhang@test ~]$ cat /proc/meminfo MemT ...
- 路由交换02-----ARP协议
路由交换协议-----ARP ARP协议 ARP(Address Resolution Protocol),是根据IP地址获取MAC地址的一个TCP/IP协议,即将IP地址对应到物理地址,从而实现数据 ...
- 3星|《创投42章经》:前VC投资人的商业评论文集
创投42章经:互联网商业逻辑与投资进阶指南 作者2014年入行VC做投资人,2016年退出改作自媒体.书中主要是作者的各类商业评论的文集,少部分是跟投资相关的内容. 投资相关的内容,有些作者自己的视角 ...