Spring学习记录(十一)---使用注解和自动装配
Spring支持用注解配置Bean,更简便。
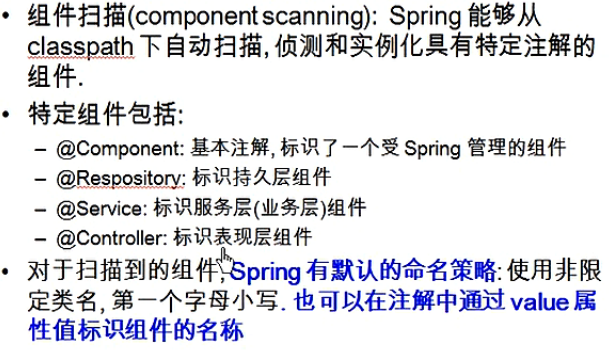
上面的组件,是根据实际情况配的。比如写的一个类,是做业务处理的,那就用注解@Service表示服务层组件,以此类推。将整体分成不同部分。
要在xml加入context命名空间
      <!-- 指定Spring IOC容器扫描的包 -->

      <context:component-scan base-package="package com.guigu.spring.beans.annotation"></context:component-scan>
这样,就表示要自动扫描 基类包的类以及子包中的类。类中有注解,就会被管理
例子:
目录结构如下,第一个annotation包为要扫描的包,有下面三个子包:controller、repository、service
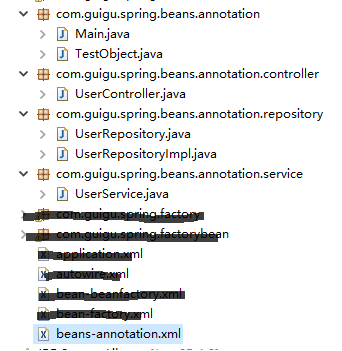
类里面都是一个简单的注解和一个方法:
    //TestObject.java

 package com.guigu.spring.beans.annotation;

 import org.springframework.stereotype.Component;

 @Component

 public class TestObject {

 }
    //UserController.java

 package com.guigu.spring.beans.annotation.controller;

 import org.springframework.stereotype.Controller;

 @Controller

 public class UserController {

     public void execute(){

         System.out.println("UserController execute...");

     }

 }
      //UserRepository.java

 package com.guigu.spring.beans.annotation.repository;

 public interface UserRepository {

     void save();

 }

     //UserRepositoryImpl.java  继承 UserRepository

 package com.guigu.spring.beans.annotation.repository;

 import org.springframework.stereotype.Repository;

 @Repository("userRepository");

 public class UserRepositoryImpl implements UserRepository {

     @Override

     public void save() {

         System.out.println("UserRepositoryImpl Save...");

     }

 }
写一个继承,为了说明注解命名可以更改,这里改成了userRepository,否则是默认的userRepositoryImpl,下面讲。
      //UserService.java

 package com.guigu.spring.beans.annotation.service;

 import org.springframework.stereotype.Service;

 @Service

 public class UserService {

     public void add(){

         System.out.println("UserService add...");

     }

 }
xml最上面已经配置,最后main函数:
 package com.guigu.spring.beans.annotation;

 import org.springframework.context.ApplicationContext;

 import org.springframework.context.support.ClassPathXmlApplicationContext;

 import com.guigu.spring.beans.annotation.controller.UserController;

 import com.guigu.spring.beans.annotation.repository.UserRepository;

 import com.guigu.spring.beans.annotation.service.UserService;

 public class Main {

     public static void main(String[] args) {

         ApplicationContext ctx =new ClassPathXmlApplicationContext("beans-annotation.xml");

         TestObject to = (TestObject) ctx.getBean("testObject");

         System.out.println(to);

         UserController userController=(UserController) ctx.getBean("userController");

         System.out.println(userController);

         UserService userservice=(UserService) ctx.getBean("userservice");

         System.out.println(userservice);

         UserRepository userRepository=(UserRepository) ctx.getBean("userRepository");

         System.out.println(userRepository);

     }

 }
输出如下:说明对象被创建了

xml里面没有bean,那main函数怎么获取Bean呢?
就是用最上面图中蓝色字体。Spring默认命名,名字是它的类名第一个字符小写。如:
UserService.java类中类名是UserService ,获取bean默认名字就是userService
也可以更改,如上面的UserRepositoryImpl类,用了@Repository("userRepository"),表示bean名字为userRepository
在xml中,有一些属性和节点:
resource-pattern:只扫描特定文件
context:include-filter: 子节点表示要包含的组件
context:exclude-filter: 子节点表示要排除在外的组件
      <!-- 可以通过resource-pattern指定扫描的资源 -->

      <context:component-scan base-package="package com.guigu.spring.beans.annotation"

      resource-pattern="repository/*.class">

      </context:component-scan>
这样,只会扫描repository包下的类,如果main函数中,还要调用其他类,报错。只能调用repository包下的类。
     <!-- context:exclude-filter 子节点指定排除哪些指定表达式的组件 -->

      <context:component-scan base-package="package com.guigu.spring.beans.annotation">

       <context:exclude-filter type="annotation" expression="package com.guigu.spring.beans.annotation.repository"/>  //type类型后面看

      </context:component-scan>
这表示不扫描repository子包的文件,若main函数中调用它们,会抛异常
      <!-- context:include-filter 子节点指定包含哪些指定表达式的组件, 该子节点需要use-default-filters配合使用 -->

      <context:component-scan base-package="package com.guigu.spring.beans.annotation"

      use-default-filters="false">

           <context:include-filter type="annotation"

             expression="package com.guigu.spring.beans.annotation"/>

      </context:component-scan>
注意,use-default-filters默认自动扫描全部,要设置成false不自动扫描,才能实现只扫描部分的功能。
<context:include-filter>和<context:exclude-filter>子节点支持多种类型的过滤表达式:
| 类别 | 示例 | 说明 |
| annotation | com.yl.XxxAnnotation | 所有标注了XxxAnnotation的类,该类型采用目标类是否标注了某个注解进行过滤 |
| assinable | com.yl.XxxService | 所有继承或扩展XxxService的类,该类型采用了目标类是否继承或扩展某个特定类进行过滤 |
| aspectj | com.yl.*Service | 所有类名义Service结束的类及继承或扩展它们的类,该类型采用AspectJ表达式进行过滤 |
| regex | com.yl.anno.* | 所有com.yl.anno包下的类。该类型采用正则表达式,根据类的类名进行过滤 |
| custom | com.yl.XxxTypeFilter | 采用XxxTypeFilter通过代码的方式定义过滤原则。该类必须实现org.springframewor |
@Autowired:自动装配具有兼容类型的单个bean属性。可以对类成员变量、方法及构造函数进行标注,完成自动装配的工作。 通过 @Autowired的使用来代替set方法。(property 属性通过调用setter方法进行赋值)
意思就是用它,可以代替xml中的<property name="car" ref="car"> 这样的引用赋值。自动创建bean。
例子:Person类有Car对象,不用 自动装配
    //Person类

 public class Person {

     private Car car;

     public Car getCar() {

         return car;

     }

     public void setCar(Car car) {

         this.car = car;

     }

 }
     //Car类

 public class Car {

     private String brand;

     private double price;

     public void setBrand(String brand) {

         this.brand = brand;

     }

     public void setPrice(double price) {

         this.price = price;

     }

 }
xml
     <bean id="person" class="com.guigu.spring.bean.Person">

         <property name="car" ref="car"/>

     </bean>

     <bean id="car" class="com.guigu.spring.bean.Car">

         <property name="brand" value=" aodi"/>

         <property name="price" value="200000"/>

     </bean>
main
     ApplicationContext context = new ClassPathXmlApplicationContext("autowired.xml");

     Person person=(Person)ctx.getBean("person");

     System.out.println(person);
这是之前的做法。
@Autowired自动装配的方法
查了一下,在之前版本的Spring中,要使用@Autowired,要在xml写上这一行代码才行
1 <!-- 该 BeanPostProcessor 将自动对标注 @Autowired 的 Bean 进行注入 -->

2   <bean class="org.springframework.beans.factory.annotation.AutowiredAnnotationBeanPostProcessor"/>
但现在spring4,<context:component-scan>自动注册AutowiredAnnotationBeanPostProcessor实例,可以使用@Autowired和@Resource、和@Inject注解(一般用@Autowired)
所以,如果使用了<context:component-scan>,就不用额外注册,不然还是要
      //Person类

   public class Person {

       //@Aotuwired   //自动根据xml配置实例car对象

       private Car car;

  }
      <bean id="person" class="com.guigu.spring.bean.Person">

     //这里就不需要再写ref="car"

      </bean>

      <bean id="car" class="com.guigu.spring.bean.Car">

          <property name="brand" value=" aodi"/>

          <property name="price" value="200000"/>

      </bean>
结果和不用 @Aotuwired一样,都可以
还可以写在setter上
       //Person类

    public class Person {

        private Car car;

         //@Aotuwired

        public Car setCar(Car car){

              this.car=car;

                }

  }
回到注解上面的例子:
     //UserController.java

  package com.guigu.spring.beans.annotation.controller;

  import org.springframework.stereotype.Controller;

   @Controller

   public class UserController {

       public void execute(){

           System.out.println("UserController execute...");

      }

  }
    // main函数

   public class Main {

      public static void main(String[] args) {

          private UserController userController;

          ApplicationContext ctx =new ClassPathXmlApplicationContext("beans-annotation.xml");

         userController.execute();  // 报错
  }
 9 }
在main函数声明userController然后直接调用它的方法,这样显然不行,因为userController都还没有创建,这时用@Autowired就很简单
      // main函数

     public class Main {

        public static void main(String[] args) {

            //@Autowired

            private UserController userController;

            ApplicationContext ctx =new ClassPathXmlApplicationContext("beans-annotation.xml");

            userController.execute();//不报错

    }

   }
这样,就自动配置创建了userController对象,可以直接使用
注意①:@Autowired要想成功配置,得先扫描得到,就是UserController类一定要能被扫描到。
注意②:@Autowired遇到相同两个类
          //UserRepository

     package com.guigu.spring.beans.annotation.repository;

     public interface UserRepository {

         void save();

     }

         //UserRepositoryImpl  继承 UserRepository

     package com.guigu.spring.beans.annotation.repository;

   import org.springframework.stereotype.Repository;

   @Repository("userRepository");   //这里

   public class UserRepositoryImpl implements UserRepository {

       @Override

       public void save() {

           System.out.println("UserRepositoryImpl Save...");

       }

    //UserRepositoryImpl2  继承 UserRepository

    @Repository

    public class UserRepositoryImpl2 implements UserRepository {

       @Override

      public void save() {

           System.out.println("UserRepositoryImpl2 Save...");

       }

   }
        // main函数

       public class Main {

          public static void main(String[] args) {

              //@Autowired

              private UserRepository userRepository ;

              ApplicationContext ctx =new ClassPathXmlApplicationContext("beans-annotation.xml");

              userRepository .save();

      }

    }
main函数中有@Autowired,自动创建对象,但UserRepository 类却有两个接口,它要去创建哪一个呢?
:默认情况下,若有两个,去找名字相同的,就是还没实例的这个userRepository ,若找到和它名字一样的,上面 @Repository("userRepository"); 写了名字,那就找它了。
若不是这样写@Repository("userRepository");而是 @Repository(),那就报错了。
注意③:解决②的另一个方法
若@Repository("userRepository");改成@Repository(),main函数会报错。
改一下main函数
          // main函数

         public class Main {

            public static void main(String[] args) {

                //@Autowired

                //Qualifier("userRepositoryImpl ")

                private UserRepository userRepository ;

                ApplicationContext ctx =new ClassPathXmlApplicationContext("beans-annotation.xml");

                userRepository .save();

        }

     }
用Qualifier("userRepositoryImpl ");表示去找userRepositoryImpl 实例,这样也解决了。
Spring学习记录(十一)---使用注解和自动装配的更多相关文章
- 使用Spring的JavaConfig 和 @Autowired注解与自动装配
1 JavaConfig 配置方法 之前我们都是在xml文件中定义bean的,比如: 1 2 3 4 5 6 7 8 <beans xmlns="http://www.springf ...
- Spring学习七----------Bean的配置之自动装配
© 版权声明:本文为博主原创文章,转载请注明出处 Bean的自动装配(Autowiring) no:不启用自动装配,此时需要手动注入.参考:Spring学习三----------注入方式 defaul ...
- 我的Spring学习记录(四)
虽然Spring管理这我们的Bean很方便,但是,我们需要使用xml配置大量的Bean信息,告诉Spring我们要干嘛,这还是挺烦的,毕竟当我们的Bean随之增多的话,xml的各种配置会让人很头疼. ...
- 我的Spring学习记录(五)
在我的Spring学习记录(四)中使用了注解的方式对前面三篇做了总结.而这次,使用了用户登录及注册来对于本人前面四篇做一个应用案例,希望通过这个来对于我们的Spring的使用有一定的了解. 1. 程序 ...
- 我的Spring学习记录(二)
本篇就简单的说一下Bean的装配和AOP 本篇的项目是在上一篇我的Spring学习记录(一) 中项目的基础上进行开发的 1. 使用setter方法和构造方法装配Bean 1.1 前期准备 使用sett ...
- Spring 学习记录3 ConversionService
ConversionService与Environment的关系 通过之前的学习(Spring 学习记录2 Environment),我已经Environment主要是负责解析properties和p ...
- Spring 学习记录8 初识XmlWebApplicationContext(2)
主题 接上文Spring 学习记录7 初识XmlWebApplicationContext refresh方法 refresh方法是定义在父类AbstractApplicationContext中的. ...
- Spring 学习记录6 BeanFactory(2)
主题 除了Spring 学习记录5 BeanFactory 里写的几个接口外,BeanFactory的实现类还实现了一些其他接口,这篇文章主要介绍这些接口和实现类. 结构 DefaultListabl ...
- Spring学习七:ComponentScan注解
今天主要从以下几个方面来介绍一下@ComponentScan注解: @ComponentScan注解是什么 @ComponentScan注解的详细使用 1.ComponentScan注解是什么 其实很 ...
随机推荐
- Java基础加强之多线程篇(线程创建与终止、互斥、通信、本地变量)
线程创建与终止 线程创建 Thread类与Runnable接口的关系 public interface Runnable { public abstract void run(); } public ...
- Asp.net中static变量和viewstate的使用方法(谨慎)
在.Net平台下进行CS软件开发时,我们经常遇到以后还要用到某些变量上次修改后的值,为了简单起见,很多人都习惯用static来定义这些变量,我也是.这样非常方便,下一次调用某个函数时该变量仍然保存的是 ...
- oracle中row_number和rownum的区别和联系(翻译)
http://www.tuicool.com/articles/bI3IBv 附问题:有以下一个SQL语句: SELECT * FROM ( SELECT t.*, row_number() OVER ...
- 【原】iOS学习之NSDate在项目中的一些类目扩展
在项目中,我们可能会面对各种各样的对于时间的需求,在这里提供几种可能会用到的需求代码 1.与今天的时间做比较,返回日期差值 代码: - (NSInteger)compareWithToday { NS ...
- 三星首次更新Gear VR虚拟现实浏览器Samsung Internet
通过VR浏览网页不是问题,不过你需要一个专门的VR浏览器,而GearVR的虚拟现实应用名为"Samsung Internet for Gear VR".继去年12月份上线后,迎来了 ...
- 深入理解JavaScript运行机制
深入理解JavaScript运行机制 前言 本文是写作在给团队新人培训之际,所以其实本文的受众是对JavaScript的运行机制不了解或了解起来有困难的小伙伴.也就是说,其实真正的原理和本文阐述的并不 ...
- js实现弹出的提示框只弹出一次
<script type="text/javascript"> var ua = navigator.userAgent.toLowerCase(); if (/iph ...
- Winform控件WebBrowser与JS脚本交互
1)在c#中调用js函数 如果要传值,则可以定义object[]数组. 具体方法如下例子: 首先在js中定义被c#调用的方法: function Messageaa(message) { ...
- AmazeUI 框架知识点-元素
1.按钮 .am-btn 圆角按钮 .am-radius 椭圆形按钮 .am-round 按钮激活状态 .am-active 禁用状态 .am-disabled 2.按钮尺寸.am-btn-xl . ...
- Solve VS2010 Error "Exceptions has been thrown by the target of an invocation"
Sometimes when you open a VS2010 project, an error window will pop up with the error message "E ...