gulp4.0 前端构建脚手架
最近看了下gulp4.0的升级,感觉和3.0相比变化还是比较大的,很多3.0的写法和插件会出现一些莫名其妙的变化,详细的变化就先不说了,这里我直接把我配置好的代码拿过来吧,方便各位可以更好的学习和使用(下面代码经过本人尝试,可以正确无误的运行)
gulp4.0 github源码
1,目录结构
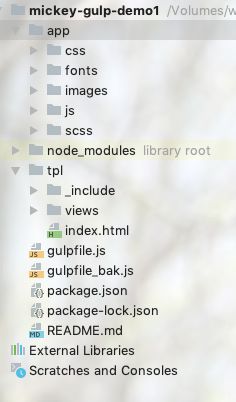
app下面的文件夹就不用多介绍了吧,都是存放的一些基本的静态资源,这里着重说下为啥会多了一个tpl文件夹。
之所以单独列出一个tpl文件夹其实是为了使用gulp-file-include,里面其实存放的是一些html的模板,
index.html
<!DOCTYPE html>

<html lang="en">

<head>

    <meta charset="UTF-8">

    <title>Title</title>

    <link rel="stylesheet" href="./css/styles.css" />

    <script type="text/javascript" src="./js/index.js"/>

</head>

<body>

@@include('./header.html',{"index":"index"})

hello I am the demo page

<div class="main">mickey</div>

<!-- footer -->

@@include('./footer.html',{"param": "我是传递过来的备案号","index":"index"})

</body>

</html>
_include/footer.html
<div>footer @@param</div>
_include/header.html
<div>

    <span @@if(context.index === 'index'){style='color:red'}>首页</span>

    <span @@if(context.index === 'aboutus'){style='color:red'}>关于我们</span>

</div>
具体语法我就不解释了,知道tpl里面存放的是什么东西就可以了。
2,package.json
{

  "name": "mickey-gulp-demo1",

  "version": "1.0.0",

  "description": "this is a demo project",

  "main": "gulpfile.js",

  "scripts": {

    "test": "echo \"Error: no test specified\" && exit 1"

  },

  "keywords": [

    "gulp"

  ],

  "author": "mickey007@163.com",

  "license": "ISC",

  "devDependencies": {

    "@babel/core": "^7.4.3",

    "@babel/preset-env": "^7.4.3",

    "autoprefixer": "^9.5.1",

    "babel-preset-env": "^1.7.0",

    "browser-sync": "^2.26.3",

    "del": "^4.1.0",

    "gulp": "^4.0.0",

    "gulp-babel": "^8.0.0",

    "gulp-clean": "^0.4.0",

    "gulp-clean-css": "^4.0.0",

    "gulp-concat": "^2.6.1",

    "gulp-connect": "^5.7.0",

    "gulp-file-include": "^2.0.1",

    "gulp-htmlmin": "^5.0.1",

    "gulp-imagemin": "^5.0.3",

    "gulp-load-plugins": "^1.5.0",

    "gulp-make-css-url-version": "^0.0.13",

    "gulp-postcss": "^8.0.0",

    "gulp-rev": "^9.0.0",

    "gulp-rev-all": "^1.0.0",

    "gulp-rev-collector": "^1.3.1",

    "gulp-rev-replace": "^0.4.4",

    "gulp-sass": "^4.0.2",

    "gulp-uglify": "^3.0.2",

    "gulp-useref": "^3.1.6",

    "gulp-watch": "^5.0.1"

  }

}
这个配置文件就比较重要了,所有的包和版本都在这里,使用的时候不要忘记执行 npm install 哦
3,gulpfile.js
const {src, dest, watch, series, parallel} = require('gulp')

const del = require('del');

//处理md5文件名

const revAll = require('gulp-rev-all');

const revReplace = require('gulp-rev-replace');

const cssver = require('gulp-make-css-url-version');

const sass=require('gulp-sass');

const postcss = require('gulp-postcss');

const autoprefixer = require('autoprefixer');

const cleancss = require('gulp-clean-css');

const babel=require('gulp-babel');

const uglify = require('gulp-uglify');

const imagemin = require('gulp-imagemin')

const htmlmin = require('gulp-htmlmin');

const fileinclude = require('gulp-file-include');

const connect = require('gulp-connect');

//配置路径

const baseUrl = './app/';

const distUrl = './dist/';

const tplUrl = './tpl/';

const configUrl = {

    file: {

        css: baseUrl + 'css/**/*.css',

        scss: baseUrl + 'scss/**/*.scss',

        images: baseUrl + 'images/**/*',

        js: baseUrl + 'js/**/*.js',

        libs: baseUrl + 'js/libs/**/*.js',

        fonts: baseUrl + 'fonts/**/*',

        html: baseUrl + '**/*.html',

        tpl: tplUrl + '**/*.html',

        tpl_include: tplUrl + '_include/**/*.html'

    },

    folder: {

        css: baseUrl + 'css',

        html: baseUrl

    },

    dist: {

        css: distUrl + 'css',

        images: distUrl + 'images',

        js: distUrl + 'js',

        html: distUrl,

        rev: distUrl + 'rev'

    }

}

//删除dist

const clean = () => del([distUrl])

//删除生成的html文件,保留文件夹

const cleanHtml = () => del([configUrl.file.html])

const scss = () => src(configUrl.file.scss)

    .pipe(sass().on('error', sass.logError))

    .pipe(postcss([autoprefixer(

        {

            // 兼容主流浏览器的最新两个版本

            browsers: ['last 2 versions'],

            // 是否美化属性值

            cascade: false

        }

    )]))

    .pipe(dest(configUrl.folder.css));

const baleCss = () => src(configUrl.file.css)

    .pipe(cssver())

    .pipe(cleancss({

        compatibility: 'ie7',//保留ie7及以下兼容写法 类型:String 默认:''or'*' [启用兼容模式; 'ie7':IE7兼容模式,'ie8':IE8兼容模式,'*':IE9+兼容模式]

        format: 'keep-breaks',//是否保留换行

        keepSpecialComments: '*'//保留所有特殊前缀 当你用autoprefixer生成的浏览器前缀,如果不加这个参数,有可能将会删除你的部分前缀

    }))

    .pipe(revAll.revision({"fileNameManifest":"rev-css-manifest.json"}))

    .pipe(dest(configUrl.dist.css))

    .pipe(revAll.manifestFile())

    .pipe(dest(configUrl.dist.rev));

const baleJs = () => src([configUrl.file.js,'!' + configUrl.file.libs])

    .pipe(babel({ presets: ['@babel/env'] })) // ES6转ES5

    .pipe(uglify({

        mangle:true,//类型:Boolean 默认:true 是否修改变量名  排除混淆关键字

        compress:true,//类型:Boolean 默认:true 是否完全压缩

    }))

    .pipe(revAll.revision({"fileNameManifest":"rev-js-manifest.json"}))

    .pipe(dest(configUrl.dist.js))

    .pipe(revAll.manifestFile())

    .pipe(dest(configUrl.dist.rev));

const baleImages = () => src(configUrl.file.images)

    .pipe(imagemin({

        progressive: true,//类型:Boolean 默认:false 多次优化svg直到完全优化

        svgoPlugins: [{removeViewBox: false}]//不要移除svg的viewbox属性

    }))

    .pipe(dest(configUrl.dist.images))

// const baleHtml = () => src([baseUrl + 'index.html',baseUrl + 'views/*.html'],{base: baseUrl})

const baleHtml = () => src(configUrl.file.html)

    .pipe(htmlmin({

        removeComments: true,//清除HTML注释

        collapseWhitespace: true//压缩HTML

    }))

    .pipe(revReplace({manifest:src(configUrl.dist.rev + '/*.json')}))

    .pipe(dest(configUrl.dist.html));

const baleCopy = () => src([configUrl.file.fonts,configUrl.file.libs],{base: baseUrl})

    .pipe(dest(distUrl))

const file = () => src([configUrl.file.tpl,'!' + configUrl.file.tpl_include])

    .pipe(fileinclude({

        prefix: '@@',//变量前缀 @@include

        basepath: './tpl/_include',//引用文件路径

        indent:true//保留文件的缩进

    }))

    .pipe(dest(configUrl.folder.html));

const reload = () => src(configUrl.file.html)

    .pipe(connect.reload());

const watchs = () => {

    watch(configUrl.file.tpl,series(cleanHtml,file));

    watch(configUrl.file.scss,scss);

    watch(baseUrl + "**/*.*", reload);

    connect.server({

        root: baseUrl,

        port: 8080,

        livereload: true,

    });

}

exports.file = file;

exports.clean = clean;

//启动项目

exports.default = watchs;

//打包项目

exports.build = series(clean,parallel(baleCss, baleJs, baleImages, baleCopy),baleHtml);
这里本地调试我使用的app文件夹下面的代码,执行gulp watchs 或者 gulp 后会启动一个本地服务来运行app下面的代码
gulp build 是打包生产的代码,打包的地址在根目录的dist文件夹下,打包上传服务器即可
项目源码地址:https://github.com/blueskyli/gulp-4.0
gulp4.0 前端构建脚手架的更多相关文章
- webpack前端构建angular1.0!!!
webpack前端构建angular1.0 Webpack最近很热,用webapcak构建react,vue,angular2.0的文章很多,但是webpack构建angualr1.0的文章找来找去也 ...
- 前端构建大法 Gulp 系列 (一):为什么需要前端构建
系列目录 前端构建大法 Gulp 系列 (一):为什么需要前端构建 前端构建大法 Gulp 系列 (二):为什么选择gulp 前端构建大法 Gulp 系列 (三):gulp的4个API 让你成为gul ...
- 前端构建工具之gulp_常用插件
gulp常用插件的使用 今天来看看一下gulp的常用插件的使用 就像gruntjs需要一个Gruntfile.js文件一样,gulp也需要一个文件作为它的主文件,在gulp中这个文件叫做gulpfil ...
- 前端构建工具gulpjs的使用介绍及技巧
gulpjs是一个前端构建工具,与gruntjs相比,gulpjs无需写一大堆繁杂的配置参数,API也非常简单,学习起来很容易,而且gulpjs使用的是nodejs中stream来读取和操作数据,其速 ...
- gulp插件(gulp-jmbuild),用于WEB前端构建
源码地址:https://github.com/jiamao/gulp-jmbuild https://github.com/jiamao/gulp-jmbuild gulp-jmbuild gulp ...
- 前端构建:Source Maps详解
一.前言 当使用CoffeeScript.ClojureScript编写前端脚本时,当使用Less.Sacc编写样式规则时,是否觉得调试时无法准确找到源码位置呢?当使用jquery.min.js等经压 ...
- 前端构建工具gulp介绍
2016年3月3日 10:46:08 晴 前端构建工具gulpjs的使用介绍及技巧 gulpjs是一个前端构建工具,与gruntjs相比,gulpjs无需写一大堆繁杂的配置参数,API也非常简 ...
- 前端构建工具gulpjs
gulpjs是一个前端构建工具,与gruntjs相比,gulpjs无需写一大堆繁杂的配置参数,API也非常简单,学习起来很容易,而且gulpjs使用的是nodejs中stream来读取和操作数据,其速 ...
- 前端构建利器Grunt—Bower
runt + Bower—前端构建利器 目前比较流行的WEB开发的趋势是前后端分离.前端采用重量级的Javascript框架,比如Angular,Ember等,后端采用restful API的Web ...
随机推荐
- Ubuntu在命令行开启远程桌面
在终端执行下列三个命令即可 gsettings set org.gnome.Vino enabled truegsettings set org.gnome.Vino prompt-enabled f ...
- Codeforces735D Taxes 2016-12-13 12:14 56人阅读 评论(0) 收藏
D. Taxes time limit per test 2 seconds memory limit per test 256 megabytes input standard input outp ...
- [leetcode] 20. Valid Sudoku
这道题目被放在的简单的类别里是有原因的,题目如下: Determine if a Sudoku is valid, according to: Sudoku Puzzles - The Rules. ...
- 【算法34】蓄水池抽样算法 (Reservoir Sampling Algorithm)
蓄水池抽样算法简介 蓄水池抽样算法随机算法的一种,用来从 N 个样本中随机选择 K 个样本,其中 N 非常大(以至于 N 个样本不能同时放入内存)或者 N 是一个未知数.其时间复杂度为 O(N),包含 ...
- 【转】WinRT 中SystemTrigger 构造函数的 SystemTriggerType 参数的解释
中文版:http://msdn.microsoft.com/library/windows/apps/windows.applicationmodel.background.systemtrigger ...
- android RadioButton文字居中的方法
每个RadioButton的style原先是这样的: <style name="radiobutton_style" > <item name="and ...
- jenkins 后台程序运行
# 背景 jenkins持续集成,需要任务后台执行(nohup执行)结果发现jenkins的job执行完后,看不到运行的进程 # 步骤 原因就是这么一个情况:Jenkins任务结束时候自动关掉了所有的 ...
- HTML5+规范:Webview(管理应用窗口界面)
一.知识点 Webview模块管理应用窗口界面,实现多窗口的逻辑控制管理操作.通过plus.webview可获取应用界面管理对象. 1.方法 1.1.all: 获取所有Webview窗口 Array[ ...
- NetCore入门篇:(五)Net Core项目使用静态文件
一.简介 1.Net Core默认无法访问静态文件,需要在Startup通过代码添加定义. 2.本文介绍两种静态文件目录实现方式. 二.启用默认目录 1.添加图片文件 2.测试访问结果(不能访问) 3 ...
- .Net Core WebApi返回的json数据,自定义日期格式
基本上所有的人都在DateTime类型的字段,被序列化成json的时候,遇到过可恨的Date(1294499956278+0800):但是又苦于不能全局格式化设置,比较难受.以往的方式,要么使用全局的 ...