spring boot mybatis 多数据源配置
package com.xynet.statistics.config.dataresources;

import org.springframework.jdbc.datasource.lookup.AbstractRoutingDataSource;

/**

 * 动态数据源

 * Copyright © 2019 xynet Tech Ltd. All rights reserved

 * @author: sund

 * @date: 2019年3月23日 下午4:35:39

 * @remark:

 */

public class DynamicDataSource extends AbstractRoutingDataSource {

    /**

     * 代码中的determineCurrentLookupKey方法取得一个字符串, 该字符串将与配置文件中的相应字符串进行匹配以定位数据源

     */

    @Override

    protected Object determineCurrentLookupKey() {

        /**

         * DynamicDataSourceContextHolder代码中使用setDataSourceType

         * 设置当前的数据源,在路由类中使用getDataSourceType进行获取,

         * 交给AbstractRoutingDataSource进行注入使用

         */

        return DynamicDataSourceContextHolder.getDataSourceType();

    }

}
package com.xynet.statistics.config.dataresources;

import org.aspectj.lang.JoinPoint;

import org.aspectj.lang.annotation.After;

import org.aspectj.lang.annotation.Aspect;

import org.aspectj.lang.annotation.Before;

import org.springframework.core.annotation.Order;

import org.springframework.stereotype.Component;

/**

 * 数据源切面

 *

 * @Order(-5)保证该AOP在@Transactional之前执行 order 越小优先级越高

 * Copyright © 2019 xynet Tech Ltd. All rights reserved

 * @author: sund

 * @date: 2019年3月23日 下午4:24:49

 * @remark:

 */

@Aspect

@Order(-5)

@Component

public class DynamicDataSourceAspect {

    /**

     * @Before("@annotation(ds)") @Before:在方法执行之前进行执行: @annotation(

     * targetDataSource): 会拦截注解targetDataSource的方法,否则不拦截;

     *

     * @param point

     * @param targetDataSource

     * @throws Throwable

     */

    @Before("@annotation(targetDataSource)")

    public void changeDataSource(JoinPoint point, TargetDataSource targetDataSource) throws Throwable {

        // 获取当前的指定的数据源;

        String dsId = targetDataSource.value();

        // 如果不在我们注入的所有的数据源范围之内,那么输出警告信息,系统自动使用默认的数据源。

        if (!DynamicDataSourceContextHolder.containsDataSource(dsId)) {

            System.out.println("数据源【" + targetDataSource.value() + "】不存在,使用默认数据源:" + point.getSignature());

        } else {

            System.out.println("Use DataSource:" + targetDataSource.value() + ":" + point.getSignature());

            // 找到的话,那么设置到动态数据源上下文中指定的数据源

            DynamicDataSourceContextHolder.setDataSourceType(targetDataSource.value());

        }

    }

    @After("@annotation(targetDataSource)")

    public void restoreDataSource(JoinPoint point, TargetDataSource targetDataSource) {

        System.out.println("Revert DataSource:" + targetDataSource.value() + ":" + point.getSignature());

        // 方法执行完毕之后,销毁当前数据源信息,进行垃圾回收

        DynamicDataSourceContextHolder.clearDataSourceType();

    }

}
package com.xynet.statistics.config.dataresources;

import java.util.ArrayList;

import java.util.List;

/**

 * 动态数据源上下文

 * Copyright © 2019 xynet Tech Ltd. All rights reserved

 * @author: sund

 * @date: 2019年3月23日 下午4:32:45

 * @remark:

 */

public class DynamicDataSourceContextHolder {

    /**

     * 当使用ThreadLocal维护变量时,ThreadLocal为每个使用该变量的线程提供独立的变量副本,

     * 所以每一个线程都可以独立地改变自己的副本,而不会影响其它线程所对应的副本。

     */

    private static final ThreadLocal<String> contextHolder = new ThreadLocal<String>();

    /**

     * 管理所有的数据源id

     * 主要是为了判断数据源是否存在

     */

    public static List<String> dataSourceIds = new ArrayList<String>();

    /**

     * 使用setDataSourceType设置当前的

     * @param dataSourceType

     */

    public static void setDataSourceType(String dataSourceType) {

        contextHolder.set(dataSourceType);

    }

    public static String getDataSourceType() {

        return contextHolder.get();

    }

    public static void clearDataSourceType() {

        contextHolder.remove();

    }

    /**

     * 判断指定DataSource当前是否存在

     * @param dataSourceId

     * @return

     */

    public static boolean containsDataSource(String dataSourceId) {

        return dataSourceIds.contains(dataSourceId);

    }

}
package com.xynet.statistics.config.dataresources;

import org.springframework.beans.MutablePropertyValues;

import org.springframework.beans.PropertyValues;

import org.springframework.beans.factory.support.BeanDefinitionRegistry;

import org.springframework.beans.factory.support.GenericBeanDefinition;

import org.springframework.boot.autoconfigure.jdbc.DataSourceBuilder;

import org.springframework.boot.bind.RelaxedDataBinder;

import org.springframework.boot.bind.RelaxedPropertyResolver;

import org.springframework.context.EnvironmentAware;

import org.springframework.context.annotation.Configuration;

import org.springframework.context.annotation.Import;

import org.springframework.context.annotation.ImportBeanDefinitionRegistrar;

import org.springframework.core.convert.ConversionService;

import org.springframework.core.convert.support.DefaultConversionService;

import org.springframework.core.env.Environment;

import org.springframework.core.type.AnnotationMetadata;

import javax.sql.DataSource;

import java.util.HashMap;

import java.util.Map;

/**

 * 动态数据源注册 Copyright © 2019 xynet Tech Ltd. All rights reserved

 *

 * @author: sund

 * @date: 2019年3月23日 下午4:34:37

 * @remark:要在启动类上增加注解  @Import({DynamicDataSourceRegister.class})

 */

public class DynamicDataSourceRegister implements ImportBeanDefinitionRegistrar, EnvironmentAware {

    private static final Object DATASOURCE_TYPE_DEFAULT = "org.apache.tomcat.jdbc.pool.DataSource";

    private ConversionService conversionService = new DefaultConversionService();

    private PropertyValues dataSourcePropertyValues;

    // 默认数据源

    private DataSource defaultDataSource;

    private Map<String, DataSource> customDataSources = new HashMap<String, DataSource>();

    @Override

    public void setEnvironment(Environment environment) {

        initDefaultDataSource(environment);

        initCustomDataSources(environment);

    }

    /**

     * 加载主数据源配置.

     *

     * @param env

     */

    private void initDefaultDataSource(Environment env) {

        RelaxedPropertyResolver propertyResolver = new RelaxedPropertyResolver(env, "spring.datasource.");

        Map<String, Object> dsMap = new HashMap<String, Object>();

        dsMap.put("type", propertyResolver.getProperty("type"));

        dsMap.put("driverClassName", propertyResolver.getProperty("driverClassName"));

        dsMap.put("url", propertyResolver.getProperty("url"));

        dsMap.put("username", propertyResolver.getProperty("username"));

        dsMap.put("password", propertyResolver.getProperty("password"));

        defaultDataSource = buildDataSource(dsMap);

        dataBinder(defaultDataSource, env);

    }

    /**

     * 加载更多据源配置.

     *

     * @param env

     */

    private void initCustomDataSources(Environment env) {

        RelaxedPropertyResolver propertyResolver = new RelaxedPropertyResolver(env, "custom.datasource.");

        String dsPrefixs = propertyResolver.getProperty("names");

        for (String dsPrefix : dsPrefixs.split(",")) {

            Map<String, Object> dsMap = propertyResolver.getSubProperties(dsPrefix + ".");

            DataSource ds = buildDataSource(dsMap);

            customDataSources.put(dsPrefix, ds);

            dataBinder(ds, env);

        }

    }

    public DataSource buildDataSource(Map<String, Object> dsMap) {

        Object type = dsMap.get("type");

        if (type == null) {

            type = DATASOURCE_TYPE_DEFAULT;

        }

        Class<? extends DataSource> dataSourceType;

        try {

            dataSourceType = (Class<? extends DataSource>) Class.forName((String) type);

            String driverClassName = dsMap.get("driverClassName").toString();

            String url = dsMap.get("url").toString();

            String username = dsMap.get("username").toString();

            String password = dsMap.get("password").toString();

            DataSourceBuilder factory = DataSourceBuilder.create().driverClassName(driverClassName).url(url)

                    .username(username).password(password).type(dataSourceType);

            return factory.build();

        } catch (ClassNotFoundException e) {

            e.printStackTrace();

        }

        return null;

    }

    private void dataBinder(DataSource dataSource, Environment env) {

        RelaxedDataBinder dataBinder = new RelaxedDataBinder(dataSource);

        dataBinder.setConversionService(conversionService);

        dataBinder.setIgnoreNestedProperties(false);

        dataBinder.setIgnoreInvalidFields(false);

        dataBinder.setIgnoreUnknownFields(true);

        if (dataSourcePropertyValues == null) {

            Map<String, Object> rpr = new RelaxedPropertyResolver(env, "spring.datasource").getSubProperties(".");

            Map<String, Object> values = new HashMap<>(rpr);

            // 排除已经设置的属性

            values.remove("type");

            values.remove("driverClassName");

            values.remove("url");

            values.remove("username");

            values.remove("password");

            dataSourcePropertyValues = new MutablePropertyValues(values);

        }

        dataBinder.bind(dataSourcePropertyValues);

    }

    @Override

    public void registerBeanDefinitions(AnnotationMetadata importingClassMetadata, BeanDefinitionRegistry registry) {

        Map<Object, Object> targetDataSources = new HashMap<Object, Object>();

        // 将主数据源添加到更多数据源中

        targetDataSources.put("dataSource", defaultDataSource);

        DynamicDataSourceContextHolder.dataSourceIds.add("dataSource");

        // 添加更多数据源

        targetDataSources.putAll(customDataSources);

        for (String key : customDataSources.keySet()) {

            DynamicDataSourceContextHolder.dataSourceIds.add(key);

        }

        // 创建DynamicDataSource

        GenericBeanDefinition beanDefinition = new GenericBeanDefinition();

        beanDefinition.setBeanClass(DynamicDataSource.class);

        beanDefinition.setSynthetic(true);

        MutablePropertyValues mpv = beanDefinition.getPropertyValues();

        // 添加属性:AbstractRoutingDataSource.defaultTargetDataSource

        mpv.addPropertyValue("defaultTargetDataSource", defaultDataSource);

        mpv.addPropertyValue("targetDataSources", targetDataSources);

        registry.registerBeanDefinition("dataSource", beanDefinition);

        System.out.println("============注册数据源成功==============");

    }

}
package com.xynet.statistics.config.dataresources;

import java.lang.annotation.*;

/**

 * 自定义注解,数据源指定

 * Copyright © 2019 xynet Tech Ltd. All rights reserved

 * @author: sund

 * @date: 2019年3月23日 下午4:37:16

 * @remark:

 */

@Target({ ElementType.METHOD, ElementType.TYPE })

@Retention(RetentionPolicy.RUNTIME)

@Documented

public @interface TargetDataSource {

    String value();

}
将上面五个类建立好后在启动类中加入@Import({DynamicDataSourceRegister.class}),这个很关键不然加载不了多数据源,只会调用默认数据源
@EnableDiscoveryClient

@EnableHystrix

@EnableEurekaClient

@SpringBootApplication

@EnableCircuitBreaker

@ServletComponentScan

@EnableRedisHttpSession

@EnableTransactionManagement

@EnableFeignClients

@EnableScheduling

@MapperScan(basePackages = "com.xynet.statistics.dao")

@Import({DynamicDataSourceRegister.class})

public class XynetServiceStatisticsApplication {

    public static void main(String[] args) {

        SpringApplication.run(XynetServiceStatisticsApplication.class, args);

    }

    @Bean

    public AsyncTaskExecutor paraTaskExecutor() {

        ThreadPoolTaskExecutor executor = new ThreadPoolTaskExecutor();

        executor.setThreadNamePrefix("statistics-paraTaskExecutor-Executor");

        executor.setCorePoolSize(24);

        executor.setQueueCapacity(100);

        executor.setMaxPoolSize(500);

        executor.setRejectedExecutionHandler(new ThreadPoolExecutor.DiscardPolicy());

        executor.initialize();

        /*

         * // 设置拒绝策略 executor.setRejectedExecutionHandler(new

         * RejectedExecutionHandler() {

         *

         * @Override public void rejectedExecution(Runnable r,

         * ThreadPoolExecutor executor) { // ..... } }); // 使用预定义的异常处理类

         * executor.setRejectedExecutionHandler(new

         * ThreadPoolExecutor.CallerRunsPolicy());

         */

        return executor;

    }

}
数据源切换注解要加到service上不要加到Mapper中上否则不会生效
@Service
public class BigDataServiceImpl implements BigDataService {
    @Override

    @TargetDataSource("slave1")

    public List<T_jq_jqxx> selectJqbhByShbh(String shbh) {

        return t_jq_jqxxMapper.selectJqbhByShbh(shbh);

    }
}
application-dev.yaml 配置文件如下:
spring:

  profiles: dev

  #mysql

  datasource:

      type: com.alibaba.druid.pool.DruidDataSource

      initialSize: 5

      minIdle: 5

      maxActive: 20

      maxWait: 60000

      timeBetweenEvictionRunsMillis: 60000

      minEvictableIdleTimeMillis: 300000

      validationQuery: SELECT NOW()

      testWhileIdle: true

      testOnBorrow: true

      testOnReturn: false

      poolPreparedStatements: true

      maxPoolPreparedStatementPerConnectionSize: 20

      filters: stat,log4j

      connectionProperties: druid.stat.mergeSql=true;druid.stat.slowSqlMillis=5000

      driverClassName: com.mysql.jdbc.Driver

      username: root

      password: 1234

      url: jdbc:mysql://192.168.1.253:3306/xy-platform?characterEncoding=utf-8&serverTimezone=GMT%2B8&useSSL=false

  #jpa

  jpa:

      show-sql: true

      open-in-view: true

#redis

  redis:

    database: 15

    host: 192.168.1.253

    password:

    port: 6379

    pool:

      min-idle: 1

      max-idle: 8

      max-active: 100

      max-wait: 1

    timeout: 10000

custom:

    datasource:

      names: slave1,slave2

      slave1:

        type: com.alibaba.druid.pool.DruidDataSource

        driverClassName: com.mysql.jdbc.Driver

        username: root

        password: 1234

        url: jdbc:mysql://192.168.1.253:3306/test?characterEncoding=utf-8&serverTimezone=GMT%2B8&useSSL=false

      slave2:

        type: com.alibaba.druid.pool.DruidDataSource

        driverClassName: com.mysql.jdbc.Driver

        username: root

        password: 1234

        url: jdbc:mysql://192.168.1.253:3306/sy?characterEncoding=utf-8&serverTimezone=GMT%2B8&useSSL=false

 #log

logging:

    level:

      root: INFO

      com.xynet: DEBUG

    file: logs/service-statistics.log

#server

server:

  port: 8081

app:

    fileHome: C:\

    tempFileHome: tmp/

    fileDownloadUrl: C:\

auth:

    #url: http://localhost:7011/remote/authRemoteService

    url: http://192.168.1.253:8899/authentication/remote/authRemoteService

eureka:

  client:

    #service-url.defaultZone: http://localhost:8761/eureka

    service-url.defaultZone: http://admin:123@192.168.1.253:7010/eureka

    enabled: true

    registerWithEureka: true

    fetchRegistry: true

    healthcheck.enabled: true

  instance:

    lease-renewal-interval-in-seconds: 5

    lease-expiration-duration-in-seconds: 5

    prefer-ip-address: true

    instance-id: ${spring.cloud.client.ipAddress}:${server.port}
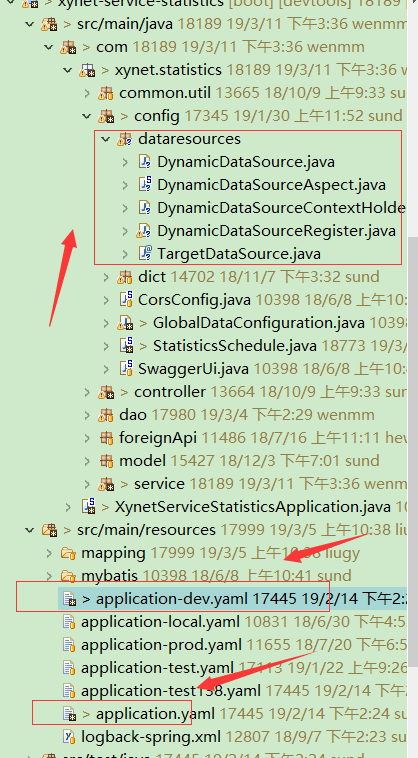
最上附上项目结构图:标红的地方为要修改的地方
spring boot mybatis 多数据源配置的更多相关文章
- spring boot Mybatis多数据源配置
关于 有时候,随着业务的发展,项目关联的数据来源会变得越来越复杂,使用的数据库会比较分散,这个时候就会采用多数据源的方式来获取数据.另外,多数据源也有其他好处,例如分布式数据库的读写分离,集成多种数据 ...
- Spring Boot + Mybatis 多数据源配置实现读写分离
本文来自网易云社区 作者:王超 应用场景:项目中有一些报表统计与查询功能,对数据实时性要求不高,因此考虑对报表的统计与查询去操作slave db,减少对master的压力. 根据网上多份资料测试发现总 ...
- spring boot mybatis多多数据源解决方法
在我们的项目中不免会遇到需要在一个项目中使用多个数据源的问题,像我在得到一个任务将用户的聊天记录进行迁移的时候,就是用到了三个数据源,当时使用的AOP的编程方式根据访问的方法的不同进行动态的切换数据源 ...
- spring boot +mybatis(通过properties配置) 集成
注:日常学习记录贴,下面描述的有误解的话请指出,大家一同学习. 因为我公司现在用的是postgresql数据库,所以我也用postgresql进行测试 一.前言 1.Spring boot 会默认读取 ...
- Spring MVC+Mybatis 多数据源配置
文章来自:https://www.jianshu.com/p/fddcc1a6b2d8 1. 继承AbstractRoutingDataSource AbstractRoutingDataSource ...
- spring boot jpa 多数据源配置
在实际项目中往往会使用2个数据源,这个时候就需要做额外的配置了.下面的配置在2.0.1.RELEASE 测试通过 1.配置文件 配置两个数据源 spring.datasource.url=jdbc:m ...
- spring boot + mybatis + druid配置实践
最近开始搭建spring boot工程,将自身实践分享出来,本文将讲述spring boot + mybatis + druid的配置方案. pom.xml需要引入mybatis 启动依赖: < ...
- Spring Boot 2.X(五):MyBatis 多数据源配置
前言 MyBatis 多数据源配置,最近在项目建设中,需要在原有系统上扩展一个新的业务模块,特意将数据库分库,以便减少复杂度.本文直接以简单的代码示例,如何对 MyBatis 多数据源配置. 准备 创 ...
- Spring Boot + Mybatis 配置多数据源
Spring Boot + Mybatis 配置多数据源 Mybatis拦截器,字段名大写转小写 package com.sgcc.tysj.s.common.mybatis; import java ...
随机推荐
- springboot中@webfilter注解的filter时注入bean都是null
在使用@Webfilter注解Filter的情况下,不上外部tomcat时是没有问题的.但是在tomcat下运行时,filter中注入的bean就都是null 解决办法: 一:去掉@Webfilter ...
- UITableView--文档版
CHENYILONG Blog UITableView Fullscreen UITableView技术博客http://www.cnblogs.com/ChenYilong/ 新浪微博http: ...
- Entity Framework Context上下文管理(CallContext 数据槽)
Context上下文管理 Q1:脏数据 Q2:一次逻辑操作中,会多次访问数据库,增加了数据库服务器的压力 >在一次逻辑操作中实现上下文实例唯一 方法一:单例模式:内存的爆炸式增长 在整个运行期间 ...
- 关于java线程锁synchronized修饰普通方法与静态方法的区别
最近研究线程方面问题,关于这个synchronized锁修饰的问题,先是修饰普通方法,然后通过两个线程,各自执行自己对象的锁,发现方法执行互不影响,代码如下: private static int n ...
- imperva 获取gti文档
SSH到设备(MX或GW) 以root用户身份登录MX和GW 运行“impctl support get-tech-info --last-server-archives=5 --caes-numbe ...
- 利用rundll32执行程序的函数执行程序
1.前言 无意间发现hexacorn这个国外大佬,给出了很多通过rundll32执行DLL中的函数执行程序的方法,思路很灵巧. 2.原理 rundll32加载dll 用法: rundll32 < ...
- linux下补丁制作及打补丁实例【转】
转自:http://www.latelee.org/using-gnu-linux/diff-and-patch-on-linux.html 搞ARM有一段时日了,期间看了不少开发板的手册,手册的内容 ...
- MySQL 高可用:mysql+Lvs+Keepalived 负载均衡及故障转移
系统信息: mysql主库 mysql从库 VIP 192.168.1.150 mysql 主主同步都设置 auto-increment-offset,auto-increment-increment ...
- 05 Go 1.5 Release Notes
Go 1.5 Release Notes Introduction to Go 1.5 Changes to the language Map literals The Implementation ...
- git内部原理
Git 内部原理 无论是从之前的章节直接跳到本章,还是读完了其余章节一直到这——你都将在本章见识到 Git 的内部工作原理 和实现方式. 我们发现学习这部分内容对于理解 Git 的用途和强大至关重要. ...