SpringCloud教程 | 第二篇: 服务消费者(rest+ribbon)
在上一篇文章,讲了服务的注册和发现。在微服务架构中,业务都会被拆分成一个独立的服务,服务与服务的通讯是基于http restful的。Spring cloud有两种服务调用方式,一种是ribbon+restTemplate,另一种是feign。在这一篇文章首先讲解下基于ribbon+rest。
一、ribbon简介
Ribbon is a client side load balancer which gives you a lot of control over the behaviour of HTTP and TCP clients. Feign already uses Ribbon, so if you are using @FeignClient then this section also applies.
ribbon是一个负载均衡客户端,可以很好的控制htt和tcp的一些行为。Feign默认集成了ribbon。
ribbon 已经默认实现了这些配置bean:
IClientConfig ribbonClientConfig: DefaultClientConfigImpl
IRule ribbonRule: ZoneAvoidanceRule
IPing ribbonPing: NoOpPing
ServerList ribbonServerList: ConfigurationBasedServerList
ServerListFilter ribbonServerListFilter: ZonePreferenceServerListFilter
ILoadBalancer ribbonLoadBalancer: ZoneAwareLoadBalancer
二、准备工作
这一篇文章基于上一篇文章的工程,启动eureka-server 工程;启动service-hi工程,它的端口为8762;将service-hi的配置文件的端口改为8763,并启动,这时你会发现:service-hi在eureka-server注册了2个实例,这就相当于一个小的集群。访问localhost:8761如图所示:
三、建一个服务消费者
重新新建一个spring-boot工程,取名为:service-ribbon;
在它的pom.xml文件分别引入起步依赖spring-cloud-starter-eureka、spring-cloud-starter-ribbon、spring-boot-starter-web,代码如下:
<?xml version="1.0" encoding="UTF-8"?>
<project xmlns="http://maven.apache.org/POM/4.0.0" xmlns:xsi="http://www.w3.org/2001/XMLSchema-instance"
         xsi:schemaLocation="http://maven.apache.org/POM/4.0.0 http://maven.apache.org/xsd/maven-4.0.0.xsd">
    <modelVersion>4.0.0</modelVersion>
    <parent>
        <groupId>org.springframework.boot</groupId>
        <artifactId>spring-boot-starter-parent</artifactId>
        <version>2.1.4.RELEASE</version>
        <relativePath/> <!-- lookup parent from repository -->
    </parent>
    <groupId>com.javen</groupId>
    <artifactId>service-ribbon</artifactId>
    <version>0.0.1-SNAPSHOT</version>
    <name>service-ribbon</name>
    <description>Demo project for Spring Boot</description>

    <properties>
        <java.version>1.8</java.version>
        <spring-cloud.version>Greenwich.SR1</spring-cloud.version>
    </properties>

    <dependencies>
        <dependency>
            <groupId>org.springframework.cloud</groupId>
            <artifactId>spring-cloud-starter-netflix-eureka-client</artifactId>
        </dependency>
        <dependency>
            <groupId>org.springframework.cloud</groupId>
            <artifactId>spring-cloud-starter-netflix-ribbon</artifactId>
        </dependency>

        <dependency>
            <groupId>org.springframework.boot</groupId>
            <artifactId>spring-boot-starter-web</artifactId>
        </dependency>

        <dependency>
            <groupId>org.springframework.boot</groupId>
            <artifactId>spring-boot-starter-test</artifactId>
            <scope>test</scope>
        </dependency>
    </dependencies>

    <dependencyManagement>
        <dependencies>
            <dependency>
                <groupId>org.springframework.cloud</groupId>
                <artifactId>spring-cloud-dependencies</artifactId>
                <version>${spring-cloud.version}</version>
                <type>pom</type>
                <scope>import</scope>
            </dependency>
        </dependencies>
    </dependencyManagement>

    <build>
        <plugins>
            <plugin>
                <groupId>org.springframework.boot</groupId>
                <artifactId>spring-boot-maven-plugin</artifactId>
            </plugin>
        </plugins>
    </build>

</project>
在工程的配置文件指定服务的注册中心地址为http://localhost:8761/eureka/,程序名称为 service-ribbon,程序端口为8764。配置文件application.yml如下:
eureka:
  client:
    serviceUrl:
      defaultZone: http://localhost:8761/eureka/

server:
  port: 8764

spring:
  application:
    name: service-ribbon
在工程的启动类中,通过@EnableDiscoveryClient向服务中心注册;并且向程序的ioc注入一个bean: restTemplate;并通过@LoadBalanced注解表明这个restRemplate开启负载均衡的功能。
@SpringBootApplication
@EnableDiscoveryClient
public class ServiceRibbonApplication {

    public static void main(String[] args) {
        SpringApplication.run(ServiceRibbonApplication.class, args);
    }

    @Bean
    @LoadBalanced
    RestTemplate restTemplate() {
        return new RestTemplate();
    }
}
写一个测试类HelloService,通过之前注入ioc容器的restTemplate来消费service-hi服务的“/hi”接口,在这里我们直接用的程序名替代了具体的url地址,在ribbon中它会根据服务名来选择具体的服务实例,根据服务实例在请求的时候会用具体的url替换掉服务名,代码如下:
@Service
public class HelloService {
    @Autowired
    RestTemplate restTemplate;

    public String hiService(String name) {
        return restTemplate.getForObject("http://SERVICE-HI/hi?name=" + name, String.class);
    }
}
写一个controller,在controller中用调用HelloService 的方法,代码如下:
@RestController
public class HelloControler {
    @Autowired
    HelloService helloService;

    @RequestMapping(value = "/hi")
    public String hi(@RequestParam String name) {
        return helloService.hiService(name);
    }
}
在浏览器上多次访问http://localhost:8764/hi?name=forezp,浏览器交替显示:
hi forezp,i am from port:8762
hi forezp,i am from port:8763
这说明当我们通过调用restTemplate.getForObject(“http://SERVICE-HI/hi?name=”+name,String.class)方法时,已经做了负载均衡,访问了不同的端口的服务实例。
四、此时的架构
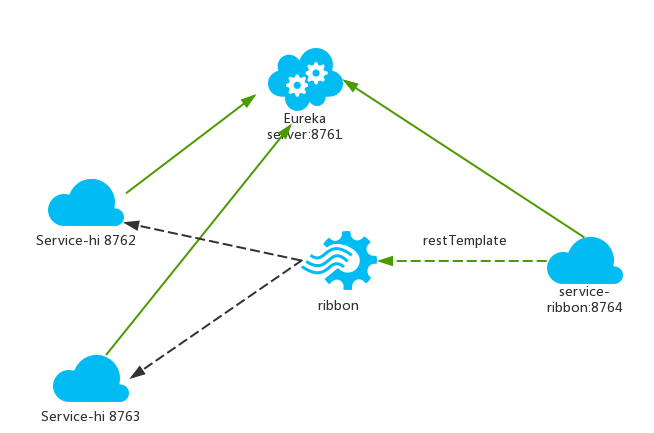
一个服务注册中心,eureka server,端口为8761
service-hi工程跑了两个实例,端口分别为8762,8763,分别向服务注册中心注册
sercvice-ribbon端口为8764,向服务注册中心注册
当sercvice-ribbon通过restTemplate调用service-hi的hi接口时,因为用ribbon进行了负载均衡,会轮流的调用service-hi:8762和8763 两个端口的hi接口;
SpringCloud教程 | 第二篇: 服务消费者(rest+ribbon)的更多相关文章
- SpringCloud教程 | 第二篇: 服务消费者(rest+ribbon)(Finchley版本)
在上一篇文章,讲了服务的注册和发现.在微服务架构中,业务都会被拆分成一个独立的服务,服务与服务的通讯是基于http restful的.Spring cloud有两种服务调用方式,一种是ribbon+r ...
- 史上最简单的SpringCloud教程 | 第二篇: 服务消费者(rest+ribbon)(Finchley版本)
转载请标明出处: 原文首发于:https://www.fangzhipeng.com/springcloud/2018/08/30/sc-f2-ribbon/ 本文出自方志朋的博客 在上一篇文章,讲了 ...
- 史上最简单的SpringCloud教程 | 第二篇: 服务消费者(rest+ribbon)
在上一篇文章,讲了服务的注册和发现.在微服务架构中,业务都会被拆分成一个独立的服务,服务与服务的通讯是基于http restful的.Spring cloud有两种服务调用方式,一种是ribbon+r ...
- 【SpringCloud】第二篇: 服务消费者(rest+ribbon)
前言: 必需学会SpringBoot基础知识 简介: spring cloud 为开发人员提供了快速构建分布式系统的一些工具,包括配置管理.服务发现.断路器.路由.微代理.事件总线.全局锁.决策竞选. ...
- SpringCloud教程 | 第一篇: 服务的注册与发现
一.spring cloud简介 spring cloud 为开发人员提供了快速构建分布式系统的一些工具,包括配置管理.服务发现.断路器.路由.微代理.事件总线.全局锁.决策竞选.分布式会话等等.它运 ...
- 史上最简单的SpringCloud教程 | 第九篇: 服务链路追踪(Spring Cloud Sleuth)(Finchley版本)
转载请标明出处: 原文首发于:>https://www.fangzhipeng.com/springcloud/2018/08/30/sc-f9-sleuth/ 本文出自方志朋的博客 这篇文章主 ...
- 史上最简单的SpringCloud教程 | 第九篇: 服务链路追踪(Spring Cloud Sleuth)
这篇文章主要讲述服务追踪组件zipkin,Spring Cloud Sleuth集成了zipkin组件. 注意情况: 该案例使用的spring-boot版本1.5.x,没使用2.0.x, 另外本文图3 ...
- SpringCloud教程 | 第九篇: 服务链路追踪(Spring Cloud Sleuth)
版权声明:本文为博主原创文章,欢迎转载,转载请注明作者.原文超链接 ,博主地址:http://blog.csdn.net/forezp. http://blog.csdn.net/forezp/art ...
- 史上最简单的SpringCloud教程 | 第三篇: 服务消费者(Feign)
转载请标明出处: https://www.fangzhipeng.com/springcloud/2017/07/12/sc03-feign/ 本文出自方志朋的博客 最新Finchley版本请访问: ...
随机推荐
- AHOI2019N省联考凉凉记
博主并未时空穿越,本文没有对选手造成恐慌 DAY0 这已经是我第四次省选了,时间真快啊,怀念三年前毫无压力的省选,考完以后如果有时间并且没退役的话可能会陆续搬以前写在别处的游记(主要是2018年的游记 ...
- [jzoj]4271. 【NOIP2015模拟10.27】魔法阵(37种转移的dp)
题意不说 应该这辈子都不会忘记了... 这是我人生中做的最SB的一道DP题. 真的打的我心态崩了.... 可是竟然被我调出来了..... 也是没谁了... 我们设\(F[i][j][S]\)表示到第\ ...
- Vue的指令系统、计算属性和表单输入绑定
指令系统 指令 (Directives) 是带有 v- 前缀的特殊特性.指令特性的值预期是单个 JavaScript 表达式 (v-for 是例外情况,稍后我们再讨论).指令的职责是,当表达式的值改变 ...
- MessagePack for C#
MessagePack for C# 快速序列化组件MessagePack介绍 简介 MessagePack for C#(MessagePack-CSharp)是用于C#的极速MessagePa ...
- DirectX11 With Windows SDK--12 深度/模板状态、平面镜反射绘制
前言 深度/模板测试使用的是与后备缓冲区同等分辨率大小的缓冲区,每个元素的一部分连续位用于深度测试,其余的则用作模板测试.两个测试的目的都是为了能够根据深度/模板状态需求的设置来选择需要绘制的像素. ...
- 使用SIGALARM为recvfrom设置超时
static void sig_alrm(int); void dg_cli(FILE *fp, int sockfd, const SA *pservaddr, socklen_t servlen) ...
- volative 与处理器的嗅探技术
在<java并发编程的艺术>这本书中,关于volatile的内存原理本质的描述如下: 有volatile变量修饰共享变量在编译器编译后,后多出一个“lock” 来(lock前缀指令相当于一 ...
- 安装vs2017后造成无法打开xproj项目无法打开
安装vs2017后,再用vs2015打开xproj项目的时候会报错: Error MSB4019 The imported project "C:\Program Files\dotnet\ ...
- JAVA进阶7
间歇性混吃等死,持续性踌躇满志系列-------------第7天 1.Map接口的常用方法 import java.util.HashMap; import java.util.Map; publi ...
- installshield安装包制作
入门教程:http://blog.csdn.net/gaofang2009/article/details/5260065 入门教程:http://blog.csdn.net/plfl520/arti ...