
iOS开发基础-九宫格坐标(1)

一、功能分析
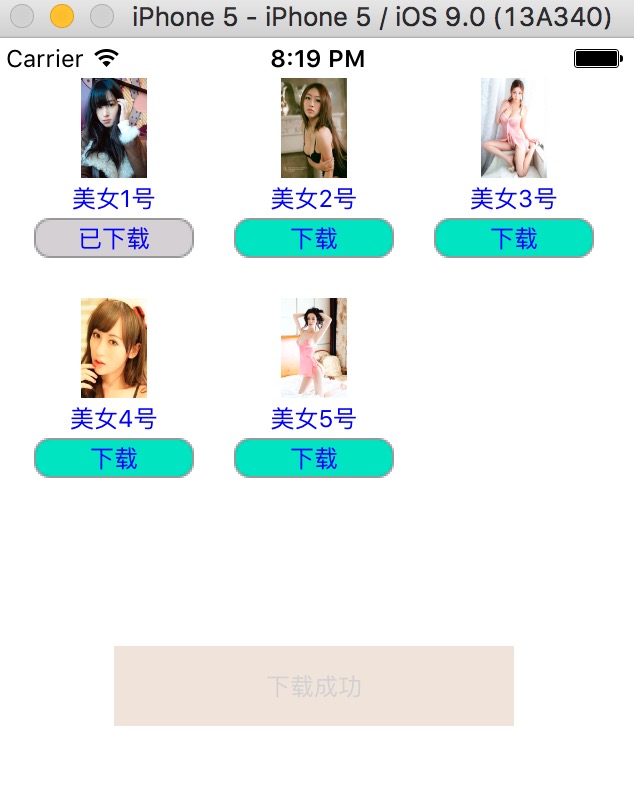
1)以九宫格展示图片信息,每一个 UIView 包含一个 UIImageView 、一个 UILabel 和一个 UIButton 。
2)加载App数据,根据数据长度创建对应的格子数;
3)点击下载按钮后,做出相应操作。
二、九宫格信息分析
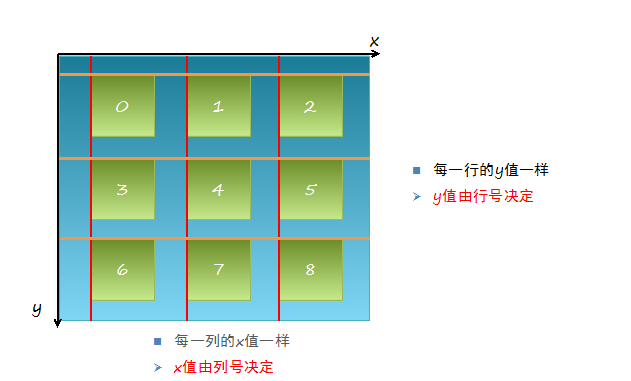
三、实例代码
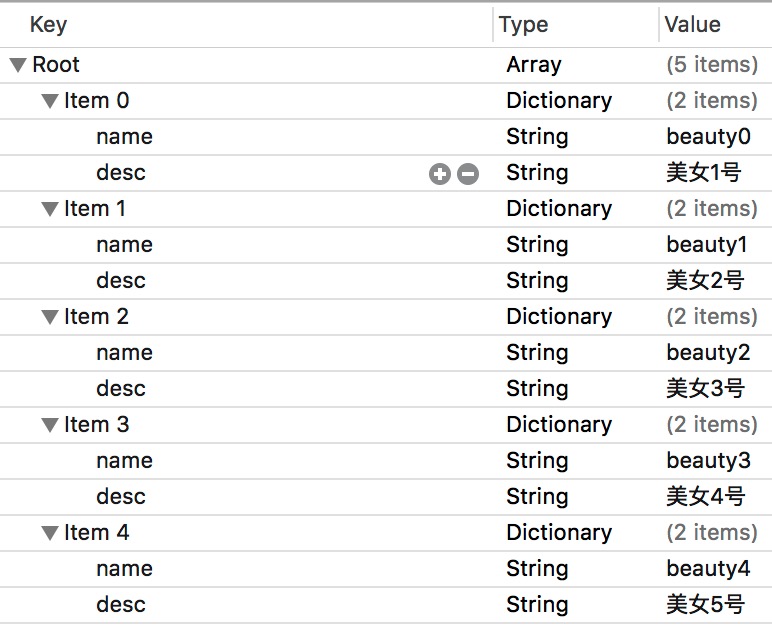
新建Plist属性文件,并命名为Data,修改属性列表成如下形式:
定义每一个 UIview 的宽度和高度:
//ViewController.m

const CGFloat appViewWidth = ;        //子视图宽度

const CGFloat appViewHeight = ;       //子视图高度
在类扩展中声明 NSArray 属性,用于存放属性列表中的数据:
@interface ViewController ()

@property (nonatomic, weak) NSArray *apps;

@end
懒加载 apps 属性,即重写 getter 方法:
 - (NSArray *)apps {

     if (!_apps) {

         NSString *path = [[NSBundle mainBundle] pathForResource:@"Data" ofType:@"plist"];

         _apps = [NSArray arrayWithContentsOfFile:path];

     }

     return _apps;

 }
修改 viewDidLoad 方法,让其加载视图:
 - (void)viewDidLoad {

     [super viewDidLoad];

     int totalColumn = ;        //3列

     CGFloat margin = (self.view.frame.size.width - totalColumn*appViewWidth) / (totalColumn + );

     int count = self.apps.count;

     NSLog(@"%d", count);

     for (int i = ; i < count; i++) {

         int row = i/totalColumn;        //行号,从0开始

         int column = i%totalColumn;     //列号,从0开始

         CGFloat appViewX = margin + (margin + appViewWidth) * column;       //子视图的X坐标

         CGFloat appViewY = margin + (margin + appViewHeight) * row;      //子视图的Y坐标

         //创建UIView控件

         UIView *appView = [[UIView alloc] initWithFrame:CGRectMake(appViewX, appViewY, appViewWidth, appViewHeight)];

         [self.view addSubview:appView];

         //创建上述UIView控件的子视图,创建图像信息

         UIImageView *appImageView = [[UIImageView alloc] initWithFrame:CGRectMake(, , , )];

         UIImage *appImage = [UIImage imageNamed:self.apps[i][@"name"]];

         appImageView.image = appImage;

         [appImageView setContentMode:UIViewContentModeScaleAspectFit];

         [appView addSubview:appImageView];

         //创建上述UIView控件的子视图,创建UILabel信息描述标签

         UILabel *appLabel = [[UILabel alloc] initWithFrame:CGRectMake(, , , )];

         [appLabel setText:self.apps[i][@"desc"]];

         [appLabel setTextAlignment:NSTextAlignmentCenter];

         [appLabel setFont:[UIFont systemFontOfSize:12.0]];

         [appLabel setTextColor:[UIColor blueColor]];

         [appView addSubview:appLabel];

         //创建下载按钮

         UIButton *appButton = [UIButton buttonWithType:UIButtonTypeCustom];

         appButton.frame = CGRectMake(, , , );

         [appButton setBackgroundImage:[UIImage imageNamed:@"download"] forState:UIControlStateNormal];

         [appButton setBackgroundImage:[UIImage imageNamed:@"downloaded"] forState:UIControlStateHighlighted];

         [appButton setTitle:@"下载" forState:UIControlStateNormal];

         appButton.titleLabel.font = [UIFont systemFontOfSize:12.0];

         [appButton setTitleColor:[UIColor blueColor] forState:UIControlStateNormal];

         [appView addSubview:appButton];

         [appButton addTarget:self action:@selector(buttonClicked:) forControlEvents:UIControlEventTouchUpInside];

     }

 }
创建下载按钮的响应事件:
 - (void)buttonClicked:(UIButton *)button {

     //动画标签

     UILabel *animaLabel = [[UILabel alloc] initWithFrame:CGRectMake(self.view.center.x-, self.view.center.y+, , )];

     [animaLabel setText:@"下载成功"];

     [animaLabel setTextAlignment:NSTextAlignmentCenter];

     animaLabel.font = [UIFont systemFontOfSize:12.0];

     [animaLabel setBackgroundColor:[UIColor brownColor]];

     [animaLabel setAlpha:0.0];

     [self.view addSubview:animaLabel];

     [UIView animateWithDuration:4.0 animations:^{

         //逐渐显示标签

         [animaLabel setAlpha:1.0];

     } completion:^(BOOL finished) {

         //动画结束时,移除显示下载完成的标签

         [animaLabel removeFromSuperview];

         //已下载时,改变按钮标题,及背景图片

         [button setTitle:@"已下载" forState:UIControlStateNormal];

         [button setBackgroundImage:[UIImage imageNamed:@"downloaded"] forState:UIControlStateNormal];

         //已下载完成的,取消按钮下载触发事件

         [button removeTarget:self action:@selector(buttonClicked:) forControlEvents:UIControlEventTouchUpInside];

     }];

 }
实例:
参考博客:iOS开发UI篇—九宫格坐标计算
实例代码:http://pan.baidu.com/s/1qXyZhWK
iOS开发基础-九宫格坐标(1)的更多相关文章
- iOS开发基础-九宫格坐标(6)
继续对iOS开发基础-九宫格坐标(5)中的代码进行优化. 优化思路:把字典转模型部分的数据处理操作也拿到模型类中去实现,即将 ViewController 类实现中 apps 方法搬到 WJQAppI ...
- iOS开发基础-九宫格坐标(5)
继续在iOS开发基础-九宫格坐标(4)的基础上进行优化. 一.改进思路 1)iOS开发基础-九宫格坐标(4)中 viewDidLoad 方法中的第21.22行对控件属性的设置能否拿到视图类 WJQAp ...
- iOS开发基础-九宫格坐标(4)
对iOS开发基础-九宫格坐标(3)的代码进行进一步优化. 新建一个 UIView 的子类,并命名为 WJQAppView ,将 appxib.xib 中的 UIView 对象与新建的视图类进行关联. ...
- iOS开发基础-九宫格坐标(3)之Xib
延续iOS开发基础-九宫格坐标(2)的内容,对其进行部分修改. 本部分采用 Xib 文件来创建用于显示图片的 UIView 对象. 一.简单介绍 Xib 和 storyboard 的比较: 1) X ...
- iOS开发基础-九宫格坐标(2)之模型
在iOS开发基础-九宫格(1)中,属性变量 apps 是从plist文件中加载数据的,在 viewDidLoad 方法中的第20行.26行中,直接通过字典的键名来获取相应的信息,使得 ViewCont ...
- IOS开发基础知识碎片-导航
1:IOS开发基础知识--碎片1 a:NSString与NSInteger的互换 b:Objective-c中集合里面不能存放基础类型,比如int string float等,只能把它们转化成对象才可 ...
- iOS开发——总结篇&IOS开发基础知识
IOS开发基础知识 1:Objective-C语法之动态类型(isKindOfClass, isMemberOfClass,id) 对象在运行时获取其类型的能力称为内省.内省可以有多种方法实现. 判断 ...
- IOS开发基础环境搭建
一.目的 本文的目的是windows下IOS开发基础环境搭建做了对应的介绍,大家可根据文档步骤进行mac环境部署: 二.安装虚拟机 下载虚拟机安装文件绿色版,点击如下文件安装 获取安装包: ...
- iOS开发基础-图片切换(4)之懒加载
延续:iOS开发基础-图片切换(3),对(3)里面的代码用懒加载进行改善. 一.懒加载基本内容 懒加载(延迟加载):即在需要的时候才加载,修改属性的 getter 方法. 注意:懒加载时一定要先判断该 ...
随机推荐
- 如何限制用户仅通过HTTPS方式访问OSS?
一.当前存在的问题 当前OSS支持用户使用HTTPS/HTTP协议访问Bucket.但由于HTTP存在安全漏洞.大型企业客户都要求使用HTTPS方式访问OSS,并且拒绝HTTP访问请求. 目前OSS可 ...
- 基本 SQL 之数据库及表管理
上篇文章,我们基于『数据库』做了一个宏观上的介绍,你应当了解到数据库是在何种背景下,为了解决什么样的问题而诞生的,以及在具体实现下又可以划分哪些中类型. 非关系型数据库的种类很多,我们会在后续的篇章中 ...
- 使用LR编写HTTP协议Json报文格式接口脚本实战
最近在做HTTP协议接口压测时,遇到一些编写脚本方面的问题,在这里总结记录下,以便以后温习,也希望能帮助到和我有同样困惑的朋友吧. //实战代码如下所示:Action() { lr_start_tra ...
- JQuery——选择器
简单介绍一下什么是选择器:选择器是CSS样式中用来选择页面元素的一个特有的方式,而JQuery的选择器同样也是如此,JQuery的选择器简单的分为一下这几种:1.常用的CSS选择器 标签选择器:E{ ...
- .NetCore教程之 EFCore连接Mysql DBFirst模式
一:创建EF的类库,同时将此项目设置为启动项(为Scaffold-DbContext -tables指令使用),同时安装2个包 ①Microsoft.EntityFrameworkCore.Too ...
- EF三种编程方式的区别Database first ,Model first ,code first
首先对于EF中先出现的datebase first和model first两种编程方式,其的区别根据字面意思很容易能够理解. datebase first就是代表数据库优先,那么前提就是先创建数据 ...
- Qt Creator的下载和安装
原文:https://blog.csdn.net/weixin_38090427/article/details/83827678 一,Qt和Qt Creator的区别 Qt是C++的一个库,或者说是 ...
- java日期转化,三种基本的日期格式
import java.text.ParseException; import java.text.SimpleDateFormat; import java.util.Date; public cl ...
- zepto和jQuery on事件委托在苹果手机上的”坑“
移动端用zepto做的页面,突然发现on绑定的click事件并没有触发,代码如下: <ul> <li class="a">1111111aaaaaaasss ...
- iOS----------检测app进入后台或前台
开发播放器的时候,经常需要检测app进入后台(暂停播放)或者进入前台(开始播放).方法非常简单. 1.检测app进入后台 // 在AppDelete实现该方法 - (void)applicationD ...