rsyslog及loganalyzer
日志:历史日志
历史事件:
时间记录,事件的关键性程度,loglevel
系统日志服务:
syslogd,守护进程
syslogd:system
klogd:kernel
rsyslog:
syslogd
klogd
多线程:
UDP,TCP,SSL,TLS,
Mysql,PGSQL
强大的过滤器,可实现过滤日志信息中的任何部分;
自定义输出格式;
日志收集方:
priority:
debug,info,notice,warn(warning),err(error),crit(critical),alert,emerg(panic)
调试-信息级别-引起注意-警告-产生错误-蓝色警报-橙色警报-要挂了。
指定级别:
*:表示所以级别
none:没用级别
priority:此级别及更高级别的日志信息;
[root@localhost ~]# rpm -ql rsyslog
/etc/rsyslog.conf 主配置文件
rsyslogd 主程序;
/etc/rc.d/init.d/rsyslog 服务脚本;
root@localhost ~]# vim /etc/rsyslog.conf
# rsyslog v5 configuration file
# For more information see /usr/share/doc/rsyslog-*/rsyslog_conf.html
# If you experience problems, see http://www.rsyslog.com/doc/troubleshoot.html
#### MODULES ####
$ModLoad imuxsock # provides support for local system logging (e.g. via logger command) //支持本地日志收集的模块
$ModLoad imklog # provides kernel logging support (previously done by rklogd) //支持本地内核日志收集的模块
#$ModLoad immark # provides --MARK-- message capability
# Provides UDP syslog reception
#$ModLoad imudp
#$UDPServerRun 514
# Provides TCP syslog reception
#$ModLoad imtcp
#$InputTCPServerRun 514
#### GLOBAL DIRECTIVES #### 全局参数指定
# Use default timestamp format
$ActionFileDefaultTemplate RSYSLOG_TraditionalFileFormat
# File syncing capability is disabled by default. This feature is usually not required,
# not useful and an extreme performance hit
#$ActionFileEnableSync on
# Include all config files in /etc/rsyslog.d/
$IncludeConfig /etc/rsyslog.d/*.conf
#### RULES ####
# Log all kernel messages to the console.
# Logging much else clutters up the screen.
#kern.* /dev/console //
# Log anything (except mail) of level info or higher.
# Don't log private authentication messages!
*.info;mail.none;authpriv.none;cron.none /var/log/messages //
# The authpriv file has restricted access.
authpriv.* /var/log/secure
# Log all the mail messages in one place.
mail.* -/var/log/maillog //-号表示异步写入;
# Log cron stuff
cron.* /var/log/cron
# Everybody gets emergency messages
*.emerg * //通知所有用户在线的用户系统要挂了
# Save news errors of level crit and higher in a special file.
uucp,news.crit /var/log/spooler
# Save boot messages also to boot.log
local7.* /var/log/boot.log //自定义日志
# ### begin forwarding rule ###
# The statement between the begin ... end define a SINGLE forwarding
# rule. They belong together, do NOT split them. If you create multiple
# forwarding rules, duplicate the whole block!
# Remote Logging (we use TCP for reliable delivery)
#
# An on-disk queue is created for this action. If the remote host is
# down, messages are spooled to disk and sent when it is up again.
#$WorkDirectory /var/lib/rsyslog # where to place spool files
#$ActionQueueFileName fwdRule1 # unique name prefix for spool files
#$ActionQueueMaxDiskSpace 1g # 1gb space limit (use as much as possible)
#$ActionQueueSaveOnShutdown on # save messages to disk on shutdown
#$ActionQueueType LinkedList # run asynchronously
#$ActionResumeRetryCount -1 # infinite retries if host is down
# remote host is: name/ip:port, e.g. 192.168.0.1:514, port optional
#*.* @@remote-host:514
# ### end of the forwarding rule ###
# A template to for higher precision timestamps + severity logging
$template SpiceTmpl,"%TIMESTAMP%.%TIMESTAMP:::date-subseconds% %syslogtag% %syslogseverity-text%:%msg:::sp-if-no-1st-sp%%msg:::drop-last-lf%\n"
:programname, startswith, "spice-vdagent" /var/log/spice-vdagent.log;SpiceTmpl
(END)
主服务器测试:
root@localhost ~]# vim /etc/ssh/sshd_config
添加:SyslogFacility local2
service sshd reload
root@localhost ~]# vim /etc/rsyslog.conf
local7.* /var/log/boot.log 下添加如下:
local2.* /var/log/sshd.log
重启服务:servicee rsyslog restart
测试:只要复制下当前xshell会话即可,然后查看日志;
总结:
文件记录的日志的格式:
时间产生记录的日期时间 主机 进程(PID) :事件内容
有些日志记录二进制格式:/var/log/wtmp,/var/logbtmp
/var/log/wtmp :当前系统上成功登陆的日志;
last 查看
/var/log/btmp:当前系统上失败的登陆尝试;
lastb
lastlog 查看哪些用户登陆过系统,
mail **Never logged in** 表示从来没用登陆过系统;
--------------------------------------------------------------------------------------------------
一:rsyslog服务器:
1,主服务器:root@localhost ~]# vim /etc/rsyslog.conf
# Provides UDP syslog reception
$ModLoad imudp 去掉#号
$UDPServerRun 514 去掉#号
# Provides TCP syslog reception
$ModLoad imtcp 去掉#号
$InputTCPServerRun 514 去掉#号
service rsyslog restart
netstat -tunl
3:主服务器查看日志:
tail /var/log/messages
2,从服务器:
主服务器:root@localhost ~]# vim /etc/rsyslog.conf
*.info;mail.none;authpriv.none;cron.none @172.16.100.6 //把从服务器的日志传输给主日志服务器;
service rsyslog restart
yum -y install vsftpd
二: 配置下rsyslog如何记录到mysql服务中;
1:从服务安装mysql;
查看包: rpm -q mariadb
安装: [root@localhost ~]# yum -y install mariadb-server
启动: [root@localhost ~]# systemctl start mariadb.service
查看监听:ss -tnlp
进入mysql数据库: [root@localhost ~]# mysql -uroot -p 直接回车,默认密码为空;
mariaDB [(none)]> use mysql;
MariaDB [mysql]> update user set password=password('password') where user='root';
MariaDB [(none)]> GRANT ALL ON Syslog.* TO 'syslog'@'192.168.%.%' IDENTIFIED BY 'syslogpass';
MariaDB [mysql]> flush privileges;
MariaDB [mysql]> quit
root@localhost ~]# vim /etc/my.cnf
[mysqld]
skip_name_resolve = on
innodb_file_per_table = on
[root@localhost ~]# systemctl restart mariadb.service
[root@localhost ~]# ss -tnl
测试:
[root@localhost ~]# mysql -usyslog -psyslogpass -h 192.168.214.140
Welcome to the MariaDB monitor. Commands end with ; or \g.
Your MariaDB connection id is 3
Server version: 5.5.56-MariaDB MariaDB Server
Copyright (c) 2000, 2017, Oracle, MariaDB Corporation Ab and others.
Type 'help;' or '\h' for help. Type '\c' to clear the current input statement.
MariaDB [(none)]> show databases;
+--------------------+
| Database |
+--------------------+
| information_schema |
| test |
+--------------------+
2 rows in set (0.00 sec)
MariaDB [(none)]>
4:验证
[root@localhost ~]# mysql -usyslog -psyslogpass -h 192.168.214.140
Welcome to the MariaDB monitor. Commands end with ; or \g.
Your MariaDB connection id is 5
Server version: 5.5.56-MariaDB MariaDB Server
Copyright (c) 2000, 2017, Oracle, MariaDB Corporation Ab and others.
Type 'help;' or '\h' for help. Type '\c' to clear the current input statement. MariaDB [(none)]> show databases;
+--------------------+
| Database |
+--------------------+
| information_schema |
| Syslog |
| test |
+--------------------+
3 rows in set (0.00 sec)
MariaDB [(none)]> use Syslog
Reading table information for completion of table and column names
You can turn off this feature to get a quicker startup with -A
Database changed
MariaDB [Syslog]> show tables;
+------------------------+
| Tables_in_Syslog |
+------------------------+
| SystemEvents |
| SystemEventsProperties |
+------------------------+
2 rows in set (0.00 sec)
6:查看日志
MariaDB [Syslog]> show tables;
+------------------------+
| Tables_in_Syslog |
+------------------------+
| SystemEvents |
| SystemEventsProperties |
+------------------------+
2 rows in set (0.00 sec)
MariaDB [Syslog]>
MariaDB [Syslog]> show tables;
+------------------------+
| Tables_in_Syslog |
+------------------------+
| SystemEvents |
| SystemEventsProperties |
+------------------------+
2 rows in set (0.00 sec)
MariaDB [Syslog]> select * from SystemEvents\G;
2:主服务器端想要rsyslog日志存储到mysql服务器中,使用 yum list all rsyslog*,有一个rsyslog-mysql的程序包,安装即可。
yum -y install rsyslog-mysql
[root@localhost log]# rpm -ql rsyslog-mysql
/lib64/rsyslog/ommysql.so
/usr/share/doc/rsyslog-mysql-5.8.10
/usr/share/doc/rsyslog-mysql-5.8.10/createDB.sql
3:[root@localhost log]# mysql -usyslog -h192.168.214.140 -p < /usr/share/doc/rsyslog-mysql-5.8.10/createDB.sql
Enter password: syslogpass //192.168.214.140是从服务器的IP地址
5:[root@localhost log]# vim /etc/rsyslog.conf
#### MODULES ####
$ModLoad ommysql 手动添加;
#### RULES ####
*.info;mail.none;authpriv.none;cron.none :ommysql:192.168.214.140,Syslog,syslog,syslogpass
service rsyslog restart
记录日志:yum -y install vsftp
---------------------------------------------
主服务器:
yum install httpd php php-mysql
vim /var/www/html/index.php
<?php
$conn = mysql_connect('192.168.214.140','syslog','syslogpass');
if ($conn)
echo "OK";
else
echo "Failure";
?>
service httpd start
网页测试:192.168.214.146 是否显示OK
下载loganalyzer-3.6.5.tar.gz
tar xf alyzer-3.6.5.tar.gz
mv alyzer-3.6.5 /var/www/html/log
cd /var/www/html/log
ls
cd ..
ls
mv log/src loganalyzer
ls
cd loganalyzer
cd ..
cd log
ls
ls contrib/
cp conrtib/* ../loganalyzer/
cd ../loganalyzer/
chmod +x *.sh
./configure.sh
./secure.sh
chmod 666 config.php
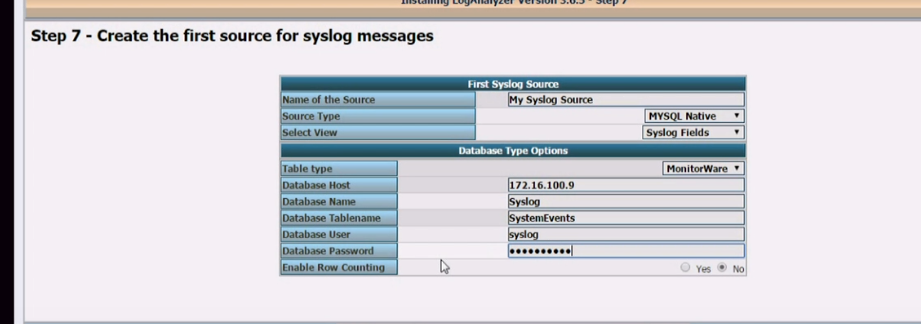
访问:192.168.214.145/loganalyzer/install.php
~ 
yum -y install php-gd
service httpd restart
//支持本地日志收集的模块
rsyslog及loganalyzer的更多相关文章
- django+nginx+xshell简易日志查询,接上<关于《rsyslog+mysql+loganalyzer搭建日志服务器<个人笔记>》的反思>
纠正一下之前在<关于<rsyslog+mysql+loganalyzer搭建日志服务器<个人笔记>>的反思>中说到的PHP+MySQL太慢,这里只是说我技术不好,没 ...
- 关于《rsyslog+mysql+loganalyzer搭建日志服务器<个人笔记>》的反思
关于<rsyslog+mysql+loganalyzer搭建日志服务器<个人笔记>>的反思--链接--http://www.cnblogs.com/drgcaosheng/p/ ...
- rsyslog+mariadb+loganalyzer实现日志服务器搭建
rsyslog+mariadb+loganalyzer实现日志服务器搭建 一.概述 Linux的日志记录了用户在系统上一切操作,包括系统自身运作产生的日志,这些日志是应使用者了解服务器的情况最好的资料 ...
- rsyslog+mysql+loganalyzer搭建日志服务器<个人笔记>
大概思路如下: 使用Linux自带的rsyslog服务来做底层,然后再使用mysql与rsyslog的模板来存储文件,并且以web来进行显示出来.<模板的存储以日期的树形结构来存储,并且以服务器 ...
- Linux 之 rsyslog+mysql+LogAnalyzer 日志收集系统
作者:邓聪聪 LogAnalyzer 是一个 syslog 和其他网络事件数据的 Web 前端工具,提供简单易用的日志浏览.搜索和基本分析以及图表显示 由于公司部分项目需求使用日志记录系统,随笔记录 ...
- CentOS 6.5下的lamp环境rsyslog+MySQL+loganalyzer实现日志集中分析管理
前言 rsyslog系统日志,在CentOS5上叫syslog,而在CentOS6上叫rsyslog,是增强版的syslog,CentOS5上的配置文件在/etc/syslog.conf下,而Cent ...
- rsyslog+loganalyzer配置
1.loganalyzer服务器搭建[root@localhost ~]# getenforce #查看selinux是否关闭[root@localhost ~]# setenforce 0 #临时关 ...
- 实现将rsyslog将日志记录与MySQL中
准备两个节点 node3: rsyslog node2: 数据库 准备相应的包 [root@node3 php-fpm.d]#yum install rsyslog-mysql 将数据拷贝到数据 ...
- CentOS 6.7下利用Rsyslog+LogAnalyzer+MySQL部署日志服务器
一.简介 LogAnalyzer 是一款syslog日志和其他网络事件数据的Web前端.它提供了对日志的简单浏览.搜索.基本分析和一些图表报告的功能.数据可以从数据库或一般的syslog文本文件中获取 ...
随机推荐
- Redis做分布式锁
在分布式系统中,在接口没有保证幂等性或者在某些场景下相同的服务需要有且仅有一个服务执行的情况下,需要使用分布式锁来保证系统的安全执行. 分布式锁的执行顺序,有服务A,分别部署了三个节点为A1.A2.A ...
- JDBC中常用的接口
JDBC常用的接口DriverManager 驱动管理器获得数据库链接 Connection 数据库链接接口 Statement 语句接口,用来静态操作SQL语句 PreparedStatement ...
- web 分享到facebook
利用meta 使自己的页面变为一种富媒体文件,利用facebook的 open Graph 比如你的html页面想要以图片的形式被分享 <meta property="og:image ...
- java线程学习之yield方法
yield方法是暂停当前正在执行的线程对象,并执行其他线程. 这是一个静态方法,一旦执行,它会使当前线程让出CPU.让出的cpu并不代表当前线程不执行了.当前线程让出CPU后,还会CPU资源的争夺,但 ...
- TeamViewer连CentOS
用过TeamViewer的人都会感叹其远程连接的强大,昨天有将Windows和CentOS在同一网段内互相连接打通了,今天在外网环境下突然想到是否可以用TeamViewer在外网环境下连到CentOS ...
- MyTests
目录 About Tests Selenium自动化测试 Pyppeteer Explain About Tests 扯淡!测试之瞎扯淡 Selenium自动化测试 什么是Selenium? Sele ...
- shell脚本-工作练习篇
瞎扯时间 人的惰性真的很难去戒掉,每天工作下班回家后,只想瘫倒在床上,玩玩手游,刷刷抖音,甚至看看无聊至极的“爽文”,对于学习.看书啥的,完全提不起兴趣,也许正是因为如此,我才显得这么平庸而无趣吧. ...
- 使用pynlpir增强jieba分词的准确度
在使用jieba分词时,发现分词准确度不高.特别是一些专业词汇,比如堡垒机,只能分出堡垒,并不能分出堡垒机.这样导致的问题是很多时候检索并不准确. 经过对比测试,发现nlpir进行分词效果更好.但是n ...
- linux启动httpd服务出现 Could not reliably determine the server`s fully qualified domain name.
安装好apache启动httpd服务时,出现httpd: Could not reliably determine the server's fully qualified domain name, ...
- webdriver之富文本,Firefox配置加载
chrome驱动下载:http://chromedriver.storage.googleapis.com/index.html 加载浏览器配置,需要用FirefoxProfile(profile_d ...