部署MYSQL高可用集群
mysql-day08 部署MYSQL高可用集群
u 集群架构
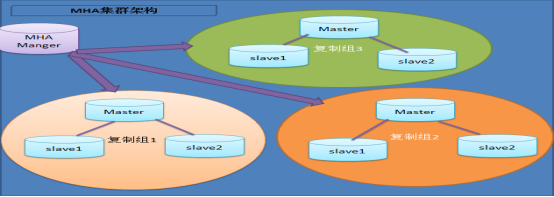
MHA 工作过程
• MHA Manager 会定时探测集群中的 master 节点,
当 master 出现故障时,它可以自动将最新数据的 sl
ave 提升为新的 master ,然后将所有其他的 slave
重新指向新的 master 。整个故障转移过程对应用程
序完全透明。
– ( 1 )从宕机崩溃的 master 保存二进制日志事件( binlog events)
– ( 2 )识别含有最新更新的 slave
– ( 3 )应用差异的中继日志( relay log )到其他的 slave
– ( 4 )应用从 master 保存的二进制日志事件( binlog events )
– ( 5 )提升一个 slave 为新的 master ;
– ( 6 )使其他的 slave 连接新的 master 进行复制;
u 准备环境
一、集群定义:使用多台服务提供相同的服务
二、高可用集群定义:主备模式,被客户端访问的称作主,当主宕机时,备用
服务器自动接收客户端访问。
拓扑结构
client
|
| -->vip 192.168.4.100 《51,52,53》
_____________________________________________________
||| ||| ||| || || || ||
master51 master(备)52 master(备)53 slave54 slave55 mgm56 Manager
一、配置所有数据节点主机之间可以互相以ssh密钥对方式认证登陆
二、配置manager56主机无密码ssh登录所有数据节点主机
三、配置主从同步,要求如下:
51主库 开半同步复制
52从库(备用主库)开半同步复制
53从库(备用主库)开半同步复制
54从库不做备用主库所以不用开半同步复制
55从库不做备用主库所以不用开半同步复制
拓扑图
• 采用 5 个数据库服务器节点
u 步骤
注意:安装mariadb,就有mysql命令
1.在所有主机上安装perl软件包(51~56)
]#cd mha-soft-student
]#yum -y install perl-*.rpm
2.在所有主机上安装mha_node软件包(51~56)
yum -y install perl-DBD-mysql
rpm -ivh mha4mysql-node-0.56-0.el6.noarch.rpm
2.只在管理"主机56"上安装mha_manager软件包
]#yum -y install perl-ExtUtils-* perl-CPAN*
]#tar -zxvf mha4mysql-manager-0.56.tar.gz
]#cd mha4mysql-manager-0.56
]#perl Makefile.PL
]#make
]#make install
3.2.4检查配置环境
在主机51 52 53检查是否有同步数据的用户repluser
mysql>show grants for repluser@"%";
u 在主机51~55做如下授权
mysql>grant all on *.* to root@"%" identified by "123456";
u 在主机51~55做如下设置
mysql>set global relay_log_purge=off;
3.2.5拷贝命令(56)
]#cp mha4mysql-manager-0.56/bin/* /usr/local/bin/
3.2.6创建工作目录和主配置文件(56)
]#mkdir /etc/mha_manager/
]#cp mha4mysql-manager-0.56/samples/conf/app1.cnf
/etc/mha_manager/
3.2.7创建故障切换脚本(56)
]#ls /usr/local/bin/master_ip_failover
]#cp mha4mysql-manager-0.56/samples/scripts/master_ip_failover /usr/local/bin/
3.2.8编辑主配置文件app1.cnf (56)
]#vim /etc/mha_manager/app1.cnf
[server default]
manager_workdir=/etc/mha_manager
manager_log=/etc/mha_manager/manager.log
master_ip_failover_script=/usr/local/bin/master_ip_failover
ssh_user=root
ssh_port=22
repl_user=repluser
repl_password=123456
user=root
password=123456
[server1]
hostname=192.168.4.51
port=3306
[server2]
hostname=192.168.4.52
port=3306
candidate_master=1
[server3]
hostname=192.168.4.53
port=3306
candidate_master=1
[server4]
hostname=192.168.4.54
no_master=1
[server5]
hostname=192.168.4.55
no_master=1
2.2.9验证配置
u 验证ssh免密码登录数据节点主机
]#masterha_check_ssh --conf=/etc/mha_manager/app1.cnf
Sun May 6 16:38:19 2018-[info]All SSH connection tests passed
successfully.
u 验证数据节点的主从同步配置(要不调用故障切换脚本)
masterha_check_repl --conf=/etc/mha_manager/app1.cnf
MySQL Replication Health is OK.
四、测试高可用集群配置
4.1在主库上手动部署vip地址192.168.4.100
[root@db51~]#ifconfig eth0:1 192.168.4.100/24
[root@db51~]#ifconfig eth0:1
eth0:1:flags=4163<UP,BROADCAST,RUNNING,MULTICAST>mtu 1500
inet 192.168.4.100 netmask 255.255.255.0 broadcast
192.168.4.255
ether 74:52:09:07:51:01 txqueuelen 1000(Ethernet)
4.2修改故障切换脚本指定vip地址的部署信息
]#vim/usr/local/bin/master_ip_failover
my$vip='192.168.4.100/24';#Virtual IP
my$key="1";
my$ssh_start_vip="/sbin/ifconfig eth0:$key$vip";
my$ssh_stop_vip="/sbin/ifconfig eth0:$key down";
......
##Update master ip on the catalog database,etc
#FIXME_xxx;//备注
:wq
#!/usr/bin/env perl
# Copyright (C) 2011 DeNA Co.,Ltd.
#
# This program is free software; you can
redistribute it and/or modify
# it under the terms of the GNU General
Public License as published by:
# the Free Software Foundation; either
version 2 of the License, or
# (at your option) any later
version.
#
# This program is distributed in the
hope that it will be useful,
# but WITHOUT ANY WARRANTY; without even
the implied warranty of
# MERCHANTABILITY or FITNESS FOR A
PARTICULAR PURPOSE. See the
# GNU General Public License for more
details.
#
# You should have received a copy of the
GNU General Public License
# along with this program; if not,
write to the Free Software
# Foundation, Inc.,
# 51 Franklin Street, Fifth Floor,
Boston, MA 02110-1301 USA
## Note: This is a sample script and is not complete. Modify the script based
on your environment.
use strict;
use warnings FATAL => 'all';
use Getopt::Long;
use MHA::DBHelper;
my (
$command, $ssh_user, $orig_master_host,
$orig_master_ip, $orig_master_port,
$new_master_host,
$new_master_ip, $new_master_port, $new_master_user,
$new_master_password
);
my $vip = '192.168.4.60/24'; # Virtual
IP
my $key = "1";
my $ssh_start_vip = "/sbin/ifconfig eth0:$key $vip";
my $ssh_stop_vip = "/sbin/ifconfig eth0:$key down";
GetOptions(
'command=s' => \$command,
'ssh_user=s' => \$ssh_user,
'orig_master_host=s' => \$orig_master_host,
'orig_master_ip=s' => \$orig_master_ip,
'orig_master_port=i' => \$orig_master_port,
'new_master_host=s' => \$new_master_host,
'new_master_ip=s' => \$new_master_ip,
'new_master_port=i' => \$new_master_port,
'new_master_user=s' => \$new_master_user,
'new_master_password=s' => \$new_master_password,
);
exit &main();
sub main {
if ( $command eq "stop" ||
$command eq "stopssh" ) {
# $orig_master_host, $orig_master_ip,
$orig_master_port are passed.
# If you manage master ip address at
global catalog database,
# invalidate orig_master_ip
here.
my $exit_code = 1;
eval {
# updating global catalog,
etc
&stop_vip();
$exit_code = 0;
};
if ($@) {
warn "Got Error:
$@\n";
exit $exit_code;
}
exit $exit_code;
}
elsif ( $command eq "start" )
{
# all arguments are passed.
# If you manage master ip address at
global catalog database,
# activate new_master_ip here.
# You can also grant write access
(create user, set read_only=0, etc) here.
my $exit_code = 10;
eval {
my $new_master_handler = new
MHA::DBHelper();
# args: hostname, port, user,
password, raise_error_or_not
$new_master_handler->connect(
$new_master_ip, $new_master_port,
$new_master_user,
$new_master_password, 1 );
## Set read_only=0 on the new master
$new_master_handler->disable_log_bin_local();
print "Set read_only=0 on the
new master.\n";
$new_master_handler->disable_read_only();
## Creating an app user on the new
master
print "Creating app user on
the new master..\n";
$new_master_handler->enable_log_bin_local();
$new_master_handler->disconnect();
## Update master ip on the catalog
database, etc
&start_vip();
$exit_code = 0;
};
if ($@) {
warn $@;
# If you want to continue failover,
exit 10.
exit $exit_code;
}
exit $exit_code;
}
elsif ( $command eq "status"
) {
# do nothing
exit 0;
}
else {
&usage();
exit 1;
}
}
sub start_vip() {
`ssh $ssh_user\@$new_master_host
\" $ssh_start_vip \"`;
}
sub stop_vip() {
return 0 unless ($ssh_user);
`ssh $ssh_user\@$orig_master_host
\" $ssh_stop_vip \"`;
}
sub usage {
print
"Usage: master_ip_failover --command=start|stop|stopssh|status --orig_master_host=host
--orig_master_ip=ip --orig_master_port=port --new_master_host=host
--new_master_ip=ip --new_master_port=port\n";
}
4.3启动管理服务,并查看服务状态
]#masterha_manager--conf=/etc/mha/app1.cnf
--remove_dead_master_conf--ignore_last_failover
[root@host56~]#masterha_check_status--conf=/etc/mha_manager/app1.cnf
app1(pid:16944)is running(0:PING_OK),master:192.168.4.51
[root@host56~]#
+++++++++++++++++++++++++++++++++++++++++++
4.4测试故障转移
在主库51上执行]#shutdown-h now
4.5在管理主机上查看服务状态(如果服务停止了,手动启动一下服务,再查看状态)
[root@host56~]#masterha_check_status --conf=/etc/mha_manager/app1.cnf
app1(pid:17507)is running(0:PING_OK),master:192.168.4.52
4.6在52本机查看是否获取vip地址
[root@db52~]#ip addr show|grep 192.168.4 inet 192.168.4.52/24 brd 192.168.4.255 scope global eth0
inet 192.168.4.100/24 brd 192.168.4.255 scope global secondary
4.7客户端连接vip地址,访问数据服务
]#mysql-h192.168.4.100-uwebadmin-p123456
4.8重置主库
Smysql>stop slave;
Mysql>change master to
master_host="192.168.4.51",master_user="repluser", master_password="123456",
master_log_file="master51.000014",
master_log_pos=154;
Mysql>start slave;
Mysql>show slave status\G;//查看主库信息
mysql>show variables like'log_bin%';//查看log设置
##############################################
还原成独立数据库
root@host55~]#systemctl stop mysqld
[root@host55~]#cd /var/lib/mysql
[root@host55 mysql]#rm -rf master.info relay-log.info
[root@host55 mysql]#ls
[root@host55 mysql]#rm -rf host55-relay-bin.*
[root@host55 mysql]#systemctl start mysqld
[root@host55 mysql]#mysql -uroot -p123456 -e "show slave status\G"
部署MYSQL高可用集群的更多相关文章
- MySQL高可用集群方案
一.Mysql高可用解决方案 方案一:共享存储 一般共享存储采用比较多的是 SAN/NAS 方案. 方案二:操作系统实时数据块复制 这个方案的典型场景是 DRBD,DRBD架构(MySQL+DRBD+ ...
- MySQL高可用集群MHA方案
MySQL高可用集群MHA方案 爱奇艺在用的数据库高可用方案 MHA 是目前比较成熟及流行的 MySQL 高可用解决方案,很多互联网公司正是直接使用或者基于 MHA 的架构进行改造实现 MySQL 的 ...
- (六) Docker 部署 Redis 高可用集群 (sentinel 哨兵模式)
参考并感谢 官方文档 https://hub.docker.com/_/redis GitHub https://github.com/antirez/redis happyJared https:/ ...
- Mysql高可用集群环境介绍
MySQL高可用集群环境搭建 01.MySQL高可用环境方案 02.MySQL主从复制原理 03.MySQL主从复制作用 04.在Linux环境上安装MySQL 05.在MySQL集群环境上配置主从复 ...
- Mysql 高可用集群PXC
PXC是percona公司的percona xtraDB cluster,简称PXC.它是基于Galera协议的高可用集群方案.可以实现多个节点间的数据同步复制以及读写,并且可保障数据库的服务高可 ...
- 部署zookeepe高可用集群
部署zookeepe高可用集群 部署规划 Nno1 192.16 ...
- keepalived+MySQL高可用集群
基于keepalived搭建MySQL的高可用集群 MySQL的高可用方案一般有如下几种: keepalived+双主,MHA,MMM,Heartbeat+DRBD,PXC,Galera Clus ...
- corosync+pacemaker and drbd实现mysql高可用集群
DRBD:Distributed Replicated Block Device 分布式复制块设备,原理图如下 DRBD 有主双架构和双主架构的,当处于主从架构时,这个设备一定只有一个节点是可以读写的 ...
- 一键部署Kubernetes高可用集群
三台master,四台node,系统版本为CentOS7 IP ROLE 172.60.0.226 master01 172.60.0.86 master02 172.60.0.106 master0 ...
随机推荐
- django 博客搭建
comment1.安装django pip install django 2.创建项目 django-admin startproject mysite 3.在mysite文件夹下创建app pyth ...
- Java自学路线图之Java系统自学
Java自学不是一朝一夕的事情.可以采用"懒开始"的方法,但是必须要坚持下去,才能真正自学Java掌握编程技术.那些企图学几天去包装一下找工作的,请绕道.如果你下定决心自学Java ...
- Elasticsearch数据建模笔记
数据建模 数据建模是创建数据模型的过程 数据模型是对真实世界进行抽象描述的一种工具和方法,实现对现实世界的映射 三个过程:概念模型=>逻辑模型=>数据模型 数据模型:结合具体的数据库,在满 ...
- Vue2.0 【第二季】第6节 Component 初识组件
目录 Vue2.0 [第二季]第6节 Component 初识组件 第6节 Component 初识组件 一.全局化注册组件 二.局部注册组件局部 三.组件和指令的区别 Vue2.0 [第二季]第6节 ...
- [红日安全]Web安全Day12 – 会话安全实战攻防
本文由红日安全成员: ruanruan 编写,如有不当,还望斧正. 大家好,我们是红日安全-Web安全攻防小组.此项目是关于Web安全的系列文章分享,还包含一个HTB靶场供大家练习,我们给这个项目起了 ...
- 题解 UVA12186 【工人的请愿书 Another Crisis】
俺太难了 记录一下我调了一个小时的错误 多测不清空 多测清空只清空了\(vector\) 多测全清空了,但是忘了清空\(vector[0]\) \(priority\)_ \(queue\)把\(gr ...
- (转)协议森林08 不放弃 (TCP协议与流通信)
协议森林08 不放弃 (TCP协议与流通信) 作者:Vamei 出处:http://www.cnblogs.com/vamei 欢迎转载,也请保留这段声明.谢谢! TCP(Transportation ...
- shell编程之循环语句
for #! /bin/sh for FRUIT in apple banana pear; do echo "I like $FRUIT" done while #! /bin/ ...
- DjangoORM操作之其他知识点
一.F与Q查询 F查询 F查询的应用场景主要是当你想要查询字段需要与数据库中的另外一个字段进行比较的时候,基于我们前面所学的知识点无法完成,那就需要用到F查询. F的导入 from django.db ...
- 《HelloGitHub》第 48 期
兴趣是最好的老师,HelloGitHub 就是帮你找到兴趣! 简介 分享 GitHub 上有趣.入门级的开源项目. 这是一个面向编程新手.热爱编程.对开源社区感兴趣 人群的月刊,月刊的内容包括:各种编 ...