中文文本分类之CharCNN
文本分类是自然语言处理中一个非常经典的任务,可用的模型非常多,相关的开源代码也非常多了。这篇博客用一个CNN模型,对新闻文本进行分类。
全部代码有4个模块:1、数据处理模块(命名为:cnews_loader.py) ;2、模型搭建模块(命名为cnn_model.py);3、模型运行模块(命名为run_cnn.py);4、模型预测模块(命名为predict.py)。
GitHub地址:https://github.com/DengYangyong/Chinese_Text_Classification/tree/master/Text_Classification_On_CNN
下面分别来看各模块的代码。
一、数据预处理
首先做数据预处理,从原始的新闻语料得到字典,将所有新闻文本转化为数字,生成批量数据。
这段代码首先考虑了在python2环境运行时的编码问题,在打开文档时,把文本的格式编码成 UTF-8格式,在处理文本时解码为Unicode格式。
接下来读取文本文件,把每一篇新闻处理成字列表: ['黄', '蜂', 'v', 's', '湖', '人', '首', '发', ':', '科', '比',...]。因为这是CharCNN,所以不需要进行分词,也不用去停用词(标点符号),比较省事。这里没法使用预训练的word2vec,因为word2vec是用当前的词预测上下文词语,或者上下文词语预测当前词语,因此必须是黄峰、首发这种词语,而不能是单个的字。
然后统计词频,并取出频率最高的前5000个字,做成一个字典。利用这个字典,把每一篇新闻都转化为数字索引,并且把每一篇新闻的长度设定为600字,字数多余600字则截断,字数少于600字则补零。将标签转化为one-hot编码。
最后是生成批量数据,每个批量64个样本,在训练、验证和测试模型时,都使用小批量数据,防止内存溢出。
#coding: utf-8

import sys

from collections import Counter

import numpy as np

import tensorflow.contrib.keras as kr

if sys.version_info[0] > 2:

    is_py3 = True

else:

    reload(sys)

    sys.setdefaultencoding("utf-8")

    is_py3 = False

    # 判断软件的版本,如果版本为3.6.5,那么sys.version_info的输出为:sys.version_info(major=3, minor=6, micro=5)。

"""如果在python2下面使用python3训练的模型,可考虑调用此函数转化一下字符编码"""

def native_word(word, encoding='utf-8'):

    if not is_py3:

        return word.encode(encoding)

    else:

        return word

"""is_py3函数当版本为3时返回True,否则返回False。if not 后面的值为False则将“utf-8”编码转换为'unicode'."""

def native_content(content):

    if not is_py3:

        return content.decode('utf-8')

    else:

        return content

""" 常用文件操作,可在python2和python3间切换."""

def open_file(filename, mode='r'):

    if is_py3:

        return open(filename, mode, encoding='utf-8', errors='ignore')

    else:

        return open(filename, mode)

""" 读取文件数据"""

def read_file(filename):

    contents, labels = [], []

    with open_file(filename) as f:

        for line in f:

            try:

                label, content = line.strip().split('\t')

                if content:

                    contents.append(list(native_content(content)))

                    labels.append(native_content(label))

            except:

                pass

    return contents, labels

      #  line.strip().split('\t')的输出为两个元素的列表:['体育', '黄蜂vs湖人首发:科比带伤战保罗 加索尔救赎之战 新浪体育讯...']。

      # 注意这个list()函数,把一段文字转化为了列表,元素为每个字和符号:['黄', '蜂', 'v', 's', '湖', '人', '首', '发', ':', '科', '比',...]

      # contents的元素为每段新闻转化成的列表:[['黄', '蜂', 'v', 's', '湖', '人', '首', '发', ':', '科', '比',...],[],...]

      # labels为['体育', '体育',...]

"""根据训练集构建词汇表,存储"""

def build_vocab(train_dir, vocab_dir, vocab_size=5000):

    data_train, _ = read_file(train_dir)

    all_data = []

    for content in data_train:

        all_data.extend(content)

    counter = Counter(all_data)

    count_pairs = counter.most_common(vocab_size - 1)

    words, _ = list(zip(*count_pairs))

    words = ['<PAD>'] + list(words)

    open_file(vocab_dir, mode='w').write('\n'.join(words) + '\n')

'''读取词汇表'''

def read_vocab(vocab_dir):

    with open_file(vocab_dir) as fp:

        words = [native_content(_.strip()) for _ in fp.readlines()]

    word_to_id = dict(zip(words, range(len(words))))

    return words, word_to_id

# readlines()读取所有行然后把它们作为一个字符串列表返回:['头\n', '天\n', ...]。strip()函数去掉"\n"。

# words: ['<PAD>', ',', '的', '。', '一', '是', '在', '0', '有',...]

# word_to_id:{'<PAD>': 0, ',': 1, '的': 2, '。': 3, '一': 4, '是': 5,..},每个类别对应的value值为其索引ID

"""读取分类目录"""

def read_category():

    categories = ['体育', '财经', '房产', '家居', '教育', '科技', '时尚', '时政', '游戏', '娱乐']

    categories = [native_content(x) for x in categories]

    cat_to_id = dict(zip(categories, range(len(categories))))

    return categories, cat_to_id

   # cat_to_id的输出为:{'体育': 0, '财经': 1, '房产': 2, '家居': 3,...},每个类别对应的value值为其索引ID.

""" 将id表示的内容转换为文字 """

def to_words(content, words):

    return ''.join(words[x] for x in content)

""" 将文件转换为id表示,进行pad """

def process_file(filename, word_to_id, cat_to_id, max_length=600):

    contents, labels = read_file(filename)

    data_id, label_id = [], []

    #contents的形式为:[['黄', '蜂', 'v', 's', '湖', '人',...],[],[],...],每一个元素是一个列表,该列表的元素是每段新闻的字和符号。

    #labels的形式为:['体育', '体育', '体育', '体育', '体育', ...]

    for i in range(len(contents)):

        data_id.append([word_to_id[x] for x in contents[i] if x in word_to_id])

        label_id.append(cat_to_id[labels[i]])

    x_pad = kr.preprocessing.sequence.pad_sequences(data_id, max_length)

    y_pad = kr.utils.to_categorical(label_id, num_classes=len(cat_to_id))

    return x_pad, y_pad

   # word_to_id是一个字典:{'<PAD>': 0, ',': 1, '的': 2, '。': 3, '一': 4, '是': 5,...}

   # 对于每一段新闻转化的字列表,把每个字在字典中对应的索引找到:

   # data_id: 将[['黄', '蜂', 'v', 's', '湖', '人',...],[],[],...] 转化为 [[387, 1197, 2173, 215, 110, 264,...],[],[],...]的形式

   # label_id : ['体育', '体育', '体育', '体育', '体育', ...] 转化为[0, 0, 0, 0, 0, ...]

   # data_id的行数为50000,即为新闻的条数,每个元素为由每段新闻的字的数字索引构成的列表;

   # data_id长这样:[[387, 1197, 2173, 215, 110, 264,...],[],[],...]

   # 由于每段新闻的字数不一样,因此每个元素(列表)的长度不一样,可能大于600,也可能小于600,需要统一长度为600。

   # 使用keras提供的pad_sequences来将文本pad为固定长度,x_pad的形状为(50000,600).

   # label_id是形如[0, 0, 0, 0, 0, ...]的整形数组,cat_to_id是形如{'体育': 0, '财经': 1, '房产': 2, '家居': 3,...}的字典

   # to_categorical是对标签进行one-hot编码,num-classes是类别数10,y_pad的维度是(50000,10)

"""生成批次数据"""

def batch_iter(x, y, batch_size=64):

    data_len = len(x)

    num_batch = int((data_len - 1) / batch_size) + 1

    indices = np.random.permutation(np.arange(data_len))

    x_shuffle = x[indices]

    y_shuffle = y[indices]

    # 样本长度为50000

    # int()可以将其他类型转化为整型,也可以用于向下取整,这里为782.

    # indices元素的范围是0-49999,形如[256,189,2,...]的拥有50000个元素的列表

    # 用indices对样本和标签按照行进行重新洗牌,接着上面的例子,把第256行(从0开始计)放在第0行,第189行放在第1行.

    for i in range(num_batch):

        start_id = i * batch_size

        end_id = min((i + 1) * batch_size, data_len)

        yield x_shuffle[start_id:end_id], y_shuffle[start_id:end_id]

        # i=780时,end_id=781*64=49984;

        # 当i=781时,end_id=50000,因为782*64=50048>50000,所以最后一批取[49984:50000]

        # yield是生成一个迭代器,用for循环来不断生成下一个批量。

        # 为了防止内存溢出,每次只取64个,内存占用少。
二、搭建模型
这一个模块是搭建TextCNN模型和配置相关的参数。
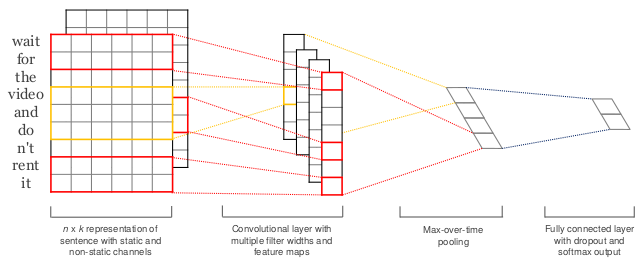
基本就是按照以上这张图的模型结构来搭建的,首先是一个embedding层,将字转化为64维的向量。然后进行一维卷积,提取出256个特征后,进行最大池化。最后接全连接层,在全连接进行dropout。相比图像识别中的CNN模型,这个模型比较简单。
# coding: utf-8

import tensorflow as tf

""" CNN配置参数 """

class TCNNConfig(object):

    embedding_dim = 64

    seq_length = 600

    num_classes = 10

    num_filters = 256

    kernel_size = 5

    # 输入层的维度是(600,64,1)

    # 卷积核数目是256,也就是提取的特征数量是256种,决定了卷积层的通道数为256

    # 卷积核的维度是(5,64)

    # 卷积核尺寸为5,也就是一次卷多少个词,这里卷5个词,那么是5-gram。

    # 卷积层的维度是(600-5+1,1,256),如果Stride=1, n-gram=5。256是由卷积核的个数决定的。

    # 卷积层的通道数等于卷积核的个数,卷积核的通道数等于输入层的通道数。

    vocab_size = 5000

    hidden_dim = 128

    dropout_keep_prob = 0.5

    learning_rate = 1e-3

    batch_size = 64

    num_epochs = 10

    print_per_batch = 100

    save_per_batch = 10

   # 每100批输出一次结果。

   # 每10批存入tensorboard。

"""文本分类,CNN模型"""

class TextCNN(object):

    def __init__(self, config):

        self.config = config

        # None是bitch_size,input_x是(64,600)的维度,input_y的维度是(64,10)

        self.input_x = tf.placeholder(tf.int32, [None, self.config.seq_length], name='input_x')

        self.input_y = tf.placeholder(tf.float32, [None, self.config.num_classes], name='input_y')

        self.keep_prob = tf.placeholder(tf.float32, name='keep_prob')

        self.cnn()

    def cnn(self):

        with tf.device('/gpu:0'):


            embedding = tf.get_variable('embedding', [self.config.vocab_size, self.config.embedding_dim])

            embedding_inputs = tf.nn.embedding_lookup(embedding, self.input_x)

            # 指定在第1块gpu上运行,如果指定是cpu则('/cpu:0')

            # 获取已经存在的变量,不存在则创建并随机初始化。这里的词向量是随机初始化的,embedding的维度是(5000,64)

            # embedding_inputs.shape=(64,600,64)

        with tf.name_scope("cnn"):

            conv = tf.layers.conv1d(embedding_inputs, self.config.num_filters, self.config.kernel_size, name='conv')

            gmp = tf.reduce_max(conv, reduction_indices=[1], name='gmp')

            # 使用一维卷积核进行卷积,因为卷积核的第二维与词向量维度相同,只能沿着行向下滑动。

            # 输入样本维度是(600,64),经过(5,64)的卷积核卷积后得到(596,1)的向量(600-5+1=596),默认滑动为1步。

            # 由于有256个过滤器,于是得到256个(596,1)的向量。

            # 结果显示为(None,596,256)

            # 用最大池化方法,按行求最大值,conv.shape=[Dimension(None), Dimension(596), Dimension(256)],留下了第1和第3维。

            # 取每个向量(596,1)中的最大值,然后就得到了256个最大值,

            # gmp.shape=(64,256)

            with tf.name_scope("score"):

                fc = tf.layers.dense(gmp, self.config.hidden_dim, name='fc1')

                fc = tf.contrib.layers.dropout(fc, self.keep_prob)

                fc = tf.nn.relu(fc)

                # 全连接层,后面接dropout以及relu激活

                # 神经元的个数为128个,gmp为(64,256),经过这一层得到fc的维度是(64,128)

                self.logits = tf.layers.dense(fc, self.config.num_classes, name='fc2')

                self.y_pred_cls = tf.argmax(tf.nn.softmax(self.logits), 1)

                # softmax得到的输出为[Dimension(None), Dimension(10)],是10个类别的概率

                # 然后再从中选出最大的那个值的下标,如[9,1,3...]

                # 最后得到的是(64,1)的列向量,即64个样本对应的类别。

            with tf.name_scope("optimize"):

                cross_entropy = tf.nn.softmax_cross_entropy_with_logits_v2(logits=self.logits, labels=self.input_y)

                self.loss = tf.reduce_mean(cross_entropy)

                self.optim = tf.train.AdamOptimizer(learning_rate=self.config.learning_rate).minimize(self.loss)

                # tf.reduce_mean(input_tensor,axis)用于求平均值,这里是求64个样本的交叉熵损失的均值。

            with tf.name_scope("accuracy"):

                correct_pred = tf.equal(tf.argmax(self.input_y, 1), self.y_pred_cls)

                self.acc = tf.reduce_mean(tf.cast(correct_pred, tf.float32))

                # 准确率的计算,tf.equal对内部两个向量的每个元素进行对比,返回[True,False,True,...]这样的向量

                # 也就是对预测类别和标签进行对比,self.y_pred_cls形如[9,0,2,3,...]

                # tf.cast函数将布尔类型转化为浮点型,True转为1.,False转化为0.,返回[1,0,1,...]

                # 然后对[1,0,1,...]这样的向量求均值,恰好就是1的个数除以所有的样本,恰好是准确率。
三、训练、验证和测试模型
以下的代码分别定义了用于训练、验证和测试的函数,需要注意的是在验证和测试时是不用进行dropout的,也就是保留比例设定为1。并且用早停来防止过拟合。
#!/usr/bin/python

# -*- coding: utf-8 -*-

#哪怕程序在2.7的版本运行,也可以用print()这种语法来打印。

from __future__ import print_function

import os

import sys

import time

from datetime import timedelta

import numpy as np

import tensorflow as tf

from sklearn import metrics

from cnn_model import TCNNConfig, TextCNN

from cnews_loader import read_vocab, read_category, batch_iter, process_file, build_vocab

# 数据处理模块为cnews_loader

# 模型搭建模块为cnn_model

base_dir = 'data/cnews'

train_dir = os.path.join(base_dir, 'cnews.train.txt')

test_dir = os.path.join(base_dir, 'cnews.test.txt')

val_dir = os.path.join(base_dir, 'cnews.val.txt')

vocab_dir = os.path.join(base_dir, 'cnews.vocab.txt')

save_dir = 'checkpoints/textcnn'

save_path = os.path.join(save_dir, 'best_validation')

#这里说是保存路径,其实这个“best_validation”是保存的文件的名字的开头,比如保存的一个文件是“best_validation.index”

def get_time_dif(start_time):

    """获取已使用时间"""

    end_time = time.time()

    time_dif = end_time - start_time

    return timedelta(seconds=int(round(time_dif)))

   # round函数是对浮点数四舍五入为int,注意版本3中round(0.5)=0,round(3.567,2)=3.57。

   # timedelta是用于对间隔进行规范化输出,间隔10秒的输出为:00:00:10

def feed_data(x_batch, y_batch, keep_prob):

    feed_dict = {

        model.input_x: x_batch,

        model.input_y: y_batch,

        model.keep_prob: keep_prob

    }

    return feed_dict

""" 评估在某一数据上的准确率和损失 """

def evaluate(sess, x_, y_):

    data_len = len(x_)

    batch_eval = batch_iter(x_, y_, 128)

    total_loss = 0.0

    total_acc = 0.0

    for x_batch, y_batch in batch_eval:

        batch_len = len(x_batch)

        feed_dict = feed_data(x_batch, y_batch, 1.0)

        loss, acc = sess.run([model.loss, model.acc], feed_dict=feed_dict)

        total_loss += loss * batch_len

        total_acc += acc * batch_len

    return total_loss / data_len, total_acc / data_len

        # 1.0是dropout值,在测试和验证时不需要舍弃

        # 把feed_dict的数据传入去计算model.loss,是求出了128个样本的平均交叉熵损失

        # 把平均交叉熵和平均准确率分别乘以128个样本得到总数,不断累加得到10000个样本的总数。

        # 求出10000个样本的平均交叉熵,和平均准确率。

def train():

    print("Configuring TensorBoard and Saver...")

    tensorboard_dir = 'tensorboard/textcnn'

    if not os.path.exists(tensorboard_dir):

        os.makedirs(tensorboard_dir)

    tf.summary.scalar("loss", model.loss)

    tf.summary.scalar("accuracy", model.acc)

    # 用到 tf.summary 中的方法保存日志数据,用于tensorboard可视化操作。

    # 用 tf.summary.scalar 保存标量,一般用来保存loss,accuary,学习率等数据

    merged_summary = tf.summary.merge_all()

    writer = tf.summary.FileWriter(tensorboard_dir)

    # 使用 tf.summaries.merge_all() 对所有的汇总操作进行合并

    # 将数据写入本地磁盘: tf.summary.FileWriter

    saver = tf.train.Saver()

    if not os.path.exists(save_dir):

        os.makedirs(save_dir)

    print("Loading training and validation data...")

    start_time = time.time()

    x_train, y_train = process_file(train_dir, word_to_id, cat_to_id, config.seq_length)

    x_val, y_val = process_file(val_dir, word_to_id, cat_to_id, config.seq_length)

    time_dif = get_time_dif(start_time)

    print("Time usage:", time_dif)

    session = tf.Session()

    session.run(tf.global_variables_initializer())

    writer.add_graph(session.graph)

    print('Training and evaluating...')

    start_time = time.time()

    total_batch = 0

    best_acc_val = 0.0

    last_improved = 0

    require_improvement = 1000

    # 如果超过1000轮未提升,提前结束训练,防止过拟合。

    flag = False

    for epoch in range(config.num_epochs):

        print('Epoch:', epoch + 1)

        batch_train = batch_iter(x_train, y_train, config.batch_size)

        for x_batch, y_batch in batch_train:

            feed_dict = feed_data(x_batch, y_batch, config.dropout_keep_prob)

            if total_batch % config.save_per_batch == 0:

                s = session.run(merged_summary, feed_dict=feed_dict)

                writer.add_summary(s, total_batch)

            if total_batch % config.print_per_batch == 0:

                feed_dict[model.keep_prob] = 1.0

                loss_train, acc_train = session.run([model.loss, model.acc], feed_dict=feed_dict)

                loss_val, acc_val = evaluate(session, x_val, y_val)  # todo

                if acc_val > best_acc_val:

                    # 保存最好结果

                    best_acc_val = acc_val

                    last_improved = total_batch

                    saver.save(sess=session, save_path=save_path)

                    improved_str = '*'

                else:

                    improved_str = ''

                time_dif = get_time_dif(start_time)

                msg = 'Iter: {0:>6}, Train Loss: {1:>6.2}, Train Acc: {2:>7.2%},' \

                      + ' Val Loss: {3:>6.2}, Val Acc: {4:>7.2%}, Time: {5} {6}'

                print(msg.format(total_batch, loss_train, acc_train, loss_val, acc_val, time_dif, improved_str))

            session.run(model.optim, feed_dict=feed_dict)  # 运行优化

            total_batch += 1

            if total_batch - last_improved > require_improvement:

                # 验证集正确率长期不提升,提前结束训练

                print("No optimization for a long time, auto-stopping...")

                flag = True

                break

        if flag:

            break

def test():

    print("Loading test data...")

    start_time = time.time()

    x_test, y_test = process_file(test_dir, word_to_id, cat_to_id, config.seq_length)

    session = tf.Session()

    session.run(tf.global_variables_initializer())

    saver = tf.train.Saver()

    saver.restore(sess=session, save_path=save_path)

    # 在保存和恢复模型时都需要首先运行这一行:tf.train.Saver(),而不是只有保存时需要。

    print('Testing...')

    loss_test, acc_test = evaluate(session, x_test, y_test)

     # 返回了10000个总测试样本的平均交叉熵损失和平均准率。

    msg = 'Test Loss: {0:>6.2}, Test Acc: {1:>7.2%}'

    print(msg.format(loss_test, acc_test))

    batch_size = 128

    data_len = len(x_test)

    num_batch = int((data_len - 1) / batch_size) + 1

    y_test_cls = np.argmax(y_test, 1)

    y_pred_cls = np.zeros(shape=len(x_test), dtype=np.int32)

    for i in range(num_batch):

        start_id = i * batch_size

        end_id = min((i + 1) * batch_size, data_len)

        feed_dict = {

            model.input_x: x_test[start_id:end_id],

            model.keep_prob: 1.0

        }

        y_pred_cls[start_id:end_id] = session.run(model.y_pred_cls, feed_dict=feed_dict)

        # 测试的时候不需要dropout神经元。

    print("Precision, Recall and F1-Score...")

    print(metrics.classification_report(y_test_cls, y_pred_cls, target_names=categories))

    # 可以得到准确率 、召回率和F1_score

    # 混淆矩阵

    print("Confusion Matrix...")

    cm = metrics.confusion_matrix(y_test_cls, y_pred_cls)

    print(cm)

    time_dif = get_time_dif(start_time)

    print("Time usage:", time_dif)

if __name__ == '__main__':

    config = TCNNConfig()

    if not os.path.exists(vocab_dir):

        build_vocab(train_dir, vocab_dir, config.vocab_size)

    categories, cat_to_id = read_category()

    words, word_to_id = read_vocab(vocab_dir)

    # 如果不存在词汇表,重建,值为False时进行重建。

    # 字典中有5000个字。

    # 返回categories:['体育', '财经', '房产', '家居', '教育', '科技', '时尚', '时政', '游戏', '娱乐']

    # 以及cat-to-id:{'体育': 0, '财经': 1, '房产': 2    , '家居': 3, '教育': 4, '科技': 5, '时尚': 6, '时政': 7, '游戏': 8, '娱乐': 9}

    # 输出word:['<PAD>', ',', '的', '。', '一', '是', '在', '0', '有', '不', '了', '中', '1', '人', '大', '、', '国', '', '2', ...]

    # 输出word_to_id:{'<PAD>': 0, ',': 1, '的': 2, '。':     3, '一': 4, '是': 5,...},里面还包含了一些字号、逗号和数字作为键值。

    config.vocab_size = len(words)

    model = TextCNN(config)

    option='train'
    # 选则 train 则为训练模式,输入 test 则为测试模式

    if option == 'train':

        train()

    else:

        test()
在第4000次迭代时停止了,验证精度为95.26%,测试精度为96.41%。并且可以看到每个类别的准确率、召回率和F1值、混淆矩阵。
Epoch: 6

Iter:   4000, Train Loss: 0.0046, Train Acc: 100.00%, Val Loss:   0.19, Val Acc:  95.26%, Time: 0:03:21

No optimization for a long time, auto-stopping...

Testing...
Test Loss:   0.12, Test Acc:  96.41%
Precision, Recall and F1-Score...
              precision    recall  f1-score   support

          体育       1.00      0.99      0.99      1000
          财经       0.96      0.99      0.97      1000
          房产       0.98      1.00      0.99      1000
          家居       0.99      0.87      0.92      1000
          教育       0.93      0.94      0.93      1000
          科技       0.94      0.98      0.96      1000
          时尚       0.95      0.97      0.96      1000
          时政       0.95      0.94      0.95      1000
          游戏       0.98      0.98      0.98      1000
          娱乐       0.97      0.98      0.98      1000

   micro avg       0.96      0.96      0.96     10000
   macro avg       0.96      0.96      0.96     10000
weighted avg       0.96      0.96      0.96     10000

Confusion Matrix...
[[991   0   0   0   5   2   0   0   2   0]
 [  0 988   2   0   2   3   0   5   0   0]
 [  0   0 997   1   1   0   0   0   0   1]
 [  1  19  19 866  18  13  30  26   4   4]
 [  0   6   2   1 937  19   7  12   8   8]
 [  0   0   0   2   2 983   4   3   6   0]
 [  1   1   0   2   8   5 973   1   2   7]
 [  0  13   0   2  24  10   1 945   1   4]
 [  1   2   1   1   4   2   2   1 982   4]
 [  1   2   0   4   5   4   3   0   2 979]]
Time usage: 0:00:08
四、模型预测
从一个科技新闻和体育新闻中,各摘取了一小段文字,进行预测,结果预测为:科技、体育。
# coding: utf-8

from __future__ import print_function

import os

import tensorflow as tf

import tensorflow.contrib.keras as kr

from cnn_model import TCNNConfig, TextCNN

from cnews_loader import read_category, read_vocab

try:

    bool(type(unicode))

except NameError:

    unicode = str

base_dir = 'data/cnews'

vocab_dir = os.path.join(base_dir, 'cnews.vocab.txt')

save_dir = 'checkpoints/textcnn'

save_path = os.path.join(save_dir, 'best_validation')

# 最佳验证结果保存路径

class CnnModel:

    def __init__(self):

        self.config = TCNNConfig()

        self.categories, self.cat_to_id = read_category()

        self.words, self.word_to_id = read_vocab(vocab_dir)

        self.config.vocab_size = len(self.words)

        self.model = TextCNN(self.config)

        self.session = tf.Session()

        self.session.run(tf.global_variables_initializer())

        saver = tf.train.Saver()

        saver.restore(sess=self.session, save_path=save_path)

        # 读取保存的模型

    def predict(self, message):

        # 支持不论在python2还是python3下训练的模型都可以在2或者3的环境下运行

        content = unicode(message)

        data = [self.word_to_id[x] for x in content if x in self.word_to_id]

        feed_dict = {

            self.model.input_x: kr.preprocessing.sequence.pad_sequences([data], self.config.seq_length),

            self.model.keep_prob: 1.0

        }

        y_pred_cls = self.session.run(self.model.y_pred_cls, feed_dict=feed_dict)

        return self.categories[y_pred_cls[0]]

if __name__ == '__main__':

    cnn_model = CnnModel()

    test_demo = ['三星ST550以全新的拍摄方式超越了以往任何一款数码相机',

                 '热火vs骑士前瞻:皇帝回乡二番战 东部次席唾手可得新浪体育讯北京时间3月30日7:00']

    for i in test_demo:

        print(cnn_model.predict(i))
中文文本分类之CharCNN的更多相关文章
- Chinese-Text-Classification,用卷积神经网络基于 Tensorflow 实现的中文文本分类。
用卷积神经网络基于 Tensorflow 实现的中文文本分类 项目地址: https://github.com/fendouai/Chinese-Text-Classification 欢迎提问:ht ...
- 基于Text-CNN模型的中文文本分类实战 流川枫 发表于AI星球订阅
Text-CNN 1.文本分类 转眼学生生涯就结束了,在家待就业期间正好有一段空闲期,可以对曾经感兴趣的一些知识点进行总结. 本文介绍NLP中文本分类任务中核心流程进行了系统的介绍,文末给出一个基于T ...
- 基于Text-CNN模型的中文文本分类实战
Text-CNN 1.文本分类 转眼学生生涯就结束了,在家待就业期间正好有一段空闲期,可以对曾经感兴趣的一些知识点进行总结. 本文介绍NLP中文本分类任务中核心流程进行了系统的介绍,文末给出一个基于T ...
- 利用RNN进行中文文本分类(数据集是复旦中文语料)
利用TfidfVectorizer进行中文文本分类(数据集是复旦中文语料) 1.训练词向量 数据预处理参考利用TfidfVectorizer进行中文文本分类(数据集是复旦中文语料) ,现在我们有了分词 ...
- 利用CNN进行中文文本分类(数据集是复旦中文语料)
利用TfidfVectorizer进行中文文本分类(数据集是复旦中文语料) 利用RNN进行中文文本分类(数据集是复旦中文语料) 上一节我们利用了RNN(GRU)对中文文本进行了分类,本节我们将继续使用 ...
- 万字总结Keras深度学习中文文本分类
摘要:文章将详细讲解Keras实现经典的深度学习文本分类算法,包括LSTM.BiLSTM.BiLSTM+Attention和CNN.TextCNN. 本文分享自华为云社区<Keras深度学习中文 ...
- 中文文本分类之TextRNN
RNN模型由于具有短期记忆功能,因此天然就比较适合处理自然语言等序列问题,尤其是引入门控机制后,能够解决长期依赖问题,捕获输入样本之间的长距离联系.本文的模型是堆叠两层的LSTM和GRU模型,模型的结 ...
- CNN在中文文本分类的应用
深度学习近一段时间以来在图像处理和NLP任务上都取得了不俗的成绩.通常,图像处理的任务是借助CNN来完成的,其特有的卷积.池化结构能够提取图像中各种不同程度的纹理.结构,并最终结合全连接网络实现信息的 ...
- TextGrocery中文文本分类处理
详细使用说明:http://textgrocery.readthedocs.io/zh/latest/index.html TextGrocery是一个基于LibLinear和结巴分词的短文本分类工具 ...
随机推荐
- 移动端禁止缩放<meta>
<meta name="viewport" content="width=device-width,initial-scale=1.0,minimum-scale= ...
- 2018 蓝桥杯省赛 B 组模拟赛
C. 结果填空:U型数字 最近蒜头君喜欢上了U型数字,所谓U型数字,就是这个数字的每一位先严格单调递减,后严格单调递增.比如 212 就是一个U型数字,但是 333, 98, 567, 3131,就是 ...
- LibreOJ #6008. 「网络流 24 题」餐巾计划
这道题其实我在刚学 OI 的时候就在一本通上看见过,还记得上面写着"新餐巾一次性买完"之类的话.当时还很稚嫩(现在也是),想了好久,根本想不出来. 学了网络流之后发现这道题的图也是 ...
- reactor---元数据驱动的表单
class NameForm extends React.Component { constructor(props) { super(props); this.state = { ...
- 初始化加载和导航时脚本执行的函数(初始化脚本执行环境)page.evaluateOnNewDocument
/** * Copyright 2017 Google Inc., PhantomJS Authors All rights reserved. * * Licensed under the Apac ...
- 十 用栈解决LeetCode20题括号的匹配
aaarticlea/png;base64,iVBORw0KGgoAAAANSUhEUgAAAiIAAACWCAYAAADjcONgAAAAAXNSR0IArs4c6QAAAARnQU1BAACxjw
- 学习笔记:中国剩余定理(CRT)
引入 常想起在空间里见过的一些智力题,这个题你见过吗: 一堆苹果,\(3\)个\(3\)个地取剩\(1\)个,\(5\)个\(5\)个地取剩\(1\)个,\(7\)个\(7\)个地取剩\(2\)个,苹 ...
- 「CF10D」LCIS
传送门 Luogu 解题思路 首先考虑怎么求方案,这样才可能会输出方案. 考虑 \(\text{DP}\). 设 \(f[i][j]\) 表示在 \(a\) 序列中选择一个 \([1...i]\) 的 ...
- 【Luogu2496】【BZOJ3005】[SDOI2012]体育课
把自己去年在luogu写的一个题解搬过来 原题解链接 1. 题目大意 给定一个长度为 \(n\) 的数列 \(a_1,a_2,a_3,...,a_n\) , 并给出 \(m\) 个操作,操作类型如下: ...
- Vue方法中修改数组某一项元素而不能响应式更新
<template> <div> <ul> <li v-for="(item, i) in ms" :key="i"& ...