Vue+koa2开发一款全栈小程序(3.vue入门、Mpvue入门)
1.Vue-cli
1.新建一个vue项目
打开cmd
官方命令行工具
npm install -g vue-cli //安装脚手架
cd到你想要存放demo的目录下,然后
vue init webpack vue-demo //新建demo
其中user EsLint....那一行选项要选n
还有选最后一条时,让你选npm、yarn、No,I can handle it myselft,要选第三个No,I can handle it myselft,不然有可能一整天都新建不完。
然后执行
cd vue-demo

cnpm install

npm run dev
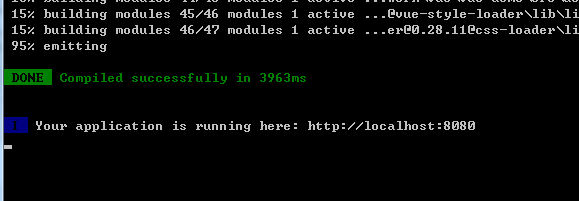
浏览器访问http://localhost:8080 可以看到vue的默认界面
2.数据渲染
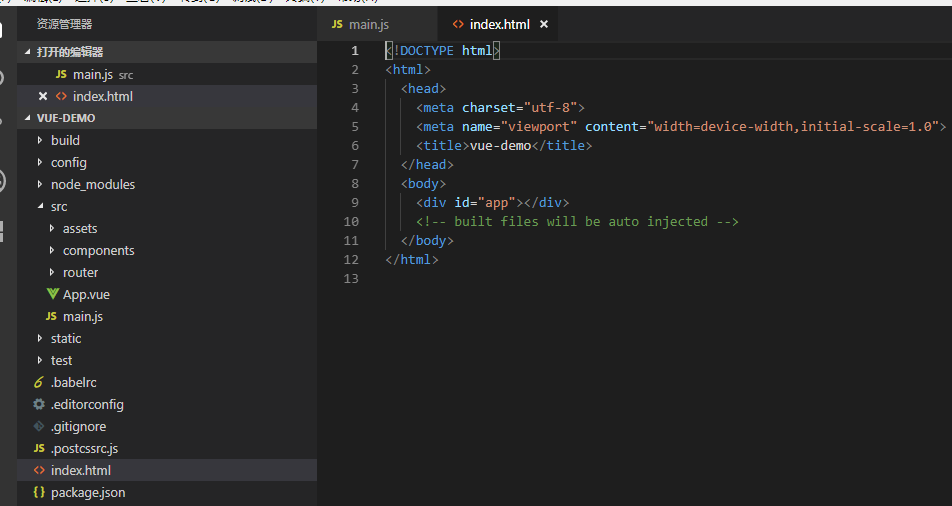
用vscode打开vue-demo项目
在main.js
// The Vue build version to load with the `import` command

// (runtime-only or standalone) has been set in webpack.base.conf with an alias.

import Vue from 'vue'

import App from './App'

import router from './router'

Vue.config.productionTip = false

/* eslint-disable no-new */

// new Vue({

//   el: '#app',

//   router,

//   components: { App },

//   template: '<App/>'

// })

new Vue({

  el:'#app',

  data:{

    title:'hello vuejs',

    subTitle:'Vue React Angular is good',

    showSub:false,

    todos:['吃饭','睡觉','写代码']

  }

})
在index.html中
<!DOCTYPE html>

<html>

  <head>

    <meta charset="utf-8">

    <meta name="viewport" content="width=device-width,initial-scale=1.0">

    <title>vue-demo</title>

  </head>

  <body>

    <div id="app">

      <p>{{title}}</p>

      <p v-if='showSub'>{{subTitle}}</p>

      <ul>

        <li v-for='todo in todos'>{{todo}}</li>

      </ul>

    </div>

    <!-- built files will be auto injected -->

  </body>

</html>
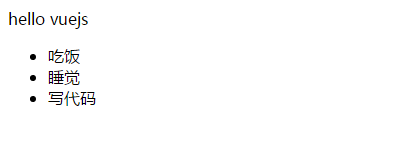
浏览器中效果
3.简单事件处理
main.js中
// The Vue build version to load with the `import` command

// (runtime-only or standalone) has been set in webpack.base.conf with an alias.

import Vue from 'vue'

import App from './App'

import router from './router'

Vue.config.productionTip = false

/* eslint-disable no-new */

// new Vue({

//   el: '#app',

//   router,

//   components: { App },

//   template: '<App/>'

// })

new Vue({

  el:'#app',

  data:{

    title:'hello vuejs',

    subTitle:'Vue React Angular is good',

    showSub:false,

    todos:['吃饭','睡觉','写代码'],

    mytodo:''

  },

  methods:{

    handleClick(){

      //this.title='你好 小程序'

      this.todos.push(this.mytodo)

      this.mytodo=''

    }

  }

})
index.html
<!DOCTYPE html>

<html>

  <head>

    <meta charset="utf-8">

    <meta name="viewport" content="width=device-width,initial-scale=1.0">

    <title>vue-demo</title>

  </head>

  <body>

    <div id="app">

      <p>{{title}}</p>

      <p v-if='showSub'>{{subTitle}}</p>

      <div>

        <input type="text" v-model="mytodo">

        <button @click="handleClick">添加</button>

      </div>

      <ul>

        <li v-for='todo in todos'>{{todo}}</li>

      </ul>

    </div>

    <!-- built files will be auto injected -->

  </body>

</html>
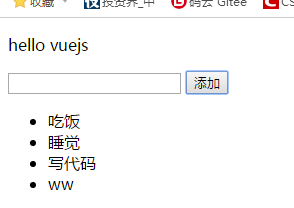
效果图
4.循环事件处理,计算属性computed(购物车功能用得上)
main.js中
// The Vue build version to load with the `import` command

// (runtime-only or standalone) has been set in webpack.base.conf with an alias.

import Vue from 'vue'

import App from './App'

import router from './router'

Vue.config.productionTip = false

/* eslint-disable no-new */

// new Vue({

//   el: '#app',

//   router,

//   components: { App },

//   template: '<App/>'

// })

new Vue({

  el:'#app',

  data:{

    title:'hello vuejs',

    subTitle:'Vue React Angular is good',

    showSub:false,

    todos:[

      {text:'吃饭',done:false},

      {text:'睡觉',done:false},

      {text:'写代码',done:false}

    ],

    mytodo:''

  },

  computed:{

    remain(){

      return this.todos.filter(v=>!v.done).length

    }

  },

  methods:{

    handleClick(){

      this.todos.push({

        text:this.mytodo,

        done:false

      })

      this.mytodo=''

    },

    toggle(i){

      this.todos[i].done=!this.todos[i].done

    },

    clean(){

      this.todos=this.todos.filter(v=>!v.done)

    }

  }

})
index.html
<!DOCTYPE html>

<html>

  <head>

    <meta charset="utf-8">

    <meta name="viewport" content="width=device-width,initial-scale=1.0">

    <title>vue-demo</title>

    <style>

      li.done{

        text-decoration: line-through;

        color:'red'

      }

    </style>

  </head>

  <body>

    <div id="app">

      <p>{{title}}</p>

      <p v-if='showSub'>{{subTitle}}</p>

      <div>

        <input @keyup.enter="handleClick" type="text" v-model="mytodo">

        <button @click="handleClick">添加</button>

        <button @click="clean">清理</button>

      </div>

      <ul>

        <li :class="{'done':todo.done}" @click="toggle(index)" v-for='(todo,index) in todos'>{{index+1}}:{{todo.text}}</li>

      </ul>

      <p>{{remain}}/{{todos.length}}</p>

    </div>

    <!-- built files will be auto injected -->

  </body>

</html>
5.改造成单文件组件
1.在src目录下新建 Todolist.vue将上面的代码组件化
1.index.html
<!DOCTYPE html>

<html>

  <head>

    <meta charset="utf-8">

    <meta name="viewport" content="width=device-width,initial-scale=1.0">

    <title>vue-demo</title>

    <style>

    </style>

  </head>

  <body>

    <div id="app">

    </div>

    <!-- built files will be auto injected -->

  </body>

</html>
2.main.js中
// The Vue build version to load with the `import` command

// (runtime-only or standalone) has been set in webpack.base.conf with an alias.

import Vue from 'vue'

import App from './App'

import router from './router'

import Todolist from './Todolist'

Vue.config.productionTip = false

/* eslint-disable no-new */

// new Vue({

//   el: '#app',

//   router,

//   components: { App },

//   template: '<App/>'

// })

new Vue({

  el:'#app',

  components:{

    Todolist

  },

  template:'<Todolist/>'

})
3.Todolist.vue中
<template>

    <div>

      <p>{{title}}</p>

      <p v-if='showSub'>{{subTitle}}</p>

      <div>

        <input @keyup.enter="handleClick" type="text" v-model="mytodo">

        <button @click="handleClick">添加</button>

        <button @click="clean">清理</button>

      </div>

      <ul>

        <li :class="{'done':todo.done}" @click="toggle(key)" v-for='(todo,key) in todos'>{{key+1}}:{{todo.text}}</li>

      </ul>

      <p>{{remain}}/{{todos.length}}</p>

    </div>

</template>

<script>

export default {

    data(){

        return {

        title:'hello vuejs',

        subTitle:'Vue React Angular is good',

        showSub:false,

        mytodo:'',

        todos:[

        {text:'吃饭',done:false},

        {text:'睡觉',done:false},

        {text:'写代码',done:false}

        ]

    }

  },

  computed:{

    remain(){

      return this.todos.filter(v=>!v.done).length

    }

  },

  methods:{

    handleClick(){

      this.todos.push({

        text:this.mytodo,

        done:false

      })

      this.mytodo=''

    },

    toggle(i){

      this.todos[i].done=!this.todos[i].done

    },

    clean(){

      this.todos=this.todos.filter(v=>!v.done)

    }

  }

}

</script>

<style>

li.done{

        text-decoration: line-through;

        color:'red'

      }

</style>
2.将todolist中的title再分出一个组件(组件间传值)
1.Todolist.vue中
<template>

    <div>

        <Title :title="title" :subtitle="subtitle"></Title>

      <div>

        <input @keyup.enter="handleClick" type="text" v-model="mytodo">

        <button @click="handleClick">添加</button>

        <button @click="clean">清理</button>

      </div>

      <ul>

        <li :class="{'done':todo.done}" @click="toggle(key)" v-for='(todo,key) in todos'>{{key+1}}:{{todo.text}}</li>

      </ul>

      <p>{{remain}}/{{todos.length}}</p>

    </div>

</template>

<script>

import Title from './components/Title'

export default {

    components:{

        Title

    },

    data(){

        return {

        title:'hello vuejs',

        subtitle:'Vue React Angular is good',

        showSub:false,

        mytodo:'',

        todos:[

        {text:'吃饭',done:false},

        {text:'睡觉',done:false},

        {text:'写代码',done:false}

        ]

    }

  },

  computed:{

    remain(){

      return this.todos.filter(v=>!v.done).length

    }

  },

  methods:{

    handleClick(){

      this.todos.push({

        text:this.mytodo,

        done:false

      })

      this.mytodo=''

    },

    toggle(i){

      this.todos[i].done=!this.todos[i].done

    },

    clean(){

      this.todos=this.todos.filter(v=>!v.done)

    }

  }

}

</script>

<style>

li.done{

        text-decoration: line-through;

        color:'red'

      }

</style>
2.在src/components目录下新建组件Title.vue
<template>

    <div class="title">

      <p>{{title}}</p>

      <p>{{subtitle}}</p>

    </div>

</template>

<script>

export default {

    props:['title','subtitle']

}

</script>

<style>

    .title{

        color: red;

    }

</style>
2.mpvue入门
1.新建mpvue项目
1.新建mpvue项目,打开cmd,cd到想要放置项目的目录
vue init mpvue/mpvue-quickstart my-project

Project name mpvue-demo

wxmp appid //登录微信小程序后台,找到appid

//然后全都默认即可
2.cd 到my-project
npm install

npm run dev
3.打开微信开发者工具,选择添加项目,项目目录选择my-project
2.生命周期
vue生命周期+兼容小程序生命周期
1.Create 创建初始化
2.Vue不支持的 用小程序自己的,比如 onPullDownRefresh(下拉刷新)
3.模板语法
computed+模板+熟悉的html
1.动态style和class使用计算属性返回字符串
2.v-if和v-for用法不变
3.表单v-model全支持
4.模板
除了动态渲染,别的都支持
1..vue单文件组件
2.小程序自带的组件也可以用
3.自带组件事件绑定也使用vue的,比如@click
5.todolist迁移
1.在src/components目录下,新建Todolist.vue组件
<template>

    <div>

      <div>

        <input @keyup.enter="handleClick" type="text" v-model="mytodo">

        <button @click="handleClick">添加</button>

        <button @click="clean">清理</button>

      </div>

      <ul>

        <li :class="{'done':todo.done}" @click="toggle(key)" :key="key" v-for='(todo,key) in todos'>{{key+1}}:{{todo.text}}</li>

      </ul>

      <p>{{remain}}/{{todos.length}}</p>

    </div>

</template>

<script>

export default {

    data(){

        return {

        title:'hello vuejs',

        subtitle:'Vue React Angular is good',

        showSub:false,

        mytodo:'',

        todos:[

        {text:'吃饭',done:false},

        {text:'睡觉',done:false},

        {text:'写代码',done:false}

        ]

    }

  },

  computed:{

    remain(){

      return this.todos.filter(v=>!v.done).length

    }

  },

  methods:{

    handleClick(){

      this.todos.push({

        text:this.mytodo,

        done:false

      })

      this.mytodo=''

    },

    toggle(i){

      this.todos[i].done=!this.todos[i].done

    },

    clean(){

      this.todos=this.todos.filter(v=>!v.done)

    }

  }

}

</script>

<style>

li.done{

        text-decoration: line-through;

        color:'red'

      }

</style>
2.在src/pages目录下,新建目录todolist,在todolist目录下新建index.vue和main.js
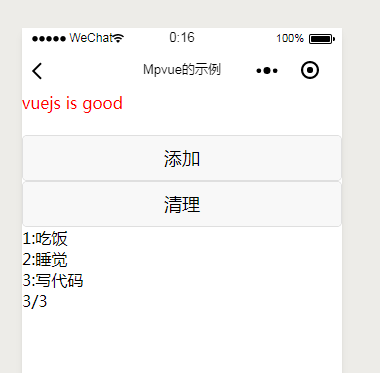
index.vue
<template>

    <div>

        <h1>vuejs is good</h1>

        <Todolist></Todolist>

    </div>

</template>

<script>

import Todolist from '@/components/Todolist'

export default {

    components:{

        Todolist

    }

}

</script>

<style>

 h1{

     color: red;

 }

</style>
main.js(通用)
import Vue from 'vue'

import App from './index'

const app = new Vue(App)

app.$mount()
在src/pages/index/index.vue中

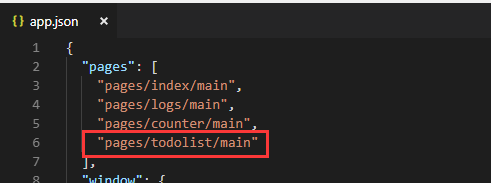
3.在src/app.json中,增加路由
4.在package.json中的lint,添加--fix属性

5.修正代码,在cmd里,Ctrl+C y 停止正在运行的项目,执行
npm run lint
6.启动项目
npm run dev
Vue+koa2开发一款全栈小程序(3.vue入门、Mpvue入门)的更多相关文章
- Vue+koa2开发一款全栈小程序(1.课程介绍+2.ES6入门)
1.课程介绍 1.课程概述 1.做什么? Vue+koa2开发一款全栈小程序 2.哪些功能? 个人中心.图书列表.图书详情.图书评论.个人评论列表 3.技术栈 小程序.Vue.js.koa2.koa- ...
- Vue+koa2开发一款全栈小程序(5.服务端环境搭建和项目初始化)
1.微信公众平台小程序关联腾讯云 腾讯云的开发环境是给免费的一个后台,但是只能够用于开发,如果用于生产是需要花钱的,我们先用开发环境吧 1.用小程序开发邮箱账号登录微信公众平台 2.[设置]→[开发者 ...
- Vue+koa2开发一款全栈小程序(6.个人中心)
1.用户信息的获取和展示 1.初始化数据库 cd到server目录下,执行 node tools/initdb.js 登录mysql控制界面,查看初始化以后生成的表 show databases; u ...
- Vue+koa2开发一款全栈小程序(9.图书详情页)
1.获取图书详情 1.修改server/controllers/bookdetail.js为 const {mysql}=require('../qcloud') module.exports=asy ...
- Vue+koa2开发一款全栈小程序(8.图书列表页)
1.图书列表页获取数据 1.在server/routes/index.js中新增路由 router.get('/booklist',controllers.booklist) 2.在server/co ...
- Vue+koa2开发一款全栈小程序(7.图书录入功能)
1.图书录入功能 1.获取图书信息 1.在mydemo/src/until.js中封装工具函数post和get // 工具函数 import config from './config' // htt ...
- Vue+koa2开发一款全栈小程序(4.Koa入门)
1.Koa是什么? 基于nodejs平台的下一代web开发框架 1.Express原班人马打造,更精简 2.Async+await处理异步 3.洋葱圈型的中间件机制 新建一个koa项目 1.打开cmd ...
- 微信小程序云开发-从0打造云音乐全栈小程序
第1章 首门小程序“云开发”课程,你值得学习本章主要介绍什么是小程序云开发以及学习云开发的重要性,并介绍项目的整体架构,真机演示项目功能,详细介绍整体课程安排.课程适用人群以及需要掌握的前置知识.通过 ...
- 从零开发一款自己的小程序UI组件库(一)
写在前面:有开发过小程序的朋友肯定知道组件化开发的特性,高内聚与低耦合.使用已有的UI组件库,诸如:vantUI-weapp.minUI-weapp等UI组件库的诞生使我们的开发速度大大的加快,丰富的 ...
随机推荐
- WPF Image控件的绑定
在我们平时的开发中会经常用到Image控件,通过设置Image控件的Source属性,我们可以加载图片,设置Image的source属性时可以使用相对路径也可以使用绝对路径,一般情况下建议使用绝对路径 ...
- python3高级编程
1. SMTP发送邮件 internet相关协议: http:网页访问相关,httplib,urllib,xmlrpclib ftp:文件传输相关, ftplib, urllib nntp:新闻和帖子 ...
- 一、VS2017支持Github
选择 工具-->扩展和更新,搜索GitHub,安装GitHub的VS插件 安装完插件,打开视图-->团队资源管理器,我们可以看到Git插件菜单.通过菜单我们可以新建Git存储库,可以提交修 ...
- 数据库语法group by
因为在做pgsql和mysql数据库时group by 有报错,但是在以前做mysql5.6的时候没有问题,虽然知道时违反了sql的语法问题,但是没有搞清楚什么原因,也找了不少资料,查找原因,在盆友的 ...
- powerdesigner 16.5 不允许有扩展属性,或对象不存在
创建完之后这边会出现 选择刚创建的用户 这样就可以了
- H5(仅仅是个地址)
http://www.w3school.com.cn/html5/html_5_intro.asp (▼ヘ▼#) 怕你不看,我特地给你记个地址,应该不能再故意不看了吧 (▼ヘ▼#)
- opencv imdecode和imencode用法
主要是对内存数据自动编解码 string fname = "D:/image.jpg"; //! 以二进制流方式读取图片到内存 FILE* pFile = fopen(fname. ...
- codeforces630C
Lucky Numbers CodeForces - 630C 小希称只含7和8的数是幸运数,那么不超过n位的幸运数有多少个? Input 一个整数 n (1 ≤ n ≤ 55) Output 输出幸 ...
- 轻量级浏览器Midori
导读 这是一个对再次回归的轻量级.快速.开源的 Web 浏览器 Midori 的快速回顾. 如果你正在寻找一款轻量级网络浏览器替代品,请试试 Midori. Midori是一款开源的网络浏览器,它更注 ...
- django-admin和manage.py
目录 一.Django内置命令选项 check dbshell diffsettings flush makemigrations migrate runserver shell startapp s ...