16_点击事件第三种写法_activity实现接口
第一种写法是有名内部类,第二种写法是匿名内部类,第三种写法是MainActivity实现接口OnClickListener.直接让MainActivity实现了OnClickListener这个接口。
用当前的MainActivity来实现这个接口.这种实现方式要在点击事件里面区分究竟是哪一个按钮被点了.
public void onClick(View v) {
哪一个控件被点击,这个控件就会被作为参数传进来.
v.getId()
拿到这个控件对应的具体的id是啥.由于每个控件的id都不一样,由于每个控件它的id都不一样.咱们就可以通过这个id进行区分.就可以知道是哪一个按钮被点击了。
package com.itheima.thirdclickmethod; import android.net.Uri;
import android.os.Bundle;
import android.app.Activity;
import android.content.Intent;
import android.text.TextUtils;
import android.view.Menu;
import android.view.View;
import android.view.View.OnClickListener;
import android.widget.Button;
import android.widget.EditText;
import android.widget.Toast; public class MainActivity extends Activity implements OnClickListener{ private EditText et_number; @Override
protected void onCreate(Bundle savedInstanceState) {
super.onCreate(savedInstanceState);
//把布局文件加载到界面上
setContentView(R.layout.activity_main);
et_number = (EditText) findViewById(R.id.editText1);
Button btn_call = (Button) findViewById(R.id.button1);
Button btn2 = (Button) findViewById(R.id.button2);
Button btn3 = (Button) findViewById(R.id.button3);
btn_call.setOnClickListener(this);
btn2.setOnClickListener(this);
btn3.setOnClickListener(this);
} @Override
public boolean onCreateOptionsMenu(Menu menu) {
// Inflate the menu; this adds items to the action bar if it is present.
getMenuInflater().inflate(R.menu.main, menu);
return true;
} @Override
public void onClick(View v) {
// TODO Auto-generated method stub
//View v 参数 当控件被点击的时候 被点击的对象就会作为参数传进来 可以通过控件的id进行区分
int id = v.getId();//
switch (id) {
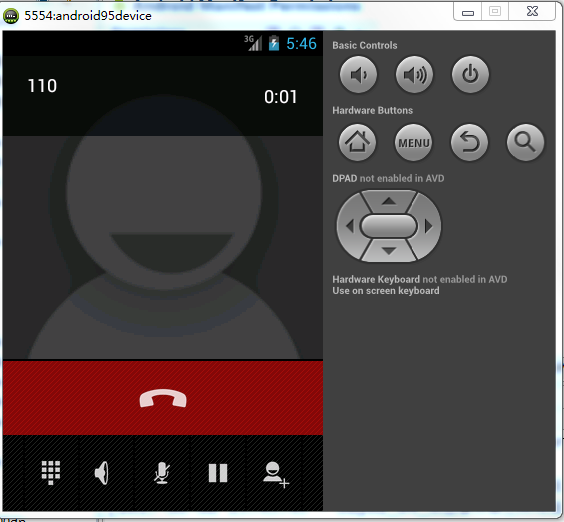
case R.id.button1:
String number = et_number.getText().toString().trim();
if(TextUtils.isEmpty(number)){
Toast.makeText(this, "输入不能为空", Toast.LENGTH_SHORT).show();
}else{
Intent intent = new Intent();
intent.setAction(Intent.ACTION_CALL);
intent.setData(Uri.parse("tel:"+number));
startActivity(intent);//通过这个意图开启打电话的界面
}
break;
case R.id.button2:
Toast.makeText(this, "按钮2被点击", Toast.LENGTH_SHORT).show();
break;
case R.id.button3:
Toast.makeText(this, "按钮3被点击", Toast.LENGTH_SHORT).show();
break; default:
break;
} } }
<RelativeLayout xmlns:android="http://schemas.android.com/apk/res/android"

    xmlns:tools="http://schemas.android.com/tools"

    android:layout_width="match_parent"

    android:layout_height="match_parent"

    android:paddingBottom="@dimen/activity_vertical_margin"

    android:paddingLeft="@dimen/activity_horizontal_margin"

    android:paddingRight="@dimen/activity_horizontal_margin"

    android:paddingTop="@dimen/activity_vertical_margin"

    tools:context=".MainActivity" >

    <TextView

        android:id="@+id/textView1"

        android:layout_width="wrap_content"

        android:layout_height="wrap_content"

        android:text="请输入电话" />

    <EditText

        android:id="@+id/editText1"

        android:layout_width="wrap_content"

        android:layout_height="wrap_content"

        android:layout_alignLeft="@+id/textView1"

        android:layout_below="@+id/textView1"

        android:layout_marginTop="14dp"

        android:hint="在此输入电话"

        android:ems="10" >

        <requestFocus />

    </EditText>

    <Button

        android:id="@+id/button1"

        android:layout_width="wrap_content"

        android:layout_height="wrap_content"

        android:layout_alignLeft="@+id/editText1"

        android:layout_below="@+id/editText1"

        android:layout_marginTop="22dp"

        android:text="拨打此号码" />

    <Button

        android:id="@+id/button2"

        android:layout_width="wrap_content"

        android:layout_height="wrap_content"

        android:layout_alignRight="@+id/button1"

        android:layout_below="@+id/button1"

        android:layout_marginTop="24dp"

        android:text="Button2" />

    <Button

        android:id="@+id/button3"

        android:layout_width="wrap_content"

        android:layout_height="wrap_content"

        android:layout_alignLeft="@+id/button2"

        android:layout_below="@+id/button2"

        android:layout_marginTop="29dp"

        android:text="Button3" />

</RelativeLayout>
<?xml version="1.0" encoding="utf-8"?>

<manifest xmlns:android="http://schemas.android.com/apk/res/android"

    package="com.itheima.thirdclickmethod"

    android:versionCode="1"

    android:versionName="1.0" >

    <uses-sdk

        android:minSdkVersion="8"

        android:targetSdkVersion="17" />

    <uses-permission android:name="android.permission.CALL_PHONE"/>

    <application

        android:allowBackup="true"

        android:icon="@drawable/ic_launcher"

        android:label="@string/app_name"

        android:theme="@style/AppTheme" >

        <activity

            android:name="com.itheima.thirdclickmethod.MainActivity"

            android:label="@string/app_name" >

            <intent-filter>

                <action android:name="android.intent.action.MAIN" />

                <category android:name="android.intent.category.LAUNCHER" />

            </intent-filter>

        </activity>

    </application>

</manifest>
16_点击事件第三种写法_activity实现接口的更多相关文章
- (转)Ext.Button点击事件的三种写法
转自:http://maidini.blog.163.com/blog/static/377627042008111061844345/ ExtJs的写法太灵活了,现在收集了关于Button点击事件的 ...
- JavaScript 点击事件的三种写法
嵌入式 <button οnclick='alert("hello")'>点击按钮</button> 脚本模型 btn.onclick=function() ...
- jquery绑定点击事件的三种写法
一.用jquery动态绑定点击事件的写法 部分代码: <script type="text/javascript"> $(document).ready(functio ...
- Android journey3 @点击事件的4种写法
对于android布局中的控件,如Button等会有相应的点击事件去响应它所需要的功能,今天我们就以电话拨号器的代码说明下几种点击事件: package com.itheima.phone; impo ...
- Android中点击事件的四种写法详解
Android中点击事件的四种写法 使用内部类实现点击事件 使用匿名内部类实现点击事件 让MainActivity实现View.OnClickListener接口 通过布局文件中控件的属性 第一种方法 ...
- 无废话Android之常见adb指令、电话拨号器、点击事件的4种写法、短信发送器、Android 中各种布局(1)
1.Android是什么 手机设备的软件栈,包括一个完整的操作系统.中间件.关键的应用程序,底层是linux内核,安全管理.内存管理.进程管理.电源管理.硬件驱动 2.Dalvik VM 和 JVM ...
- Android笔记---点击事件的四种写法
Android 点击事件的四种写法: 1. 以内部类的形式实现 OnClickListener 接口.定义点击事件 class MainActivity extents Activity{ // .. ...
- 17_点击事件第四种写法_布局文件添加onclick属性
尽量不要用第四种点击事件的写法.在一万多行代码中发现了一个没被调用的代码 public void call(View v){//第四种写法参数一定是View v //public void call( ...
- [Android] 点击事件的四种写法
点击事件的必备条件:实现OnClickListener接口,重写onclick(View v)方法 以拨号简单案例为例,如下图效果: 逻辑流程: 获取点击对象,获取数据 给对象设置监听类 实现OnCl ...
随机推荐
- vim 光标的移动和跳转文件的位置
刚启动vim进入的就是命令模式 在命令模式下 h等于左箭头 j等于下箭头 k等于上箭头 l等于右箭头 想要多次移动可以使用30j或30↓向下移动30行 在命令模式下输入0跳到行头 在命令模式下输入$跳 ...
- SpringBoot学习笔记(7):Druid使用心得
SpringBoot学习笔记(7):Druid使用心得 快速开始 添加依赖 <dependency> <groupId>com.alibaba</groupId> ...
- 让你快速上手Runtime(转)
前言 本篇主要介绍Runtime在开发中的一些使用场景,顺便讲解了下MJExtension的底层实现.如果喜欢我的文章,可以关注我微博:袁峥Seemygo,也可以来小码哥,了解下我们的iOS培训课程. ...
- 《Java并发编程的艺术》留给自己以后看的笔记
<Java并发编程的艺术>这本书特别好,和<深入了解JAVA虚拟机>有一拼,建议做java的都看看,下面全部都是复制书中的部分内容,主要目的是做个笔记,方便以后遇到问题能找到. ...
- CSS3响应式侧边菜单
在线演示 本地下载
- BZOJ 1562 [NOI2009]变换序列:二分图匹配
题目链接:http://www.lydsy.com/JudgeOnline/problem.php?id=1562 题意: 给定n,定义D(x,y) = min(|x-y|, n-|x-y|),然后 ...
- 内存表 ClientDataSet CreateDataSet
unit Form_Main; interface uses Windows, Messages, SysUtils, Variants, Classes, Graphics, Controls, F ...
- jQuery 事件 - one() 方法
jQuery 事件参考手册 实例 当点击 p 元素时,增加该元素的文本大小: $("p").one("click",function(){ $(this).an ...
- L102
Let us make our future now, and let us make our dreams tomorrow's reality.I panted my congratulation ...
- CCUserDefault 存档
void HelloWorld::testCCUserDefault() { CCSize size = CCDirector::sharedDirector()->getWinSize(); ...