Spring Boot中的自定义start pom
start pom是springboot中提供的简化企业级开发绝大多数场景的一个工具,利用好strat pom就可以消除相关技术的配置得到自动配置好的Bean。
举个例子,在一般使用中,我们使用基本的spring-boot-starter配置基本的springboot项目,也使用spring-boot-starter-web去配置web项目,
<dependencies>

        <dependency>

            <groupId>org.springframework.boot</groupId>

            <artifactId>spring-boot-starter</artifactId>

        </dependency>

        <dependency>

            <groupId>org.springframework.boot</groupId>

            <artifactId>spring-boot-starter-web</artifactId>

        </dependency>

    </dependencies>
在pom文件中,引入这个start pom,便可以方便我们快速的导包以及配置相关必要配置,能大大的简化我们的操作。
spring boot官方也给我们提供了很多start pom,当然除了官方的start pom外,我们也可以使用一些第三方为spring boot写的start pom。
本篇文章,则是介绍一个自己写start pom的方法,当能熟练使用这个之后,便可以实现自定义快速编程,敏捷开发了。
- 首先,先新建一个maven工程,在pom文件中引入spring-boot-autoconfigure依赖
pom文件
<project xmlns="http://maven.apache.org/POM/4.0.0" xmlns:xsi="http://www.w3.org/2001/XMLSchema-instance"

    xsi:schemaLocation="http://maven.apache.org/POM/4.0.0 http://maven.apache.org/xsd/maven-4.0.0.xsd">

    <modelVersion>4.0.0</modelVersion>

    <groupId>site.wangxin520</groupId>

    <artifactId>spring-boot-start-hello</artifactId>

    <version>0.0.1-SNAPSHOT</version>

    <name>spring-boot-start-hello</name>

    <description>自定义的一个spring boot的start pom</description>

    <dependencies>

        <dependency>

            <groupId>org.springframework.boot</groupId>

            <artifactId>spring-boot-autoconfigure</artifactId>

            <version>1.5.8.RELEASE</version>

        </dependency>

    </dependencies>

</project>
新建的maven工程目录为
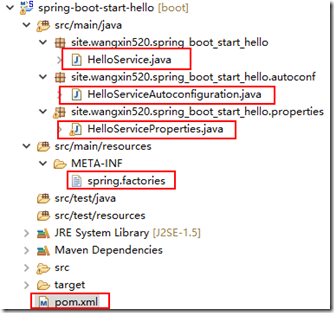
其中HelloService.java是我们需要在springboot中引入的实体类。
- HelloService.java如下
package site.wangxin520.spring_boot_start_hello;

/**

 * 这个是Bean类,用于在spring boot中使用的

 *

 * @author wangXgnaw

 *

 */

public class HelloService {

    // 私有属性,与下面的set和get方法一起,用于注入

    private String msg;

    /**

     * 打招呼的类,用于在spring boot中调用

     *

     * @return

     */

    public String sayHello() {

        return "hello " + msg;

    }

    public String getMsg() {

        return msg;

    }

    public void setMsg(String msg) {

        this.msg = msg;

    }

}
- HelloServiceProperties.java相当于是读取到的application.properties中的配置注入到HelloService中,或者说是当没有配置的话,就注入默认配置
package site.wangxin520.spring_boot_start_hello.properties;

import org.springframework.boot.context.properties.ConfigurationProperties;

/**

 * 这个是类型安全属性的获取,用于配置自动注入bean的参数

 *

 * @author wangXgnaw

 *

 */

@ConfigurationProperties(prefix = "hello")

public class HelloServiceProperties {

    // 默认的配置的值

    private final static String MSG = "wangxin";

    // 由于在configuationProperties中配置了前缀,所以可以在application.properties中使用hello.msg配置该值。

    private String msg = MSG;

    // 这里的get和set方法,是方便外部注入参数值用的,需要注意的是这里和HelloService不同,并没有让properties中的参数直接注入到HelloService中

    public String getMsg() {

        return msg;

    }

    public void setMsg(String msg) {

        this.msg = msg;

    }

}
- HelloServiceAutoconfiguration.java是自动注入的一个配置,与spring相关
package site.wangxin520.spring_boot_start_hello.autoconf;

import org.springframework.beans.factory.annotation.Autowired;

import org.springframework.boot.autoconfigure.condition.ConditionalOnClass;

import org.springframework.boot.autoconfigure.condition.ConditionalOnMissingBean;

import org.springframework.boot.autoconfigure.condition.ConditionalOnProperty;

import org.springframework.boot.context.properties.EnableConfigurationProperties;

import org.springframework.context.annotation.Bean;

import org.springframework.context.annotation.Configuration;

import site.wangxin520.spring_boot_start_hello.HelloService;

import site.wangxin520.spring_boot_start_hello.properties.HelloServiceProperties;

/**

 * 自动配置类,给bean注入参数

 *

 * @author wangXgnaw

 *

 */

@Configuration // 标记当前类是配置类

@EnableConfigurationProperties(HelloServiceProperties.class) // 使用java类作为配置文件

@ConditionalOnClass(HelloService.class) // 需要被配置的类

@ConditionalOnProperty(prefix = "hello", value = "enable", matchIfMissing = true)

public class HelloServiceAutoconfiguration {

    // 自动注入配置

    @Autowired

    private HelloServiceProperties helloServiceProperties;

    /**

     * 给bean注入参数,同时返回一个bean实例

     * 同时注解表名,返回是一个bean实例

     * 当容器中没有这个bean实例的时候,就返回一个自动注入好参数的bean实例回去

     * @return HelloService

     */

    @Bean

    @ConditionalOnMissingBean(HelloService.class)

    public HelloService helloService() {

        HelloService helloService = new HelloService();

        helloService.setMsg(helloServiceProperties.getMsg());

        return helloService;

    }

}
- spring.factories在src/main/resources中,添加一个文件夹,即META-INF,然后添加一个文件spring.factories
org.springframework.boot.autoconfigure.EnableAutoConfiguration=site.wangxin520.spring_boot_start_hello.autoconf.HelloServiceAutoconfiguration
这个文件里面,标注出自动注入的配置文件
以上就是全部的start pom案例,当写完后,使用maven的install安装到本地仓库后,在创建好springboot之后,添加上依赖,就可以很方便的使用了。
下面是springboot中引用自定义startpom依赖的实例:
- pom文件
<?xml version="1.0" encoding="UTF-8"?>

<project xmlns="http://maven.apache.org/POM/4.0.0" xmlns:xsi="http://www.w3.org/2001/XMLSchema-instance"

    xsi:schemaLocation="http://maven.apache.org/POM/4.0.0 http://maven.apache.org/xsd/maven-4.0.0.xsd">

    <modelVersion>4.0.0</modelVersion>

    <groupId>site.wangxin520</groupId>

    <artifactId>springboot-starter-test</artifactId>

    <version>0.0.1-SNAPSHOT</version>

    <packaging>jar</packaging>

    <name>springboot-starter-test</name>

    <description>springboot学习</description>

    <parent>

        <groupId>org.springframework.boot</groupId>

        <artifactId>spring-boot-starter-parent</artifactId>

        <version>1.5.8.RELEASE</version>

        <relativePath/> <!-- lookup parent from repository -->

    </parent>

    <properties>

        <project.build.sourceEncoding>UTF-8</project.build.sourceEncoding>

        <project.reporting.outputEncoding>UTF-8</project.reporting.outputEncoding>

        <java.version>1.7</java.version>

    </properties>

    <dependencies>

        <dependency>

            <groupId>org.springframework.boot</groupId>

            <artifactId>spring-boot-starter</artifactId>

        </dependency>

        <dependency>

            <groupId>org.springframework.boot</groupId>

            <artifactId>spring-boot-starter-test</artifactId>

            <scope>test</scope>

        </dependency>

        <dependency>

            <groupId>org.springframework.boot</groupId>

            <artifactId>spring-boot-starter-web</artifactId>

        </dependency>

        <dependency>

            <groupId>site.wangxin520</groupId>

            <artifactId>spring-boot-start-hello</artifactId>

            <version>0.0.1-SNAPSHOT</version>

        </dependency>

    </dependencies>

    <build>

        <plugins>

            <plugin>

                <groupId>org.springframework.boot</groupId>

                <artifactId>spring-boot-maven-plugin</artifactId>

            </plugin>

        </plugins>

    </build>

</project>
代码中标黄了的就是我们自定义的一个startpom依赖坐标。
- 在启动类中,我们就可以使用自定义的helloservice类了。
package site.wangxin520.springbootstartertest;

import org.springframework.beans.factory.annotation.Autowired;

import org.springframework.boot.SpringApplication;

import org.springframework.boot.autoconfigure.SpringBootApplication;

import org.springframework.web.bind.annotation.RequestMapping;

import org.springframework.web.bind.annotation.RestController;

import site.wangxin520.spring_boot_start_hello.HelloService;

@SpringBootApplication

@RestController

public class SpringbootStarterTestApplication {

    @Autowired

    private HelloService helloService;

    @RequestMapping("/")

    public String index(){

        return helloService.sayHello();

    }

    public static void main(String[] args) {

        SpringApplication.run(SpringbootStarterTestApplication.class, args);

    }

}
- 实际操作:
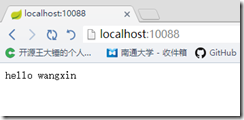
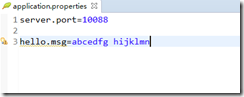
可见,已经自动注入进去了。当我们在application.properties中自行配置的时候,如下
- 得到结果为
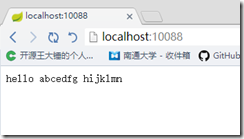
可见,我们自定义的start pom成功了!
Spring Boot中的自定义start pom的更多相关文章
- 如何优雅地在 Spring Boot 中使用自定义注解,AOP 切面统一打印出入参日志 | 修订版
欢迎关注个人微信公众号: 小哈学Java, 文末分享阿里 P8 资深架构师吐血总结的 <Java 核心知识整理&面试.pdf>资源链接!! 个人网站: https://www.ex ...
- Spring Boot 中关于自定义异常处理的套路!
在 Spring Boot 项目中 ,异常统一处理,可以使用 Spring 中 @ControllerAdvice 来统一处理,也可以自己来定义异常处理方案.Spring Boot 中,对异常的处理有 ...
- Spring Boot中如何自定义starter?
Spring Boot starter 我们知道Spring Boot大大简化了项目初始搭建以及开发过程,而这些都是通过Spring Boot提供的starter来完成的.品达通用权限系统就是基于Sp ...
- 在spring boot中使用自定义的properties
1 在application.properties中添加 android.name=Tim android.password=123456 新建一个保存该Setting的配置类, @Configura ...
- Spring Boot 中使用自定义注解,AOP 切面打印出入参日志及Dubbo链路追踪透传traceId
一.使用背景 开发排查系统问题用得最多的手段就是查看系统日志,在分布式环境中一般使用 ELK 来统一收集日志,但是在并发大时使用日志定位问题还是比较麻烦,由于大量的其他用户/其他线程的日志也一起输出穿 ...
- Spring Boot中自定义注解+AOP实现主备库切换
摘要: 本篇文章的场景是做调度中心和监控中心时的需求,后端使用TDDL实现分表分库,需求:实现关键业务的查询监控,当用Mybatis查询数据时需要从主库切换到备库或者直接连到备库上查询,从而减小主库的 ...
- Spring Boot中使用MongoDB数据库
前段时间分享了关于Spring Boot中使用Redis的文章,除了Redis之后,我们在互联网产品中还经常会用到另外一款著名的NoSQL数据库MongoDB. 下面就来简单介绍一下MongoDB,并 ...
- Spring Boot2 系列教程(六)自定义 Spring Boot 中的 starter
我们使用 Spring Boot,基本上都是沉醉在它 Stater 的方便之中.Starter 为我们带来了众多的自动化配置,有了这些自动化配置,我们可以不费吹灰之力就能搭建一个生产级开发环境,有的小 ...
- Spring Boot2 系列教程(十八)Spring Boot 中自定义 SpringMVC 配置
用过 Spring Boot 的小伙伴都知道,我们只需要在项目中引入 spring-boot-starter-web 依赖,SpringMVC 的一整套东西就会自动给我们配置好,但是,真实的项目环境比 ...
随机推荐
- luasocket 接收数据
在游戏客户端使用luasocket作为网络通信的手段, 有一点很蛋疼, 就是它的receive是阻塞的, 那界面就卡死在那里了, 不过有一个函数:settimeout(), 传入参数0, 表示如果 ...
- 【GIS】Cesium1.49编译
1.npm install 2.npm install --save-dev gulp 3.gulp default 4.npm run build 5.npm start 遇到问题 1.gulp不好 ...
- 【安全开发】PHP安全编码规范
申明:本文非笔者原创,原文转载自:https://github.com/SecurityPaper/SecurityPaper-web/blob/master/_posts/2.SDL%E8%A7%8 ...
- RF-字符串转为整数的方法
- 搭建ntp服务器
1.同步网络时间 先关闭掉ntp服务,使用ntpd同步网络时间. /etc/init.d/ntpd stop ntpdate 2.hk.pool.ntp.org 网络时间可以从http://www.p ...
- getopenfilename多选文件/文件夹问题和getsavefilename另存为路径
关于使用getopenfilename多选多个文件是可以的. 以下是多选文件的代码 bool GetNeedOpenFilePath(vector<tstring>& vectFi ...
- 队列Queue中add()和offer()的区别?
区别:两者都是往队列尾部插入元素,不同的时候,当超出队列界限的时候,add()方法是抛出异常让你处理,而offer()方法是直接返回false
- 在RDLC报表中对纸张的设置
RDLC报表是存放成XML文件格式的,这一点你可以直接打开RDLC报表文件看一下,而且在使用时,通过ReportViewer来读取报表并与数据源进行合成,也就是说RDLC是定义了一个格式,那就不能通过 ...
- css !important用法以及CSS样式使用优先级判断
之前一直看到很多css中都有!important这个样式,一直不知道有什么作用的,今天在网上详细了解了一下,看了别人的博客,顺便转载收藏一下 css !important用法CSS样式使用优先级判断 ...
- 怎样用Windows10全屏流畅运行红色警戒2
https://jingyan.baidu.com/article/9113f81b1cb7f22b3214c724.html jpg 转 rar