SGI STL内存管理
前言
万丈高楼平地起,内存管理在C++领域里扮演着举足轻重的作用。对于SGI STL这么重量级的作品,当然少不了内存管理的实现。同时,想要从深层次理解SGI STL的原理,必须先将内存管理这部分的内容理解清楚,STL最常用也是最重要的容器都是基于内存管理实现的。前面已经写了几篇文章SGI源码分析的文章,内存管理这一块虽然很早之前就理解过,实现容器的过程也会分析申请释放空间的操作,但一直没有写关于内存管理这部分的文章。
但今天看了一个关于写博客对程序员的作用的知乎高赞回答,讲到写博客有助于点连成线汇成面,是一个升维思考的一个契机。对于程序员来说,是一条成长之路,比只精于自身那一亩三分地的细节强得多。“写作是一个逼着自己深入了解领域知识的好方法,普遍意义的学习仅仅只是获取信息而已,没有经过实践或者其他方式的转化,知识不过是暂存在你脑中的某个内存空间,是一个没有被充分训练的特征值,而写作就是性价比最高的知识转化方式”。现在觉得非常有必要将自己对这部分内容的理解整理处理,形成一个完整的思维架构。
对象的构造/析构
内存空间的配置/释放与对象内容的构造/析构,分别落在stl_alloc.h和stl_construct.h两个文件身上。其中<stl_construct.h>定义两个基本的函数:构造用construct()和析构destroy()。在理解内存动态配置和释放的复杂操作之前,我们需要先看清楚这两个函数如何完成对象的构造和析构的。
#ifndef __SGI_STL_INTERNAL_CONSTRUCT_H

#define __SGI_STL_INTERNAL_CONSTRUCT_H

#include <new.h>  //欲使用 placement new,需先包含此文件

__STL_BEGIN_NAMESPACE

template <class T1, class T2>

inline void construct(T1* p, const T2& value) {

    new (p) T1(value);  //placement new

}

//第一个版本,接收一个指针

template <class T>

inline void destroy(T* pointer)

{

    pointer->~T();

}

//如果有trivial destructor,什么也不做

template <class ForwardIterator>

inline void __destroy_aux(ForwardIterator, ForwardIterator, __true_type) {

    //no_op

}

//如果没有trivial destructor,调用第一版本的destroy

template <class ForwardIterator>

inline void __destroy_aux(ForwardIterator first, ForwardIterator last, __false_type) {

    for ( ; first < last; ++first)

        destroy(&*first);

}

//判断元素的数值型别(value_type),是否有trivial destructor

template <class ForwardIterator, class T>

inline void __destroy(ForwardIterator first, ForwardIterator last, T*)

{

    typedef typename __type_traits<T>::has_trivial_destructor trivial_destructor;

    __destroy_aux(first, last, trivial_destructor());

}

//第二个版本,就收两个迭代器,此函数设法找出元素的数值型别,利用type_traits求取最适当措施

template <class ForwardIterator>

inline void destroy(ForwardIterator first, ForwardIterator last) {

    __destroy(first, last, value_type(first));

}

//以下是destroy第二版本对两个迭代器为char*和wchar_t*的特化版

//如果区间内的元素类型为char或wchar_t,则destroy什么也不做

inline void destroy(char*, char*) {  }

inline void destroy(wchar_t*, wchar_t*) {  }

__STL_END_NAMESPACE

#endif
源码非常清楚,构造和析构的函数设计为全局函数,construct()接受一个指针p和初值value,该函数的作用是将初值设定到指针所指的空间上,这里是用placement new运算子完成这一任务。destroy()有两个版本,第一版本接受一个指针,直接调用对象的析构函数,将指针所指之物析构掉。第二版本接受first和last两个迭代器,准备将[first,last)范围内的所有对象析构掉。为提高效率,这里甄别对象的型别是否调用其析构函数。即如果对象的析构函数是无关痛痒的(所谓trivial destructor),那么就不调用其析构函数,否则就必须调用。这里利用__type_traits<T>的萃取技法判断析构函数是否无关痛痒。
配置器接口
对象构造前的空间配置和对象析构后的空间释放,由<stl_alloc.h>负责。考虑到小型区块可能造成的内存破碎问题,SGI设计了双层级配置器,第一级配置器直接使用malloc()和free(),第二级配置器则视情况采用不同的策略:当配置区间超过128bytes时,调用第一级配置器;当小于128bytes时,为降低额外负担,采用复杂的memory pool整理方式,而不再求助于第一级配置器。
但无论alloc被定义为第一级或者第二级配置器,SGI都为它包装一个接口simple_alloc,SGI容器全部使用这个接口。
template<class T, class Alloc>

class simple_alloc {

public:

    static T *allocate(size_t n)

                { return  == n ?  : (T*)Alloc::allocate(n * sizeof(T)); }

    static T *allocate(void)

                { return (T*)Alloc::allocate(sizeof(T)); }

    static void deallocate(T *p, size_t n)

                { if( != n) Alloc::deallocate(p, n * sizeof(T)); }

    static void deallocate(T *p)

                { Alloc::deallocate(p, sizeof(T)); }

};
一级配置器
#define __NODE_ALLOCATOR_THREADS false

#define __THROW_BAD_ALLOC std::cerr << "out of memoty" << std::endl; exit(1)

//一级配置器,直接调用malloc和free函数申请和释放内存

template<int inst>

class __malloc_alloc_template {

private:

    //oom = out of memroy,当内存不足时,使用下面这两个函数

    static void *oom_malloc(size_t);

    static void *oom_realloc(void*, size_t);

    static void (*__malloc_alloc_oom_handler)();

public:

    static void *allocate(size_t n) {

        void *result = malloc(n);

        if ( == result)  //如果不足,用下面处理方法

            result = oom_malloc(n);

        return result;

    }

    //直接释放

    static void deallocate(void* p, size_t /*n*/)

    {

        free(p);

    }

    static void *reallocate(void *p, size_t /*old_sz*/, size_t new_sz) {

        void *result = realloc(p, new_sz);

        if ( == result)  //如果不足,用下面处理方法

            result = oom_realloc(p, new_sz);

        return result;

    }

    static void(*__set_malloc_handler(void(*f)))()

    {

        void (*old)() = __malloc_alloc_oom_handler;

        __malloc_alloc_oom_handler = f;

        return old;

    }

};

template<int inst>

void (*__malloc_alloc_template<inst>::__malloc_alloc_oom_handler)() = ;

//malloc内存不够的处理函数

template<int inst>

void *__malloc_alloc_template<inst>::oom_malloc(size_t n)

{

    void(*my_malloc_handler)();

    void *result;

    for (;;)

    {

        my_malloc_handler = __malloc_alloc_oom_handler;

        if ( == my_malloc_handler)

        {

            __THROW_BAD_ALLOC;   //如果没有设置处理函数,抛出异常退出

        }

        (*my_malloc_handler)();  //设置了处理函数,调用之,这里推测应该是回收一些内存的操作

        result = malloc(n);      //重新调用malloc,申请空间成功则返回地址,否则继续本循环

        if (result)

            return result;

    }

}

//realloc内存不够的处理函数,处理过程和上面函数类似,不注释了

template<int inst>

void *__malloc_alloc_template<inst>::oom_realloc(void *p, size_t n)

{

    void (*my_malloc_handler)();

    void *result;

    for (;;)

    {

        my_malloc_handler = __malloc_alloc_oom_handler;

        if ( == my_malloc_handler)

        {

            __THROW_BAD_ALLOC;

        }

        result = realloc(p, n);

        if (result)

            return result;

    }

}

typedef __malloc_alloc_template<> malloc_alloc;  //一级配置器全局变量
一级配置器以malloc(),free(),realloc()等C函数执行实际的内存配置、释放、重配置操作,并实现类似C++ new-handler的机制。所谓C++ new-handler机制是,你可以要求系统在内存配置需求无法满足时,调用一个你所指定的函数。第一级配置器的allocate()和reallocate()在调用alloc()和realloc()不成功后,改调用oom_malloc()和oom_realloc()。后两者有两个内循环,不断调用“内存不足处理程序”,期望在某次调用后获得足够的内存而圆满完成任务。但如果“内存不足处理程序”并未被客端设定,程序会老实不客气地调用__THROW_BAD_ALLOC抛出异常信息并调用exit(1)中断程序。
二级配置器
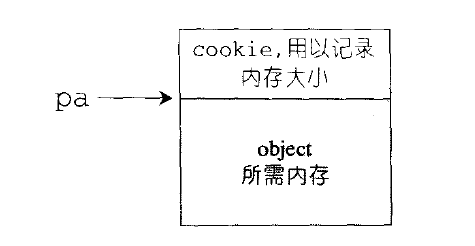
第二级配置器多了一些机制,避免太多小额区块造成内存的碎片。小额区块带来的其实不仅是内存碎片,配置时的额外负担(overhead)也是一个大问题。额外负担无法避免,毕竟系统要靠这多出来的空间管理内存,如下图所示,但是区块愈小,额外空间所占的比例就愈大,愈显得浪费。
第二级配置器的做法是,如果区块超过128bytes时,就交给第一级配置器处理,当小于128bytes时,则以内存池管理,此法又称为次层配置:每次配置一大块内存,并维护对应之自由链表(free-list),下次若再有相同大小的内存需求,就直接从free-list中取出。如果客端释怀小额区块,就由配置器回收到free-list中。即配置器除了负责配置,也负责回收。为方便管理,SGI第二级配置器会主动将任何小额区块的内存需求量上调至 8的倍数并维护16个free-lists,各自管理的大小分别为8,16,24,32,40,48,56,64,72,80,88,96,104,112,120,128bytes的小额区块。free-lists的节点结构如下:
union obj {

    union obj *free_list_link;

    char client_data[];

};
注意,上述的obj所用的是union,由于union之故,从其第一个字段观之,obj可视为一个指针,指向相同形势的另一个obj。从其第二字段观之,obj可视为一个指针,指向实际区块。一物二用的结果是,不会为了维护链表所必要的指针造成内存的另一种浪费。
template<class T, class Alloc>

class simple_alloc {

public:

    static T *allocate(size_t n)

                { return  == n ?  : (T*)Alloc::allocate(n * sizeof(T)); }

    static T *allocate(void)

                { return (T*)Alloc::allocate(sizeof(T)); }

    static void deallocate(T *p, size_t n)

                { if( != n) Alloc::deallocate(p, n * sizeof(T)); }

    static void deallocate(T *p)

                { Alloc::deallocate(p, sizeof(T)); }

};

//二级配置器,申请空间大于128byte使用一级配置器,否则使用二级配置器

template<bool threads, int inst>

class __default_alloc_template {

private:

    enum { ALIGN =  };                       //区间间隔字节数

    enum { MAX_BYTES =  };                 //最大字节数

    enum { NFREELISTS = MAX_BYTES / ALIGN };  //自由链表数组的长度

    static size_t ROUND_UP(size_t bytes) {    //向上取8的倍数

        return ((bytes + (size_t)ALIGN - ) & ~(ALIGN - ));

    }

    static size_t FREELIST_INDEX(size_t bytes) {  //获取所在自由链表数组的索引

        return ((bytes + (size_t)ALIGN - ) / (size_t)ALIGN - );

    }

    union obj {

        union obj *free_list_link;

        char client_data[];

    };

    static obj* volatile freeLists[NFREELISTS];

    static char *chunk_alloc(size_t size, int& nobj);  //配置size*nobjs大小的区块

    static void *refill(size_t __n);  //补充链表并返回一个有效的期望区块

    static char *start_free;  //内存池起始位置,只在chunk_alloc()中变化

    static char *end_free;    //内存池结束位置,只在chunk_alloc()中变化

    static size_t heap_size;

public:

    //配置空间

    static void *allocate(size_t n) {

        obj *volatile *my_free_list;

        obj *result;

        if (n > size_t(MAX_BYTES)) {  //大于128bytes,调用第一级配置器allocate()

            return malloc_alloc::allocate(n);

        }

        my_free_list = freeLists + FREELIST_INDEX(n);  //定位到对应自由链表

        result = *my_free_list;  //取当前链表的头结点

        if (result == ) {       //如果取值为空

            void *r = refill(ROUND_UP(n));  //调用refill()函数

            return r;

        }

        //如果取值不为空,则自由链表指向下一个节点

        *my_free_list = result->free_list_link;

        return result;

    }

    //释放空间

    static void deallocate(void* p, size_t n) {

        obj *q = (obj*)p;  //q指向待释放的区块

        obj *volatile *my_free_list;

        if (n > size_t(MAX_BYTES)) {  //大于128bytes,调用第一级配置的deallocate()

            malloc_alloc::deallocate(p, n);

            return;

        }

        my_free_list = freeLists + FREELIST_INDEX(n);  //定位到对应自由链表

        q->free_list_link = *my_free_list;  //待释放区块节点指向原自由链表的头结点

        *my_free_list = q;  //自由链表的头结点指向q,上述过程既是头插法插入q节点

    }

    static void *reallocate(void *p, size_t old_sz, size_t new_sz);

};

typedef __default_alloc_template<__NODE_ALLOCATOR_THREADS, > alloc;  //二级配置器全局变量

typedef __default_alloc_template<false, > single_client_alloc;

//配置size*nobjs大小的区块,只被refill()函数调用

template<bool threads, int inst>

char *__default_alloc_template<threads, inst>::chunk_alloc(size_t size, int& nobjs)

{

    char* result;

    size_t total_bytes = size * nobjs;

    size_t bytes_left = end_free - start_free;

    if (bytes_left >= total_bytes) {  //如果内存池剩余空间大小大于等于total_bytes

        result = start_free;          //直接取空间并返回

        start_free += total_bytes;

        return result;

    } else if (bytes_left >= size) {  //如果内存池剩余空间[size, total_bytes)

        nobjs = bytes_left/size;      //取一个及以上区块,尽量多

        total_bytes = size * nobjs;   //然后取空间并返回

        result = start_free;

        start_free += total_bytes;

        return result;

    } else {

        size_t bytes_to_get =  * total_bytes + ROUND_UP(heap_size >> );

        if (bytes_left > ) {  //内存里还有些零头,配置给适当的free-list中

            obj* volatile* my_free_list = freeLists + FREELIST_INDEX(bytes_left);

            ((obj*)start_free)->free_list_link = *my_free_list;

            *my_free_list = (obj*)start_free;

        }

        //配置heap空间,用来补充内存池

        start_free = (char*)malloc(bytes_to_get);

        if ( == start_free) {  //heap空间不足,malloc失败

            int i;

            obj *volatile *my_free_list, *p;

            /*系统实在没有内存了,向上释放链表已用内存*/

            for (i = size; i <= MAX_BYTES; i += ALIGN) {

                my_free_list = freeLists + FREELIST_INDEX(i);

                p = *my_free_list;

                if ( != p) {

                    *my_free_list = p->free_list_link;

                    start_free = (char*)p;

                    end_free = start_free + i;

                    return chunk_alloc(size, nobjs);

                }

            }

            end_free = ;  //到这里已经到山穷水尽,调用第一级配置器

            start_free = (char*)malloc_alloc::allocate(bytes_to_get);

            //这会导致抛出异常或改善内存不足的情况

        }

        //内存池补充足够,递归调用chunk_alloc()

        heap_size += bytes_left;

        end_free = start_free + bytes_to_get;

        return chunk_alloc(size, nobjs);

    }

}

template<bool threads, int inst>

void *__default_alloc_template<threads, inst>::refill(size_t n)

{

    int nobjs = ;

    char *chunk = chunk_alloc(n, nobjs);  //获取20*n的区块,nobjs为引用会被chunk_alloc改变

    obj* volatile *my_free_list;

    obj* result;

    obj* current_obj, *next_obj;

    int i;

    if ( == nobjs) return chunk;  //如果只有一块,直接返回

    my_free_list = freeLists + FREELIST_INDEX(n);

    result = (obj*)chunk;  //取第一个块size大小的空间

    *my_free_list = next_obj = (obj*)(chunk + n);  //指向第二块size空间

    for (i = ; ; i++) {  //循环将nobjs-1个size大小的空间依次插入到链表中

        current_obj = next_obj;

        next_obj = (obj*)((char*)next_obj + n);

        if (nobjs -  == i) {  //此时已经将nbojs-1个size大小的空间插入完毕,退出循环

            current_obj->free_list_link = ;

            break;

        } else {

            current_obj->free_list_link = next_obj;

        }

    }

    return result;

}

template<bool threads, int inst>

void *__default_alloc_template<threads, inst>::reallocate(void *p,

                                                          size_t old_sz,

                                                          size_t new_sz)

{

    void *result;

    size_t copy_sz;

    if (old_sz > (size_t)MAX_BYTES && new_sz > (size_t)MAX_BYTES) {

        return realloc(p, new_sz);  //直接调用realloc()函数

    }

    if (ROUND_UP(old_sz) == ROUND_UP(new_sz)) return p;  //旧空间大小等于新空间大小,直接返回p

    result = allocate(new_sz);  //调用allocate配置新空间

    copy_sz = new_sz > old_sz ? old_sz : new_sz;  //取新旧空间大小的最小值

    memcpy(result, p, copy_sz);  //复制copy_sz大小的内容到新空间

    deallocate(p, old_sz);  //释放旧空间

    return result;

}

template<bool threads, int inst>

char* __default_alloc_template<threads, inst>::start_free = ;

template<bool threads, int inst>

char* __default_alloc_template<threads, inst>::end_free = ;

template<bool threads, int inst>

size_t __default_alloc_template<threads, inst>::heap_size = ;

template<bool threads, int inst>

typename __default_alloc_template<threads, inst>::obj *volatile

__default_alloc_template<threads, inst>::freeLists[

    __default_alloc_template<threads, inst>::NFREELISTS]

    = {, , , , , , , , , , , , , , , , };
上面是SGI第二级配置器的源代码,我已经将关键代码进行注释。第二级配置器是SGI内存管理的关键,相对也叫复杂一点,所以理解源码时结合下图会比较容易一点。
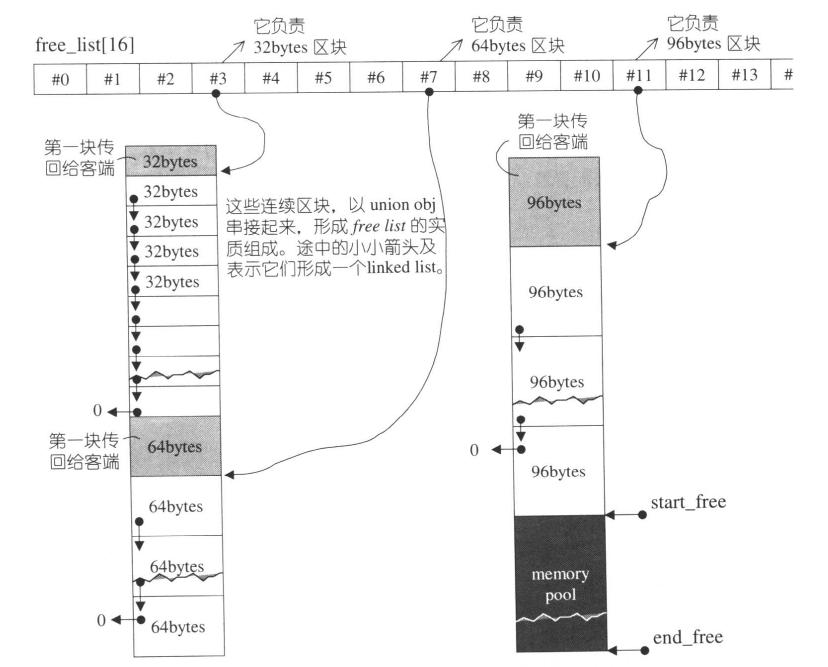
如果觉得理解困难,多联系上下代码我相信是可以理解的,毕竟管理内存池的过程本质只是维护一个含16个元素的链表数组。具体的操作过程就是定位链表的位置,然后对链表就行插入和删除,对链表熟悉的话其实非常容易理解。所以文字的解释我觉得这里没什么必要。如果你还是疑惑,我建议这部分的理解可以看侯捷的《STL源码剖析》,上面讲得非常详细,上面这个帮助理解第二配置器原理的图也是从他这本书上复制下来的。但书上的分析过程对于已经理解其原理的人来说比较繁琐。我觉得没有必要在本文写出来。
总结
好了,行文至此,返回来开头讲的,写文章是真的有助于提升自己对某一件事务的思维理解。通过这次总结,我对SGI的内存管理的理解有了一个较为完整的思维框架,对它的理解深刻了很多。希望以后能坚持学习后写博客进行总结。不要急躁,慢,有时是最快的方法。
SGI STL内存管理的更多相关文章
- C++STL内存管理方法(g++版)
STL作为C++的经典作品,一直备受人们关注.本文主要介绍STL的内存管理策略. 早期的STL内存管理 第一次接触STL源码是看侯捷先生的<STL源码剖析>,此书通俗易懂,剖析透彻,是极佳 ...
- STL内存管理
1. 概述 STL Allocator是STL的内存管理器,也是最低调的部分之一,你可能使用了3年stl,但却不知其为何物. STL标准如下介绍Allocator the STL includes s ...
- SGI STL 内存分配方式及malloc底层实现分析
在STL中考虑到小型区块所可能造成的内存碎片问题,SGI STL设计了双层级配置器,第一级配置器直接使用malloc()和free();第二级配置器则视情况采用不同的策略:当配置区块超过128byte ...
- SGI STL内存配置器存在内存泄漏吗?
阅读了SGI的源码后对STL很是膜拜,很高质量的源码,从中学到了很多.温故而知新!下文中所有STL如无特殊说明均指SGI版本实现. STL 内存配置器 STL对内存管理最核心部分我觉得是其将C++对象 ...
- STL内存管理器的分配策略
STL提供了很多泛型容器,如vector,list和map.程序员在使用这些容器时只需关心何时往容器内塞对象,而不用关心如何管理内存,需要用多少内存,这些STL容器极大地方便了C++程序的编写.例如可 ...
- sgi stl内存池实现------源码加翻译
class __default_alloc_template { enum { unit = 8 };//分配单位 后面直接用8代替 enum { max_bytes = 128 };//最大分配字节 ...
- STL的内存管理
SGI STL 的内存管理 http://www.cnblogs.com/sld666666/archive/2010/07/01/1769448.html 1. 好多废话 在分析完nginx的内存池 ...
- SGI STL中内存池的实现
最近这两天研究了一下SGI STL中的内存池, 网上对于这一块的讲解很多, 但是要么讲的不完整, 要么讲的不够简单(至少对于我这样的初学者来讲是这样的...), 所以接下来我将把我对于对于SGI ST ...
- (原创滴~)STL源码剖析读书总结1——GP和内存管理
读完侯捷先生的<STL源码剖析>,感觉真如他本人所说的"庖丁解牛,恢恢乎游刃有余",STL底层的实现一览无余,给人一种自己的C++水平又提升了一个level的幻觉,呵呵 ...
随机推荐
- 原生JS实现拖动滑块验证登录效果
♀分享一组利用原生JS实现拖动滑块验证效果 ♀在这个组代码中涉及三个方面的知识: ⑴事件处理 ⑵添加验证标记 ⑶选择器的封装 代码如下: <!DOCTYPE html> <htm ...
- OFDM符号速率与子载波间隔的关系
一般采样速率fs等于符号速率Rb: 采样速率表示采样的快慢,现有N个采样点: 类似于路程(N)除以速度(fs)等于时间(Tb): 采样一个点所需时间Tb = N/fs: 即一个子载波持续时间为Tb = ...
- OI程序常见的设计陷阱
宏定义的问题 有时候为了方便,我会大量使用宏定义.但是最近我发现下面这两个宏定义老是出问题: #define SET(x,a) memset(x,a,sizeof(x)) inline void wo ...
- NetCore2.0无法下载apk文件 IIS设置
把apk 文件放到网站的wwwroot目录 1.IIS设置MIME类型添加.apk, MIME类型:application/vnd.android.package-archive 2.然后StarUp ...
- Codeforces 869E. The Untended Antiquity (二维Fenwick,Hash)
Codeforces 869E. The Untended Antiquity 题意: 在一张mxn的格子纸上,进行q次操作: 1,指定一个矩形将它用栅栏围起来. 2,撤掉一个已有的栅栏. 3,询问指 ...
- @Value和@PropertySource实现*.properties配置文件读取过程和实现原理
@Value和@PropertySource实现*.properties 配置文件读取过程和实现原理 1 配置使用步骤 (1)右击resource目录添加*.prooerties配置文件
- NFFM的原理与代码
本篇深入分析郭大nffm的代码 TensorFlow计算图 计算图的构建 ones = tf.ones_like(emb_inp_v2) mask_a = tf.matrix_band_part(on ...
- 21.栈的压入、弹出序列 Java
题目描述 输入两个整数序列,第一个序列表示栈的压入顺序,请判断第二个序列是否可能为该栈的弹出顺序.假设压入栈的所有数字均不相等.例如序列1,2,3,4,5是某栈的压入顺序,序列4,5,3,2,1是该压 ...
- openapi and light-4j
light-4j项目支持openapi规范,本文介绍一下参照相关demo做的上传功能. openapi.yaml,按照规范编写内容,/openapi/swagger可以查看对应的swagger页面,A ...
- easyUI之Accordion(分类)
<!DOCTYPE HTML PUBLIC "-//W3C//DTD HTML 4.01 Transitional//EN"> <html> <hea ...