Nginx+PHP(FastCGI)高性能服务器加载redis+memcache模块
1)Nginx+FastCGI安装配置:
yum install openssl openssl-devel pcre-devel pcre zlib zlib-devel –y
#下载Nginx源码包,upstream_check健康检查模块,sticky负载均衡模块,Lua模块
cd /usr//local/src
wget https://github.com/yaoweibin/nginx_upstream_check_module/archive/master.zip
wget https://bitbucket.org/nginx-goodies/nginx-sticky-module-ng/get/master.tar.gz
wget http://luajit.org/download/LuaJIT-2.0.5.tar.gz
wget https://github.com/simpl/ngx_devel_kit/archive/v0.2.19.tar.gz
wget https://github.com/openresty/lua-nginx-module/archive/v0.10.8.tar.gz
wget -c http://nginx.org/download/nginx-1.8.1.tar.gz
#解压源码包安装
mkdir /usr/local/modules ###存放所以的第三方模块目录
1.tar -zxvf LuaJIT-2.0.5.tar.gz
cd LuaJIT-2.0.5
make install PREFIX=/usr/local/LuaJIT
最后一行会输出一下提示:
==== Successfully installed LuaJIT 2.0.5 to /usr/local/LuaJIT ====
vi /etc/profile文件末尾加入环境变量:export LUAJIT_LIB=/usr/local/LuaJIT/lib
export LUAJIT_INC=/usr/local/LuaJIT/include/luajit-2.0
source /etc/profile
ln -s /usr/local/luajit/lib/libluajit-5.1.so.2 /lib64/libluajit-5.1.so.2 #不增加这行,nginx启动会报错
2.unzip master.zip
mv nginx_upstream_check_module-master/ /usr/local/modules/nginx-check-module
3.tar -zxf master.tar.gz
mv nginx-goodies-nginx-sticky-module-ng-c78b7dd79d0d/ /usr/local/modules/nginx-sticky-module
4.tar -xzvf v0.3.0.tar.gz -C /usr/local/modules
5.tar -xzvf v0.10.8.tar.gz -C /usr/local/modules
6.tar zxvf nginx-1.8.1.tar.gz
cd nginx-1.8.1
在nginx目录先patch 一下
patch -p1 < /usr/local/modules//nginx-check-module/check_1.7.5+.patch
#预编译Nginx
useradd www
./configure --user=www --group=www --prefix=/usr/local/nginx --with-pcre --with-pcre-jit --with-http_sub_module --with-http_stub_status_module --with-http_ssl_module --with-http_flv_module --with-http_realip_module --with-http_spdy_module --with-http_gunzip_module --with-http_gzip_static_module --add-module=/usr/local/modules/nginx-check-module --add-module=/usr/local/modules/nginx-sticky-module --add-module=/usr/local/modules/ngx_devel_kit-0.2.19 --add-module=/usr/local/modules/lua-nginx-module-0.10.8
#.configure预编译成功后,执行make命令进行编译
make
#make执行成功后,执行make install 正式安装
make install
#自此Nginx安装完毕
/usr/local/nginx/sbin/nginx -t 检查nginx配置文件是否正确,返回OK即正确。
[root@localhost ~]# /usr/local/nginx/sbin/nginx -t
nginx: the configuration file /usr/local/nginx/conf/nginx.conf syntax is ok
nginx: configuration file /usr/local/nginx/conf/nginx.conf test is successful
[root@localhost ~]#
然后启动nginx,/usr/local/nginx/sbin/nginx 回车即可。查看进程是否已启动:
[root@localhost ~]# ps -ef |grep nginx
nobody 5381 30285 0 May16 ? 00:04:31 nginx: worker process
root 30285 1 0 2014 ? 00:00:00 nginx: master process /usr/local/nginx/sbin/nginx
root 32260 32220 0 12:34 pts/0 00:00:00 grep nginx
2) 下载安装并编译PHP
安装依赖包:
yum install -y gcc gcc-c++ zlib zlib-devel pcre pcre-devel gd libjpeg libjpeg-devel libpng libpng-devel freetype freetype-devel libxml2 libxml2-devel glibc glibc-devel glib2 glib2-devel bzip2 bzip2-devel ncurses ncurses-devel curl curl-devel e2fsprogs e2fsprogs-devel krb5 krb5-devel openssl openssl-devel openldap openldap-devel nss_ldap openldap-clients openldap-servers mcrypt libmcrypt libmcrypt-devel mhash
php安装:
wget –c http://cn2.php.net/distributions/php-5.6.14.tar.gz
tar –zxf php-5.6.14.tar.gz
cd php-5.6.14
./configure --prefix=/usr/local/php5 --with-config-file-path=/usr/local/php5/etc --enable-fpm --with-mysql=mysqlnd --with-mysqli=mysqlnd --with-pdo-mysql=mysqlnd --with-iconv-dir --with-freetype-dir --with-jpeg-dir --with-png-dir --with-zlib --with-libxml-dir --enable-xml --disable-rpath --enable-bcmath --enable-shmop --enable-sysvsem --enable-inline-optimization --with-curl --enable-mbregex --enable-mbstring --with-mcrypt --with-gd --enable-gd-native-ttf --with-openssl --with-mhash --enable-pcntl --enable-sockets --with-xmlrpc --enable-zip --enable-soap --with-gettext --disable-fileinfo --enable-opcache
make
make install
cp php.ini-development /usr/local/php5/etc/php.ini
cp /usr/local/php5/etc/php-fpm.conf.default /usr/local/php5/etc/php-fpm.conf
/usr/local/php5/sbin/php-fpm
3) Ninx配置文件设置conf/nginx.conf:
user www www;
worker_processes 4;
worker_cpu_affinity 00000001 00000010 00000100 00001000;
error_log /usr/local/nginx/logs/error.log crit;
pid /usr/local/nginx/nginx.pid;
worker_rlimit_nofile 102400;
events {
use epoll;
worker_connections 102400;
multi_accept on;
}
http {
include mime.types;
log_format main '$remote_addr - $remote_user [$time_local] "$request" '
'$status $body_bytes_sent "$http_referer" '
'"$http_user_agent" "$request_time"';
default_type application/octet-stream;
access_log logs/access.log main ;
sendfile on;
tcp_nopush on;
tcp_nodelay on;
keepalive_timeout 60;
gzip on;
gzip_min_length 1k;
gzip_buffers 4 16k;
gzip_http_version 1.1;
gzip_comp_level 4;
gzip_types text/plain application/x-javascript text/css application/xml;
gzip_vary on;
client_max_body_size 10m;
client_body_buffer_size 128k;
proxy_connect_timeout 90;
proxy_send_timeout 90;
proxy_read_timeout 90;
proxy_buffer_size 4k;
proxy_buffers 4 32k;
proxy_busy_buffers_size 64k;
large_client_header_buffers 4 4k;
client_header_buffer_size 4k;
open_file_cache max=102400 inactive=20s;
open_file_cache_valid 30s;
open_file_cache_min_uses 1;
server {
listen 80;
server_name localhost;
location / {
index index.html index.php;
root /usr/local/nginx/html;
}
location ~ \.php$ {
root html;
fastcgi_pass 127.0.0.1:9000;
fastcgi_index index.php;
fastcgi_param SCRIPT_FILENAME /usr/local/nginx/html$fastcgi_script_name;
include fastcgi_params;
}location /hello_lua {
default_type 'text/plain';
content_by_lua 'ngx.say("hello, lua")';
}}
}
然后启动nginx,/usr/local/nginx/sbin/nginx -s reload 回车即可。
然后访问 ip/hello_lua 会出现”hello, lua”表示lua安装成功。
4)启动PHP-FPM(php-fpm,php-ini文件配置优化参照文档:https://www.cnblogs.com/zhangan/p/10910448.html)
/usr/local/php5/sbin/php-fpm
ps -aux | grep php
echo "/usr/local/php/sbin/php-fpm" >>/etc/rc.local
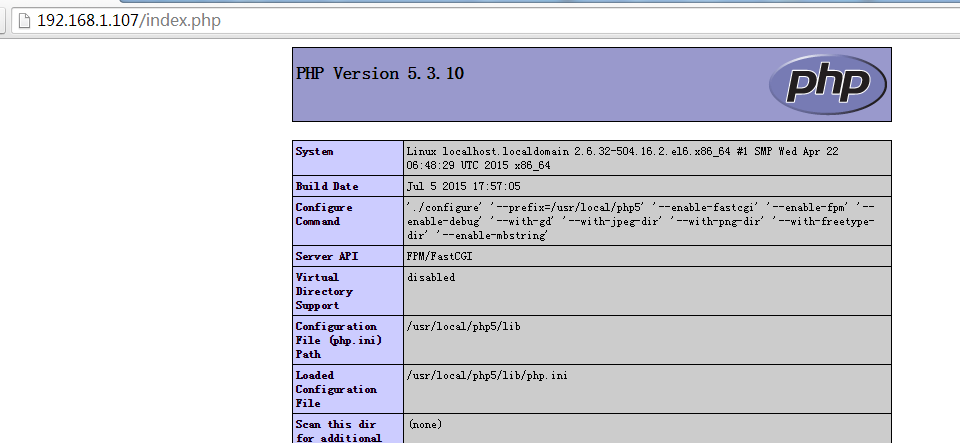
5) 测试Nginx+PHP整合结果
cat >> /usr/local/nginx/html/index.php << EOF
<?php phpinfo(); ?>
EOF
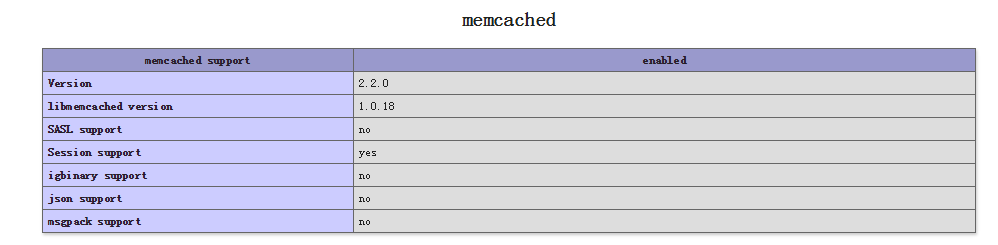
6)php整合memcached
#===========================memcached===============================================
下面两个软件是php扩展memcached的包
wget https://launchpadlibrarian.net/165454254/libmemcached-1.0.18.tar.gz
wget http://pecl.php.net/get/memcached-2.2.0.tgz
./configure --prefix=/usr/local/libmemcached --with-memcached
make ; make install
cd memcached-2.2.0
/usr/local/php5/bin/phpize
./configure --enable-memcached --with-php-config=/usr/local/php5/bin/php-config --with-libmemcached-dir=/usr/local/libmemcached --disable-memcached-sasl
make ; make install
ll /usr/local/php5/lib/php/extensions/no-debug-non-zts-20131226/
-rwxr-xr-x 1 root root 335433 1月 8 12:37 memcached.so
-rw-r--r-- 1 root root 259968 1月 8 11:32 memcache.so
-rwxr-xr-x 1 root root 1104016 1月 8 10:28 opcache.a
-rwxr-xr-x 1 root root 585616 1月 8 10:28 opcache.so
echo "extension=memcached.so" >> /usr/local/php5/etc/php.ini
重新启动php,pkill php&&/usr/local/php5/sbin/php-fpm
7)下面是php整合redis
wget http://test.hexin.cn/software/redis-2.2.7.tgz
tar –zxf redis-2.2.7.tgz
cd redis-2.2.7.tgz
/usr/local/php5/bin/phpize
./configure --with-php-config=/usr/local/php5/bin/php-config
make && make install
echo "extension_dir = "/usr/local/php5/lib/php/extensions/no-debug-non-zts-20131226/" " >> /usr/local/php5/etc/php.ini (可以默认不添加)
echo "extension=redis.so" >>/usr/local/php5/etc/php.ini
8)php整合memcache
wget http://test.hexin.cn/software/memcache-3.0.8.tgz
tar –zxf memcache-3.0.8.tgz
cd memcache-3.0.8
/usr/local/php/bin5/phpize
./configure --with-php-config=/usr/local/php5/bin/php-config
make
make install
ll /usr/local/php/lib/php5/extensions/no-debug-non-zts-20131226/
echo "extension=memcache.so" >> /usr/local/php5/etc/php.ini
/usr/local/php5/bin/php -m 查看php加载的所有模块
Nginx+PHP(FastCGI)高性能服务器加载redis+memcache模块的更多相关文章
- 高性能页面加载技术--BigPipe设计原理及Java简单实现
1.技术背景 动态web网站的历史可以追溯到万维网初期,相比于静态网站,动态网站提供了强大的可交互功能.经过几十年的发展,动态网站在互动性和页面显示效果上有了很大的提升,但是对于网站动态网站的整体页面 ...
- 使用 jQuery Ajax 在页面滚动时从服务器加载数据
简介 文本将演示怎么在滚动滚动条时从服务器端下载数据.用AJAX技术从服务器端加载数据有助于改善任何web应用的性能表现,因为在打开页面时,只有一屏的数据从服务器端加载了,需要更多的数据时,可以随着用 ...
- 我们无法找到服务器加载工作簿的数据模型"的 SharePoint 网站,当您刷新 Excel 2013 工作簿中的数据透视表时出错
假定您使用 Analysis Services 源在 Microsoft Excel 2013 中创建数据透视表.将 Excel 工作簿上载到 Microsoft SharePoint 网站中.当您尝 ...
- 高性能JavaScript 加载和执行
前言 本章主要讲述如何加载脚本使得用户能有良好的用户体验,而核心内容就是JavaScript的异步加载.之前写过一篇不得不说的JavaScript异步加载,相似的内容就不多加描述,讲些不同的东西,主要 ...
- 根据配置文件加载js依赖模块(JavaScript面试题)
面试题目 根据下面的配置文件 module=[ {'name':'jquery','src':'/js/lib/jquery-1.8.3.js'}, {'name':'swfobject','src' ...
- Extjs4.1.x使用Application动态按需加载MVC各模块
我们知道Extjs4之后提出了MVC模块开发,将以前肥厚的js文件拆分成小的js模块[model\view\controller\store\form\data等],通过controller拼接黏合, ...
- js模块化/js模块加载器/js模块打包器
之前对这几个概念一直记得很模糊,也无法用自己的语言表达出来,今天看了大神的文章,尝试根据自己的理解总结一下,算是一篇读后感. 大神的文章:http://www.css88.com/archives/7 ...
- CentOS中自动加载802.1q模块
要想在CentOS中自动加载内核模块,需要在/etc/sysconfig/modules/目录中增加一个脚本,在此脚本中加载所需的模块. 下面是我所用的一个名为8021q.modules的脚本,用来在 ...
- 如何查看apache加载了哪些模块
apache2/bin/apachectl -l 可以看到类似下面的结果: 这是编译时就已编译在apache中的模块,启动时自然会加载. 另外一部分,要看apach的配置文件(httpd.conf)的 ...
随机推荐
- Mongodb 查询优化(慢查询Profiling)
开启慢查询Profiling Profiling级别说明 0:关闭,不收集任何数据. 1:收集慢查询数据,默认是100毫秒. 2:收集所有数据 1.通过修改配置文件开启Profiling 修改启动mo ...
- SpringBoot项目中,Redis的初次使用
1.引入Redis依赖包,在application.yml中配置redis <dependency> <groupId>org.springframework.boot< ...
- Ubuntu18.04开机动画(bootsplash)安装
一.搜索喜欢的主题 1.通过软件源搜索,这个比较简单但是没有太喜欢的.-----------------------------------------------------------pipci@ ...
- 模拟I2C协议学习点滴之原理框架
I2C是一种串行总线协议. 目前几种常用的串行总线有UART.SPI和I2C协议.UART协议的总线只有两条,发送(Transmit:TX)和接收(Receive:RX),没有时钟信号,这就要求两位数 ...
- Linux使用Aria2命令下载BT种子/磁力/直链文件 转载
Linux使用Aria2命令下载BT种子/磁力/直链文件 博主: Rat's 发布时间:2017 年 10 月 10 日 26725 次浏览 8 条评论 1073 字数 分类:主机教程 首页 正文 分 ...
- wepy项目的学习
使用Promise 开发实时编译 wepy build --watch 安装依赖 cd myproject npm install 安装(更新) wepy 命令行工具. npm install wep ...
- [ZJOI2004]嗅探器 (割点)
这题就比较好玩吧水题 以数据范围来看随便怎么做就能过 \(O(n)\)显然我们得过一个割点,其次这个割点得在\(x-y\)中间且不为始终点 其他都好说,在中间:从\(x\)开始遍历,首先得保证\(x- ...
- Spring Cloud Gateway(十):网关过滤器工厂 GatewayFilterFactory
本文基于 spring cloud gateway 2.0.1 1.GatewayFilterFactory 简介 路由过滤器允许以某种方式修改传入的HTTP请求或传出的HTTP响应. 路径过滤器的范 ...
- Mybatis基础-完整CRUD操作
步骤一:mybatis基本配置 1)创建Java项目,在lib下导入mybatis所需要的Jar包,包括链接mysql的mysql-connector-java-5.1.7-bin.jar. 2)在s ...
- ZR#999
ZR#999 解法: 一道计数题,看到要求必须 $ m $ 个标号,所有标号至少出现一次的方案. 很容易想到可以容斥,但容斥这个东西是一种很神奇的东西,你可以看出来一道题需要容斥,但你就是不知道怎么容 ...