Android Fragment 完全解析
参考文章:http://blog.csdn.net/guolin_blog/article/details/8881711
http://blog.csdn.net/guolin_blog/article/details/13171191
Android Fragment应用实战,使用碎片向ActivityGroup说再见
界面如下:

实现步骤:
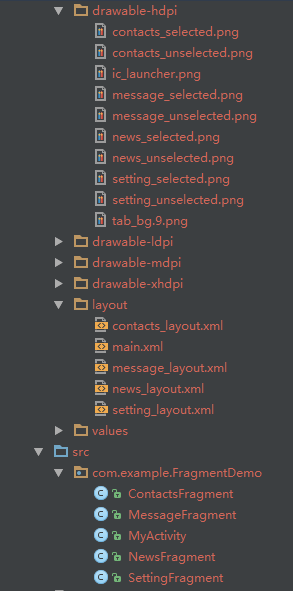
程序结构:
- 编写主界面的xml文件
- <?xml version="1.0" encoding="utf-8"?>
- <LinearLayout
xmlns:android="http://schemas.android.com/apk/res/android" - android:orientation="vertical"
- android:layout_width="fill_parent"
- android:layout_height="fill_parent">
- <FrameLayout
- android:layout_width="match_parent"
- android:layout_height="0dp"
- android:layout_weight="1"
- android:id="@+id/content">
- </FrameLayout>
- <LinearLayout
- android:layout_width="match_parent"
- android:layout_height="60dp"
- android:background="@drawable/tab_bg">
- <RelativeLayout
- android:layout_width="0dp"
- android:layout_height="match_parent"
- android:layout_weight="1"
- android:id="@+id/message_layout">
- <LinearLayout
- android:layout_width="match_parent"
- android:layout_height="wrap_content"
- android:layout_centerVertical="true"
- android:orientation="vertical">
- <ImageView
- android:layout_width="wrap_content"
- android:layout_height="wrap_content"
- android:layout_gravity="center_horizontal"
- android:src="@drawable/message_unselected"
- android:id="@+id/message_image"/>
- <TextView
- android:layout_width="wrap_content"
- android:layout_height="wrap_content"
- android:layout_gravity="center_horizontal"
- android:text="消息"
- android:id="@+id/message_text"
- android:textColor="#82858b"/>
- </LinearLayout>
- </RelativeLayout>
- <RelativeLayout
- android:layout_width="0dp"
- android:layout_height="match_parent"
- android:layout_weight="1"
- android:id="@+id/contacts_layout">
- <LinearLayout
- android:layout_width="match_parent"
- android:layout_height="wrap_content"
- android:layout_centerVertical="true"
- android:orientation="vertical">
- <ImageView
- android:layout_width="wrap_content"
- android:layout_height="wrap_content"
- android:layout_gravity="center_horizontal"
- android:src="@drawable/contacts_unselected"
- android:id="@+id/contacts_image"/>
- <TextView
- android:layout_width="wrap_content"
- android:layout_height="wrap_content"
- android:layout_gravity="center_horizontal"
- android:text="联系人"
- android:id="@+id/contacts_text"
- android:textColor="#82858b"/>
- </LinearLayout>
- </RelativeLayout>
- <RelativeLayout
- android:layout_width="0dp"
- android:layout_height="match_parent"
- android:layout_weight="1"
- android:id="@+id/news_layout">
- <LinearLayout
- android:layout_width="match_parent"
- android:layout_height="wrap_content"
- android:layout_centerVertical="true"
- android:orientation="vertical">
- <ImageView
- android:layout_width="wrap_content"
- android:layout_height="wrap_content"
- android:layout_gravity="center_horizontal"
- android:src="@drawable/news_unselected"
- android:id="@+id/news_image"/>
- <TextView
- android:layout_width="wrap_content"
- android:layout_height="wrap_content"
- android:layout_gravity="center_horizontal"
- android:text="动态"
- android:id="@+id/news_text"
- android:textColor="#82858b"/>
- </LinearLayout>
- </RelativeLayout>
- <RelativeLayout
- android:layout_width="0dp"
- android:layout_height="match_parent"
- android:layout_weight="1"
- android:id="@+id/setting_layout">
- <LinearLayout
- android:layout_width="match_parent"
- android:layout_height="wrap_content"
- android:layout_centerVertical="true"
- android:orientation="vertical">
- <ImageView
- android:layout_width="wrap_content"
- android:layout_height="wrap_content"
- android:layout_gravity="center_horizontal"
- android:src="@drawable/setting_unselected"
- android:id="@+id/setting_image"/>
- <TextView
- android:layout_width="wrap_content"
- android:layout_height="wrap_content"
- android:layout_gravity="center_horizontal"
- android:text="设置"
- android:id="@+id/setting_text"
- android:textColor="#82858b"/>
- </LinearLayout>
- </RelativeLayout>
- </LinearLayout>
- </LinearLayout>
效果图如下:

这里面最上方是一个frameLayout,下面是一个大的LinearLayout套了四个RelativeLayout,每个RelativeLayout 里面有套了一个LinearLayout,然后此线性布局下面放了一个imageview和Textview。
其中,四个相对布局都是用的weight权重来实现的。
- 分别编写每个fragment的xml。
- <?xml version="1.0" encoding="utf-8"?>
- <RelativeLayout
xmlns:android="http://schemas.android.com/apk/res/android"
android:layout_width="match_parent" - android:layout_height="match_parent">
- <LinearLayout
- android:layout_width="wrap_content"
- android:layout_height="wrap_content"
- android:orientation="vertical"
- android:layout_centerInParent="true">
- <ImageView
- android:layout_width="wrap_content"
- android:layout_height="wrap_content"
- android:layout_gravity="center_horizontal"
- android:src="@drawable/message_selected"/>
- <TextView
- android:layout_width="wrap_content"
- android:layout_height="wrap_content"
- android:layout_gravity="center_horizontal"
- android:padding="10dp"
- android:text="这是消息界面"
- android:textSize="20sp"/>
- </LinearLayout>
- </RelativeLayout>

只举一个实例,其他一样。
- 为每个xml 定义各自的Fragment
- package com.example.FragmentDemo;
- import android.app.Fragment;
- import android.os.Bundle;
- import android.view.LayoutInflater;
- import android.view.View;
- import android.view.ViewGroup;
- /**
- * Created by zhuxuekui on 2015/5/18.
- */
- public
class MessageFragment extends Fragment { - @Override
- public View onCreateView(LayoutInflater inflater, ViewGroup container, Bundle savedInstanceState) {
- View messageLayout = inflater.inflate(R.layout.message_layout,container,false);
- return messageLayout;
- }
- }
- 编写业务逻辑层
- /**
- * 项目的主Activity,所有的Fragment都嵌入在这里。
- *
- * @author guolin
- */
- public
class MainActivity extends Activity implements OnClickListener { - /**
- * 用于展示消息的Fragment
- */
- private MessageFragment messageFragment;
- /**
- * 用于展示联系人的Fragment
- */
- private ContactsFragment contactsFragment;
- /**
- * 用于展示动态的Fragment
- */
- private NewsFragment newsFragment;
- /**
- * 用于展示设置的Fragment
- */
- private SettingFragment settingFragment;
- /**
- * 消息界面布局
- */
- private View messageLayout;
- /**
- * 联系人界面布局
- */
- private View contactsLayout;
- /**
- * 动态界面布局
- */
- private View newsLayout;
- /**
- * 设置界面布局
- */
- private View settingLayout;
- /**
- * 在Tab布局上显示消息图标的控件
- */
- private ImageView messageImage;
- /**
- * 在Tab布局上显示联系人图标的控件
- */
- private ImageView contactsImage;
- /**
- * 在Tab布局上显示动态图标的控件
- */
- private ImageView newsImage;
- /**
- * 在Tab布局上显示设置图标的控件
- */
- private ImageView settingImage;
- /**
- * 在Tab布局上显示消息标题的控件
- */
- private TextView messageText;
- /**
- * 在Tab布局上显示联系人标题的控件
- */
- private TextView contactsText;
- /**
- * 在Tab布局上显示动态标题的控件
- */
- private TextView newsText;
- /**
- * 在Tab布局上显示设置标题的控件
- */
- private TextView settingText;
- /**
- * 用于对Fragment进行管理
- */
- private FragmentManager fragmentManager;
- @Override
- protected
void onCreate(Bundle savedInstanceState) { - super.onCreate(savedInstanceState);
- requestWindowFeature(Window.FEATURE_NO_TITLE);
- setContentView(R.layout.activity_main);
- // 初始化布局元素
- initViews();
- fragmentManager = getFragmentManager();
- // 第一次启动时选中第0个tab
- setTabSelection(0);
- }
- /**
- * 在这里获取到每个需要用到的控件的实例,并给它们设置好必要的点击事件。
- */
- private
void initViews() { - messageLayout = findViewById(R.id.message_layout);
- contactsLayout = findViewById(R.id.contacts_layout);
- newsLayout = findViewById(R.id.news_layout);
- settingLayout = findViewById(R.id.setting_layout);
- messageImage = (ImageView) findViewById(R.id.message_image);
- contactsImage = (ImageView) findViewById(R.id.contacts_image);
- newsImage = (ImageView) findViewById(R.id.news_image);
- settingImage = (ImageView) findViewById(R.id.setting_image);
- messageText = (TextView) findViewById(R.id.message_text);
- contactsText = (TextView) findViewById(R.id.contacts_text);
- newsText = (TextView) findViewById(R.id.news_text);
- settingText = (TextView) findViewById(R.id.setting_text);
- messageLayout.setOnClickListener(this);
- contactsLayout.setOnClickListener(this);
- newsLayout.setOnClickListener(this);
- settingLayout.setOnClickListener(this);
- }
- @Override
- public
void onClick(View v) { - switch (v.getId()) {
- case R.id.message_layout:
- // 当点击了消息tab时,选中第1个tab
- setTabSelection(0);
- break;
- case R.id.contacts_layout:
- // 当点击了联系人tab时,选中第2个tab
- setTabSelection(1);
- break;
- case R.id.news_layout:
- // 当点击了动态tab时,选中第3个tab
- setTabSelection(2);
- break;
- case R.id.setting_layout:
- // 当点击了设置tab时,选中第4个tab
- setTabSelection(3);
- break;
- default:
- break;
- }
- }
- /**
- * 根据传入的index参数来设置选中的tab页。
- *
- * @param index
- * 每个tab页对应的下标。0表示消息,1表示联系人,2表示动态,3表示设置。
- */
- private
void setTabSelection(int index) { - // 每次选中之前先清楚掉上次的选中状态
- clearSelection();
- // 开启一个Fragment事务
- FragmentTransaction transaction = fragmentManager.beginTransaction();
- // 先隐藏掉所有的Fragment,以防止有多个Fragment显示在界面上的情况
- hideFragments(transaction);
- switch (index) {
- case 0:
- // 当点击了消息tab时,改变控件的图片和文字颜色
- messageImage.setImageResource(R.drawable.message_selected);
- messageText.setTextColor(Color.WHITE);
- if (messageFragment == null) {
- // 如果MessageFragment为空,则创建一个并添加到界面上
- messageFragment = new MessageFragment();
- transaction.add(R.id.content, messageFragment);
- } else {
- // 如果MessageFragment不为空,则直接将它显示出来
- transaction.show(messageFragment);
- }
- break;
- case 1:
- // 当点击了联系人tab时,改变控件的图片和文字颜色
- contactsImage.setImageResource(R.drawable.contacts_selected);
- contactsText.setTextColor(Color.WHITE);
- if (contactsFragment == null) {
- // 如果ContactsFragment为空,则创建一个并添加到界面上
- contactsFragment = new ContactsFragment();
- transaction.add(R.id.content, contactsFragment);
- } else {
- // 如果ContactsFragment不为空,则直接将它显示出来
- transaction.show(contactsFragment);
- }
- break;
- case 2:
- // 当点击了动态tab时,改变控件的图片和文字颜色
- newsImage.setImageResource(R.drawable.news_selected);
- newsText.setTextColor(Color.WHITE);
- if (newsFragment == null) {
- // 如果NewsFragment为空,则创建一个并添加到界面上
- newsFragment = new NewsFragment();
- transaction.add(R.id.content, newsFragment);
- } else {
- // 如果NewsFragment不为空,则直接将它显示出来
- transaction.show(newsFragment);
- }
- break;
- case 3:
- default:
- // 当点击了设置tab时,改变控件的图片和文字颜色
- settingImage.setImageResource(R.drawable.setting_selected);
- settingText.setTextColor(Color.WHITE);
- if (settingFragment == null) {
- // 如果SettingFragment为空,则创建一个并添加到界面上
- settingFragment = new SettingFragment();
- transaction.add(R.id.content, settingFragment);
- } else {
- // 如果SettingFragment不为空,则直接将它显示出来
- transaction.show(settingFragment);
- }
- break;
- }
- transaction.commit();
- }
- /**
- * 清除掉所有的选中状态。
- */
- private
void clearSelection() { - messageImage.setImageResource(R.drawable.message_unselected);
- messageText.setTextColor(Color.parseColor("#82858b"));
- contactsImage.setImageResource(R.drawable.contacts_unselected);
- contactsText.setTextColor(Color.parseColor("#82858b"));
- newsImage.setImageResource(R.drawable.news_unselected);
- newsText.setTextColor(Color.parseColor("#82858b"));
- settingImage.setImageResource(R.drawable.setting_unselected);
- settingText.setTextColor(Color.parseColor("#82858b"));
- }
- /**
- * 将所有的Fragment都置为隐藏状态。
- *
- * @param transaction
- * 用于对Fragment执行操作的事务
- */
- private
void hideFragments(FragmentTransaction transaction) { - if (messageFragment != null) {
- transaction.hide(messageFragment);
- }
- if (contactsFragment != null) {
- transaction.hide(contactsFragment);
- }
- if (newsFragment != null) {
- transaction.hide(newsFragment);
- }
- if (settingFragment != null) {
- transaction.hide(settingFragment);
- }
- }
- }
首先在oncreate方法里面initview() 初始化各个控件,然后为每个layout 设置监听事件(相对布局的layout),当我们点击到某个layout时候,执行SetTabSelection(index)方法。
在刚刚的方法里面,我们首先执行clearSelection,将所有的imageview都设置为不选中状态,然后并隐藏hideFragment,这里我们用FragmentManager里面的FragmentTransaction来实现的。
这两个方法执行完之后,我们进入到switch条件语句,改变某个选中的图标的图片以及文字,这里面我们显示的是Fragment,没有用replace而是用的add,show,hide方法来实现。这样程序执行的效率会高一点,不然,用replace的话,被替换掉的fragment会彻底的被干掉,即声明周期结束,当我们又一次选中的时候,还要重新加载,这样变得麻烦。
Android Fragment 完全解析的更多相关文章
- Android Fragment完全解析
转载请注明出处:http://blog.csdn.net/guolin_blog/article/details/8881711 我们都知道,Android上的界面展示都是通过Activity实现的, ...
- Android Fragment完全解析,关于碎片你所需知道的一切
转载请注明出处:http://blog.csdn.net/guolin_blog/article/details/8881711 我们都知道,Android上的界面展示都是通过Activity实现的, ...
- Android Fragment完全解析,关于碎片你所需知道的一切 (转)。
我们都知道,Android上的界面展示都是通过Activity实现的,Activity实在是太常用了,我相信大家都已经非常熟悉了,这里就不再赘述. 但是Activity也有它的局限性,同样的界面在手机 ...
- (转) Android Fragment完全解析,关于碎片你所需知道的一切
我们都知道,Android上的界面展示都是通过Activity实现的,Activity实在是太常用了,我相信大家都已经非常熟悉了,这里就不再赘述. 但是Activity也有它的局限性,同样的界面在手机 ...
- Android Fragment 初步解析
Fragment经常在我们的开发中见到,但是自我感觉对Fragment的理解还是处于初级的阶段,接下来我将用几篇文章尽量深的解析Fragment 让我们开始吧!!! Fragment的生命周期 Fra ...
- Android Fragment 深度解析
1.Fragment的产生与介绍 Android运行在各种各样的设备中,有小屏幕的手机,超大屏的平板甚至电视.针对屏幕尺寸的差距,很多情况下,都是先针对手机开发一套app,然后拷贝一份,修改布局以适应 ...
- Android Fragment应用实战
现在Fragment的应用真的是越来越广泛了,之前Android在3.0版本加入Fragment的时候,主要是为了解决Android Pad屏幕比较大,空间不能充分利用的问题,但现在即使只是在手机上, ...
- Android Fragment应用实战,使用碎片向ActivityGroup说再见
转载请注明出处:http://blog.csdn.net/guolin_blog/article/details/13171191 现在Fragment的应用真的是越来越广泛了,之前Android在3 ...
- Android Fragment碎片
什么是碎片? 碎片(Fragment)是一种可以嵌入在活动当中的UI片段,它能让程序更加合理和充分地利用大屏幕的空间,因而在平板上应用的非常广泛.可以把Fragment当成Activity一个界面的一 ...
随机推荐
- 在Android开发中使用Ant 二:进行一次完整的打包
一次完整的Android打包要进行以下的几步:编译.代码混淆.打包apk.签名apk.apk优化. 为了能包涵使用NDK的情况,在这里使用一个有native代码的工程TestJni. 在工程根目录下新 ...
- iOS之UI--关于modal
modal的效果展示: 关于modal的涉及到的知识点: 1.当一个控制器被销毁的时候,它里面所有子控制器的业务逻辑都不能够处理 2.当一个控制器被销毁的时候,它里面所有子控件的业务逻辑都不能够处理 ...
- widowns 列出文件目录树结构 tree命令
TREE [drive:][path] [/F] [/A] /F 显示每个文件夹中文件的名称.(带扩展名) /A 使用 ASCII 字符,而不使用扩展字符. tree -f > list.t ...
- jQuery学习笔记:整理一些常用的jQuery操作DOM事件
1.attr() .removeAttr() .attr() 方法可以传入一个名值对的参数,也可以传入一个包含2个以上名值对的对象参数,例如: .attr('src','images/a.jpg'); ...
- maven 错误No goals have been specified for this build. You must specify a valid lifecycle phase or a goal in the format
[INFO] Scanning for projects... [INFO] ------------------------------------------------------------- ...
- Linux磁盘、目录、文件操作命令
0x01. Linux磁盘分区与目录结构 ① 主分区.拓展分区.逻辑分区:早期主引导扇区MBR用64B存放主分区信息,每个分区用16B,因而上限为4个主分区,后来,因分区需求,引入拓展分区(类主分区) ...
- 魔改——MFC MDI程序 定制 文档模板 运行时全部打开 禁用关闭按钮
==================================声明================================== 本文原创,转载在正文中显要的注明作者和出处,并保证文章的完 ...
- CentOS 6.5安装MongoDB
1.创建mongodb.repo文件在/etc/yum.repos.d/目录下创建文件mongodb.repo,它包含MongoDB仓库的配置信息,内容如下: [mongodb] name=Mongo ...
- 23 其它话题 - 《Python 核心编程》
- js制作倒计时效果
该程序可以计算任意指定的两个日期中间的差值. 本例子的指定日期是2017年1月1日,当前时间是2016年10月21日:计算它们之间的差值,在网页上显示如图所示: 关键部分代码: var nowtime ...