
dlib python 人脸检测与关键点标记
http://blog.csdn.net/sunmc1204953974/article/details/49976045
人脸检测
#coding=utf-8

# -*- coding: utf-8 -*-

import sys

import dlib

from skimage import io

#使用dlib自带的frontal_face_detector作为我们的特征提取器

detector = dlib.get_frontal_face_detector()

#使用dlib提供的图片窗口

win = dlib.image_window()

#sys.argv[]是用来获取命令行参数的,sys.argv[0]表示代码本身文件路径,所以参数从1开始向后依次获取图片路径

for f in sys.argv[1:]:

    #输出目前处理的图片地址

    print("Processing file: {}".format(f))

    #使用skimage的io读取图片

    img = io.imread(f)

    #使用detector进行人脸检测 dets为返回的结果

    dets = detector(img, 1)

    #dets的元素个数即为脸的个数

    print("Number of faces detected: {}".format(len(dets)))

    #使用enumerate 函数遍历序列中的元素以及它们的下标

    #下标i即为人脸序号

    #left:人脸左边距离图片左边界的距离 ;right:人脸右边距离图片左边界的距离

    #top:人脸上边距离图片上边界的距离 ;bottom:人脸下边距离图片上边界的距离

    for i, d in enumerate(dets):

        print("dets{}".format(d))

        print("Detection {}: Left: {} Top: {} Right: {} Bottom: {}"

            .format( i, d.left(), d.top(), d.right(), d.bottom()))

    #也可以获取比较全面的信息,如获取人脸与detector的匹配程度

    dets, scores, idx = detector.run(img, 1)

    for i, d in enumerate(dets):

        print("Detection {}, dets{},score: {}, face_type:{}".format( i, d, scores[i], idx[i]))

    #绘制图片(dlib的ui库可以直接绘制dets)

    win.set_image(img)

    win.add_overlay(dets)

    #等待点击

    dlib.hit_enter_to_continue()
python dlibface.py itlay.jpg

人脸关键点标记
# -*- coding: utf-8 -*-

import dlib

import numpy

from skimage import io

#源程序是用sys.argv从命令行参数去获取训练模型,精简版我直接把路径写在程序中了

predictor_path = "./shape_predictor_68_face_landmarks.dat"

#源程序是用sys.argv从命令行参数去获取文件夹路径,再处理文件夹里的所有图片

#这里我直接把图片路径写在程序里了,每运行一次就只提取一张图片的关键点

faces_path = "./itlay.jpg"

#与人脸检测相同,使用dlib自带的frontal_face_detector作为人脸检测器

detector = dlib.get_frontal_face_detector()

#使用官方提供的模型构建特征提取器

predictor = dlib.shape_predictor(predictor_path)

#使用dlib提供的图片窗口

win = dlib.image_window()

#使用skimage的io读取图片

img = io.imread(faces_path)

#绘制图片

win.clear_overlay()

win.set_image(img)

 #与人脸检测程序相同,使用detector进行人脸检测 dets为返回的结果

dets = detector(img, 1)

#dets的元素个数即为脸的个数

print("Number of faces detected: {}".format(len(dets)))

#使用enumerate 函数遍历序列中的元素以及它们的下标

#下标k即为人脸序号

#left:人脸左边距离图片左边界的距离 ;right:人脸右边距离图片左边界的距离

#top:人脸上边距离图片上边界的距离 ;bottom:人脸下边距离图片上边界的距离

for k, d in enumerate(dets):

    print("dets{}".format(d))

    print("Detection {}: Left: {} Top: {} Right: {} Bottom: {}".format(

    k, d.left(), d.top(), d.right(), d.bottom()))

    #使用predictor进行人脸关键点识别 shape为返回的结果

    shape = predictor(img, d)

    #获取第一个和第二个点的坐标(相对于图片而不是框出来的人脸)

    print("Part 0: {}, Part 1: {} ...".format(shape.part(0),  shape.part(1)))

    #绘制特征点

    win.add_overlay(shape)

#绘制人脸框

win.add_overlay(dets)

#也可以这样来获取(以一张脸的情况为例)

#get_landmarks()函数会将一个图像转化成numpy数组,并返回一个68 x2元素矩阵,输入图像的每个特征点对应每行的一个x,y坐标。

def get_landmarks(im):

    rects = detector(im, 1)

    return numpy.matrix([[p.x, p.y] for p in predictor(im, rects[0]).parts()])

#多张脸使用的一个例子

def get_landmarks_m(im):

    dets = detector(im, 1)

    #脸的个数

    print("Number of faces detected: {}".format(len(dets)))

    for i in range(len(dets)):

        facepoint = np.array([[p.x, p.y] for p in predictor(im, dets[i]).parts()])

        for i in range(68):

            #标记点

            im[facepoint[i][1]][facepoint[i][0]] = [232,28,8]

    return im

#打印关键点矩阵

print("face_landmark:")

print(get_landmarks(img))

#等待点击

dlib.hit_enter_to_continue()
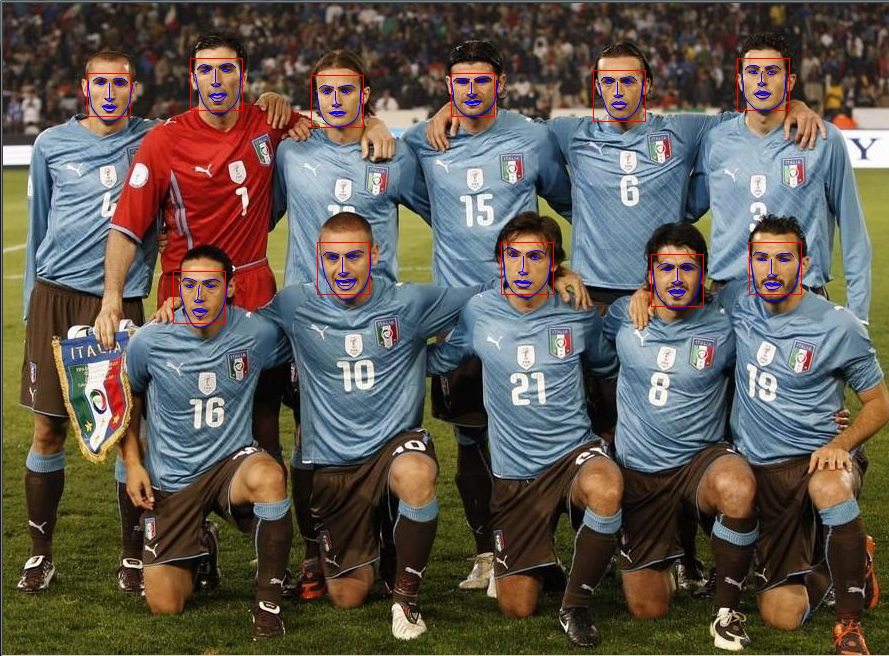
dlib python 人脸检测与关键点标记的更多相关文章
- Python 3 利用 Dlib 实现人脸检测和剪切
0. 引言 利用 Python 开发,借助 Dlib 库进行人脸检测 / face detection 和剪切: 1. crop_faces_show.py : 将检测到的人脸剪切下来,依次排序平 ...
- 人脸检测学习笔记(数据集-DLIB人脸检测原理-DLIB&OpenCV人脸检测方法及对比)
1.Easily Create High Quality Object Detectors with Deep Learning 2016/10/11 http://blog.dlib.net/201 ...
- OpenCV + Python 人脸检测
必备知识 Haar-like opencv api 读取图片 灰度转换 画图 显示图像 获取人脸识别训练数据 探测人脸 处理人脸探测的结果 实例 图片素材 人脸检测代码 人脸检测结果 总结 下午的时候 ...
- Python 3 利用 Dlib 实现摄像头实时人脸检测和平铺显示
1. 引言 在某些场景下,我们不仅需要进行实时人脸检测追踪,还要进行再加工:这里进行摄像头实时人脸检测,并对于实时检测的人脸进行初步提取: 单个/多个人脸检测,并依次在摄像头窗口,实时平铺显示检测到的 ...
- win10+anaconda+cuda配置dlib,使用GPU对dlib的深度学习算法进行加速(以人脸检测为例)
在计算机视觉和机器学习方向有一个特别好用但是比较低调的库,也就是dlib,与opencv相比其包含了很多最新的算法,尤其是深度学习方面的,因此很有必要学习一下.恰好最近换了一台笔记本,内含一块GTX1 ...
- MTCNN算法与代码理解—人脸检测和人脸对齐联合学习
目录 写在前面 算法Pipeline详解 如何训练 损失函数 训练数据准备 多任务学习与在线困难样本挖掘 预测过程 参考 博客:blog.shinelee.me | 博客园 | CSDN 写在前面 主 ...
- Python学习--使用dlib、opencv进行人脸检测标注
参考自https://www.pyimagesearch.com/2017/04/03/facial-landmarks-dlib-opencv-python/ 在原有基础上有一部分的修改(image ...
- 人脸检测? 对Python来说太简单, 调用dlib包就可以完成
"Dlib 是一个现代化的 C ++ 工具包,包含用于创建复杂软件的机器学习算法和工具 " .它使您能够直接在 Python 中运行许多任务,其中一个例子就是人脸检测. 安装 dl ...
- Dlib Python 检测人脸特征点 Face Landmark Detection
首先安装Dlib,Opencv库 Dlib安装链接:http://www.cnblogs.com/as3asddd/p/7237280.html 环境:Mac Sierra 10.12.1 Pytho ...
随机推荐
- 矩阵的frobenius范数及其求偏导法则
例子: http://www.mathchina.net/dvbbs/dispbbs.asp?boardid=4&Id=3673
- KineticJS教程(8)
KineticJS教程(8) 作者: ysm 8.动画 动画就是一帧帧的画面按照时间间隔显示出来,Kinetic给我们提供了一个舞台对象的onFrame方法,用这个方法可以绑定一个动画方法,我们要显 ...
- LeetCode_Path Sum
一.题目 Path Sum My Submissions Given a binary tree and a sum, determine if the tree has a root-to-leaf ...
- Hadoop-2.2.0中文文档—— 从Hadoop 1.x 迁移至 Hadoop 2.x
简单介绍 本文档对从 Apache Hadoop 1.x 迁移他们的Apache Hadoop MapReduce 应用到 Apache Hadoop 2.x 的用户提供了一些信息. 在 Apache ...
- Sublime key
-– BEGIN LICENSE -– TwitterInc 200 User License EA7E-890007 1D77F72E 390CDD93 4DCBA022 FAF60790 61AA ...
- ant design pro (十一)advanced Mock 和联调
一.概述 原文地址:https://pro.ant.design/docs/mock-api-cn Mock 数据是前端开发过程中必不可少的一环,是分离前后端开发的关键链路.通过预先跟服务器端约定好的 ...
- UG NX9.0.0 for linux安装
自:http://vivianyw.blog.163.com/blog/static/13454742220145601415881/?latestBlog NX9.0.0 for linux安装. ...
- Android中对Handle机制的理解
一.重要參考资料 [參考资料] 眼下来看,以下的几个网址中的内容质量比較不错.基本不须要再读别的网址了. 1.android消息机制一 http://xtfncel.javaeye. ...
- java 动态代理(模式) InvocationHandler(为类中方法执行前或后添加内容)
动态代理属于Java反射的一种. 当我们得到一个对象,想动态的为其一些方法每次被调用前后追加一些操作时,我们将会用到java动态代理. 下边上代码: 首先定义一个接口: package com.liu ...
- 5分钟教你配置命令行界面的163邮箱client
网易163免费邮箱相关server信息: mutt 是命令行下的邮件client,它仅是管理邮件的组织编辑,邮件的发送和接收须要调用相应的程序. 这里用的各自是getmail 和 msmtp. 过程例 ...