
SIP UserAgent (B2BUA client)——pjsip
1. sip stacks
pjsip/bell-sip/sofia-sip/libeXosip/libre
https://github.com/staskobzar/sip_stacks_examples
2. sip user agent and server network architecture

3. Installing pjsip on Ubuntu
sudo apt-get install libasound2-dev
Linux system has two audio drivers: alsa and oss,oss is old,pjsip supports both,deflaut is oss.
如果目标系统内核使用的是alsa驱动,运行例子程序的时候会出现以下问题。
alsa_dev.c ! ca_thread_func: error reading data! 解决方法 修改config_site.h文件 在pjproject\pjlib\include\pj目录下
add #define PJMEDIA_AUDIO_DEV_HAS_ALSA 1
4. cross-compile
_install.sh
#compiler setup

if [[ $ = 'arm' ]]; then

compiler=`CC=arm-linux-gnueabihf-gcc CXX=arm-linux-gnueabihf-g++`

host=arm-linux-gnueabihf

elif [[ $ = 'himix100' ]]; then

compiler=`CC=arm-himix100-linux-gcc CXX=arm-himix100-linux-g++`

host=arm-himix100-linux

elif [[ $ = 'himix200' ]]; then

compiler=`CC=arm-himix200-linux-gcc CXX=arm-himix200-linux-g++`

host=arm-himix200-linux

else

:

fi

#Preinstalled directory

install=${HOME}/_install

#Delete installed directory

rm -rf ${install}

#library path

pkg_config=${install}/lib/pkgconfig

lib_config=`CPPFLAGS=-I${install}/include CFLAGS=-I${install}/include LDFLAGS=-L${install}/lib`

#Delete compiled directory

for i in `ls .`

    do

    if [ -d $i ];then

    rm -rf $i

    fi

done

tar xvf alsa-lib-*

cd alsa-lib-*

./configure ${compiler} --prefix=${install} --host=${host}

make && make install

cd ..

tar xvf alsa-utils-*

cd alsa-utils-*

./configure ${compiler} --prefix=${install} --host=${host} PKG_CONFIG_PATH=${pkg_config} ${lib_config} --enable-static --enable-shared --disable-alsamixer --disable-xmlto

touch ./alsaconf/po/t-ja.gmo

touch ./alsaconf/po/t-ru.gmo

make && make install

cd ..

tar xvf pjproject-*

cd pjproject-*

./configure ${compiler} --prefix=${install} --host=${host} PKG_CONFIG_PATH=${pkg_config} ${lib_config} --enable-static --enable-shared --disable-libwebrtc

make dep

make && make install

cd ..

export PATH=$PATH:${install}/bin

export LD_LIBRARY_PATH=${install}/lib:$LD_LIBRARY_PATH

export ALSA_CONFIG_PATH=${install}/share/alsa/alsa.conf
dong@ubuntu:~/pjsip$ su
Password:
root@ubuntu:/home/dong/pjsip# ./_install.sh arm
root@ubuntu:~# tar cvf _install.tar.gz _install/
root@ubuntu:~# mv _install.tar.gz /home/dong/
dong@ubuntu:~$ sudo chmod 777 _install.tar.gz
4)如果用的海思arm-himix200-linux-gcc编译器,如果报错的话,可能需要将
alsa-utils-1.1.9/alsamixer/alsa-utils-1.1.9/alsamixer/volume_mapping.c里的三行exp10改成exp
5)声卡设备验证
#查看音频设备
dong@dong-ubuntu:~$ arecord -l
**** CAPTURE 硬體裝置清單 ****
card 0: PCH [HDA Intel PCH], device 0: ALC255 Analog [ALC255 Analog]
子设备: 1/1
子设备 #0: subdevice #0
#列举出机器所有的声卡
dong@dong-ubuntu:~$ cat /proc/asound/cards
0 [PCH ]: HDA-Intel - HDA Intel PCH
HDA Intel PCH at 0xa4220000 irq 132
#列举每个声卡的card number和device number
dong@dong-ubuntu:~$ aplay -l
**** PLAYBACK 硬體裝置清單 ****
card 0: PCH [HDA Intel PCH], device 0: ALC255 Analog [ALC255 Analog]
子设备: 1/1
子设备 #0: subdevice #0
card 0: PCH [HDA Intel PCH], device 3: HDMI 0 [HDMI 0]
子设备: 1/1
子设备 #0: subdevice #0
card 0: PCH [HDA Intel PCH], device 7: HDMI 1 [HDMI 1]
子设备: 1/1
子设备 #0: subdevice #0
card 0: PCH [HDA Intel PCH], device 8: HDMI 2 [HDMI 2]
子设备: 1/1
子设备 #0: subdevice #0
card 0: PCH [HDA Intel PCH], device 9: HDMI 3 [HDMI 3]
子设备: 1/1
子设备 #0: subdevice #0
card 0: PCH [HDA Intel PCH], device 10: HDMI 4 [HDMI 4]
子设备: 1/1
子设备 #0: subdevice #0
#录音
dong@dong-ubuntu:~$ arecord -D "plughw:0,0" -f S16_LE -r 16000 -d 5 -t wav file.wav
正在录音 WAVE 'file.wav' : Signed 16 bit Little Endian, 频率16000Hz, Mono
#播放录音文件
dong@dong-ubuntu:~$ aplay file.wav
正在播放 WAVE 'file.wav' : Signed 16 bit Little Endian, 频率16000Hz, Mono
一般alsa设置了一个defaults设备,音频播放软件默认使用defaults设备输出声音。defaults设备定义在alsa.conf中,内容如下:
[plain]

#

# defaults

#

# show all name hints also for definitions without hint {} section

defaults.namehint.showall off

# show just basic name hints

defaults.namehint.basic on

# show extended name hints

defaults.namehint.extended off

#

defaults.ctl.card 0

defaults.pcm.card 0

defaults.pcm.device 0

defaults.pcm.subdevice -1

……
defaults会默认匹配card number和device number比较小的声卡。
如果要修改,则修改/etc/asound.conf或~/.asoundrc。比如我要把defaults匹配到card 1,device 3上,则添加一下几行:
[plain]

$ sudo vim /etc/asound.conf

defaults.pcm.card 1

defaults.pcm.device 3

defaults.ctl.card 1
5) 添加声卡节点
if [ ! -d /dev/snd/ ]; then
echo "make snd node."
mkdir /dev/snd
ln -s /dev/pcmC0D0c /dev/snd/pcmC0D0c
ln -s /dev/pcmC0D0p /dev/snd/pcmC0D0p
ln -s /dev/timer /dev/snd/timer
ln -s /dev/controlC0 /dev/snd/controlC0
ln -s /dev/mixer /dev/snd/mixer
fi
5) 录音播音测试
arecord -D "plughw:0,0" -f S16_LE -r 16000 -d 5 -t wav file.wav
aplay file.wav
arecord -d 10 -f cd -r 8000 -c 2 -t wav test.wav
arecord -D "plughw:0,0" -f U16_LE -r 16000 -d 5 -t wav file.wav
arecord -d 10 -t raw -f S16_LE test.pcm
aplay -t raw -c 1 -f S16_LE -r 8000 test.pcm
arecord -d 10 -t raw -f U16_LE test.pcm
aplay -t raw -c 1 -f U16_LE -r 8000 test.pcm
arecord -d 10 -t raw -f U8 test.pcm
aplay -t raw -c 1 -f U8 -r 8000 test.pcm
aplay -t raw -r 8000 test.g711
arecord -D "plughw:0,0" -f U16_LE -r 16000 -d 5 -t wav file.wav
arecord -f S16_LE | aplay -f S16_LE
3、pjsua应用实例
pjsua Manual Page
https://www.pjsip.org/pjsua.htm
1) register --- make call
./pjsua-x86_64-unknown-linux-gnu --config-file paul.cfg
m
sip:alice@120.78.180.208:5060
2) peer to peer
./pjsua-x86_64-unknown-linux-gnu --null-audio
./pjsua-x86_64-unknown-linux-gnu sip:120.78.180.208 --null-audio
3) register cli
>>> +a
Your SIP URL: (empty to cancel):sip:100@120.78.180.208:5060
URL of the registrar: (empty to cancel):sip:120.78.180.208:5060
Auth Realm: (empty to cancel): *
Auth Username: (empty to cancel): 100
Auth Password: (empty to cancel): 100
sip:104@120.78.180.208
4) alice.cfg
# This is a comment in the config file.
--id sip:alice@xx.xxx.xx.236:5060
--registrar sip:xx.xxx.xx.236:5060
--realm *
--username alice
--password secret
启动程序,自动应答
./pjsua-arm-unknown-linux-gnueabihf --config-file alice.cfg --auto-answer 200
指定“紧凑模式”(去掉SIP协议的一些非必须的字段),采样率和编码优先级,我在cortex-a5上以默认参数启动,会出现pb和ca线程不同步underrun!
./pjsua-arm-unknown-linux-gnueabihf --config-file alice.cfg
--use-compact-form --clock-rate=8000 --add-codec=pcmu --auto-answer 200
其他配置参考官网应用手册https://www.pjsip.org/pjsua.htm
5) 临时建群,多方通话
查看pjsua应用手册https://www.pjsip.org/pjsua.htm
的Call Commands和Conference Commands
|
M |
Make multiple calls | Make multiple calls to the same destination. |
|
cl |
Conference List | List all the ports registered to the conference bridge, and show the interconnection among these ports. |
|
cc |
Conference Connect | Create a unidirectional connection between two ports. For example, if you have a WAV player connected at slot #1 and a call connected at slot #2, you can stream WAV file to the call by specifying this command: cc 1 2. |
cl查看已拨号的通道, 0是拨号的主叫号码本身,1和2分别是ringback和ring,3和4是被叫号码
M
2
sip:101@xx.xxx.xx.236:5060
sip:101@xx.xxx.xx.236:5060
cc 3 4
cc 4 3

6) freepbx语音会议

配置好freepbx语音会议后,直接拨号会议号,然后输入密码进入会议室
./pjsua-x86_64-unknown-linux-gnu --config-file 106.cfg --use-compact-form --clock-rate=8000 --add-codec=pcmu --auto-answer 200
也可以自动登陆会议室,auto-conf是自动登陆会议室
./pjsua-x86_64-unknown-linux-gnu --config-file 106.cfg
--use-compact-form --clock-rate=8000 --add-codec=pcmu --auto-answer 200
--auto-conf sip:2018@xx.xxx.xx.236:5060
PC/android/ios也是一样的操作


4、 py_pjsua应用实例
https://trac.pjsip.org/repos/wiki/Py_PJSUA
python实例在pjsip-apps/src/python/samples/
5、Python_SIP编译安装
1) ./configure CFLAGS='-O2 -fPIC' --enable-shared
https://trac.pjsip.org/repos/wiki/Python_SIP/Build_Install
2) pjsua2安装
sudo apt-get install -y software-properties-common # To make add-apt-repository work

sudo add-apt-repository ppa:dennis.guse/sip-tools

sudo apt-get update

sudo apt-get install python-pjsua

sudo apt-get install python-pjsua2
To check if everything went well:
python

import pjsua
https://stackoverflow.com/questions/20195542/python-how-to-get-the-import-pjsua-giving-no-module-named-pjsua
3)Building PJSUA2 and SWIG
The PJSUA2 C++ library will be built by default by PJSIP build system. Standard C++ library is required. If you intend to use Python SWIG module (see below), you need to configure PJSIP with --enable-shared option, i.e.:
./configure --enable-shared

make dep & make

sudo make install
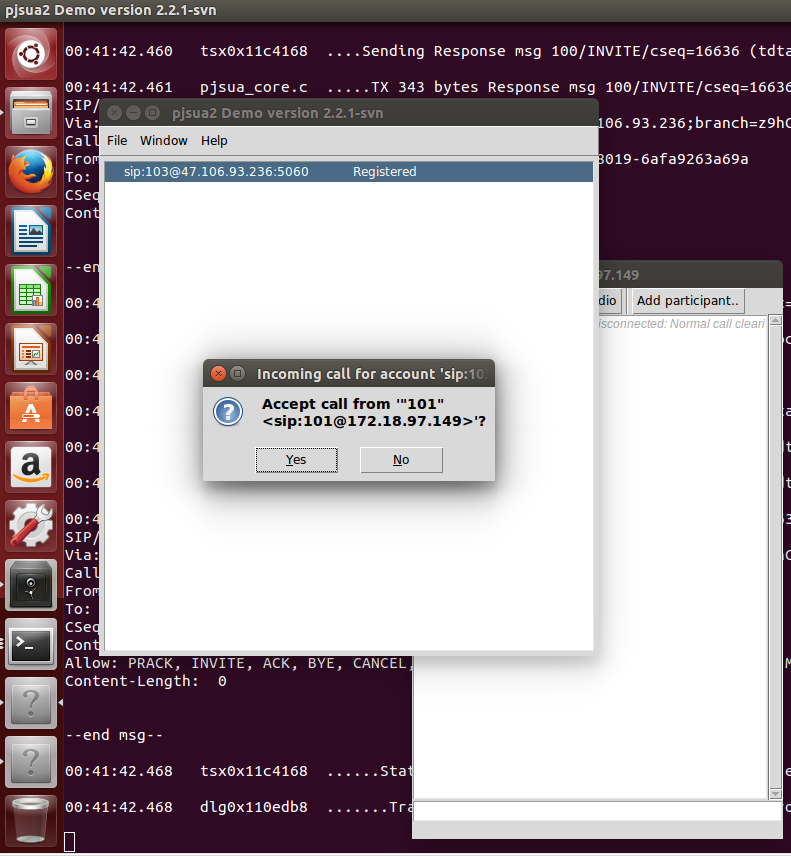
https://www.pjsip.org/docs/book-latest/html/intro_pjsua2.html#building-python-and-java-swig-modules装好pjsua2就可以启动pygui测试了拨号了,这个例子带图形界面,ui用的Tkinter,另外一个带gui的例子是vidgui,ui用的qt

6、Using OpenCORE AMR NB and WB Codecs
https://trac.pjsip.org/repos/wiki/Using-OpenCORE-AMR-NB-WB-Codec
#opencore-amr 和 vo-amrwbenc
./configure --prefix=$(pwd)/_install --host=arm-linux-gnueabihf CC=/usr/local/arm/gcc-4.9.4-arm-buildroot-linux-gnueabihf/bin/arm-linux-gnueabihf-gcc
make
make install
装好之后将两个库的_install目录合并,合并到opencore-amr-0.1.3/_install
#pjproject
./configure --prefix=/home/dong/pjproject-2.8/_install --host=arm-linux-gnueabihf CC=/usr/local/arm/gcc-4.9.4-arm-buildroot-linux-gnueabihf/bin/arm-linux-gnueabihf-gcc --disable-libwebrtc CFLAGS=-I/home/dong/alsa/include LDFLAGS=-L/home/dong/alsa/lib --with-opencore-amr=$(pwd)/third_party/opencore-amr-0.1.3/_install
make dep
make
make install
ln -s libopencore-amrnb.so.0.0.3 libopencore-amrnb.so.0
ln -s libopencore-amrwb.so.0.0.3 libopencore-amrwb.so.0
ln -s libvo-amrwbenc.so.0.0.4 libvo-amrwbenc.so.0
7、Ubuntu 16.04 下编译pjsip,支持视频通话
https://blog.csdn.net/wywf4/article/details/82260582
https://blog.csdn.net/SUKHOI27SMK/article/details/18667465
https://github.com/sxcong/pjsipvideo_demo
2. js sip user agent
基于pjsip实现p2p语音对讲
https://blog.csdn.net/voidreturn/article/details/65634390
Pjsip中一些有用的基本函数实现
https://blog.csdn.net/croop520/article/details/84634160
pjsua播放rtp音频包问题
https://blog.csdn.net/rankun1/article/details/52034323
可以推荐一些基于Sip协议的开源IP电话客户端吗?
https://www.zhihu.com/question/20093472?sort=created
freepbx对接gms网关
https://blog.csdn.net/weixin_30656145/article/details/97707013
freeswitch对接asterisk案例
https://blog.csdn.net/educast/article/details/25310819
end
SIP UserAgent (B2BUA client)——pjsip的更多相关文章
- SIP UserAgent (B2BUA client)——linphonec
1.linphone编译 linphone一般用在android/ios/windows/mobile上,但是没有图形界面的linphonec命令行程序用在资源紧张的硬件平台上也跟pjsip命令行一样 ...
- SIP UserAgent (B2BUA client)——libosip2 libeXosip2
1. libosip2 libeXosip2 http://www.antisip.com/download/exosip2/ Features:--------eXosip2 has support ...
- 介绍一个开源的SIP(VOIP)协议库PJSIP
本文系转载,出处不可考. 假设你对SIP/VoIP技术感兴趣,哪希望你不要错过:),假设你对写出堪称优美的Code感兴趣 ,那么你也不可错过:) 这期间我想分析一下一个实际的协议栈的设计到实现的相关技 ...
- Simple GB28181 System
I. Deployment / Architecture Block Diagram II. Resources Used 1. freeswitch —— sip server and media ...
- Open Source VOIP applications, both clients and servers (开源sip server & sip client 和开发库)
SIP Proxies SBO SIP Proxy Bypass All types of Internet Firewall JAIN-SIP Proxy Mini-SIP-Proxy A very ...
- 《FreeSWITCH: VoIP实战》:SIP 模块 - mod_sofia
SIP 模块是 FreeSWITCH 的主要模块,所以,值得拿出专门一章来讲解. 在前几章时里,你肯定见过几次 sofia 这个词,只是或许还不知道是什么意思.是这样的,Sofia-SIP 是由诺基亚 ...
- sipp模拟电信运营商VoIP终端测试(SIP协议调试)
三大运营商都有SIP服务器,用来支持语音对讲,多媒体调度等功能,他们的平台可能不是标准的SIP协议会话. 为了应对没完没了的对接各个厂商的平台,这里再整理了一套协议脚本,毕竟全都是没有意义的无用功,标 ...
- sipp模拟freepbx分机测试(SIP协议调试)
1.sipp的安装 1) 在centos 7.2下安装 yum install make gcc gcc-c++ ncurses ncurses.x86_64 ncurses-devel ncurse ...
- UAC(User Agent Client) 和 UAS(User Agent Server)
SIP协议采用Client/Server模型.每一个请求(Request)触发服务器的一个操作:每个操作被称为方法(Method):每个请求除了指明具体方法外,还携带了一系列的头域(Header fi ...
随机推荐
- Maven基础命令
Maven 参数 -D 传入属性参数 -P 使用pom中指定的配置 -e 显示maven运行出错的信息 -o 离线执行命令,即不去远程仓库更新包 -X 显示maven允许的debug信息 -U 强制去 ...
- docker Failed to get D-Bus connection 报错 docker run -e MYVAR1 --env MYVAR2=foo --env-file ./env.list ubuntu bash
docker Failed to get D-Bus connection 报错 原创憬薇2016-01-15 11:25:26评论(10)40278人阅读 在centos7的容器里面出现了一个B ...
- Javascript事件监听
FireFox : addEventListener()方法 IE : attachEvent()方法 为HTML元素添加一个事件监听, 而不是直接对元素的事件属性(如:onclick.onmouse ...
- C++ 类的抽象初练
/* 某商店经销一种货物,货物的购进和卖出以箱为单位,各箱的重量不一样, 因此商店需要目前库存的总重量. 现在用c++模拟商店货物购进和卖出的情况 */ #include<iostream> ...
- 第二百六十九节,Tornado框架-Session登录判断
Tornado框架-Session登录判断 Session需要结合cookie来实现 Session的理解 1.用户登录系统时,服务器端获取系统当前时间,进行nd5加密,得到加密后的密串 2.将密串作 ...
- 【BZOJ】1176: [Balkan2007]Mokia(cdq分治)
http://www.lydsy.com/JudgeOnline/problem.php?id=1176 在写这题的时候思维非常逗啊........2333................... 最后 ...
- c# 扩展方法 奇思妙用 高级篇 九:OrderBy(string propertyName, bool desc)
下面是 Queryable 类 中最常用的两个排序的扩展方法: 1 2 public static IOrderedQueryable<TSource> OrderBy<TSourc ...
- Spring配置文件总结
http://blog.csdn.net/zhejingyuan/article/details/41042789
- ios开发之 -- UIView总结
如果想调用某个类的某个方法可以写成这样,这个方法来自NSObject类 performSelector: performSelector:withObject: performSelector:wit ...
- Windows游戏编程大师技巧之三角形填充
一.三角形的种类 三角形一般可以分为如下的四种类型(这四种类型是对于计算机来说的,不是数学意义上的分类): 平顶三角形:就是在计算机中显示的上面两个顶点的Y坐标相同. 平底三角形:就是在计算机中显示的 ...